Introduction
A pair of fingerless mitts looks like a modern convenience, the sort of small accessory that seems to have arrived alongside smartphones and heated car seats. It is not.
Mitts and wristers — knitted tubes that cover the palm and wrist and stop short of the fingers — have been worn across northern Europe for centuries. They show up in household accounts, in portraits, and in the ordinary working wardrobes of people who could not afford clumsy hands.
Coachmen wore them because a hand closed around leather reins needs skin, not wool, to feel the horse. Fishermen wore them because mending a net with cold fingers is slow, and mending it with cold wet wool fingers is slower still.
Fashionable women wore them indoors, over silk, with the fingers left bare for needlework, letters, and tea. Three very different lives, one design problem: keep the hand warm, keep the fingers useful.
That is still the whole brief. Nothing about the garment has needed improving; only the yarn has changed.
It is also why fingerless mitts make such a satisfying gift. They solve something specific. A scarf is warmth, a hat is warmth, but a mitt is warmth with a job to do.
And they are quick. Genuinely quick, in the way that a hat is quick and a sweater is not. One evening per mitt is an honest estimate for a steady knitter, which matters in December.
A Short Provenance: Mitts, Wristers, and Household Accounts
Eighteenth- and nineteenth-century households tended to record clothing the way we record appliances: as goods with a lifespan, worth listing, mending, and passing on. Knitted wristers turn up in that paperwork as ordinary property rather than luxury.
Alongside them sat the cut-finger glove — a leather or fabric glove with the fingers trimmed away and the raw edge finished. It is the same idea reached from the other direction, a glove reduced to its useful parts.
The vocabulary shifts with the region. Mitt, wrister, mittin, half-glove: the names vary, and so do the lengths, from a narrow band at the wrist to a tube that stops just short of the knuckles.
In the knitting traditions of Shetland and Scandinavia, the wrister was a natural home for leftover yarn. A pair takes so little that it could be made from the tail end of a fleece or the odd balls left after a larger garment.
That economy shaped the design. When yarn is precious you knit the part that works and stop. Fingers are the first thing a knitter runs out of patience and wool for, and the last thing a working hand needs covered.
The accounts also show mending. Mitts were darned at the thumb and re-ribbed at the cuff, which tells you something the museum cases cannot: these were tools, used until they failed and then repaired.
I am generalising deliberately here. The details shift by parish, decade, and trade, and no two account books agree. But the shape of the thing — a short tube, a gap for the thumb, an open end — is remarkably stable.
Choosing Yarn: Warmth Without Bulk
Fingerless mitts live on the hand, which means they are felt constantly. Bulk that seems cosy in a skein becomes clumsy the moment you try to hold a pen, unlock a door, or buckle a child into a car seat.
Weight. DK or light worsted is the sweet spot. A pair takes roughly 100 to 120 metres, which is often a single 50-gram ball with a little to spare.
Fibre. Wool, or a wool-heavy blend, for warmth. Wool also has memory: it springs back after stretching, which is what keeps a ribbed cuff snug through a winter of wear. Cotton sags and stays sagged.
Structure. A smooth plied yarn shows ribbing far better than a soft, haloed single. Ribbing is a pattern of shadows, and shadows need clean edges. Fuzzy yarn swallows them and the cuff reads as a plain tube.
Practicality. Superwash wool is easier to gift, because the recipient can wash it without ceremony or instruction. If you are knitting for someone who will not hand wash anything, choose superwash and mean it.
Colour is worth a moment's thought too. A mid-tone solid hides uneven tension and shows the ribbing, where a dark marl hides everything, including the pattern you spent the evening on.
Sizing and Gauge: Measure the Hand, Not the Wrist
Most mitt patterns fail at the measuring stage, because the wrist is the easiest place to measure and the least useful. A wrist measurement tells you about the cuff and nothing about the hand.
Measure around the knuckles, over the broadest part of the hand, with the hand relaxed and the fingers together. An adult hand circumference usually lands somewhere around 18 to 20 cm.
Gauge for this pattern is roughly 24 stitches to 10 cm in stockinette on 3.25 mm needles. Work a swatch, or at minimum measure a finished hat whose gauge you already know, before committing 40 stitches to a gift.
Cast on 40 to 44 stitches. The smaller number suits a hand near 18 cm, the larger a hand near 20 cm, and the ribbing forgives a half-centimetre either way.
Negative ease of 2 to 3 cm is right. The mitt should measure smaller than the hand it is meant for, so that it stretches on and then stays put. A mitt knit to exact hand size slides around and wears through at the thumb.
If you are knitting for someone whose hand you cannot measure, knit the larger size and shorten the cuff. Too much ease is a nuisance; too little is a gift that does not get worn.
The Four Parts of a Mitt
Every fingerless mitt, however elaborate, is four decisions stacked in a row. Knowing what each one is for makes the pattern read like sense rather than arithmetic.
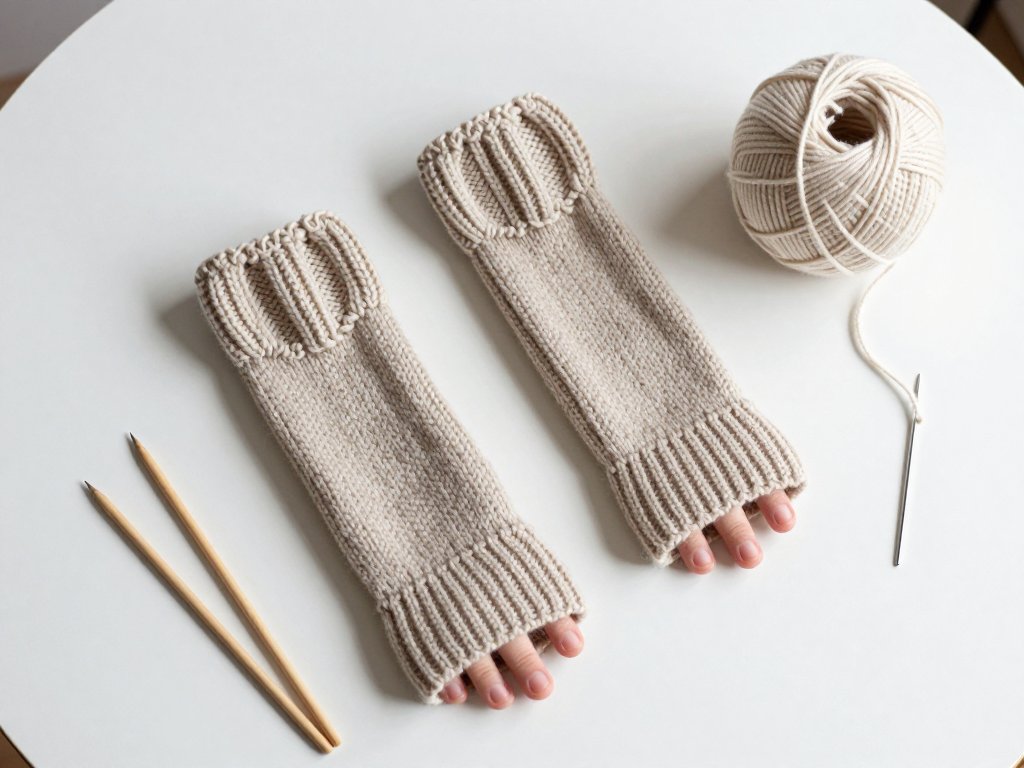
- Cuff. The ribbed band at the wrist. Its job is grip: it holds the mitt on the hand without any fastening, so it wants more length than you think.
- Hand. The smooth stockinette tube across the palm and back of the hand. Its job is coverage, and it is where the fit is either generous or mean.
- Thumb gusset. A shaped wedge that grows out of the hand to make room for the base of the thumb. Its job is articulation — the difference between a mitt you can use and a mitt you can only wear.
- Top trim. The few centimetres of ribbing at the knuckles. Its job is to stop the opening curling and hold the edge against the base of the fingers.
Miss the gusset and you have a tube that rides up. Miss the top trim and the opening rolls into a rope. Miss the cuff length and the whole thing migrates down your palm.
The Pattern: Fingerless Mitts in the Round
This is a small pattern, worked on double-pointed needles, and if you can knit, purl, and increase you already have every skill it asks for. If working in the round is new to you, the site's knitting in the round basics covers the joining and the needle handling.
What You Need
- One 50 g ball of DK wool, roughly 100 to 120 m for the pair
- 3.25 mm double-pointed needles for the cuff and thumb
- 4 mm double-pointed needles for the hand
- A stitch marker, a length of waste yarn, and a blunt tapestry needle
Step by Step
- Cast on 40 stitches on the 3.25 mm needles. Divide them across three or four needles and join in the round, taking care not to twist the cast-on edge.
- Work the cuff in k2 p2 rib for 7 cm. Resist shortening this. Seven centimetres of ribbing is what keeps the mitt on the hand.
- Change to the 4 mm needles and knit 2 cm in stockinette. The larger needle relieves the fabric so the hand of the mitt is not tight across the palm.
- Set up the gusset. Place a marker at the beginning of the round, then m1r, k1, m1l. That single increase round adds two stitches and marks where the thumb will grow.
- Work the increase rounds. Knit plain rounds, and on every third round work m1r, knit to one stitch before the marker, m1l. Repeat until there are 13 stitches between the markers.
- Set the thumb aside. Slip those 13 stitches onto waste yarn. Cast on 3 stitches over the gap, then continue knitting in the round.
- Knit the hand for 4 cm more, or until the tube reaches the base of your fingers when you try it on.
- Work the top trim in k1 p1 rib for 2 cm, then bind off in rib, working each stitch as it presents itself.
- Knit the second mitt from the same notes, checking each number against the first as you go.
- Work the thumb. Pick up the 13 held stitches plus 3 from the gap edge, 16 in total. Work 2 cm of k1 p1 rib and bind off in rib.
Reading the Numbers
Five centimetres of stockinette before the gusset is a judgement call, not a rule. The gusset should begin where the thumb joins the hand, which is roughly level with the base of the thumb webbing.
Try the mitt on before you set the thumb stitches aside. It should feel snug at the cuff and easy across the palm, and the gusset should sit centred on the thumb rather than forward of it.
Why the Thumb Gusset Works
A thumb is not a tube attached to a tube. It sits at an angle, and the web of skin between thumb and palm needs fabric that curves around it rather than fabric that hangs beside it.
The paired increases do that curving. A right-leaning m1r before the marker and a left-leaning m1l after it lean away from each other, so the new stitches fan out symmetrically instead of skewing the whole hand to one side.
Increase on one side only and the fabric rotates. The mitt still fits, but it fits the way a sock put on sideways fits — wearable, and quietly wrong in a way you feel rather than see.
Working the gusset in the round matters for the same reason. A seamed tube leaves a ridge, and a ridge anywhere near the thumb web will rub against the most sensitive part of the hand.
There is an older alternative worth knowing: the afterthought thumb. You knit a plain tube, then later snip a single stitch, unravel a small opening, and pick up around it.
It suits yarns that felt or grip each other, where the opening will not run, and it suits knitters who dislike committing to thumb placement in advance. On a smooth superwash yarn it is riskier, and the gusset remains the safer gift.
Finishing: Ends, Blocking, and the Matching Pair
Weave in the ends on the wrong side, working each one along the back of a column of stitches for a few centimetres before trimming. Do not knot them; knots work their way to the surface and then stay there.
Block gently. A short soak in cool water, a press in a towel rather than a wring, and a flat dry on a folded towel will even the ribbing and settle the gusset. Pin nothing — you are persuading, not stretching.
Then lay both mitts side by side and compare them. Check that the cuffs match in length, that the thumbs sit at the same height, and that neither has grown in the blocking.
A matching pair matters more than perfect stitches, and for a reason that has nothing to do with vanity. A gift gets worn in public by someone who did not ask for it, and an obviously mismatched pair asks them to explain it.
Two mitts of the same length and the same thumb height read as deliberate and considered. A dropped stitch in the third round reads as handmade, which is a different thing entirely, and entirely fine.
Variations That Stay Beginner-Friendly
Once the basic pair is behind you, the pattern takes variation well, because none of the changes touch the construction. The tube, the gusset, and the ribbing all stay exactly where they were.
The flat version. Work the same numbers on two straight needles, leaving a gap on one side for the thumb, then seam up the side. It avoids double-pointed needles entirely and hides the seam inside the wrist.
A narrow cable panel. Run a four- or six-stitch cable down the back of the hand, framed by purl stitches. Keep it narrow. A wide panel pulls the gauge in and the mitt stops fitting the person it was measured for.
Two-colour stripes. Change colour every four or six rounds and carry the unused yarn loosely up the inside. Stripes are the cheapest way to make a pair look designed rather than improvised.
A thrummed lining. Knit small tufts of unspun wool into every few stitches on the inside, and the mitt becomes genuinely warm rather than merely warm-looking. Thrums are traditional in cold-climate knitting and forgiving of a loose hand.
What not to change is the ribbing. Any variation that replaces the cuff or the top trim with plain stockinette will produce a mitt that rolls at the edge and slides at the wrist.
Batch Knitting: Five Pairs from Three Skeins
Fingerless mitts are one of the few gifts that reward batch production. A pair takes roughly 100 to 120 metres, so three 100-gram skeins of DK will comfortably give you five pairs with ends to spare.
Knit both mitts of a pair at once if you can bear it, either on two sets of needles or by alternating rounds between them. It costs nothing and it removes the second-mitt problem.
That problem is real. It has ended more gift plans than any pattern error, because a single finished mitt is proof of concept rather than a gift, and the second one is pure discipline.
A realistic pace is an evening per mitt for a moderately quick knitter, so a pair is a two-evening project. Five pairs is ten evenings, which is a fortnight of television or a month of quiet half-hours.
If you are knitting several pairs for different people, change the yarn colour between pairs rather than the pattern. Your hands learn the numbers once, and the variation comes free.
Care and Gifting
Hand wash in cool water with a wool wash, squeeze rather than wring, and dry flat away from direct heat. Wool that is wrung stretches, wool that is hung stretches, and wool laid flat keeps its shape.
Superwash can go through a machine on a wool cycle, but it will still last longer washed by hand, and it will pill less if it is dried flat either way. Say so on the tag and let the recipient decide.
Add a small handwritten care tag with the fibre content and the washing instruction. It takes a minute, it makes the gift feel finished, and it is the one thing recipients most often wish they had kept.
Store wool away from light and from moths between seasons. A cotton bag with a cedar block is the old answer and still the good one.
Troubleshooting
Gaps at the base of the thumb. The join between the picked-up stitches and the cast-on stitches over the gap will gape if you pick up only what the pattern says. Pick up one extra stitch in the corner and knit it twisted on the next round.
A too-tight thumb. Usually this is a gusset that stopped too early. Thirteen stitches is a minimum for an adult hand; if the thumb binds when you bend it, add another increase round before setting the stitches aside.
A cuff that rolls. Ribbing needs more rows than you think. Two centimetres of k1 p1 will roll; seven centimetres of k2 p2 will not. The ratio of rib to plain fabric is what holds the edge flat.
Ladders at the needle joins. Give the first two stitches on each new needle a firmer tension, or shift one stitch from needle to needle every few rounds so the join travels. Ladders are a tension habit, not a pattern fault.
Running short on the second mitt. Weigh the finished first mitt. If the remaining yarn weighs less than that, shorten the cuff by a centimetre before you cast on, and decide it now rather than at the top trim.
Stitch count drifting. Count at the end of every increase round. A missed m1l is invisible until the thumb does not fit, and by then the fix involves unpicking an evening's work.
Conclusion
The coachman holding reins and the parent holding a phone are asking the same thing of a garment: keep the hand warm, leave the fingers free. Four hundred years of knitting has not found a better answer than a short tube with a gap in it.
What has changed is the speed. A pair of mitts in an evening is not a compromise on the old craft; it is the old craft with a faster yarn and better light.
Knit one pair for someone who works outdoors, and one for someone who works at a desk with the window open. Then knit a pair for yourself, because the first pair is always a measurement and the second is always the good one.