Introduction
Every few years, a craft trend comes along that feels less like a fad and more like a movement. In 2026, that movement is junk journaling.
If you've scrolled through craft TikTok or browsed Pinterest lately, you've seen it: weathered pages bound in vintage fabric, pockets stuffed with ephemera, and layers of paper stained with tea, coffee, or ink. It looks historical, personal, and entirely unique — because every single journal is.
What makes junk journaling different from other paper crafts is its accessibility. You don't need a Cricut, expensive specialty paper, or years of art training.
You need an old book, a glue stick, some paper scraps, and the willingness to experiment.
If you can cut, fold, and glue, you can junk journal.
Junk journaling sits at the intersection of scrapbooking, art journaling, and bookbinding.
Unlike a traditional scrapbook with photos and captions, a junk journal is looser, more tactile, and less structured.
It's about the feel of the materials, the serendipity of found objects, and the quiet act of making something by hand.
In a year where mindfulness, sustainability, and low-cost creativity are top priorities, it's no surprise junk journaling has become the craft everyone wants to try.
This guide covers exactly what you need to start, basic techniques, where to source materials, projects for beginners, and how to make your first journal from scratch.
What Exactly Is Junk Journaling?
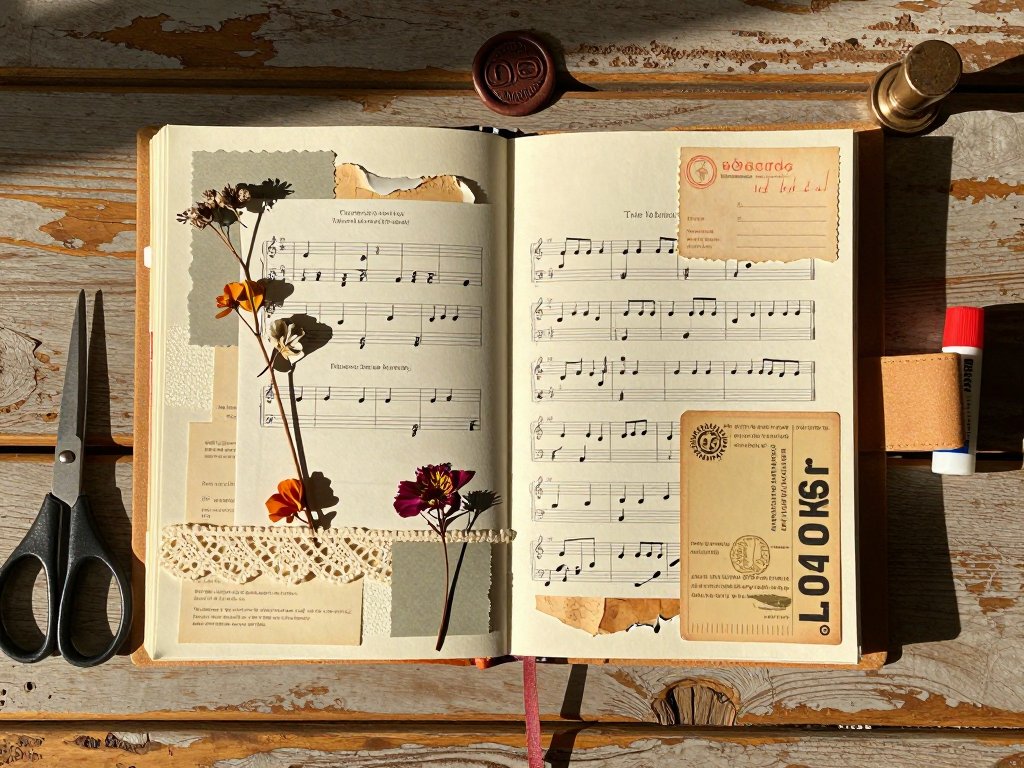
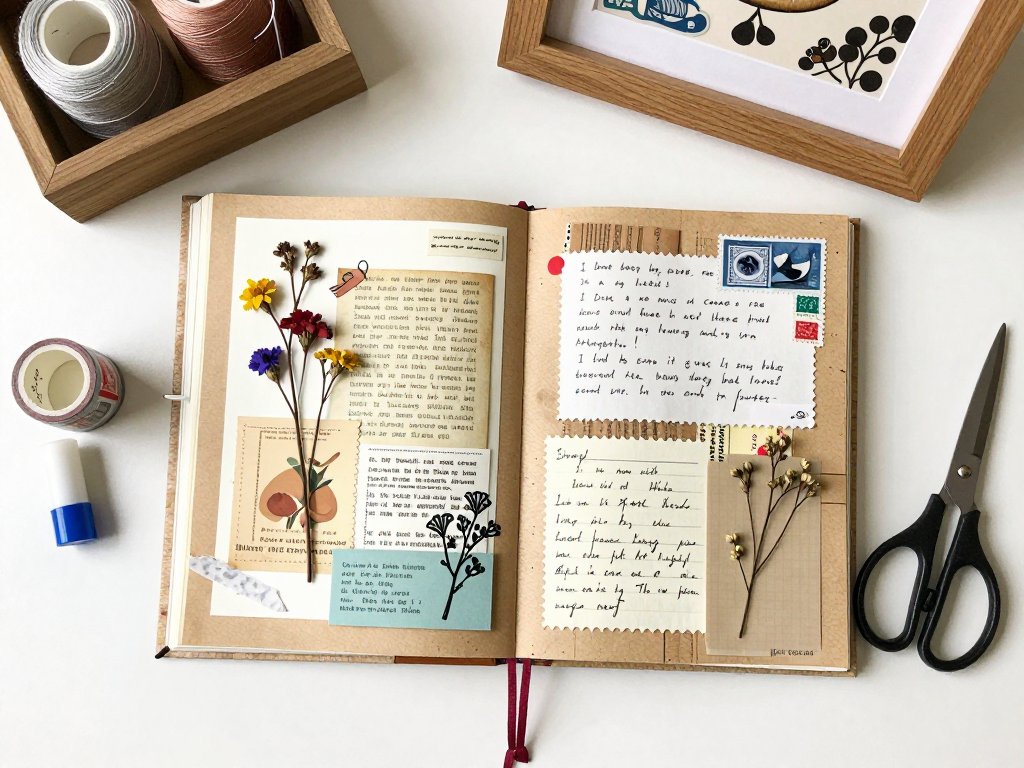
At its simplest, junk journaling is the practice of creating handmade journals using found, recycled, and repurposed materials. The "junk" in the name refers to the materials — not the result. Finished journals can be stunningly beautiful, with layered pages, hand-stitched bindings, and carefully composed spreads.
A junk journal might include:
- Pages torn from old books, sheet music, or atlases
- Envelopes sewn into the spine to create tuck spots and pockets
- Paper stained with tea, coffee, or watercolor washes
- Scraps of fabric, lace, ribbon, or vintage linens
- Ephemera such as postage stamps, tickets, playing cards, and postcards
- Handwritten notes, quotes, or journal entries
- Signatures (small booklets of folded paper) bound together
Unlike a traditional journal where you write on every page, a junk journal is as much about the construction of the book as what goes inside it.
Many crafters make journals and give them away as gifts, sell them, or fill them slowly over months.
There are no rules. Your journal can be themed around a specific color palette, season, or idea — or it can be a completely unplanned collection of whatever catches your eye.
Both approaches work.
Why Junk Journaling Is Trending in 2026
Three cultural shifts have converged to make junk journaling the defining paper craft of 2026:
Mindfulness and slow crafting. People are craving analog activities that force them to slow down. Junk journaling is inherently meditative: tearing paper, stitching signatures, arranging a spread. No screen, no algorithm, no notification. Just you, the paper, and the quiet rhythm of making.
Sustainability and repurposing. Nothing goes to waste — cereal boxes become book covers, junk mail becomes collage material, old clothes become fabric spines. For eco-conscious crafters, junk journaling is one of the most sustainable creative outlets available.
Low-cost entry. A full bookbinding setup — bone folder, awl, book press, linen thread — can easily cost over $100. Junk journaling requires none of that. A glue stick, scissors, and a stack of scrap paper are enough to start.
Add to this the thriving community on Instagram, TikTok, and YouTube, where makers share free tutorials, printable ephemera, and swap tips, and you have a trend with genuine staying power.
What You Need to Start: The Complete Beginner's Supply List
One of the best things about junk journaling is that you almost certainly have most of the supplies already. Here is exactly what you need, broken down into essentials and nice-to-haves.
Essential Supplies
- Old books. Hardcovers work best for journal bases. Thrift stores typically sell them for $1–$3. Look for books with removable covers, interesting endpapers, or pages with good texture. You will use the cover as your journal cover and the pages as the interior.
- Paper scraps. This is your main material. Save anything: printer paper, notebook pages, brown paper bags, sheet music, map pages, book pages, graph paper, tracing paper, origami paper, junk mail envelopes, receipts, and ticket stubs. Variety is the goal.
- Envelopes. Old envelopes in various sizes become pockets and tuck spots inside your journal. Save everything from tiny coin envelopes to full-size mailing envelopes.
- Glue stick. A good-quality acid-free glue stick is the most used tool in junk journaling. It is clean, easy to control, and works on most papers. Avoid wet glues for thin paper — they cause buckling.
- Scissors. A sharp pair of scissors for cutting paper and a separate pair for fabric if you plan to use textiles. Decorative-edge scissors add a nice touch but are not required.
- Bone folder. This inexpensive tool (under $10) is used to create crisp creases in paper, smooth down glued edges, and score fold lines. A dull butter knife works as a substitute, but a proper bone folder is worth the investment.
- Needle and thread. You will stitch your signatures together. Use a darning or embroidery needle and waxed linen thread, embroidery floss, or even regular sewing thread doubled up. Waxing the thread with beeswax helps prevent tangling and strengthens the stitches.
- Awl or sharp needle. Used to punch holes in your signatures and spine for binding. A basic awl costs about $5. A thick sewing needle held with pliers also works.
Nice-to-Have Supplies
- Washi tape. Decorative and repositionable. Use it to attach ephemera, reinforce page edges, or add color to spreads. The selection at arttools.com has a wide range of widths and patterns.
- Stamps and ink pads. Rubber stamps add instant vintage character. Date stamps, alphabet sets, and botanical motifs are popular choices. Distress inks (water-reactive dye inks) are especially useful for aging paper.
- Tea bags and instant coffee. Used to stain paper, giving it an aged, sepia-toned look. Black tea produces a warm brown, green tea a lighter tan, and coffee a darker, richer brown.
- Ruler and cutting mat. For precise measuring and trimming. A self-healing cutting mat protects your table and makes straight cuts easier.
- Corner rounder punch. Rounded corners give a journal a softer, more finished look. A small detail that makes a big difference.
- Embellishments. Buttons, lace, ribbon, twine, dried flowers, ticket stubs, playing cards, old keys, charms, and beads. Anything small and flat can be incorporated.
Total cost for essentials: under $20 if you already have scissors and thread — one of the lowest barriers to entry of any craft.
The Paper Crafts section at arttools.com has a curated beginner kit if you prefer to buy everything in one go.
Basic Techniques Every Beginner Should Know
These five techniques form the foundation of every junk journal. Master these, and you can make any style of journal you want.
1. Paper Distressing
Distressing makes new paper look old and textured. It is the signature look of junk journals. Four common methods:
Tearing. Instead of cutting paper with scissors, tear it along a ruler for a rough, feathered edge. The fibers create a soft, organic look. Tear with the grain for straighter tears and against the grain for more texture.
Edge inking. Run a distress ink pad or sponge with ink along the edges of your paper. This creates a shadow effect that makes pages look aged. Dark brown, vintage photo, and walnut stain are the most common colors.
Crumpling. Crumple paper into a ball, then flatten it out. The crease lines add texture and age. Lightly sanding the high points with fine-grit sandpaper after crumpling reveals the white paper underneath for a well-worn look.
Sandpaper. Lightly sand the edges and surface of paper to scuff it. This works especially well on book covers and cardstock.
2. Tea and Coffee Staining
This is the technique most commonly associated with junk journaling, and for good reason. It transforms bright white paper into warm, aged parchment in minutes.
Method: Brew a strong cup of black tea (or dissolve a spoonful of instant coffee in hot water).
Let it cool. Lay your paper flat in a baking tray or shallow dish, pour the liquid over it, and let it soak for 1–5 minutes depending on how dark you want the color.
Remove the paper carefully, blot off excess liquid with a paper towel, and let it dry flat.
For mottled effects, sprinkle coffee granules or tea leaves onto wet paper before drying.
Tips: Layered stains (stain, dry, stain again) produce richer colors. Different teas give different tones — Earl Grey gives amber, chamomile gives pale yellow, rooibos gives a reddish-brown. For a mottled look, sprinkle dry coffee granules onto wet paper before drying.
3. Pocket Pages and Tuck Spots
One of the defining structural features of a junk journal is the pocket page — a page with an envelope or folded paper attached to create a space to tuck in tags, photos, notes, and ephemera.
Method: Take an envelope, trim the flap if desired, and glue the back and bottom edges to a page, leaving the top open. Alternatively, fold a rectangle of paper in half, glue the two side edges, and attach the back to a journal page. You now have a pocket.
Pockets can also be created by folding the bottom edge of a page up (half to three-quarters of the page height) and gluing the sides. This creates a belly band or flip pocket that adds dimension to a spread.
4. Making Signatures
A signature is a small booklet made from folded paper. Multiple signatures are bound together to form the pages of your journal. This is the bookbinder's term for what most crafters call a "folio."
Method: Take 4–6 sheets of paper (this creates 8–12 pages per signature). Fold each sheet in half, then nest them inside each other. Crease the spine sharply with a bone folder. That is one signature. Repeat to create 4–6 signatures for a standard journal.
You can vary the paper types within a single signature — combine book pages, stained paper, map pages, and sheet music for variety. Each signature can be a different mix of papers.
5. Stitching Signatures Together
This is the most intimidating technique for beginners, but it is actually simple once you understand the basic stitch. The Japanese stab binding and the coptic stitch are the two most common methods for junk journals. For beginners, a simple pamphlet stitch is the easiest place to start.
Pamphlet stitch: Open your signature to the center fold. Poke three holes along the fold — one in the center, one 1–2 inches from the top, and one 1–2 inches from the bottom.
Thread your needle (about 18 inches of thread). From the outside of the fold, go in through the center hole, leaving a 3-inch tail on the outside.
Go out through the top hole, then back in through the bottom hole. Come out through the center hole, tie the two tails together in a square knot, and trim.
You have bound a signature.
To bind multiple signatures into a cover, you will use a slightly longer stitch that links each signature to the previous one. The principle is the same — you are just connecting each signature's thread to the one before it rather than tying them off individually.
Full step-by-step video tutorials for each stitch are linked in the beginner resources section at the end of this article.
Where to Find Materials Without Spending Money
Sourcing materials is half the fun of junk journaling. Here is where to look for free or nearly free supplies.
- Your recycling bin. Cardboard boxes, cereal boxes, paper bags, junk mail, envelopes, magazine pages, wrapping paper, and packing paper are all usable.
- Thrift stores. Old books ($1–$3 each), sheet music (bundles for $1), sewing patterns, vintage magazines, postcards, and board games (the boards and rule books are excellent source material).
- Nature walks. Pressed leaves, flowers, and seed pods add botanical beauty. Dry them between the pages of a heavy book for a week.
- Old letters and documents. Ask family members or check estate sales for old letters, postcards, greeting cards, and paperwork. (Ensure nothing historically significant or sentimental to someone else.)
- Facebook Marketplace and Buy Nothing groups. Crafters often give away surplus supplies for free. Post an "ISO" for old books and paper ephemera.
- Coffee shops. Ask for used coffee grounds (for staining) and take home paper bags. Some shops will save used tea bags for you.
- Library sales. Many libraries have annual book sales where hardcovers sell for $0.50–$1.00. Discarded books are often free.
The rule of thumb: if it is paper and you can cut it, glue it, or stitch it, it belongs in a junk journal.
Simple Projects for Beginners
Start with one of these projects to build confidence before tackling a full journal.
Project 1: A Single-Signature Notebook
The fastest way to a functional journal. Take 4–6 sheets of paper, fold them in half to form one signature.
Cut cardstock to the same dimensions for a cover. Punch three holes through the fold and cover spine, and stitch together with the pamphlet stitch.
You have a complete notebook in under 20 minutes.
Project 2: Tag Collection on a Ring
Cut several tags from cardstock or cereal box cardboard (approx. 2 x 4 inches). Punch a hole in each. Stain, distress, and decorate with washi tape, stamps, and ephemera. Thread a binder ring or ribbon through the holes. A low-commitment way to practice techniques.
Project 3: Repurposed Hardcover Journal
Find a hardcover book at a thrift store. Remove the text block by cutting along the spine or pulling pages out in small sections.
You now have a book cover ready to fill with your own signatures. This is the most common starting project and produces a professional-looking result with minimal skill.
Project 4: Envelope-Page Journal
Fold several envelopes in half (or leave them flat) and stitch them together like signatures. The envelopes become pockets automatically. Add plain pages between them for writing space. A functional journal for storing receipts, tickets, notes, and keepsakes.
Prompt Ideas for Journal Pages
Once your journal is assembled, the question becomes: what do you put on the pages? Here are prompts organized by mood and purpose.
Reflective Prompts
- A favorite memory from childhood, anchored to a specific object or smell
- A letter to your past self or future self
- What you are grateful for this week (use a small envelope to hold daily gratitude slips)
- A page documenting a place you love, using a map or ticket stub as the centerpiece
Creative Prompts
- A color palette page: pick three colors and fill the spread with papers, ephemera, and marks in only those colors
- A found-poetry page: cut words from a newspaper or book page and arrange them into a poem
- A texture study: glue down fabric, lace, sandpaper, corrugated cardboard, and other tactile materials
- A stamp-only page: fill a spread using nothing but rubber stamps and ink
Documentation Prompts
- Save a pressed flower or leaf with a written note about where you found it
- Document a day by collecting receipts, wrappers, tickets, and a handwritten note
- A reading log: list books you have read with a ticket or bookmark from each
- A recipe page featuring a family recipe written on a stained index card, tucked into a pocket
Seasonal Prompts
- A spring page using pressed flowers, light colors, and botanical ephemera
- A fall page with warm browns, oranges, dried leaves, and scrap fabric
- A winter page with cool blues, whites, silver, and paper snowflakes
- A holiday memory page incorporating wrapping paper scraps, gift tags, and photos
How to Make Your First Journal from Scratch: Step-by-Step
This is the full process for making a complete junk journal from start to finish, using the techniques described above.
Step 1: Gather your materials. You will need a hardcover book (for the cover), 20–30 sheets of assorted paper (book pages, stained paper, map pages, sheet music, etc.), 3–5 envelopes, a glue stick, a bone folder, an awl, a needle, waxed thread, and scissors.
Total time: about 2 hours for your first journal.
Step 2: Prepare the cover. Remove the pages from your hardcover book. You can leave the spine exposed or cover it with fabric, paper, or washi tape.
If the existing endpapers are intact, they can stay as the first and last pages of your journal.
Reinforce the spine with bookbinding tape or a strip of sturdy fabric.
Step 3: Prepare your paper. Stain any white paper with tea or coffee (see technique 2 above).
Let everything dry completely. Tear or cut your papers to the same height as your book cover but slightly narrower (about ¼ inch narrower to allow for the bulk of the signatures).
Sort into piles of 4–6 sheets each — these will become your signatures.
Step 4: Create signatures. Fold each pile of paper in half. Nest the folded sheets inside each other. Crease the fold firmly with your bone folder. Repeat for all piles. You should end up with 4–6 signatures.
Step 5: Add pockets and embellishments. Before binding, attach envelopes, tags, ribbon, and ephemera to individual pages.
Glue an envelope to the first page of a signature. Tuck a tag into a pocket.
Add a piece of lace along the edge of a page. Do this while each signature is still separate — it is much harder to add these after binding.
Step 6: Punch the holes. Mark and punch three or five holes along the spine fold of each signature. Mark the corresponding spots on the spine of your book cover. Use an awl to make clean holes.
Step 7: Bind the signatures. Thread your needle with approximately 24 inches of waxed thread.
Stitch the first signature to the cover using the pamphlet stitch. For each additional signature, stitch it to the cover and also link it to the previous signature by passing the needle through the thread loop of the previous stitch.
This creates a linked stitch that holds everything together. Pull each stitch tight, but not so tight that the paper tears.
Step 8: Tie off and finish. When all signatures are bound, tie the thread in a square knot on the inside of the last signature.
Trim the thread tails to about ¼ inch. Add a ribbon or piece of twine as a bookmark if desired.
Close the journal and press it under a stack of heavy books overnight to flatten the spine.
Step 9: Decorate the cover. Once the binding is complete, you can add a title, ephemera, fabric, or a collage to the front cover. Many crafters leave the cover plain or add only a small label. Less is often more with junk journal covers.
Your first journal will not be perfect. The pages will not line up exactly. The stitching will be uneven in places. Some envelopes will be glued slightly crooked. This is normal and, in fact, desirable — the handmade, imperfect quality is what gives junk journals their charm.
Final Tips for New Junk Journalists
Here are the things experienced junk journalists wish they had known when they started:
- Start small. A 10-page journal is a complete project. Do not feel pressured to make a 200-page tome on your first try.
- Keep a scrap stash. Designate a box, drawer, or bag for paper scraps, envelopes, and ephemera. Collect continuously. When you sit down to make a journal, you will have a deep well of materials to draw from.
- Watch tutorials. The junk journaling community on YouTube is generous and detailed. Search for "junk journal for beginners" and watch 3–4 different creators to see varying styles and techniques.
- Use what you have. The most common question from beginners is "Can I use X?" The answer is almost always yes. Paper, fabric, cardboard, plastic, metal — if you can cut it and attach it to a page, it belongs in a junk journal.
- Do not overplan. Part of the joy is discovering what a page wants to become. Glue down one piece of paper, then respond to it. Let the journal evolve organically.
- Make more than one. The second journal will be noticeably better than the first. The third will be better still. Each journal teaches you something new about technique, materials, and your own creative preferences.
Junk journaling is a craft of patience, resourcefulness, and quiet joy. It rewards the slow, the imperfect, and the personal. Your first piece of junk paper is waiting. Start collecting it today.
— Sophie Bennett