Introduction
There is something about painting birds that feels like a small act of hope.
You sit down with a brush, a puddle of paint, and a blank page. Then a little robin appears under your hand, round and rosy and very much alive.
I painted my first watercolor bird on a rainy Tuesday while the kids were at school. It had a lopsided beak and one wing bigger than the other.
I loved it anyway.
That is the secret this tutorial wants to hand you. You do not need to be a natural artist. You need paper, paint, a brush, and permission to make a few funny-looking birds before one of them flies.
By the end of this weekend project, you will have painted at least one bird you are proud of, and you will understand the simple watercolor techniques that make it possible.
Why Birds Are the Perfect First Subject
Beginners often start with landscapes or flowers. Both are lovely. But birds have a gift for forgiving a loose hand.
A flower's petals have precise shapes. A house has straight walls. A bird, though, is mostly soft curves and fluff.
If your bird's chest is a little too round, it looks cute. If the wing is a little too small, it looks like a baby bird. There is no wrong answer.
Birds also let you practice the two skills every watercolorist needs: controlling water and letting go of control.
You will use wet washes that bloom on their own. You will also use dry brushes that leave feathery edges. Both are forgiving.
Best of all, birds are small. You can paint a whole flock in one sitting, which means every mistake is just one more bird in the family.
What You'll Need
Keep the supply list short. A trip to the craft store should not feel like a second job.
Watercolor paper. Choose 140lb cold press paper. It handles water without buckling and has a gentle texture that catches pigment nicely. A 9x12 inch pad is plenty.
A round brush. A size 8 round brush does most of the work. If you have a size 4 as well, you can add fine details like beaks and legs.
Watercolor paints. A basic set with warm and cool versions of red, yellow, and blue is enough. Add a tube of burnt sienna if you can; it makes wonderful bird browns.
Water and paper towels. Two jars of clean water (one for rinsing, one for mixing) and a few paper towels for blotting.
A pencil. A regular number 2 pencil, kept light. You will barely see the lines by the end.
That is the whole list. No fancy palette, no masking fluid, no special tape. If you have painted before, you probably own all of it already.
First, Get to Know Your Paint
Before painting a single bird, spend five minutes playing with your paints.
Wet a brush and pick up a dab of blue. Paint a small square. Now add more water to the brush and paint another square next to it. See how the color fades?
That is called a wash, and it is the heart of watercolor.
Next, try a wet-on-wet bloom. Wet a small area of paper with clear water. Touch a loaded brush to the wet patch. Watch the color spread and feather on its own.
This is not a mistake. It is the paint being itself. Watercolor has a mind of its own, and half the joy is letting it have its way.
Spend a few minutes making swatches of every color you own. Label them in pencil. You are building a map of your palette, and it will make choosing colors for your birds much faster.
Simple Bird Shapes: The Foundation
Forget anatomy charts. Every bird you will paint today starts with two shapes: a teardrop and a circle.
The teardrop is the body. The circle is the head. Nudge them together and you have a bird.
Practice this on scrap paper with your pencil first. Draw five teardrops, each at a different angle. Some facing left, some facing right, one looking straight up at the sky.
Now add a tiny circle for the head on each one. Notice how changing the head's position changes the bird's mood.
Head up means curiosity. Head tucked means sleepiness. Head angled forward means "I am definitely about to eat that berry."
When you feel comfortable with the shapes, you are ready for paint. Keep the pencil lines light. They are only guides, and watercolor will soften them anyway.
The Loose Wash Body
Here is your first real bird, and it takes about sixty seconds.
Mix a puddle of paint in the color you want for the body. A robin's rusty orange, a chickadee's soft gray, or a bluebird's bright blue all work beautifully.
Load your size 8 brush and paint a teardrop shape in one confident stroke. Do not scrub at it. One pass, then stop.
Before the paint dries, touch a dab of darker color to the bottom of the body. This is called a drop-in. It gives the bird shadow and depth without any extra skill.
While that dries, paint a small circle for the head in the same color, a little lighter if you like. Overlap it slightly with the top of the body.
Step back. You have a bird shape. It may be lumpy. It may be lopsided. It is definitely a bird.
Let it dry completely before adding details. Patience here saves you from muddy paint.
Adding Feathers with a Dry Brush
Once the body is dry, you can give your bird texture with one of the most satisfying techniques in watercolor.
Load your brush with paint, then drag it across a paper towel until almost no color comes off. You want a dry, scratchy brush with a whisper of pigment left.
Holding the brush nearly flat against the paper, pull short strokes along the wing area. The rough texture of the paper catches the paint, leaving broken, feathery lines.
This is called dry brushing, and it is magic for birds.
A few strokes along the chest suggest soft fluff. A few more across the wing suggest individual feathers. Do not overdo it. Three or four strokes is plenty.
If your strokes look too strong, blot them gently with a paper towel while the paint is still damp. If they look too faint, wait for them to dry and add another pass.
Painting a Robin, Step by Step
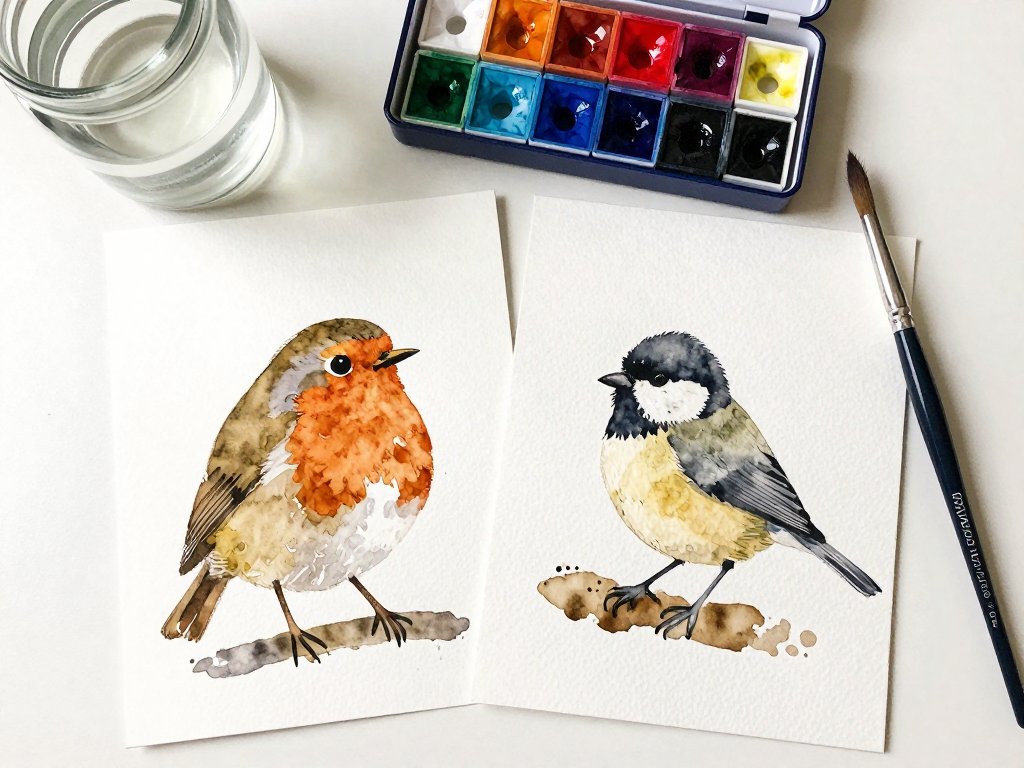
Let us put everything together with a robin, the friendliest bird in most gardens.
Step 1. Sketch a light teardrop body with a circle head. Keep it simple and small, about two inches tall.
Step 2. Mix a rusty orange with a touch of burnt sienna. Paint the body with a loose wash, leaving the belly area pale.
Step 3. While the body is wet, drop a little darker orange along the bottom edge. Let it spread on its own.
Step 4. Paint the head with the same color, slightly lighter. Wait for both to dry.
Step 5. Mix a dark gray, almost black. Paint a small wedge for the beak and a tiny dot for the eye. Add a pale gray patch around the eye if you are feeling fancy.
Step 6. Dry brush a few darker strokes on the wing to suggest feathers. Add a couple of thin legs in dark gray.
Step 7. Let it dry, then step back and smile. You painted a robin.
That is the whole process. Every bird you paint from here is a variation on these seven steps.
Painting a Chickadee
Chickadees are wonderful practice because they have bold, simple markings.
Start with a soft gray body wash, rounder than the robin's. Chickadees are plump little bundles.
Add a darker gray drop-in along the bottom while the wash is still wet.
Paint the head in the same gray, then let everything dry.
Now the fun part. With a small brush and dark gray paint, add the chickadee's black cap. It should sit on top of the head like a tiny hood, just covering the eyes.
Add a black throat patch below the beak. Leave a white cheek between the cap and the throat, and your chickadee suddenly looks exactly like itself.
Finish with a small beak, a bright eye, and a dry-brushed wing. This is a fifteen-minute bird, and it looks like it flew straight off a feeder.
Creating a Little Bird Family
Once you can paint one bird, paint five.
Arrange them on the page like a family portrait. A parent bird on a branch, a baby bird tucked beside it, and one bird taking off for the top corner.
Vary your colors. Paint one bird in warm browns, one in cool grays, one in a cheerful blue. The same technique works in any palette.
Vary your poses too. Change where the head sits, how the body tilts, and what direction the beak points. Each small change makes a new personality.
This is where the magic happens. A single bird is a practice piece. A row of birds is a story.
You can add a simple branch by painting a curving line of brown and touching a few leaves onto it. You can suggest a sky with a pale blue wash behind your birds. You can leave the paper white and let the birds float.
Every choice is correct. There are no rules about bird neighborhoods.
Common Beginner Mistakes, and How to Fix Them
Let me save you some heartache with the mistakes I made so you do not have to.
Muddy colors. This happens when you keep painting over wet paint. The fix is patience. Let each layer dry before adding the next, and rinse your brush often.
Bleeding everywhere. Too much water makes paint run wild. Blot your brush on a paper towel before touching it to the paper, and you will regain control.
Scrubbing the paper. Rubbing the brush back and forth roughens the paper and lifts color. Paint in single strokes, then leave it alone.
Wobbly beaks. Beaks are tiny, so a wobbly one is nearly invisible from arm's length. If it really bothers you, paint the beak while the head is still damp so it softens into the face.
Faded birds. Watercolor dries lighter than it looks wet. If your bird looks too pale, do not panic. Mix a slightly stronger version of the same color and add a second layer once the first is dry.
None of these are disasters. They are all just watercolor teaching you how it likes to be handled.
Making It a Weekend Ritual
The best way to improve is to paint birds on purpose, once a week, for a month.
Pick a bird you see in your yard or on your walk. A sparrow, a cardinal, a seagull. Look at its colors and its shape, then come home and paint it from memory.
Keep a small sketchbook just for birds. Date every page. In four weeks, you will flip back to this first robin and see how far you have come.
You do not need an hour. Fifteen minutes while the pasta boils is enough. Watercolor is wonderfully portable, and a bird only takes minutes once you know the shapes.
If the kids want to join, let them. Children are fearless with paint, and their birds will remind you that looseness is a gift, not a flaw.
Conclusion
Every artist who paints birds started with a wobbly first robin.
Yours will be wobbly too, and that is exactly how it should be. Wobble is how we learn where the edges are.
Paint one bird today. Just one. Then, tomorrow, paint another. Before long, you will have a whole little flock of your own making, and each one will carry a memory of the afternoon you spent with it.
The best part of watercolor birds is that they do not need to be perfect to be loved. They just need to be painted.
So pick up your brush, mix a little color, and give yourself the gift of one small bird on a page. I promise, the second one is even better.