Introduction
Every autumn, my grandmother kept a small wicker basket by the back door. It was for leaves, and by the end of October it was always overflowing with reds, golds, and one or two suspiciously green specimens that I insisted were special.
I think of that basket every time I pick up a watercolor brush in the fall. Autumn leaves are nature's way of teaching us about color, and painting them is a gentle, forgiving way to learn watercolor.
In this guide, I will walk you through painting loose, glowing fall leaves step by step, from the first soft wash to the last little vein. No experience needed, and no pressure to be perfect.
The Autumn Walk That Started It All
The best leaf paintings begin on a walk. When I was little, my grandmother and I would shuffle through the park, and she would stop at every maple that had dropped a good leaf.
She had rules. The leaf had to be dry, it had to be whole, and it had to be, in her words, "a color worth keeping." We would carry our treasures home and press them in a heavy dictionary for a week.
Years later, when I started painting, I realized I was still doing the same thing, only with a brush instead of a dictionary. A leaf is a tiny landscape, and every one tells you something about light and color.
So before you paint, take a walk. Even five minutes around your block will fill your eyes with the colors you are about to put on paper.
What You Will Need
The good news is that painting leaves needs very little. Here is the honest list.
- Watercolor paper. Any 140lb cold-press paper works. A small pad is plenty.
- A round brush. A size 6 or 8 round brush handles most leaf shapes beautifully.
- A smaller brush. A size 2 round for veins and details.
- Watercolor paints. A basic set with a warm red, a warm yellow, a burnt orange, and a brown will cover almost every fall leaf.
- Two jars of water. One for rinsing, one for clean water. It makes a real difference.
- Paper towels. For blotting and for happy accidents.
That is genuinely all you need. No masking fluid, no fancy palette, no special tape.
Choosing Your Leaves
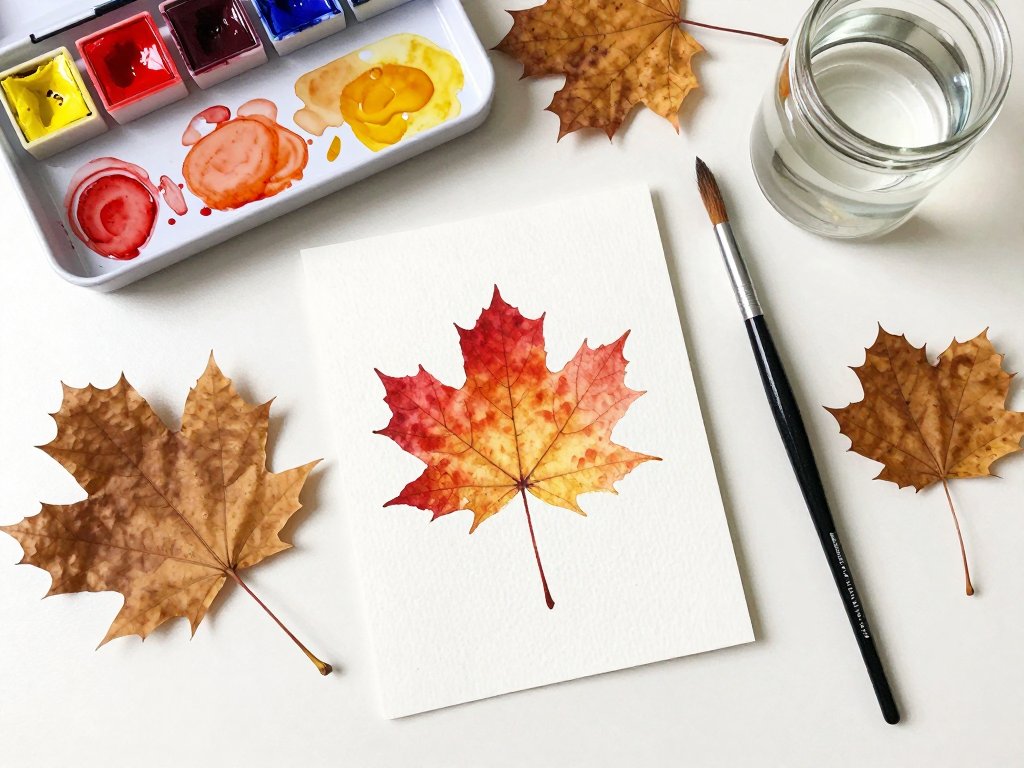
Real leaves make the best reference. Lay a few on the table beside your paper and look at them closely.
Notice the shape first: is it a maple with pointed lobes, an oak with rounded edges, or a simple oval birch leaf? You do not need to draw it perfectly, but the shape is your starting point.
Then notice the color story. Most leaves are not one color. A single red maple leaf might hold yellow near the stem, orange in the middle, and deeper red at the tips.
If you do not have real leaves handy, a photo from your phone works fine. Just zoom in and look for the color variations you would otherwise miss.
A Color Story: Reading Autumn's Palette
Fall leaves are a masterclass in color mixing, and you can learn more from one maple branch than from any color wheel.
The yellows come first, from the chlorophyll fading in the leaf. Then the oranges appear as sugars concentrate, and finally the reds arrive in the cool nights of late autumn.
That sequence is worth remembering when you paint. A believable leaf almost always moves from yellow at the stem toward red at the edges, because that is how real leaves actually color.
Try mixing your own autumn palette: warm yellow plus a touch of orange, burnt sienna with a drop of red, and a deep crimson for the darkest tips. Mixing your own colors instead of using them straight from the pan makes every leaf feel like yours.
Warm-Ups: Ten Minutes of Loose Color Play
Before you paint a single leaf, give yourself permission to play. Ten minutes of loose color exercises will loosen your wrist and your expectations.
Fill a scrap of watercolor paper with simple color blobs. Wet the paper, drop in yellow, and watch it spread. Add red to one corner and orange to another, and just notice how they behave.
Then try a few quick leaf shapes without any detail. Paint a maple shape in two seconds flat, let it dry, and do it again. The fast, ugly ones teach you more than the careful ones.
This warm-up is not wasted time. It is the difference between a stiff first painting and a loose one, and it only costs a few minutes.
The First Wash: Wet-on-Wet Backgrounds
Every leaf painting can start with the same gentle step: a soft, wet-on-wet wash. This is where watercolor gets its dreamy, atmospheric quality.
Wet your paper with clean water where the leaf will sit, using your big brush. The paper should glisten but not pool.
Now touch your brush to a puddle of yellow, and let it kiss the wet paper. The color will bloom outward on its own, soft and uncontrollable in the best way.
Add a touch of orange and red beside it, and watch the colors melt into each other. This is the moment painting leaves becomes magical. Do not fuss with it; let the water do the work.
If the wash feels too pale when it dries, that is fine, it is meant to be a background whisper, not the star. The leaf itself will carry the color.
Painting the Leaf Shape
Once your wash is dry, you can paint the leaf itself with wet-on-dry technique, which gives you sharper edges and more control.
Mix a rich color on your palette, something between orange and red. With your size 6 brush, paint the leaf shape in one confident sweep, following the outline you have in mind.
Do not try to fill the shape perfectly. A loose edge looks like a real leaf catching light, while a careful, hard outline can look flat and stiff.
If the shape wobbles, let it. The wobble is yours, and it is part of the charm. Watercolor rewards painters who trust their first stroke.
One trick for cleaner shapes: load your brush fully, then touch the paper at the tip of the leaf and pull the brush along the outline in one motion. A full brush holds more paint, which means fewer stops and a smoother edge.
Layering Color: Reds, Golds, and Oranges
Watercolor builds depth through transparent layers. This technique, called glazing, is how a flat shape becomes a glowing leaf.
When the first layer is dry, mix a deeper version of the same color and paint it over just one side of the leaf, or around the edges. The paper's white underneath will show through, and the leaf will suddenly look dimensional.
Add a wash of yellow near the stem, where leaves often stay lighter, and deepen the tip with red or burnt orange.
Let each layer dry before the next. Patience here is not waiting; it is the technique. Thin, dry layers are what give watercolor its luminous, stained-glass quality.
Warm colors advance and cool colors recede, and you can use that trick in a tiny way even in a single leaf. A touch of cool blue-violet shadow along one edge will push that side back, giving your leaf a gentle curve and a sense of turning light.
Adding Veins and Details
Veins are the details that make a leaf read as a leaf. They also happen to be forgiving, because real veins wander.
With your small brush, mix a slightly darker version of your leaf color. Paint a single line down the center, then smaller lines branching outward from it.
Do not paint every vein. Three or four on each side is plenty, and they should get lighter as they go. Think suggestion, not illustration.
If a vein comes out too dark, blot it gently with a paper towel while it is still damp, or lift it with a clean, damp brush. Watercolor is wonderfully correctable.
Painting a Small Leaf Collection
Once one leaf feels comfortable, try a small collection. Three leaves in different colors make a lovely composition and give you room to play.
Arrange them loosely in your mind: one big leaf, one medium, one small, overlapping slightly. Real fallen leaves never line up neatly, and neither should yours.
Paint each leaf with the same steps: wet-on-wet wash, then shape, then layers, then a few veins. Keep the colors different, one gold, one red, one orange, so they talk to each other.
Leave plenty of white space around them. In watercolor, the empty paper is part of the painting, like a clean floor around a pile of swept leaves.
If the composition feels off, add a small fallen leaf in a corner or a few loose dots of color to echo the pile. Little accents like these pull a collection together without any extra drawing.
A Keepsake Idea: Leaf Cards and Framed Studies
Fall leaf paintings make the sweetest little gifts, and they preserve the season in a way photographs cannot quite match.
Paint a single leaf on a small card of watercolor paper, and you have a thank-you note or a birthday card that took an afternoon and costs almost nothing.
For a bigger project, paint a small collection and frame it in a simple frame with a white mat. It becomes a piece of autumn you can keep on the wall all year.
Painted cards also make thoughtful hostess gifts and thank-you notes. Slip a single leaf painting into a plain envelope, and you have sent someone a tiny piece of the season.
My grandmother's basket is long gone, but the wall in my hallway holds a framed study of three leaves I painted on a gray November afternoon. Every time I pass it, I remember the walk.
Painting Leaves with Kids
Fall leaf painting is one of the most family-friendly watercolor projects there is, and children bring a wonderful looseness to it.
Set each child up with paper, a brush, and three colors, and let them choose their own leaves from the collection you gathered. Their washes will be bolder than yours, and that is exactly the point.
Keep the session to about twenty minutes, praise the process rather than the product, and do not correct their leaf shapes. A five-year-old's maple with six lobes is a treasure.
Paint your own leaf alongside them. Modeling the quiet concentration of painting is the best lesson you can give, and you might both end up with a painting to frame.
Common Beginner Moments
Every new watercolor painter meets the same small frustrations. Here is how to make friends with them.
My colors look muddy. You are probably using too many colors in one wash, or mixing too much on the page. Let layers dry between colors, and keep each wash to two or three hues.
My paper is pooling. Too much water. Blot the puddle with a paper towel, or tilt the paper gently so the water flows where you want it.
My leaf looks too dark. Watercolor dries lighter than it looks wet, but if it is still heavy, the fix is to start lighter next time. Thin, pale first layers are your friend.
I made a mistake. Lift it while damp with a clean brush, or paint over it once dry. Watercolor forgives almost everything except panic.
Final Thoughts
Painting fall leaves is not about perfect shapes or realistic veins. It is about catching a color you loved on a walk and holding it a little longer.
Start with one leaf and one wash. Let the water surprise you, add a few layers, and keep whatever happens. Your first painting will have something honest in it that no tutorial can teach.
This weekend, find a leaf worth keeping, press it or paint it, and give yourself the quiet hour. Autumn is short, but your painting of it can glow on the wall all winter long.