Introduction
The first day of school has a way of sneaking up on us, doesn't it? One minute the pool towels are still drying on the line, and the next you are standing in the school-supply aisle trying to remember which folder color your daughter asked for. Twice.
But here is the thing I love about this season: it is a fresh start. New notebooks, new teachers, new possibilities. And for us parents, it is a gentle reminder that our kids are growing — whether we are ready or not.
The best way to ease into it? Making something together. Crafting with your children is never just about the finished project.
It is about the half hour at the kitchen table where the world slows down, where glue gets on the tablecloth and nobody minds, where you hear about the friend drama and the lunchroom worries while your hands stay busy.
None of these projects needs to be perfect. In fact, the slightly crooked ones are usually the ones they love most. So pour the lemonade, clear the table, and let's make this school year feel a little more like home.
One quick note before we begin: every project below uses supplies you probably already have or can pick up for a dollar or two at the craft store.
And every one was designed so a child can do most of the work themselves.
You are the helper, not the artist-in-charge. That is the whole point.
Project 1: The No-Sew Felt Pencil Case
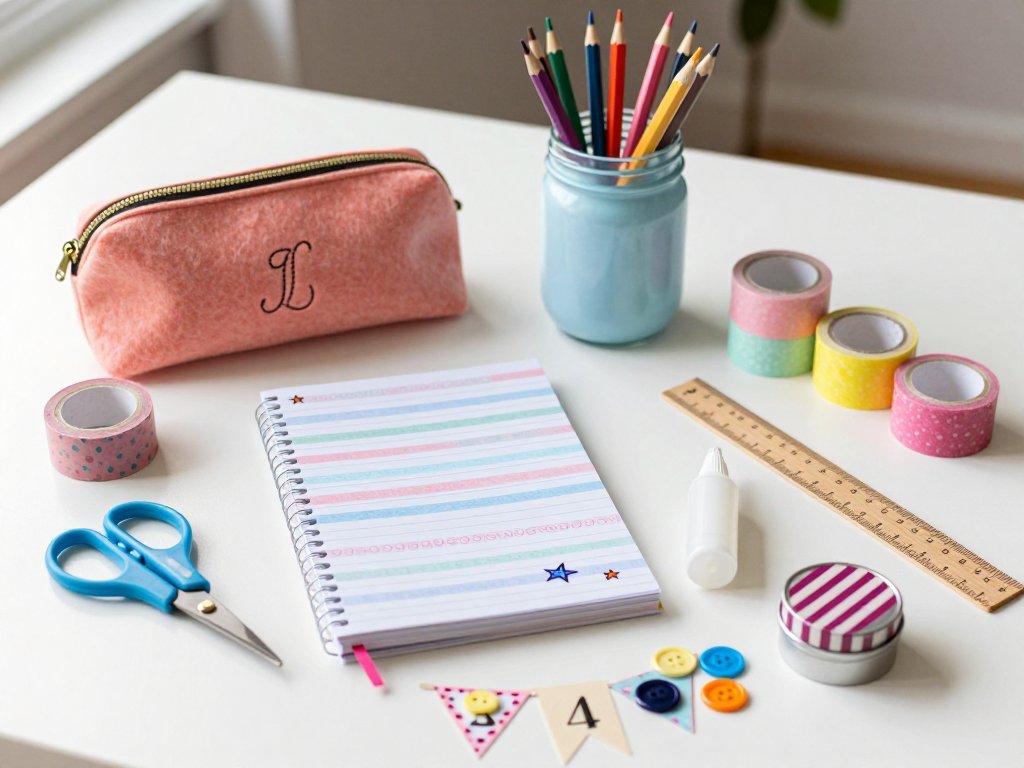
Felt is the most forgiving fabric in the craft bin. It doesn't fray, it doesn't slip, and it comes in every color your child can name — plus a few they will invent on the spot. For a first project of the school year, it is unbeatable.
What you'll need:
- Two rectangles of felt, about 9 by 6 inches each (one 9x12 sheet cut in half works perfectly)
- Fabric glue or fusible tape (the kind you press with an iron)
- A zipper, or a strip of Velcro if you want to skip the zipper entirely
- Scissors and a ruler
How to make it:
- Stack the two felt rectangles and trim any wobbly edges so they match.
- Run a line of fabric glue (or fusible tape) along the two long sides and one short side, leaving the top open.
- Press the edges together and let them dry completely. Overnight is best, even if your child checks them every ten minutes.
- Attach the zipper or Velcro across the open top. Two strips of Velcro do the job nicely.
- Let your child decorate: a felt initial, a few buttons, a strip of washi tape.
Make it last: Reinforce the corners with an extra dab of glue, and wait a full 24 hours before loading it with pencils. If your child is rough on supplies, double up the felt layers — the case will survive the bottom of a backpack all year.
What color would your child pick for theirs? My daughter chose a shade she calls "sunset purple." I did not question it.
Project 2: The Upcycled Jeans Zipper Pouch
Every family has a pile of jeans with worn-out knees. Instead of letting them sit in the donation bag, turn a leg into a sturdy zipper pouch your child can be proud of.
There is something sweet about sending them to school with a pencil case made from their own old jeans.
What you'll need:
- One jeans leg, or a sturdy fabric scrap the size of a placemat
- A zipper about 7 to 8 inches long, or ribbon and a toggle button for a no-zipper version
- Needle and thread, or fabric glue for the no-sew version
- Scissors, pins, and a ruler
How to make it:
- Cut the jeans leg about 9 inches long and turn it inside out.
- Pin and sew (or glue) the bottom edge closed. For extra strength, sew it twice, or run a second line of glue along the seam.
- Attach the zipper across the top opening. If you are using ribbon, fold the top edge over and stitch or glue it into a casing, then thread the ribbon through and tie it.
- Turn the pouch right side out and admire your handiwork. Let your child add a fabric marker doodle or a patch.
Make it last: Pre-wash the jeans before cutting so the fabric doesn't shrink later, and use a zipper with a larger pull so small fingers can open it easily. If you sew, backstitch at the start and end of every seam — that is where pouches always give out first.
Whose jeans will you use? The pair with the grass stains from last spring might be the perfect keepsake.
Project 3: The Recycled Bottle Pencil Case
This one costs absolutely nothing and teaches a lovely lesson: that "trash" can become treasure. A clean plastic bottle or a cardboard tube becomes a clever pencil case in about twenty minutes, and children love the transformation.
What you'll need:
- A clean plastic bottle with a cap, or a sturdy cardboard tube (a paper towel tube works great)
- Scissors or a craft knife — this part is for grown-ups only
- Duct tape, washi tape, or felt strips to cover the cut edge
- A zipper, or Velcro strips, plus decorations
How to make it:
- An adult cuts the bottle in half and keeps the bottom portion, about 5 inches tall.
- Cover the raw cut edge with duct tape or felt so it is smooth and safe for little hands.
- Attach a zipper around the opening, or cut a flap and fasten it with Velcro.
- Let your child decorate the outside with washi tape, stickers, or paint pens.
For the cardboard tube version, cut the tube to pencil length, wrap it in paper, and glue a felt circle on each end. Pencils slide in and out of the top — simple as that.
Make it last: Press a strip of clear packing tape over the decorations so they don't peel off by Halloween. And if the bottle version gets dented, that is okay — it was free to make, and making another one is half the fun.
Project 4: Cardboard Locker Shelves
Lockers are deep, dark, and mysteriously messy by the second week. A simple shelf doubles the usable space and gives everything a home.
Made from a cardboard box and decorated with paper, it looks like it came from a boutique — for about the cost of a roll of contact paper.
What you'll need:
- A sturdy cardboard box (double-wall cardboard is best)
- Contact paper or wrapping paper
- Scissors, a ruler, and tape or glue
How to make it:
- Measure the inside of the locker first. A shelf that is slightly narrower than the locker slides in and out easily.
- Cut a piece of cardboard to size, about 1 inch smaller than the locker width.
- Wrap the piece in contact paper or wrapping paper, folding the paper over the edges like a present.
- Fold a second strip of cardboard into a U-shape and tape it under the front edge for extra stiffness.
- Place it in the locker at eye level for your child, and let them arrange their books and treasures on top.
Make it last: Double-wall cardboard holds up far better than single-wall, and wrapping the shelf completely — not just the top — keeps moisture and grime away. If the shelf starts to sag mid-year, flip it over. Problem solved, at least until spring.
Project 5: Magnetic Locker Organizers
Small things disappear in lockers. Hair ties, erasers, lip balm — they vanish into the abyss between first period and lunch. Magnetic tins keep the little stuff in sight and in reach, and decorating them is pure fun for kids.
What you'll need:
- Magnetic spice tins, or small containers with strong adhesive magnets attached
- Washi tape in your child's favorite colors
- Scissors and a marker for labels
How to make it:
- Wash and dry the tins thoroughly.
- Let your child wrap each tin in washi tape, overlapping strips for a striped or patchwork look.
- Write a label on a small piece of tape or paper: "erasers," "hair ties," "chapstick."
- Attach the magnets and test them on the fridge before trusting them to a locker.
Make it last: Not all lockers are metal! Check with a magnet before you build a whole set. If the locker is non-magnetic, use adhesive hooks instead — same idea, same cheerful tins. And choose stronger magnets than you think you need; heavy tins slide down locker walls surprisingly easily.
It is a small project, but small wins count. Every time your child finds their hair tie without digging, they will think of the afternoon you spent taping tins together.
Project 6: Locker Mirror and Photo Frame
A locker can feel like a cold little cave. A tiny mirror and a few familiar faces turn it into a spot that feels like home. This project takes about fifteen minutes and uses mostly odds and ends from the junk drawer.
What you'll need:
- A small mirror (adhesive mirror tiles work well, or a compact mirror with the back removed)
- Craft foam or thin cardboard for the frame
- Glue dots or craft glue
- Photos, ribbon, and washi tape
How to make it:
- Cut a frame shape from craft foam or cardboard, with an opening slightly smaller than the mirror.
- Decorate the frame with washi tape, stickers, or markers.
- Glue the mirror behind the opening, then glue a ribbon loop to the top for hanging.
- Add photos of family, friends, and the family pet. Laminate them with clear packing tape first so they survive the school year.
Make it last: Use strong adhesive magnets or removable command strips to hang everything instead of glue that damages the locker door. And keep the photos covered with clear tape — locker humidity and crumpled papers are rough on printed faces.
Who will be in the frame? If your family is anything like mine, the dog will take up most of the space.
Project 7: Personalized Notebook Covers
Every September, the store shelves are full of identical notebooks, and by October nobody can tell whose is whose. A paper bag or cardstock cover fixes that in one craft afternoon — and gives your child a chance to doodle their heart out.
What you'll need:
- A brown paper bag or a large piece of cardstock
- Scissors and a ruler
- Washi tape, markers, and stickers
- Clear contact paper (optional, for durability)
How to make it:
- Open the paper bag flat and cut off the bottom. Fold the paper around the notebook like a book jacket, tucking the edges into the front and back covers.
- Trim the paper so it fits neatly, leaving a little fold-over at the top and bottom of the spine.
- Take the cover off the notebook and let your child decorate it: doodles, their name in bubble letters, a galaxy, a dragon, a rainbow of washi strips.
- Slip the cover back on and write the subject and name on the front.
Make it last: Cover the finished jacket with clear contact paper so it shrugs off spills and backpack scuffs. Write the name big on the front and the inside — labeled notebooks have a much better chance of coming home in June.
Paper bags are free, but the doodles are priceless. What will your child draw on theirs?
Project 8: Painted Pencil Cup or Mason Jar Organizer
The desk is the command center of homework season, and a cheerful pencil cup makes it a place they actually want to sit. A mason jar or a cleaned tin can becomes a bright organizer with nothing more than paint and patience.
What you'll need:
- A mason jar or a clean tin can with the label removed
- Acrylic paint or paint pens
- Newspaper to protect the table
- A clear sealer like Mod Podge, plus ribbon or washi tape
How to make it:
- Wash and dry the jar or can. If using a can, make sure the top edge is smooth — an adult can press the rim flat with pliers or cover it with a strip of felt.
- Paint the outside with one or two coats of acrylic paint, letting each coat dry completely.
- Let your child add dots, stripes, stars, or their name with paint pens.
- Seal the whole thing with a coat of Mod Podge so the paint doesn't chip.
- Fill it with pencils, scissors, and the mysterious collection of pens that migrates from every room of the house.
Make it last: The sealer is not optional — it is the difference between a cup that lasts the year and one that peels by October. Paint the outside only; the inside stays clean and food-safe, which matters if you are using a jar.
What will live in theirs? Pencils for homework, or paintbrushes for their own projects? Either way, it is theirs.
Project 9: Name Tags and Bookmarks
Sometimes the smallest projects bring the biggest smiles. Name tags for backpacks and lunch bags, and bookmarks for the first library trip of the year — both are quick enough to make on a school night, and both make your child feel quietly special.
What you'll need:
- Cardstock or sturdy paper
- Hole punch, yarn, or ribbon
- Markers, stickers, and washi tape
- Clear tape or laminating sheets
How to make it:
- Cut cardstock into tag shapes or bookmark rectangles.
- Let your child decorate with their name, a favorite animal, and a strip of washi tape down the edge.
- Punch a hole and tie on yarn or ribbon.
- Laminate with clear tape or laminating sheets — this takes two minutes and triples the life of the project.
For the name tag, attach it to the backpack loop with a key ring or a safety pin. For the bookmark, it is ready for the first book of the year.
Make it last: Lamination is everything here, and make a few spares. Bookmarks vanish into the void between couch cushions, and having a backup means no tears at bedtime reading.
How many will you make? My rule is: one for the bag, one for the book, and one to lose. That way we are always ahead.
Project 10: The First Day of School Countdown Banner
If your house is anything like mine, the last week of summer brings a strange mix of excitement and nerves. A countdown banner turns the waiting into a celebration — one triangle at a time.
What you'll need:
- Cardstock in a few colors
- Ribbon, yarn, or string
- Hole punch, markers, and washi tape
- Clothespins (optional)
How to make it:
- Cut cardstock into triangles, one for each day until the first day of school.
- Let your child write a number on each triangle and decorate them with washi tape and doodles.
- Punch two holes in each triangle and thread them onto the ribbon.
- Hang the banner across the kitchen window or the mantel, and flip one triangle over each morning.
You can also write a tiny note on the back of each triangle — a joke, a reminder, a "you've got this" — so each day brings a little surprise.
Make it last: String the triangles with clothespins instead of punching holes, so you can reuse the banner next year with fresh numbers. When school starts, roll the banner up and tuck it in a paper towel tube. It will be ready for round two next August.
The night before the first day, flip the last triangle and watch your child's face. That is the moment this whole project was for.
A Final Word
None of these projects will be perfect, and that is exactly the point. The pencil case will be slightly lopsided. The banner will have one triangle that fell off and got glued back on upside down. Your child will not remember any of that.
What they will remember is the feeling of walking into school holding something they made — with your hands nearby, steadying the scissors, and your voice saying "that looks great" even when it didn't quite.
So pick one project. Just one. Start there, keep it simple, and let the mess happen. Small wins count, and this season is full of them.
What will you make together this year?