Introduction
There is a particular sadness in a beloved book falling apart. The spine cracks. The hinge loosens. A page tears at the corner you have turned a hundred times. It feels like the story itself is wearing thin.
But here is the good news: most book damage is fixable. You do not need a conservator's studio or museum-grade materials. A little patience, a few simple supplies, and some gentle technique can give a tired book years of new life.
Book repair is a quiet, satisfying craft. It asks you to slow down and handle something with care. And when you finish, you hold a book that is whole again, ready for another reader, another journey.
In this guide, we will cover the three repairs that solve most household book problems: mending a loose spine, reattaching a split hinge, and repairing torn pages. Along the way, you will learn the tools, the materials, and the gentle habits that keep books healthy for decades.
What You Will Need
Book repair does not require a fancy kit. Most of what you need is already in your home.
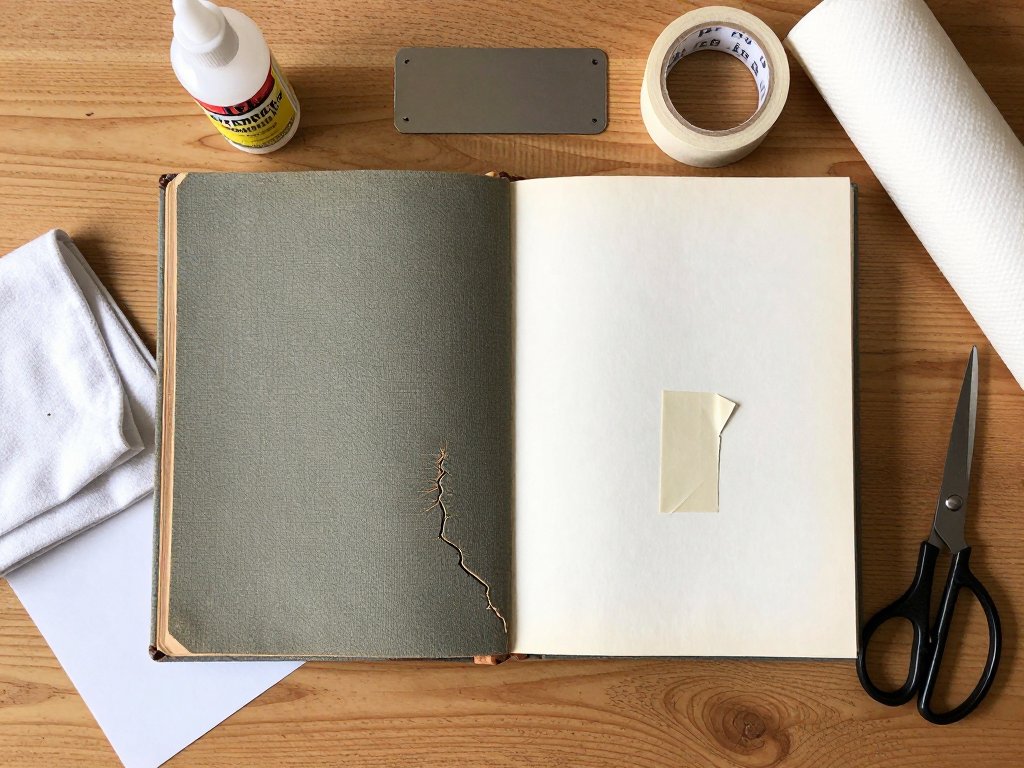
- Book or PVA glue — acid-free and archival quality if you can find it. PVA (polyvinyl acetate) glue is the standard for book repair because it dries flexible and stays clear. Craft stores sell small bottles.
- Wax paper or parchment paper — to protect pages while glue dries.
- Bone folder or a clean popsicle stick — for pressing creases and smoothing repairs. A popsicle stick works beautifully.
- Small paintbrush or glue applicator — for reaching into tight spaces.
- Weight — heavy books, a brick wrapped in cloth, or a stack of plates. You need something to press your repairs flat.
- Archival tape — acid-free book tape for tears. Avoid common office tape, which yellows and becomes brittle.
- Scissors, a ruler, and a soft cloth — for trimming tape and cleaning surfaces.
That is the whole list. You can start most repairs with glue, wax paper, and a heavy book.
One more helpful item is a clean, dry iron on a low setting. A gentle press over a wrinkled page, through parchment paper, can smooth creases that glue cannot reach.
The Golden Rules of Book Repair
Before we touch a single page, let us talk about how to think about book repair. These three principles guide every decision.
Use the right glue. Ordinary white school glue dries stiff and can crack. PVA glue stays flexible, which matters because books flex every time they are opened. If you repair with the wrong glue, you may cause more damage later.
Less is more. A thin, even layer of glue holds far better than a thick glob. Thick glue oozes, wrinkles pages, and takes forever to dry. You can always add more; you cannot easily remove it.
Work slowly. Book repair rewards patience. Rushing a hinge or forcing a page can tear the very thing you are trying to save. Give each step time to dry completely before moving on.
Keep those three rules in mind, and you will be amazed at what you can fix.
Understanding How a Book Is Built
To fix a book, it helps to understand its anatomy. A book is not one solid object; it is a collection of parts that work together.
The spine is the outside edge you see when the book sits on a shelf. It covers the text block, which is the stack of pages sewn or glued together.
The hinges are the flexible joints where the cover meets the spine, front and back. When you open a book, the hinges flex like little elbows. They are the most stressed parts of any book, and they fail first.
The endpapers are the sheets of paper glued to the inside of the covers. They are the hidden connectors between the cover and the text block.
Most household book problems live in these joints. A loose spine means the text block has separated from the cover. A split hinge means the flexible joint has torn. A torn page is damage to the text block itself. Each has its own fix.
Repair 1: Mending a Loose Spine
A loose spine is the most common book ailment. The text block pulls away from the cover, and the book feels like it is trying to escape its own binding. The fix depends on how loose it is.
For a slightly loose spine: Open the book and lay it flat. Look at the gap between the text block and the spine. If the gap is narrow and the pages still hold together, a little glue can tighten things up.
Apply a thin line of PVA glue along the inside of the spine, right where the text block meets the cover. Use your brush to work it gently into the gap. Close the book, wrap it in wax paper, and press it under a weight for twenty-four hours.
For a fully detached text block: This sounds scary, but it is fixable. Gently remove the text block from the cover if it is already loose. Apply glue to the spine of the text block itself, then press the block back into the cover.
Align the pages carefully before the glue sets. Once it is in place, wrap the book in wax paper, close it, and press it under a heavy weight. Leave it for a full day, and resist the urge to peek.
One caution: if the pages are sewn together in sections (called signatures), the spine repair is more involved. For a first project, choose a glued paperback or a book with an already-detached block.
Repair 2: Fixing a Split Hinge
The hinge is the joint where the cover flexes. When it splits, you see a crack running along the inside of the book where the cover meets the spine. The cover may even separate from the rest of the book.
This repair is delicate, so take your time.
First, clean the split area. Gently brush away dust and old paper fragments with a soft cloth. You want clean surfaces for the glue to grip.
Apply a thin layer of PVA glue to both sides of the split. Use your brush to reach into the crack, then press the hinge back together. A bone folder or popsicle stick helps you work the glue into the joint.
Wipe away any excess glue with a damp cloth immediately. Dry glue on pages is difficult to remove, so catch it while it is wet.
Place a sheet of wax paper between the cover and the first page to protect them. Close the book and press it under a weight for at least twenty-four hours. When you open it again, the hinge should flex smoothly.
If the hinge is completely detached, the repair is the same, just with more careful alignment. Match the cover to the text block, glue both surfaces, press, and wait.
Repair 3: Repairing Torn Pages
Torn pages are the most emotional repairs, because they happen to the pages we love most. The fix is simple, and the results are remarkably clean.
For a clean tear along the edge of a page, use archival tape. Cut a piece slightly longer than the tear and center it over the damage.
Press it down firmly, then fold it over the edge of the page so it covers both sides.
Rub it smooth with your bone folder or a clean finger.
For a tear that runs into the middle of the page, tape both sides. Place a piece of tape on the back of the page first, then one on the front. This sandwiches the paper and gives the repair real strength.
For a tear that has separated completely, you can rejoin the pieces with a careful glue repair.
Apply a whisper of PVA glue to one edge, press the pieces together on a flat surface, and smooth out any wrinkles.
Lay wax paper over the repair and press it under a light weight.
Never use office tape or clear packing tape. It yellows within a few years and turns brittle, and removing it can tear the page further. Archival tape is worth the small extra cost.
Refreshing a Worn Cover
Sometimes the inside of a book is fine, but the cover looks tired. Scuffs, stains, and faded cloth can make a good book look abandoned.
Start by cleaning the cover gently. A soft, dry cloth removes surface dust. For stubborn marks, a barely damp cloth works, but dry it immediately. Books and water are not friends.
For cloth covers with fraying corners, a tiny amount of PVA glue on a toothpick can tack down loose threads. Press the corner under a weight until the glue dries.
If the cover is intact but faded, consider a custom dust jacket. Measure the book, cut a piece of decorative paper to size, and fold it around the cover like a store-bought jacket. This is a wonderful way to personalize a thrift-store find.
Do not attempt to repaint or resurface leather covers at home. That is a job for a professional conservator, and the wrong treatment can cause permanent damage.
Building Healthy Book Habits
The best repair is the one you never need. A few small habits keep your books healthy for decades.
Never crack a new book flat. Opening it fully stresses the spine and hinge. Instead, open it a little at a time over several days, letting the binding loosen gradually.
Store books upright on the shelf, snug but not squeezed. Books leaning at an angle put uneven pressure on their spines.
Keep books away from heat, direct sunlight, and damp basements. All three degrade paper and glue over time.
Use a bookmark instead of folding page corners. Folding weakens the paper and can eventually cause tears right at the fold line.
And when you read, handle books with dry hands. The oils from fingers transfer to pages and attract dust and discoloration over time.
When to Call a Professional
Not every book is a do-it-yourself project. Knowing when to stop is part of being a careful crafter.
If a book has significant historical or monetary value, do not experiment on it. A first edition, a signed copy, or a family heirloom deserves a professional conservator.
If the text block has detached into multiple sections, or the sewing has failed, the repair requires re-binding skills beyond the basics.
If pages are brittle, yellowed, and crumble at the touch, that is acid degradation. Glue and tape will not stop it; the book needs conservation treatment or careful digitization.
For everyday paperbacks, thrift-store novels, and well-loved children's books, your home repairs are perfect. You are giving those books exactly what they need: another chance to be read.
A Simple Project: Repair a Thrift-Store Book
If you want to practice, here is a gentle first project. Find an inexpensive paperback at a thrift store, one with a loose spine or a torn page.
Clean the cover with a soft cloth. Assess the damage. Is the spine loose? The hinge split? A page torn? Choose one repair and do it carefully.
Gather your glue, wax paper, and a weight. Perform the repair, following the steps above. Then press the book for a full day.
When you unwrap it, open it slowly. Feel the hinge flex. Turn the repaired page. There is a real joy in that moment, the small miracle of making something whole.
Keep the book, or gift it to a friend with a note about its second life. A repaired book carries a story within a story.
Final Thoughts
Books hold our stories, our knowledge, and our memories. When they wear out, it is easy to feel like the end of the road. But with simple supplies and gentle hands, most books can be saved.
Book repair teaches patience and care. It connects you to a long tradition of readers and librarians who kept books alive long before modern glue existed.
Start small. Mend one hinge, tape one tear, press one spine. You will learn the rhythm quickly, and soon you will look at every shelf with new eyes, spotting the books that just need a little love.
Because every repaired book is a promise kept: this story is not done yet.