Introduction
There is a moment, early in most embroidery lives, when a thread simply refuses. It is too thick for the needle, too stiff to bend, too precious to force through a linen weave.
Couching is the answer the old workshops found, and it is a generous one. You do not push that stubborn thread through the cloth. You lay it on the surface and pin it down with something fine.
What you get is a raised, continuous line that behaves like a drawn stroke rather than a row of stitches. Nothing else in embroidery catches light quite the same way.
It is also the technique underneath goldwork, underneath the great medieval English vestments, and underneath the Bayeux Tapestry. Learn it and a very old door opens.
By the end of this guide you will know what couching is, where it came from, which threads to buy, and how to work a small couched leaf from first stitch to final press.
What Couching Actually Is
In ordinary embroidery, your working thread travels. It comes up through the fabric, crosses the surface, and goes back down, over and over, building a stitch with each pass.
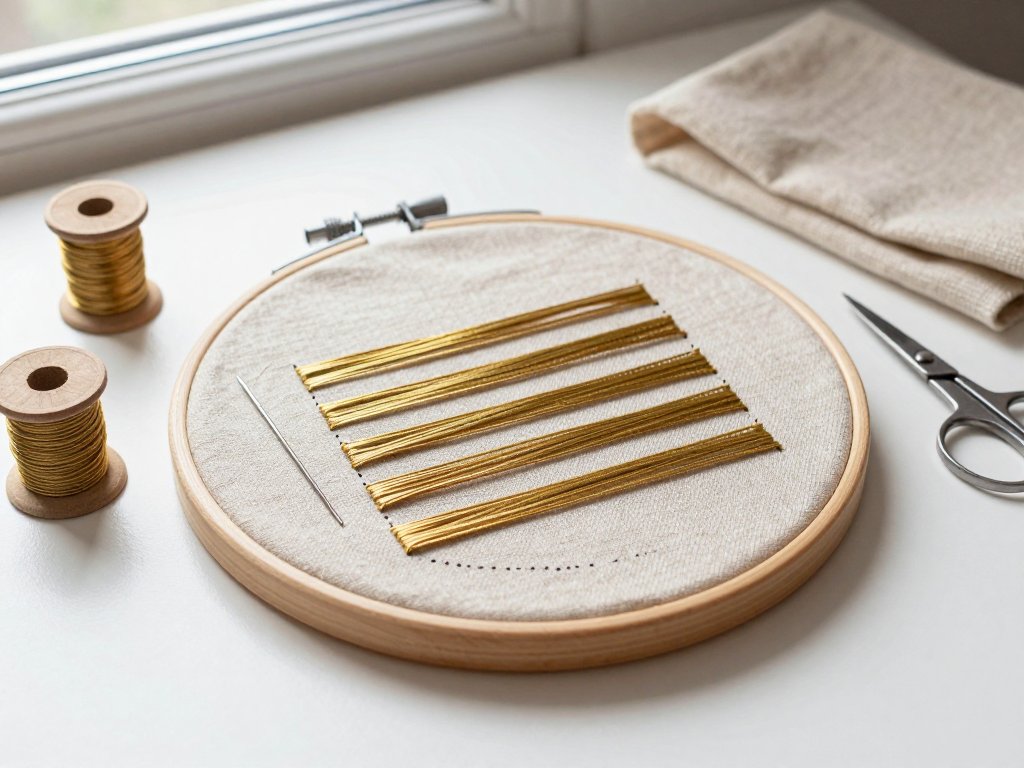
Couching reverses that logic. One thread — the laid thread — never enters the cloth at all. It rests on the surface in long, unbroken runs, following the line of the design.
A second thread, the couching thread, does all the travelling. It is fine, and it works small stitches across the laid thread to hold it down.
So two threads do two different jobs. The laid thread supplies colour, weight and shine. The couching thread supplies the structure, and it should almost disappear.
This is why couching is the foundation technique of goldwork embroidery. No needle can pass through a bundle of metallic passing thread without shredding it, but fine silk can pin it down all afternoon.
It is also why couched work has a particular look. Because the laid thread is never pierced, it keeps its twist and its sheen from end to end.
Satin stitch flattens metal at every entry point. Couching leaves it round, catching light along the whole length of the line.
There is a practical dividend too. A couched line can be unpicked and repositioned with far less damage than a stitched one, which makes it unusually forgiving for beginners.
Where the Word Comes From
The word arrives in English from the French coucher, to lay down. It shares a root with "couchette," the berth you lie in on an overnight train.
That is the whole technique in a single verb. You are laying a thread down, not sewing with it. The vocabulary has stayed stable for six hundred years.
Medieval English inventories use "couch" for exactly this work. A churchwarden's account will list couched orphreys — the ornamental bands on a vestment — as a separate line of labour.
The expense is instructive. Couching consumed metal by the yard and hours by the hundred, and the accounts price it accordingly.
Opus Anglicanum and the English Workshops
Between roughly 1250 and 1350, English embroiderers were the most sought-after in Europe. Their work had its own name: opus anglicanum, English work.
These were vestments — copes, chasubles, dalmatics — worked in silver-gilt thread and coloured silks on velvet or linen, then set with pearls and enamel.
Contemporary chroniclers describe pieces so laden with gold that they stood stiff in the hand. The Vatican inventory of 1295 lists more than a hundred English pieces.
Popes commissioned them, cardinals competed for them, and the finest were sent as diplomatic gifts between courts.
Underneath all that splendour sat the humblest of techniques: row upon row of small couching stitches, invisible from the front, holding the gold where it belonged.
Why the Back Mattered
Here is the detail I find most moving. English embroiderers did not simply stitch the gold down from the front. They carried the couching thread through to the back and anchored it there.
That is underside couching, described properly below, and the reason it existed was drape.
A cope is not a picture. It is a garment worn by a man who walks, kneels, raises his arms and stands for hours at a time.
A heavy panel of front-couched goldwork behaves like sheet metal. It folds in one place and buckles everywhere else.
Underside couching locks the gold while leaving the ground between the stitches free to move. The vestment folds; the gold stays whole.
That single technical choice is why so much medieval English goldwork survives in wearable condition. The cloth was allowed to be cloth.
The Bayeux Tapestry: Laid Work in Wool
Strictly speaking, the Bayeux Tapestry is not a tapestry at all. It is an embroidery, and a great deal of it is laid work — the same principle as couching, worked in wool on linen.
It runs some seventy metres and dates to the 1070s. Look closely at the horses and the ships and you will see long parallel threads crossing each shape.
Rather than fill a horse's flank with hundreds of small stitches, the embroiderers laid threads across it and couched them at intervals with linen thread.
The effect up close is colour laid on in bands. From a distance it becomes a solid, saturated mass.
That economy of effort is the practical argument for laid work, and it has never stopped being true. Couching covers ground quickly.
But notice what the stitches do to the surface. They leave a faint ribbing, a texture of small regular points across the colour.
Textile historians read those points like punctuation. Spacing, direction and thread choice are all evidence of a workshop's habits.
Goldwork, Japan and India
Couching travelled. Wherever a culture possessed a precious thread that could not tolerate a needle, it invented a version of this technique.
In Europe it became goldwork: passing thread, pearl purl and plate, laid and couched across ecclesiastical vestments, then later across court dress and regimental colours.
In Japan, the laid and couched metal thread work of shishu — Japanese embroidery — builds the lustre of a crane's wing or a court robe's sleeve from exactly these flat, secured lines.
The same foundation appears in Indian zardosi, the metal thread embroidery of the Mughal courts and later of Banaras and Lucknow.
A zardosi artisan lays metallic thread over a padded shape and couches it with fine cotton or silk, sometimes leaving the stitches deliberately visible as pattern.
Three continents, three vocabularies, one method. That convergence is the surest sign you are looking at a genuinely good idea.
What You Need
Couching has a short supply list for such a grand-looking result. Two threads, two needles, something to stretch the cloth, and something sharp to cut with.
The Ground Fabric
Choose a ground with enough body to carry the laid thread. A soft, loose weave will distort under the weight of metal.
Linen is the traditional choice and the most forgiving: firm, closely woven and willing to take a good stretch.
Silk dupion has a slight slub and a beautiful surface, and it holds a couched line with real elegance. It also records every needle mark.
Velvet is what the medieval workshops used and still the most sumptuous option. It is also the least forgiving, because the pile crushes and every mistake leaves a shadow.
Felt is the beginner's friend. It needs no hem, takes a transfer line easily and grips the laid thread so it barely shifts.
For a first project, choose linen or a firmly woven cotton. Save the velvet for when your hands are confident.
The Laid Thread
This is the thread that will be seen, so it deserves the largest share of your budget and your attention.
Metallic passing thread is the classic goldwork choice: a fine metal strip wound around a silk core, sold by the card or the spool.
Silk gimp has a firm, rope-like twist that gives a raised, sculptural line, lovely for outlines and for imitating braid.
Thick wool — tapestry wool or a heavy crewel — is the Bayeux choice. It covers quickly and takes dye beautifully.
Perle cotton in sizes 3 or 5 is the cheapest way to try the technique. It has a clean twist and a soft sheen.
Whatever you choose, test a length first. Lay it over the fabric, hold it with a fingertip and see whether it kinks, frays or sheds.
The Couching Thread
The couching thread should be fine, smooth and strong. Fine silk is traditional; a good polyester sewing thread is the practical modern substitute.
Two schools of thought exist here, and both are legitimate. Match the thread to the laid thread and the stitches vanish.
Or choose a deliberate contrast — a red silk on gold, a dark thread on pale wool — and the stitches become a visible rhythm across the surface.
If you want invisible stitches, silk hides more easily than cotton because its slight sheen mimics metal.
Needles, Wax and Small Tools
You need two needles, and they are not interchangeable.
A milliner's needle — long, straight, with a small round eye — carries the laid thread. Its length lets you place metal without dragging it through the cloth.
Try a size 7 or 8 for passing thread. The eye must be small enough not to abrade the metal wrap as it passes.
A fine crewel or embroidery needle, sizes 9 to 12, carries the couching thread. Use the smallest needle that will take your thread.
Beeswax earns its modest price. Draw the couching thread across it two or three times to reduce tangling and add a little strength.
You will also want a hoop or frame, and small sharp scissors with fine points. Blunt blades fray metallic thread; sharp ones cut it cleanly.
Three Ways to Couch
Almost every couched surface you will meet is a variation on one of three methods. Learn all three and you can read historical work like a map.
Brick Couching
Brick couching sets the stitches in alternating rows, offset so that no two sit directly above one another, like the courses of a brick wall.
The advantage is concealment. Where two lengths of laid thread meet end to end, an offset stitch covers the join and the eye reads one unbroken line.
Work the first row at even intervals. On the second row, begin half an interval in, so the new stitches fall between those below.
It is the standard for filling a shape with parallel laid threads. It hides joins, spreads strain and looks orderly from any distance.
Underside Couching
Underside couching is the medieval English genius, and it is worked from the back even though the gold sits on the front.
The couching thread comes up beside the laid thread, passes over the gold, and goes back down through the same hole.
The result is a tiny dimple in the metal rather than a visible stitch on top. The couching thread never shows on the face of the work.
A closely woven linen or silk ground is essential, because the thread must be pulled firmly enough to lock without tearing.
This is how goldwork stayed supple. The metal is held at intervals, and the ground between those points remains free.
A cope worked this way could fold, travel in a chest and be shaken out and worn again. Front couching could not manage that.
It is slower than brick couching and far less forgiving of uneven tension. It is also, in my view, the most satisfying stitch in the craft.
Free or Random Couching
Free couching abandons the grid. Stitches go where the eye wants them: closer where a line curves tightly, further apart along a straight run.
This is the method for texture — a nest of laid silk, a rough wool fleece, a drift of loose fibres across a landscape.
It is also how silk shading is sometimes built over a laid base, with short irregular stitches blending one band of colour into the next.
The looseness is only apparent. Random couching still needs deliberate tension and a consistent angle across the stitches.
A Couched Leaf, Step by Step
This is the project I give every student who wants to learn couching. It is small, it teaches every part of the technique, and it finishes quickly.
You will need a piece of firm linen about six inches square, a leaf outline drawn on paper, a laid thread and a fine couching thread.
- Choose and transfer a simple design. A single leaf or a simple curved shape is ideal: one continuous outline with an interior to fill. Trace it lightly with a fine pencil or water-soluble pen.
- Frame up the fabric. Stretch the linen in a hoop or frame until it is drum-tight, then tighten it again as you work. Slack fabric is the source of most puckering.
- Start and secure the couching thread. Knot the fine thread, bring it up at the edge of the shape, and take two tiny holding stitches on the spot. Keep the back tidy from the beginning.
- Lay the first laid thread. Thread the milliner's needle, bring the laid thread up at the base of the leaf, and lay it along the outline. Do not stitch it yet.
- Couch it at even intervals. With the fine needle, work small perpendicular stitches across the laid thread, roughly every four millimetres. Keep each stitch straight and snug.
- Turn a corner by pivoting. At a curve, do not fold the metal. Hold it against the line, place a couching stitch at the turning point, and let the thread pivot there.
- Work across the shape. Lay the next thread parallel to the first, offsetting the couching stitches so they fall between the row below. Continue until the leaf is filled.
- End the laid thread. Take the laid thread to the back at the edge of the shape, thread it on a tapestry needle and weave it under the couching stitches for a centimetre.
- Finish and secure the couching thread. Run the fine thread under several stitches on the back, take two small back stitches, and trim close.
- Press. Place the work face down on a padded towel, cover with a cloth, and press lightly with a dry iron. Never press metal directly.
Work slowly for the first two rows. After that your hands will find the rhythm, and the leaf will grow faster than you expect.
If you want a second exercise, try the same leaf in wool, then in passing thread. The difference in weight will teach you more than any description.
Tension: The Snug Rule
Couching lives or dies on tension, and tension is the hardest thing to describe in words. So here is the test I use.
A couching stitch should hold the laid thread flat against the cloth without denting it. Snug, not tight.
Too tight and the stitch pulls the ground fabric into a pucker. The line ripples, and no amount of pressing will flatten it.
Too loose and the laid thread lifts, loops and snags on everything — a needle, a fingernail, the edge of your hoop.
Metallic thread is unforgiving here. It has no stretch, so a tight stitch cannot relax back; the damage is permanent.
Try this: after each stitch, press the laid thread with your thumb. It should not slide sideways, and the fabric beneath should not dimple.
If you feel resistance as the stitch closes, you have gone too far. Ease off and let the thread sit.
How Far Apart Should the Stitches Be?
For metallic thread, roughly three to five millimetres between couching stitches is the working standard. It holds the metal securely without crowding it.
A very thick laid thread needs them closer, because a heavy bundle lifts more easily and will not lie flat between widely spaced points.
Thin silk or fine passing thread can take a slightly longer interval, particularly on a straight run where there is little strain.
Even spacing matters more than the exact measurement. Regular intervals read as deliberate; uneven ones read as an error, however skilled the rest of the work.
On a curve, the stitches naturally sit closer together on the inside of the bend. That is correct, and it is not a defect.
Mark your intervals lightly on the fabric if you are struggling. A faint dot every four millimetres will train your eye faster than guessing.
Common Beginner Mistakes
Puckered Ground Fabric
Almost always tension. The fabric was slack in the frame, or the couching stitches were pulled too hard. Unpick, restretch firmly, and work more gently.
Frayed or Shredded Metal
Usually the needle. A large eye or a blunt point will scrape the metal wrap off a passing thread. Switch to a smaller milliner's needle and cut with sharp scissors.
Loops and Snags Along the Line
Loops mean the laid thread was not held flat while it was couched. Keep a thumb on the thread a centimetre ahead of each stitch.
Visible Join Lines
Two lengths of laid thread were ended in the same place. Stagger the joins, and cover each one with an offset brick stitch.
Twisted, Ropey Laid Thread
Metallic thread untwists as it is handled. Cut shorter lengths, and let the thread hang from the needle for a moment to release its twist.
A Stiff, Board-Like Finished Piece
Too many couching stitches, worked too tightly. Reduce the count, loosen slightly, and consider underside couching for anything that must drape.
A Weekend Project You Can Actually Finish
This is the part of the craft that suits a busy life. A single couched leaf on a six-inch square of linen is genuinely an evening's work, or two if you are learning.
It needs no special equipment beyond a hoop, two needles and a spool of perle cotton. It can be picked up for twenty minutes and put down without losing your place.
Frame it in a small hoop when it is done and it becomes a gift. Work four leaves in different threads and you have a panel with real presence.
And the skills transfer. Once you can couch a leaf, you can couch a monogram, a border, a small bird, or the gold outline of something much larger.
Before You Begin
Couching is one of those techniques that looks like a specialist secret and turns out to be an ordinary, patient habit. Lay the thread down. Hold it with something fine.
Start with perle cotton on linen, where mistakes cost almost nothing, and let your fingers learn the snug tension before metal asks more of them.
The old workshops were not doing anything you cannot do at a kitchen table on a Sunday evening.