Introduction
I paid thirty-five dollars for a witch broom once. It was a sad, flimsy thing with plastic bristles that shed all over my porch before Halloween even arrived. By November first, it looked like a worn-out paintbrush with delusions of grandeur.
That was the last time I bought a Halloween prop. Because here is the thing I learned: a good witch broom is one of the easiest things in the world to make yourself, and the homemade version looks better than anything in the store.
Today I am going to show you how to build a rustic witch broom from a stick, some twine, and materials you can grab for a few dollars.
It takes under an hour, costs almost nothing, and your kids can help. When you are done, you will have a prop that looks like it belongs on a front porch in a fall movie.
Why Make Your Own Witch Broom?
Let me give you the practical reasons first, because I know that is why you are here.
Store-bought witch brooms run anywhere from fifteen to forty dollars, and most of them are made from plastic that looks plastic. A homemade broom costs about three dollars in supplies, and it looks genuinely rustic. That is a ten-to-one price difference for a better-looking result.
There is also the fun factor. Building a broom with your kids is a great Halloween activity. It is messy, it is hands-on, and it gives them something they made themselves to show off. No screens, no assembly required.
And because you are making it, you control the size. Want a tiny broom for a shelf? Make a tiny one. Want a six-foot porch statement piece? Grab a longer stick. The store does not offer that kind of flexibility.
What You Will Need
The supply list is short, and most of it is probably already in your house or garage.
- A stick or dowel — about three feet long for a standard broom. A fallen branch with character is perfect. A plain wooden dowel from the hardware store works too.
- Natural broom straw or dried grass — this is the bristle part. Corn stalks, dried ornamental grass, or even straw from a craft store all work beautifully.
- Twine or jute cord — the rustic look comes from natural twine. Pick up a roll for a couple of dollars.
- Scissors or pruning shears — for trimming the bristles.
- Hot glue gun — for securing the bristles to the stick. Optional but helpful.
- A few rubber bands — to hold everything in place while you work.
That is the whole list. If you are foraging for a stick and drying grass from your own yard, the only thing you need to buy is twine.
Step 1: Find Your Stick
The stick is the handle of your broom, so it deserves a little attention. Look for one that is fairly straight for most of its length, with a comfortable thickness you can grip.
Good sources are your own backyard, a local park, or a friend's woodpile. Fallen branches are ideal because they are already dry. Green branches will shrink as they dry, which can loosen your bristles later.
If you cannot find a branch you like, a wooden dowel from the hardware store works perfectly. It will cost you a couple of dollars. You can leave it plain for a clean look, or wrap it in twine for extra rustic charm.
Here is a pro tip: strip the bark off one end if you want a smoother handle, or leave it on for a wilder, woodsier look. Both are correct. This is your broom, so pick the style you like.
Step 2: Gather Your Bristles
The bristles are what make a witch broom look like a witch broom. You want material that is long, flexible, and a little wild.
Dried ornamental grass is the gold standard. It grows tall, dries well, and has that messy, windswept look that reads as "witch broom" instantly. Corn stalks work too, especially the dried husks and leaves.
You can also buy a bundle of natural broom straw at most craft stores. It comes pre-dried and ready to use, which saves time if you are in a hurry.
Whatever you use, gather a generous bundle. You will need more than you think. A skimpy broom looks sad, so err on the side of too much. You can always trim the excess.
Step 3: Attach the Bristles to the Stick
Now we get to the actual assembly, and it is simpler than you expect.
Lay your bundle of bristles against the stick, about three to four inches from the bottom end. The bristles should extend well past the end of the stick, because they become the sweep of the broom.
Wrap a rubber band tightly around both the stick and the bristles to hold them together. This is just a temporary hold, so do not worry about how it looks.
Take your twine and start wrapping it around the bundle, right over the rubber band.
Work in tight, even loops, going around and around until you have a solid band of twine about an inch and a half wide.
This is what actually holds the broom together, so make it snug.
When you are happy with the wrapping, tie the twine off with a double knot. Then add a dab of hot glue over the knot to keep it from slipping. Repeat the same process an inch or two higher up the bundle for extra security.
Step 4: Shape and Trim the Bristles
Here is where the broom starts to look like the real thing.
Hold the broom upside down and look at the bristle ends. They will be ragged and uneven, which is charming, but a little shaping makes it look intentional rather than accidental.
Use your scissors or pruning shears to trim the bristle ends into a gentle fan shape. The classic witch broom sweeps out wider at the bottom than at the top, so aim for that silhouette.
Do not trim too much at once. Cut a little, step back, look, and cut again. You can always remove more, but you cannot add it back.
If you want a really wild, storybook look, leave the ends slightly uneven on purpose. Imperfection is part of the rustic aesthetic.
Step 5: Add the Finishing Details
The base broom is done. Now let us make it look like it cost forty dollars.
Wrap a length of twine in a crisscross pattern around the top section of the handle. This adds texture and makes the handle look deliberately crafted rather than just stuck in a bundle of grass.
You can also tie a small bundle of dried flowers, berries, or a little black ribbon around the base of the bristles. A touch of deep red or orange brings out the autumn feel and makes the prop pop against fall colors.
For a lived-in look, give the handle a light sanding or rub it with a little dirt. Sounds strange, but a weathered stick reads as authentic. Your broom should look like it has been flying for a hundred years.
Design Variations to Try
Once you have made one broom, you will want to make more. Here are a few variations that are all easy.
Miniature broom. Use a short twig and a small bundle of grass to make a little broom for a shelf, mantel, or dollhouse. Same technique, one-tenth the size.
Twine-wrapped handle. Skip the stick entirely and wrap a bundle of twine around a straight dowel, leaving a loop at the top. This gives a clean, modern witchy look.
Herb broom. Add dried lavender, sage, or rosemary to the bristle bundle. It looks gorgeous and makes your porch smell amazing. This is the fanciest version and still costs almost nothing.
Bare-branch broom. Use a gnarled, twisty branch as the handle and keep the bristles untrimmed. This gives a wild, forest-witch vibe that is very popular in rustic fall decor.
Child-size broom. Let your kids make their own small brooms with short sticks. They can paint the handles or wrap them in colored ribbon for a personal touch.
Where to Use Your Witch Brooms
Half the fun of making these brooms is figuring out where to put them.
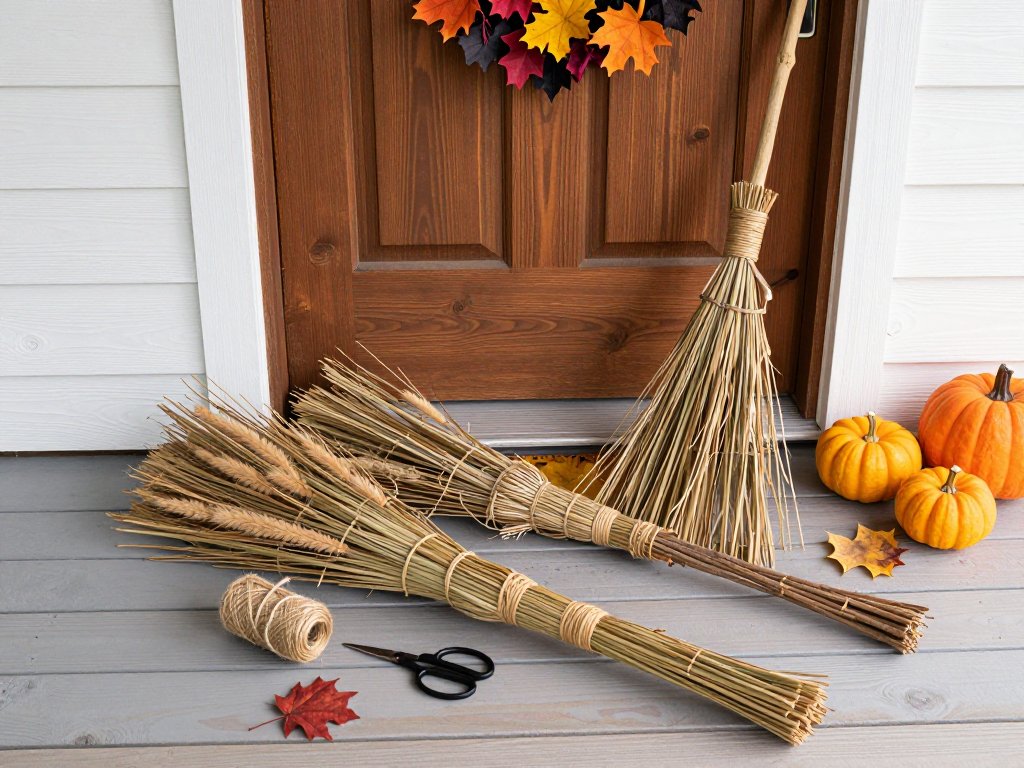
Leaning a tall broom against your front door is the classic move. Add a fall wreath and a couple of pumpkins, and your porch looks like a magazine spread.
Group three brooms of different sizes in a corner of the yard, stuck into the ground or a large planter. The cluster effect is dramatic and looks great in photos.
Tuck a mini broom into a wreath, a flower arrangement, or a table centerpiece. It is a small touch that ties your Halloween decor together.
Prop a broom against a chair on your porch with a witch hat on the seat. It looks like the witch just stepped away for a moment, and it delights every kid who walks past.
And after Halloween, do not pack them away too quickly. A rustic twine broom looks perfectly at home in fall decor all the way through Thanksgiving.
One more spot worth trying: stand a broom beside your mailbox or gate for a week or two in October. It sets the mood for the whole block and costs you nothing extra.
How to Store and Reuse Your Brooms
These brooms are durable, which means they can last for years of Halloweens with a little care.
At the end of the season, give the bristles a gentle shake to remove dust and debris. Store the broom standing upright in a dry spot, or hang it from the twine wrapping.
Avoid leaving it out in heavy rain for days at a time. Natural materials will eventually soften and sag, and the twine can rot. A covered porch is fine; an open field in a storm is not.
If the bristles get crushed in storage, give them a light spritz of water and let them dry. They will often puff back up to their original shape.
When a broom finally wears out, the materials compost easily. The stick, the grass, and the twine all break down naturally, which is one more reason to make your own instead of buying plastic.
Common Mistakes (and How to Avoid Them)
Let me save you the trial-and-error. These are the mistakes I made on my first few brooms.
Not enough bristles. Skimpy bristles make a broom look like a whisk. Gather a generous bundle, then add a little more. Fullness reads as quality.
Loose twine. If your twine wrapping is loose, the whole broom slides apart. Wrap tightly and use the hot glue on the knot. Check it after a day and re-tighten if needed.
Bristles too long. A broom with bristles three feet long looks comical. Trim them to about one and a half times the length of the handle below the wrap, and shape the fan as you go.
Smooth stick, rough look. If you use a plastic or painted dowel, it clashes with the rustic bristles. Wrap it in twine or sand it down so it feels natural.
Trimming too early. Shape the bristles only after everything is fully assembled and dry. If you trim before wrapping, you have no idea where the final line will fall.
Every one of these is easy to fix, and none of them will ruin your afternoon. That is the beauty of a three-dollar project.
Final Thoughts
That thirty-five-dollar plastic broom taught me a lesson I keep relearning in every craft: the stuff you make yourself is almost always better than the stuff you buy.
A homemade witch broom costs a fraction of the price, looks more authentic, and comes with the satisfaction of having built it with your own hands. It is a perfect family project, a perfect budget project, and a perfect quick project for a fall afternoon.
So grab a stick, raid the yard for grass, and make yourself a broom. Lean it by your door, add a pumpkin or two, and watch the neighbors try to figure out where you bought it.
And when they ask? You can tell them the truth, or you can just smile and say the witch made it herself.