Introduction
I spent a hundred and twenty dollars on Halloween decorations one year. Not on a party. Not on costumes. On decorations.
By November first, most of it was in a landfill. The cheap plastic pumpkins cracked. The string lights tangled into a knot no human could undo. The inflatable skeleton deflated and never recovered.
That was the year I learned the hard way: Halloween decor is a money pit, and the fanciest stuff in the store is often the worst made.
So I started over. Dollar store only. I gave myself a thirty dollar budget and a challenge: make my house look like a haunted mansion, not a clearance rack.
It worked. Better than the hundred and twenty dollar version.
Here is the thing about dollar stores: they sell boring stuff in bulk, and boring stuff is exactly what you need to build spooky stuff. The magic is not in the product. It is in what you do to it.
These 25 hacks are the ones I actually use. Every single one is under five dollars. Most are under two. A few are literally free once you already own paint.
Let us get into it.
The Three Rules of Dollar Store Halloween
Before the hacks, you need the system. Three rules make every one of these projects work.
Rule one: buy the boring stuff. Glass vases, pillar candles, black trash bags, plain frames. The dollar store excels at plain. You bring the creepy.
Rule two: paint changes everything. A can of matte black spray paint and a bottle of acrylic paint will transform ninety percent of dollar store junk into something you would pay forty dollars for online.
Rule three: skip the seasonal aisle. The pre-decorated Halloween section is overpriced and flimsy. Shop the candle aisle, the kitchen aisle, and the craft section instead. That is where the real deals live.
Keep those three rules in your head and every hack below gets easier. Now, the fun part.
Black and White Basics
Monochrome decor looks expensive. It photographs well, it matches any color scheme, and it hides cheap materials better than anything else.
1. Tape-resist spiderwebs. Buy a pack of painter's tape and a cheap canvas. Stick tape down in a web pattern, paint the whole canvas black, peel the tape, and you have a crisp white web.
Costs about two dollars and looks like a print. Make a few in different sizes and cluster them on one wall for a proper web gallery.
2. The trash bag ghost. A white trash bag, a marker, and a light source. Draw a face, stuff the bag with crumpled newspaper, and hang it in a dark corner. The classic. Costs a dollar and takes four minutes.
3. Blackout window silhouettes. Black poster board and scissors. Cut bat and cat shapes, tape them to your window from inside. The silhouette shows through and the neighborhood gets a spooky skyline. Free if you already have scissors.
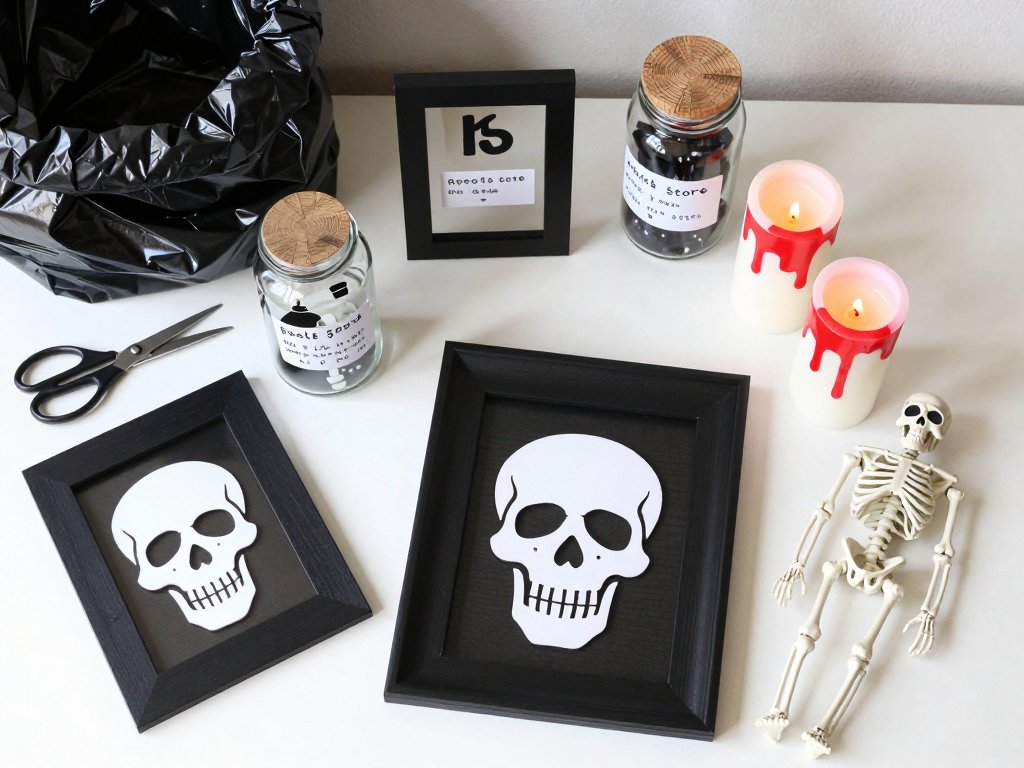
4. The frame gallery trick. Dollar store picture frames, all different sizes, spray painted black.
Fill them with black paper and white skull or raven cutouts. Hang in a cluster.
It reads as "curated haunted gallery" for about six dollars. Hang them slightly crooked and it instantly looks intentional rather than accidental.
Candle Magic
The candle aisle is the most underrated section of any dollar store. Fake candles cost a dollar and never burn your house down.
5. The blood drip candle. White pillar candles and red acrylic paint. Drip the paint down the sides in uneven streaks, let it dry, and group three on a tray. Instant horror movie set dressing.
6. The melted candle tower. Buy five fake candles in different heights. Glue them together into one big lumpy tower with hot glue. Paint the whole thing black, then dry brush white on the edges. It looks like a candle that melted for a century.
7. Floating heads in jars. This one is a crowd favorite. Take a glass jar, a cheap doll head or a styrofoam head form, and some black tea for coloring.
Fill the jar with water, add the head, and let it float. Add a few drops of red food coloring for extra unsettling.
8. The candle chandelier. Grab a cheap wreath form and hot glue fake candles all around it, pointing every direction. Hang it from your porch ceiling with fishing line. It looks like a cursed chandelier and costs about five dollars.
The Creepy Table
The dining table is where guests linger, so it deserves special attention. These are my highest-impact-per-dollar ideas.
9. The apothecary shelf. Collect glass jars of every shape. Fill them with black beans, rice dyed black, dry pasta, and cranberries.
Add printed labels like "Eye of Newt" and "Witch's Brew." It is a chemistry lab crossed with a witch's pantry.
Cheap printable labels and a marker make this look like a prop from a movie set.
10. The severed hand centerpiece. A black rubber glove, some wire, and a plastic vase. Pose the glove coming out of the vase like a hand reaching for guests. Stuff it with newspaper so it holds its shape. Costs two dollars, shocks everyone.
11. The bleeding table runner. White table runner or white fabric, red acrylic paint, and a spray bottle. Spray the paint thinned with water along the edges so it runs down the sides of the table. It looks like the table itself is bleeding.
12. The skull fruit bowl. A plastic skull from the craft section makes the best fruit bowl you have ever owned. Fill it with apples, pomegranates, or black grapes. Functional and creepy.
Windows and Walls
Vertical space is free real estate. Most people decorate tables and floors and leave their walls naked. Do not be most people.
13. The peeking ghost wall. White fabric or an old sheet, a ladder, and some string.
Drape the sheet over a high point so it hangs like a ghost peeking over the wall.
Add two black circle eyes cut from felt. Position it at the top of the stairs where guests see it out of the corner of their eye.
14. The floating picture trick. Take plain frames and hang them at crooked angles. Put black paper inside with white creepy silhouettes. The crookedness is what sells it. Straight frames look like a mistake.
15. The string web corner. A bag of cotton balls, stretched and pulled into webs, pinned into the corner of a room. Add a plastic spider. It takes ten minutes and looks like real cobwebs.
16. The window hand prints. Use bar soap or window chalk to press hand prints on your windows from inside. Smear them downward like someone was trying to get in. It washes off in spring, which is good, because it is deeply unsettling.
17. The door garland upgrade. Buy the cheap fabric garland and hot glue mini skeletons, plastic spiders, and black roses into it. The base garland costs a dollar; the upgrades cost another two. It looks custom.
Outdoor Quick Wins
The porch is your first impression. These five ideas are weather-friendly and take under fifteen minutes each.
18. The potion bottle path. Line your walkway with glass bottles filled with colored water.
Use a few drops of food coloring in each. Add a tea light behind them at night and they glow like a wizard's alley.
Cluster three or four per spot instead of spreading them thin for a stronger glow.
19. The lawn graveyard. Foam board, a marker, and spray paint. Cut tombstone shapes, write funny or classic epitaphs, and stake them in the yard. Add a little moss from the craft section for age. Rub gray paint on the edges after they dry so they look weathered and old.
20. The scarecrow without the work. A flannel shirt, a pair of jeans, a pillowcase, and a hay bale. Stuff the clothes with trash bags, pin the pillowcase face, and sit it on the hay bale. Classic scarecrow, zero sewing.
21. The glowing eyes bush. Two cheap LED tea lights taped behind two holes cut in a black paper circle.
Wedge the circle into a bush so the eyes glow out at passersby. It is creepy, it is cheap, and it is visible from the street.
Place it at eye level where the dog walks so the effect catches everyone off guard.
22. The porch spider. A large black trash bag stuffed with newspaper, four pool noodles for legs, and two white circle eyes. Hang it from the porch ceiling. It moves in the wind, which is the best part.
Kid-Friendly and Crafty
Halloween decor should be a family project, not a solo mission. These last four are easy enough for little hands to help with.
23. The handprint spider gallery. Black paint on little hands, pressed onto white paper, with googly eyes glued on. Frame them or tape them in a row. Every kid's handprint makes a perfect spider body.
24. The cotton ball ghost garland. Cotton balls strung on white thread with black marker faces. Hang across the mantel or a doorway. It is soft, safe, and kids can make a hundred of them.
25. The candy corn candle. A white pillar candle, orange and yellow acrylic paint, and painter's tape. Tape off sections and paint the candle in candy corn stripes. It is silly, seasonal, and takes about twenty minutes with dry time.
The Finish That Fools Everyone
You can build every hack on this list and still end up with something that looks like a school play. The difference is finish.
Here is the finishing sequence that makes dollar store stuff read as expensive: paint, distress, and light.
Paint. Spray paint in matte black or flat white instantly kills the plastic shine that screams "cheap." One even coat, outside, ten minutes of drying. Do this to any frame, candle, or skull before you use it.
Distress. After the paint dries, rub a candle or a dry brush of gray over the edges. The worn corners make new props look like they have been in your attic for decades.
Light. Nothing sells a haunted house like bad lighting. Warm fairy lights behind your web corner, a single flickering LED candle on the apothecary shelf, and a spotlight from below on your porch spider. Shadows do the decorating for you.
Skip all three and the props look like props. Use all three and guests will ask if you hired someone.
Storage: Make It Last More Than One October
The hundred and twenty dollar lesson was not just about money. It was about waste. Most of what I bought could not survive one season, let alone a year in a box.
The dollar store hacks on this list survive, because you are building them from glass, paint, and fabric instead of fragile plastic.
Pack smart and they will last. Wrap the apothecary jars in newspaper. Lay the framed silhouettes flat with cardboard between them. Coil the cotton web garlands in a bag, not a knot.
Label every box with a marker. Future-you, unpacking in September, will be grateful you did not write "misc Halloween stuff" on all of them.
One box for the porch, one for the dining room, one for the walls. That is the whole storage system. Ten minutes of packing now saves you ten dollars and a headache next October.
The Bottom Line
Add it up. Every project on this list, if you built them all, comes in well under thirty dollars. My record year cost twenty-two dollars and change.
The hundred and twenty dollar version of my Halloween decor is gone. The twenty-two dollar version has lasted three seasons, because glass, paint, and a little imagination do not crack, tangle, or deflate.
That is the real trick of dollar store decorating. It is not about being cheap. It is about spending money where it matters and effort where it counts.
Start with one hack tonight. The tape-resist web takes five minutes and will make you feel like a decorating genius. Then try another tomorrow.
By Halloween night, your house will look haunted, your wallet will still be happy, and your neighbors will ask where you bought everything.
Tell them it was the dollar store. Then watch their faces.