Introduction
Last September I almost spent forty dollars on a fall centerpiece. It was a wooden tray with three little pumpkins, a candle, and a scatter of fake leaves. Pretty, sure. But as I stood there doing the math, I realized something that made me set it back on the shelf.
Every single piece in that forty-dollar display came from the dollar store. The tray, the pumpkins, the candle, the leaves. I could have built the same thing for about two dollars. And honestly, I could have built it better.
That moment changed how I decorate for every season. Not because I'm cheap — because I'm smart with my money. Why hand over forty dollars for something you can make in one afternoon for pocket change?
Let me be clear about what I'm not suggesting. I'm not suggesting you fill your house with plastic clutter.
I'm suggesting you stop paying boutique prices for things the dollar store already sells — foam pumpkins, glass votives, wooden trays, mason jars, felt sheets.
Half of what makes fall decor expensive is the name on the box, not the thing inside it.
Here's the secret most people miss about dollar store decor. The materials aren't the problem.
Decor looks cheap when it sits flat on a shelf, when the colors clash, when one lonely piece stands by itself with nothing around it.
Fix the texture, layer your pieces, group things in odd numbers, and that same five-dollar pile of supplies starts looking like a magazine spread.
Every project in this list is built on that idea. Ten projects, all dollar store supplies, all under an hour each, and every one has one specific trick that makes it look like you spent ten times what you did. Grab a basket and let's get started.
1. Upgraded Faux Pumpkins
Plain foam and plastic pumpkins are the best dollar store find of the season. They cost about a dollar, they come in every size, and they are blank canvases. Out of the bag they look like exactly what they are. Ten minutes fixes that.
Supplies
- Faux pumpkins in assorted sizes
- Acrylic craft paint — cream, rust, or matte white
- Mod Podge or white school glue
- Velvet ribbon
- Hot glue gun
Steps
- Wipe each pumpkin clean so the paint sticks.
- Paint with two thin coats. Thin coats dry smooth; thick coats drip and streak.
- When the paint is dry, brush on a layer of Mod Podge for a soft, matte finish.
- Wrap a strip of velvet ribbon around the stem or base and secure it with a dot of hot glue.
Why it looks expensive
That Mod Podge is doing the heavy lifting. Dollar store pumpkins have a glossy plastic sheen that screams cheap, and a matte finish kills it instantly.
The ribbon is the detail your eye lands on — a little velvet bow turns a one-dollar pumpkin into a boutique piece.
Group three different sizes together and nobody will believe the price tag.
2. Twine-Wrapped Candle Holders
Candles are the cheapest way to make a room feel warm, and glass votives from the dollar store cost pocket change. Wrapped in twine, they look like something from a farmhouse catalog. This is a fifteen-minute project, tops.
Supplies
- Glass candle votives or small jars
- Jute twine or thin rope
- Hot glue gun
- Faux leaves or pressed leaves
- Votive candles
Steps
- Run a thin line of hot glue around the base of the glass and press the end of the twine into it.
- Wrap the twine tightly around the glass, adding a dab of glue every few rows to keep it snug.
- When you reach the top, glue the end down and trim the excess.
- Optional: hot glue a leaf or two onto the twine for a pop of color.
- Drop in a candle and light it.
Why it looks expensive
Texture, again. The twine adds a rough, natural layer that catches the light and contrasts with the smooth glass. A candle glowing through wrapped twine throws the prettiest shadows across a table. Make three in different heights and cluster them together — candles in odd numbers always read as intentional.
3. Dollar Store Fall Wreath
Wreaths at craft stores run twenty, thirty, even forty dollars. A foam wreath form at the dollar store costs about a dollar, and the rest is just ribbon and foliage you already know how to arrange.
This one takes about half an hour and looks like it came from a boutique.
Supplies
- Foam wreath form
- Faux foliage picks — leaves, berries, mini pumpkins
- Ribbon in a fall color
- Hot glue gun
- Scissors or wire cutters
Steps
- Cut the foliage picks into small stems with wire cutters.
- Arrange the stems on the wreath form before gluing anything, so you can play with placement.
- Hot glue the stems in place, working in one direction around the wreath.
- Fill the gaps with berries or small leaves until you can't see foam.
- Make a bow with the ribbon and glue it at the bottom or top.
Why it looks expensive
Fullness and a bow. Thin, sparse wreaths scream dollar store. Keep stuffing stems in until the foam disappears — that dense, layered look is what high-end wreaths have.
The bow is the cherry on top; a big, floppy ribbon bow instantly reads expensive.
And don't skimp on mixing leaf shapes. Variety is what makes it look collected rather than assembled.
4. Felt Leaf Garland
A garland is the fastest way to make a mantel or doorway feel like fall, and store-bought felt garlands are shockingly overpriced for what they are. You can make one for a couple of dollars and have it exactly the length you want.
Supplies
- Felt sheets in fall colors — rust, mustard, cream, olive
- Jute twine
- Scissors
- Hot glue gun (or a needle and thread)
Steps
- Cut leaf shapes freehand from the felt — simple ovals with a point work fine; they don't need to be perfect.
- Cut a piece of twine to your desired length, plus a little extra for hanging.
- Fold each felt leaf over the twine and secure it with a dot of hot glue.
- Space the leaves a few inches apart, alternating colors.
- Hang it and step back to admire.
Why it looks expensive
Color rhythm. Alternating the leaf colors in a loose pattern makes the garland look designed instead of random.
And felt has a soft, matte texture that photographs beautifully — it reads cozy, not crafty.
Drape it with a little slack rather than pulling it tight; a relaxed curve looks far more intentional.
If you really want to push it, weave a string of battery lights from the same aisle through the leaves — warm glow through felt is pure magic, and nobody will believe it cost less than a coffee.
5. Farmhouse-Style Wooden Sign
Every farmhouse-style sign at the big box stores costs twenty-five dollars and says something like "GATHER" in a font you've seen a thousand times. Make your own on a dollar store cutting board and it'll cost a fraction of that — and you get to pick your own words.
Supplies
- Wooden cutting board (or a small canvas)
- Black or white craft paint
- Paint pen or stencil
- Sandpaper (optional)
- Twine for hanging
Steps
- Lightly sand the cutting board so the paint and pen stick better.
- Paint the whole board in your base color and let it dry.
- Use a stencil or a paint pen to write your word — "grateful," "harvest," or "welcome" all work.
- Sand the edges and corners lightly to give it a worn, vintage look.
- Attach twine to the corners to hang it, or prop it on a shelf.
Why it looks expensive
The sanding. That worn edge is the difference between a craft project and a piece of decor — it gives the sign history, like it's been hanging in a farmhouse kitchen for years.
Distressed pieces read as curated, not cheap. And real wood, even cheap real wood, always beats plastic in the expensive department.
6. Fall Centerpiece Tray
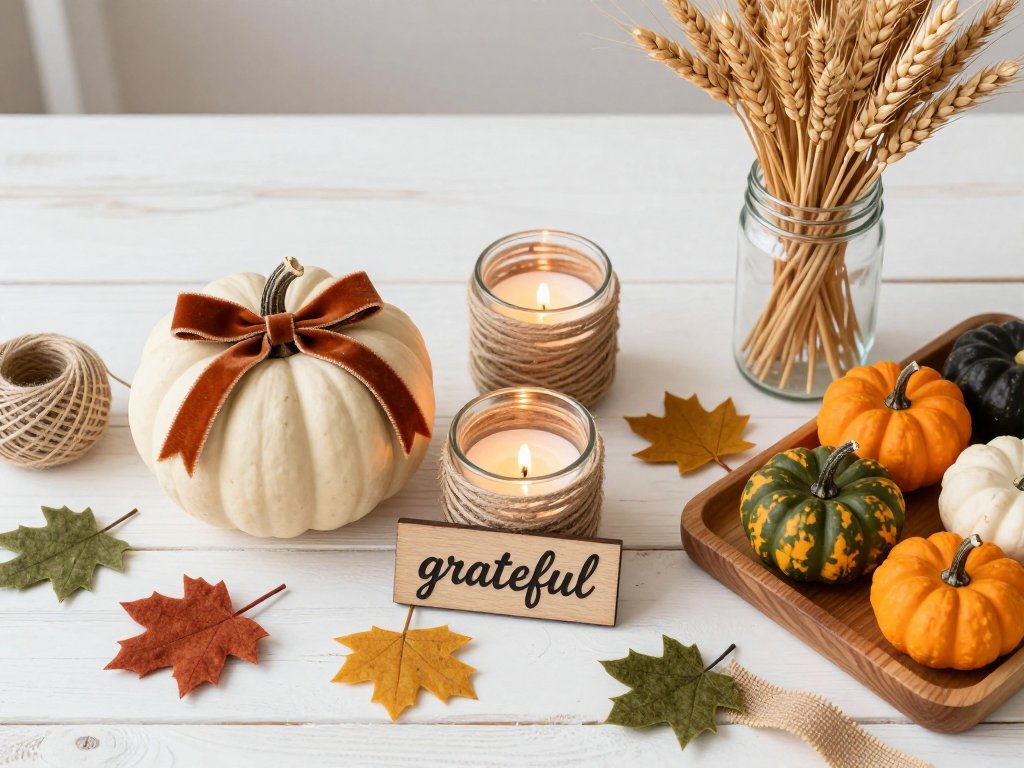
Remember the forty-dollar centerpiece that started all this? Here's the version I actually built. It costs about two dollars, takes twenty minutes, and it's sitting on my table right now.
Supplies
- Wooden tray or serving tray from the dollar store
- Mini faux pumpkins in mixed colors
- Pillar candle (or several small ones)
- Faux leaves and berries
- Small vase or jar (optional)
Steps
- Set the tray in the center of your table.
- Place the candle or candles in the middle — the tallest element goes in the center.
- Group pumpkins around the candle in odd numbers: one, three, five.
- Tuck leaves and berries around the bases to fill the gaps.
- Step back and adjust until it looks balanced from every angle.
Why it looks expensive
Grouping and height. The tray gives everything a defined home, the candle gives the eye a place to rest, and the odd-numbered pumpkins create that effortless styled look.
Vary the heights and sizes — a centerpiece with all one-size pieces looks flat and forgettable.
Mixing heights is what makes it look designed.
7. Mason Jar Wheat Vases
Dried wheat and natural florals are having a moment, and the dollar store sells them by the bunch for about a dollar. Put them in a mason jar and you have an arrangement that looks like it cost thirty dollars at a florist.
Supplies
- Mason jars (or any glass jars)
- Dried wheat, plumes, or faux florals
- Jute twine or ribbon
- Hot glue gun (optional)
Steps
- Clean the jars so they sparkle.
- Tie a piece of twine or ribbon around the neck of each jar.
- Arrange the wheat and florals into a loose bouquet before putting them in the jar.
- Trim the stems so the tallest pieces sit about one and a half times the jar height.
- Set one jar on the table, or group three in the middle for more impact.
Why it looks expensive
The height ratio. Most arrangements fail because the stems are too short, making everything look squat and timid.
Tall stems in a simple jar look architectural and intentional. And dried wheat has that warm, golden texture that reads autumn instantly.
Group three jars of varying heights and you've got a statement piece for pennies. Tuck a few sprigs of faux eucalyptus or berries in with the wheat for contrast — mixed textures are what separate a florist arrangement from a craft project.
8. Leaf Place Card Holders and Napkin Rings
Hosting a fall dinner? The little details are what people remember, and these take about five minutes. Dollar store faux leaves become place card holders that look like they cost five dollars apiece at a stationery shop.
Supplies
- Faux or pressed fall leaves
- Small wooden clothespins
- Cardstock or index cards for names
- Pen or marker
- Hot glue gun
Steps
- Write each guest's name on a small strip of cardstock.
- Hot glue a leaf to the top of each clothespin, or clip the leaf and the name card together.
- Clip each place card to a napkin or a glass.
- For napkin rings: wrap a leaf around a rolled napkin and secure it with a dot of glue or a piece of twine.
Why it looks expensive
It's the gesture. Handwritten names and a natural element say "I planned this dinner," and that reads as expensive no matter what it cost.
Mixing leaf shapes and colors keeps it from looking like a school craft. These take minutes, but they're the detail guests actually notice — and they'll assume you bought them.
9. No-Sew Fall Pillow Cover
Throw pillows are the fastest way to change a room for fall, but new pillows cost a fortune. This no-sew cover takes one yard of fabric, one dollar store pillow insert, and zero sewing skills. You'll never buy a seasonal pillow again.
Supplies
- Fabric — flannel, burlap, or velvet in a fall color (about a yard)
- Pillow insert or an old pillow
- Fabric scissors
- Fabric glue or hot glue
- Ribbon or trim (optional)
Steps
- Lay the fabric flat and place the pillow on top.
- Cut the fabric with about three inches of extra on each side.
- Wrap the fabric around the pillow like a gift, tucking the ends in.
- Fold the open edge over and secure it with fabric glue or hot glue.
- Optional: glue a ribbon strip down the front for a finished look.
Why it looks expensive
Fabric choice. Burlap and velvet are textured, matte fabrics that instantly look high-end, and they hide the fact that there's no zipper or sewn seam. The ribbon detail gives it that designed finish. Make three or four and swap the covers in ten minutes whenever you want a new look.
10. Gratitude Banner or Harvest Table Runner
Number ten is the project that ties the whole room together. A felt banner with one word — "grateful" or "harvest" — hung over the mantel or down the table makes everything else look intentional. It's basically the same supplies as the garland, so buy extra felt.
Supplies
- Felt sheets in fall colors
- Jute twine or ribbon
- Scissors
- Hot glue gun
- Letter stencils or a paint pen (optional)
Steps
- Cut the felt into triangles or rectangles for banner flags.
- Write or stencil one letter on each flag, spelling out your word.
- Fold the top of each flag over the twine and glue it down.
- Space the flags evenly and hang the banner with a little slack.
- Skip the letters and you have a simple bunting — equally cute over a buffet table.
Why it looks expensive
One word, not a sentence. Banners with long phrases look cluttered; a single word with clean spacing looks like a piece of art.
The felt texture does the same job it did in the garland — matte, soft, cozy.
And hanging it with slack instead of pulling it tight keeps the whole thing looking relaxed and curated, not like a party decoration.
Putting It All Together
Here's the part that makes all ten projects work: don't scatter them. A single upgraded pumpkin in a corner looks like a craft project. Five projects styled together — the tray centerpiece, the candle holders, the garland, the pillows — look like a professionally decorated room.
Group things in odd numbers. Mix textures: smooth glass, rough twine, soft felt, matte paint. Keep the color palette tight — rust, cream, olive, mustard — and everything you make will look like it belongs together, even though each piece cost about a dollar.
And when someone asks where you got that gorgeous centerpiece? Smile and say you made it. Or don't. The forty-dollar version is still sitting on that shelf, and your version is on your table, looking better and costing about two bucks.
That's the whole trick of dollar store decorating. It was never about the materials — it's about the texture, the layering, the grouping, and the confidence to try. You've got all of that already. Now go make something beautiful for almost nothing.