Introduction
Long before pumpkin spice had a name, people were stringing autumn treasures into garlands. The word itself travels a lovely road: it comes to us from the French guirlande, which grew out of the Italian ghirlanda, meaning a braid.
In ancient Rome, laurel garlands crowned victors and honored households. In India, marigold garlands have welcomed guests for centuries.
And every autumn, farm families across Europe and North America hung harvest swags of dried corn, apples, and herbs to celebrate the season's plenty.
Here is the comforting secret of garland-making: it has always been a craft of leftovers.
A bit of ribbon, a basket of felt scraps, paper saved from a child's school project, the last of the year's oranges sliced thin and dried by the fire.
You do not need a specialty shop. You need an afternoon, a quiet playlist, and a handful of materials you likely already own.
In this guide, I will walk you through five easy fall garlands, from a classic felt leaf strand to a fragrant dried citrus rope, along with the simple techniques that make each one look store-bought.
By the end, your mantel will be dressed for autumn, and you will have discovered why this humble braid has decorated homes for thousands of years.
Why Fall Is the Season for Garlands
Every season has its decoration, but autumn may love the garland best of all. A wreath crowns the door and a pumpkin guards the porch, yet the garland is the one that moves through your home, softening a mantel, trailing a staircase, framing a window.
There is also something deeply fitting about a harvest craft built from gathered bits. Autumn is the season of gathering, after all. The garland collects small pieces into a single, satisfying whole, the way the season itself collects the year's abundance before winter settles in.
Garlands are forgiving, too. Unlike a pie that must rise or a sweater that must fit, a garland has no wrong side.
If a leaf points the wrong way, if the spacing wobbles, it only looks more handmade, more honest.
For a busy mom carving out a rare quiet hour, that gentleness is the whole point.
What You'll Need: A Small Box of Supplies
One of the joys of garland-making is that the supply list stays humble. Gather what you have, then fill the gaps on one modest shopping trip.
Felt. Wool-blend felt in autumn shades holds its shape beautifully and costs little per sheet. Look for burnt orange, mustard, olive, rust, and cream. Acrylic felt works too and is machine-washable, which matters if a garland will live near little hands.
Fabric scraps. Old flannel shirts, worn denim, a tablecloth past its prime, baby clothes your children have outgrown. Rag garlands turn sentiment into decor, and the memories make them more precious than anything from a store.
Paper. Brown kraft paper, vintage book pages, sheet music, maps, or pages from a favorite magazine. Paper garlands are the lightest and the easiest for children to help with.
Twine, ribbon, or yarn. Jute twine suits a rustic look; satin ribbon feels more refined; chunky yarn gives a cozy, modern-farmhouse feel. All of them cost a few dollars.
Tools. Sharp scissors, a hot glue gun with extra sticks, a large-eyed needle, and thread that matches your felt. A sewing machine is a bonus for felt garlands, but hand-stitching works just as well and takes only a little longer.
That is genuinely all you need. Most garlands in this guide cost under ten dollars, and several cost nothing at all if you raid your craft basket first.
The Basic Garland Formula
Before the projects, learn the simple formula behind every garland, and you will never need a pattern again.
Measure your space first. A mantel garland looks best when it is one and a half times the width of the mantel, so it can drape and dip slightly.
A staircase swag wants roughly one foot of garland per stair. When in doubt, make it longer than you think you need, and trim the ends after hanging.
Choose one repeating shape. The eye loves repetition. A single leaf shape cut in four or five colors, repeated down a length of twine, looks intentional and polished. Beginners often scatter too many shapes and end up with clutter; trust the power of one beautiful shape.
Space your pieces evenly. Mark your twine with a piece of tape every six or eight inches, and attach one piece at each mark. Consistent spacing does more for the finished look than perfect cutting ever will.
Build in a loop at each end. Tie a small loop of twine at both ends of your garland. You will thank yourself at hanging time, when a loop slips over a nail or hook in seconds instead of requiring knots behind the mantel.
Project One: The Felt Leaf Garland
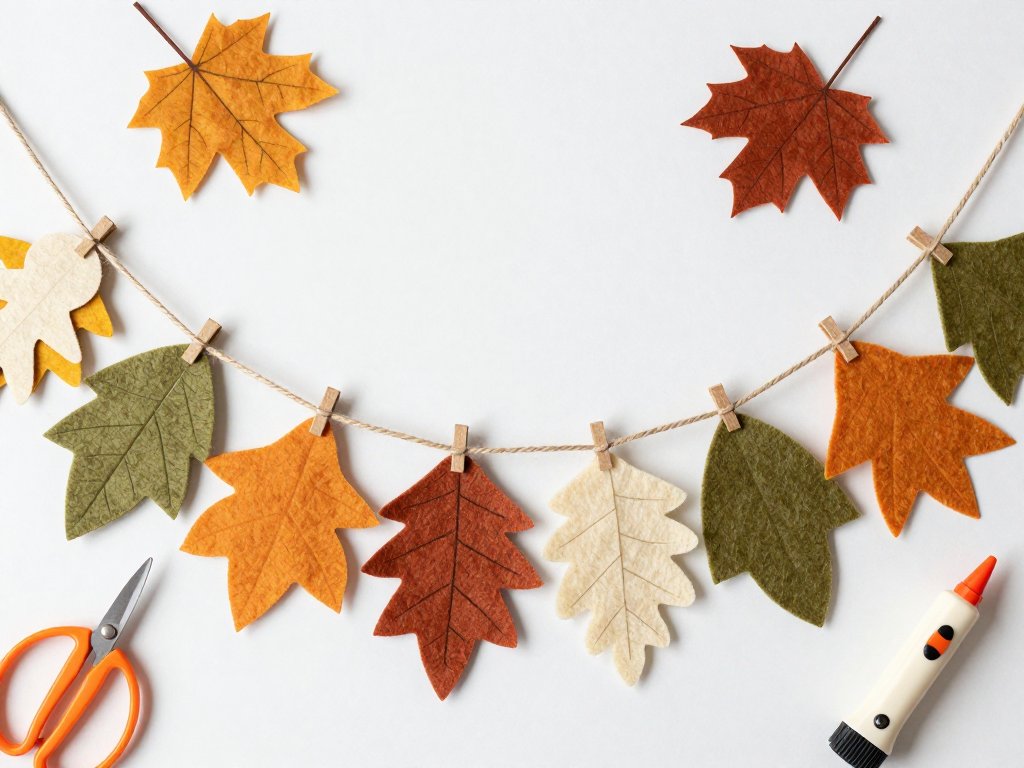
This is the classic, the garland most of us picture when we imagine autumn: a rope of warm felt leaves, gently curved like the ones drifting from maple trees. It takes about an hour and a half, and it will last for years if stored well.
Begin by drawing one simple leaf shape on cardstock. A maple leaf with five points is traditional, but an oak or birch leaf is easier for beginners, and a simple pointed oval reads as "autumn leaf" from across the room.
Cut out your cardstock template, then trace it onto felt in your chosen colors. You want about twenty to twenty-five leaves for a six-foot garland.
Cut each leaf with sharp scissors. Do not worry about perfection; felt hides tiny wobbles, and the slight variation between leaves is what makes handmade garlands charming.
To attach the leaves, you have two options. The sewing method: thread a large-eyed needle with embroidery floss, push it through the base of each leaf, and slide the leaf down onto your twine, leaving a small gap between leaves.
The glue method: fold a tiny tab of felt over the twine at each marked spot and glue the leaf over the tab, hiding the attachment completely.
For a finishing touch, stitch a center vein down the middle of each leaf with a running stitch in a slightly darker thread. It takes ten seconds per leaf and elevates the whole garland from cute to genuinely lovely.
Hang your felt garland on the mantel, drape it across a bookshelf, or wind it around a banister. Because felt is sturdy, you can pack it flat in a box each January and bring it out, as good as new, every autumn for years.
Project Two: The Fabric Scrap Rag Garland
Rag garlands are the no-sew wonder of the craft world, and they are the perfect way to honor a basket of fabric leftovers. They also come together faster than any other garland on this list, often in under an hour.
Cut your fabric into strips about one inch wide and six inches long. You do not need to measure each one; a rough cut is fine, and the frayed edges are part of the charm. Plaid flannel, denim, corduroy, and soft cotton knits all work beautifully together.
Take your twine and tie each strip around it in a simple knot, alternating colors as you go. Push each knot snug against the previous one so the garland looks full and plush. If you want a looser, airier look, leave a half-inch between knots.
This is the ideal project for a child who is old enough to tie shoes. The rhythm of cutting and knotting is soothing, and kids love seeing their old outgrown shirts become part of the family's autumn decor.
One caution: cotton fabric will shrink slightly if it gets wet, and direct sun fades denim and flannel over time. Keep rag garlands indoors, away from radiators, and they will look wonderful for several seasons.
Project Three: The Dried Citrus and Cinnamon Garland
This garland engages a sense the others cannot reach: smell. Thin slices of orange, dried slowly until translucent, catch the light like tiny stained-glass windows, and a few cinnamon sticks add a spice-rack warmth that fills a room.
Start with oranges, blood oranges, or lemons sliced about a quarter-inch thick. Lay the slices on a baking sheet lined with parchment and dry them in a 200-degree oven for two to three hours, flipping once, until they are dry but not browned.
Let them cool completely; they will feel slightly leathery, and that is exactly right.
Thread your twine through a large-eyed needle and pierce each citrus slice near the edge, stringing them like beads. Alternate orange slices with cinnamon sticks, which you can pierce with an awl or a thick needle, or simply tie on with small pieces of twine.
Add a few dried bay leaves or star anise between the slices for extra texture and scent. The finished garland looks at home on a kitchen window, a dining room sideboard, or over a doorframe where its fragrance greets everyone who enters.
Dried citrus garlands last one to two seasons. When the slices begin to fade or crumble, compost them and string a fresh batch; the making is as much fun as the hanging.
Project Four: The Paper Leaf Garland
Paper garlands are the lightest and airiest of all, and they are wonderfully democratic: even the youngest helper can contribute. This version uses folded paper leaves in a classic accordion style.
Choose your paper. Kraft paper dyed with a few drops of food coloring gives a lovely handmade look, while vintage book pages and sheet music add a nostalgic, literary feel that Eleanor of any era would approve of.
Old maps make a particularly handsome garland for a study or library corner.
Cut paper into squares, fold each square accordion-style, and pinch the middle to form a fan. Glue or staple the fan's center to your twine, then open the fan gently into a full circle for a round leaf, or leave it half-open for a teardrop shape.
Mix three sizes of fans along one strand for visual rhythm: large fans near the ends, smaller ones toward the middle. This is a trick interior designers use, and it instantly makes a paper garland look intentional.
Because paper is fragile, hang these garlands out of reach of toddlers and away from damp. They are inexpensive enough to make fresh every year, which many families prefer, folding new ones together as a cozy October tradition.
Project Five: The Pom-Pom and Tassel Garland
For a modern farmhouse look, nothing beats a garland of woolly pom-poms and silky tassels in warm neutral tones. It is plush, tactile, and somehow both rustic and sophisticated.
Pom-poms are easy with a simple cardboard ring or a store-bought pom-pom maker. Wrap yarn around the ring thirty to forty times, cut around the edge, and tie the center tightly with a length of yarn.
Fluff the result, trim any stragglers, and you have a perfect sphere of cozy. Make ten to twelve in cream, oatmeal, rust, and sage.
Tassels take five minutes each: wrap yarn around a small book or a piece of cardboard about fifteen times, slide it off, tie one end, and cut the other loop open. Attach each tassel and pom-pom to your twine with a simple knot or a stitch through the center.
Alternate the shapes, spacing them two to three inches apart so the garland reads as plush rather than crowded. A pom-pom garland draped across a nursery glider, a reading nook, or a bedroom headboard brings the same warmth to a room that a chunky knit blanket does.
Where to Hang It: Mantels, Stairs, and Doorways
A garland is only as good as its placement, and the good news is that a well-made garland flatters almost any spot.
The mantel. This is the classic home for a fall garland. Drape it across the top, letting the ends cascade down the sides, and layer it with a few candles and small pumpkins. The repetition of leaves or pom-poms behind the flame glow is pure autumn magic.
The staircase. Wind a garland around the banister, tucking it between the spindles at regular intervals. A rag or felt garland works best here because it survives the occasional brush of a small hand.
The doorway. Frame an interior doorway by draping the garland over the top corners, letting it swoop down both sides. Doorways are the forgotten canvases of home decor, and a garland turns an ordinary threshold into an invitation.
The window. A dried citrus garland across a kitchen window catches the afternoon light beautifully. Keep paper garlands away from radiators and steamy sills.
The bookshelf. Weave a felt garland between framed photos and stacked books. It softens hard edges and gives a shelf instant seasonal character without moving a single book.
Making It Last: Storage and Care
With a little thought at the end of the season, your garlands will greet you again next October, ready to hang.
Felt and fabric garlands are the hardiest. Coil them loosely, wrap them in tissue paper, and tuck them into a box with a few cedar chips or a lavender sachet. Moths love wool felt, and the lavender keeps them away without any chemical smell.
Paper garlands should be stored flat, between sheets of tissue in a shallow box. Never store them folded tightly, because the creases become permanent.
Dried citrus garlands will not keep indefinitely. Plan to refresh them every year or two; the spent slices compost beautifully, and a new batch is a pleasant first-of-October ritual.
Before storing anything, check for dust and give each garland a gentle shake outdoors. A soft brush works for felt. Whatever you do, resist the urge to "fix" the storage box in January; just close the lid, and let the garlands rest until the leaves turn again.
A Last Word
Every autumn, we are invited to slow down and notice the season, and a garland is a small, handmade answer to that invitation.
The Romans crowned their victors with laurel; Indian households string marigolds for their guests; and you, this weekend, will braid a little of your own story into felt, fabric, or paper, and hang it where your family can see it.
Start with one project, the one that calls to you, and let it be imperfect.
The slightly crooked leaf, the knot that slipped, the orange slice that dried a shade darker than the rest, these are not mistakes.
They are the evidence of your hands at work, and that is precisely what makes a handmade garland more beautiful than any store-bought strand.
When your garland is up and the candles are lit, take a moment to enjoy it.
Then, if the mood strikes, try another project from this list, or dream up one of your own.
Autumn is generous with time, and the braid is an old, patient craft. It will be waiting for you.
