Introduction
Every September, I tell myself the same thing: this is the year I make my own fall wreath. Then October arrives, I look at the price tags on the pretty ones at the store, and I change my mind again. Sound familiar?
Here is the good news: making a fall wreath is one of the easiest, most satisfying projects you can finish in a single afternoon.
You do not need a craft room, a hot glue gun you are afraid of, or a big budget.
You need a base, a handful of decorations, and about an hour of calm, quiet time.
This guide is written for absolute beginners. I will show you exactly what to buy, what you can skip, and how to put it all together so it looks intentional rather than accidental.
By the time you finish reading, you will have a clear plan for a wreath that makes your front door feel like a warm hug.
Why Make Your Own Fall Wreath?
Before we talk supplies, let us talk about why this project is worth your afternoon. There are three reasons I keep coming back to wreath making, season after season.
It costs a fraction of store-bought. A nice pre-made fall wreath can run anywhere from thirty to eighty dollars. Most DIY versions cost between ten and twenty-five dollars, and that is with brand-new supplies. If you use a secondhand base and foraged materials, you can do it for nearly nothing.
It is genuinely quick. Unlike knitting or pottery, wreath making gives you a finished object in one sitting. That instant gratification matters when your crafting time comes in small pockets between school runs and dinner prep.
It is completely personal. Your wreath can match your front door, your porch decor, and your taste. You can make it rustic, modern, playful, or elegant. No two handmade wreaths look alike, and that is the point.
Plus, there is something deeply satisfying about pulling into your driveway and seeing something you made with your own hands. It is a small daily win, and we all need more of those.
What You Will Need: The Complete Supply List
Here is exactly what you need to get started. I have organized this into must-haves and nice-to-haves so you can shop your own home first.
Must-haves:
- A wreath base (more on choosing one below)
- Floral wire or pipe cleaners (chenille stems work beautifully)
- Wire cutters or strong scissors
- A hot glue gun with glue sticks, or strong craft glue
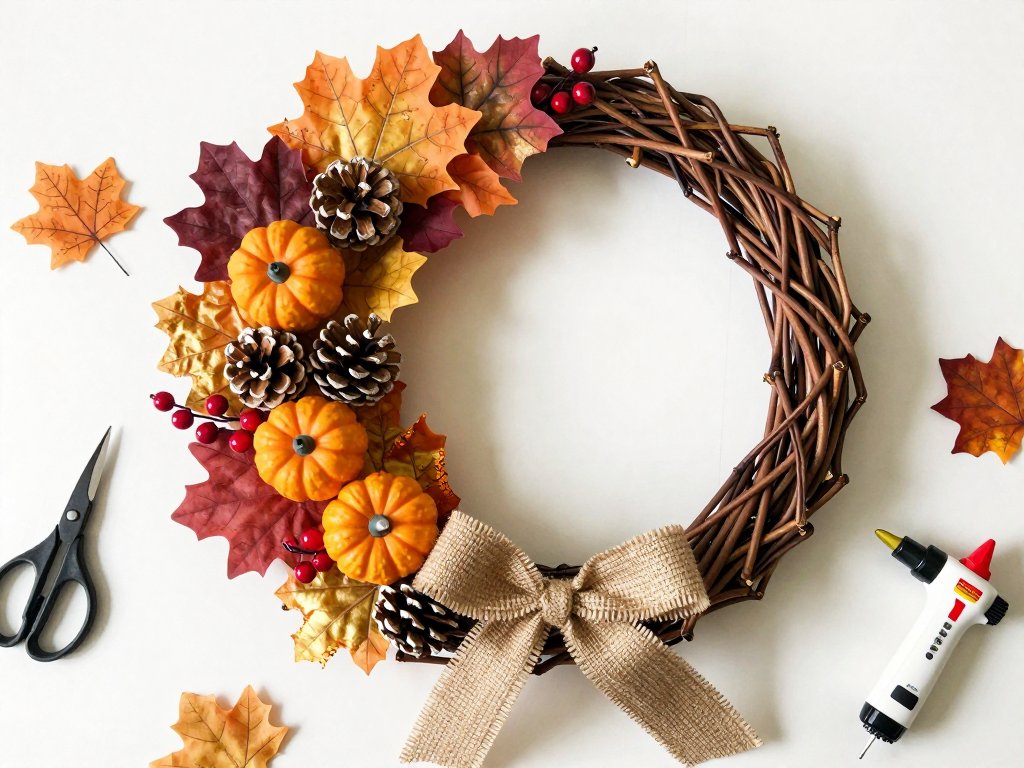
- Faux fall foliage: leaves, berries, mini pumpkins, or dried flowers
- A ribbon for the hanger and a bow
Nice-to-haves:
- A wreath hanger for your door
- Dried or foraged materials: oak leaves, pinecones, seed pods
- Small decorative touches: bells, wooden letters, burlap ribbon
- A work surface you do not mind getting glue on
Here is my best beginner tip: gather everything before you sit down. There is nothing worse than getting into a good crafting rhythm and realizing you need one more thing from the garage. Ten minutes of prep saves you from losing your flow.
Choosing Your Wreath Base
The base is the foundation of your wreath, and it sets the whole look. There are three main types, and each has a different personality.
Grapevine wreaths are my favorite for fall. They look rustic and natural, and they hide imperfections beautifully. Small gaps between decorations just look like part of the design. You can find them at craft stores, dollar stores, and thrift shops for a few dollars.
Foam wreath forms are smooth and lightweight, which makes them wonderful for beginners. You can wrap them in ribbon, burlap, or yarn, then pin or glue decorations on top. They are very forgiving if you change your mind mid-project.
Wire wreath frames are open metal circles. They are the most flexible option because you can weave foliage through the gaps, but they take a little more practice to fill evenly. Save these for your second or third wreath.
If you are not sure which to choose, start with grapevine. It does the most work for you, and it looks expensive even when it cost four dollars at a discount store.
Picking a Fall Color Palette
Here is the secret to a wreath that looks designer-made: limit your color palette. A wreath with every color of autumn can look chaotic. A wreath with two or three coordinated colors looks intentional.
Classic harvest: deep orange, burgundy, and gold. This is the traditional fall look, and it pairs beautifully with a grapevine base.
Modern neutral: cream, beige, and dried grass tones with a single pop of rust. This trend has been everywhere lately, and it works on both farmhouse and modern doors.
Moody autumn: deep plum, forest green, and bronze. This palette feels richer and slightly more dramatic, perfect for October evenings.
Playful harvest: mustard yellow, sage green, and soft peach. This is a cheerful, unexpected take on fall that reads as fresh and friendly.
When you are shopping for faux stems, try to buy within your chosen palette. It feels restrictive at first, but you will thank yourself when you step back and see how put-together the finished wreath looks.
Decorating Materials: From Faux to Foraged
You have two main routes for your decorations, and you can absolutely mix them.
Faux foliage is the most reliable option. Modern faux leaves and berries look remarkably real, and they last for years.
Look for stems with wire inside, because you can bend them into the shape you need and they will stay put.
Craft stores put their fall lines out early, and the best selection goes fast.
Foraged materials are free and personal. A walk around your neighborhood can yield oak leaves, pinecones, acorns, dried hydrangea heads, and interesting seed pods.
Press the leaves flat in a heavy book for a few days if you want them to lie neatly.
Just remember that natural materials will fade and crumble eventually, so plan to refresh them each season.
Dried flowers and grasses sit somewhere in between. Dried bunny tails, wheat, and lavender add lovely texture and a soft, romantic feel. You can buy them cheaply at craft stores or dry your own from summer bouquets.
My rule of thumb is simple: choose two textures and stick with them. Leaves plus berries is a classic. Pinecones plus dried grass is rustic. Mini pumpkins plus burlap is cozy. Two textures keep the wreath from looking cluttered.
Step-by-Step: Building Your Wreath
Now for the fun part. Here is the exact process I use for every wreath, whether it is my first of the season or my tenth.
Step 1: Lay everything out. Arrange your stems and decorations around your base on the table, mimicking where you want them to go. This is called dry-laying, and it takes two minutes. It saves you from gluing something down and immediately regretting it.
Step 2: Make your hanger first. Before you add any decorations, attach your ribbon hanger to the back of the base. Tie a loop of ribbon or wire around the top, and secure it well. Once the front is covered, you cannot reach the back easily.
Step 3: Add the greenery. Start with your largest pieces, usually the leaves or greenery stems. Tuck the stems into the grapevine or wire them onto the base, working around the circle in one direction. Overlap each piece slightly with the one before it so no bare spots peek through.
Step 4: Layer in your focal pieces. Now add your berries, mini pumpkins, pinecones, or flowers. Place these in small clusters of three, spaced unevenly around the wreath. Uneven spacing looks more natural than perfect symmetry, so do not overthink it.
Step 5: Fill the gaps. Walk around the wreath and look for any bare areas. Add small accents to fill them: a sprig of berries here, a single leaf there. This step is what separates a finished wreath from a half-finished one.
Step 6: Add the bow and step back. Attach your bow near the top or bottom of the wreath, whichever you prefer. Then hold the wreath at arm's length and give it a good look. Adjust anything that feels off balance.
That is the whole process. It really is that simple.
Five Easy Fall Wreath Ideas to Try
Once you have the basic technique down, the possibilities are endless. Here are five beginner-friendly variations, ordered from simplest to most involved.
1. The Classic Berry and Leaf Wreath. A grapevine base, two shades of faux leaves, and a handful of berry stems. This is the perfect first wreath, and it goes with almost any door color.
2. The Mini Pumpkin Wreath. Skip the foliage and cover a foam base with small faux pumpkins in your chosen palette. Hot glue them on in rows, then add a burlap bow. It looks like something from a boutique.
3. The Burlap and Pinecone Wreath. Wrap a foam base in burlap ribbon, then glue pinecones around the circle. Add a few cinnamon sticks for a lovely scent. This one is practically free if you forage the pinecones.
4. The Foraged Nature Wreath. Use only materials you found on a walk: leaves, acorns, seed pods, and dried grass. This one is the most personal, and it tells a story about your neighborhood and your season.
5. The Modern Neutral Wreath. Choose cream and beige tones with dried grasses and a single rust-colored accent. Add a simple, oversized bow in a matching tone. This look is trending and photographs beautifully.
Pick the one that excites you most, and know that every one of these can be finished in an afternoon.
Getting Kids Involved: Family-Friendly Touches
Wreath making is a wonderful project to share with children, and there are easy ways to make it kid-safe and kid-fun.
Give them their own mini wreath. A small grapevine base, a few stems of leaves, and child-safe glue are enough to keep little hands busy while you work on the main wreath.
Send them on a foraging mission. Kids love hunting for pinecones, acorns, and interesting leaves. Give them a paper bag and let them curate the nature collection. You can use their finds in the wreath and tell them exactly where each piece came from.
Let them place the bow. The bow is the most visible piece, and letting a child choose its spot gives them ownership of the finished project. If they move it three times, that is fine. It is their wreath too.
Keep the hot glue to yourself. Glue guns get dangerously hot, so handle all gluing yourself. Kids can sort materials, hand you pieces, and arrange the dry layout on the table, which is where the real decision-making happens anyway.
A wreath made with little helpers will not be perfect. It will be better than perfect: it will be full of memory. Every time you walk past the door, you will remember the afternoon you spent making it together.
Caring for and Storing Your Wreath
A well-made wreath can last for many seasons if you treat it kindly. Here is how to keep yours looking fresh.
Protect it from the weather. If your wreath lives on an uncovered door, expect some fading and dust. A light coat of clear spray sealer can help faux greenery resist the elements. If your wreath uses foraged materials, consider bringing it inside on stormy days.
Fluff it occasionally. Faux stems get squished in storage. When you hang the wreath each year, spend two minutes bending the leaves and berries back into shape. It makes a huge difference.
Store it flat in a box. At the end of the season, place the wreath in a large box or garment bag and store it flat, not hanging. Hanging storage squashes the bottom over time. A layer of tissue paper between the wreath and the box lid protects the bow.
Refresh instead of rebuild. Next year, you do not have to start from scratch. Swap the bow, add a few new stems, or change the mini pumpkins for a different color. A fifteen-minute refresh makes the wreath feel brand new.
Final Thoughts
Your first fall wreath does not need to be perfect. It needs to be made, and it needs to make you smile when you see it on your door.
Start simple. Choose a grapevine base, two or three colors, and one or two textures. Follow the steps, step back, and adjust. Then hang it up, make yourself a cup of tea, and enjoy the view from the porch.
And when someone compliments your wreath, and they will, you get to say those wonderful words: thank you, I made it myself.
Happy crafting, and welcome to the wreath-making club. Your front door is about to look a whole lot more like autumn.