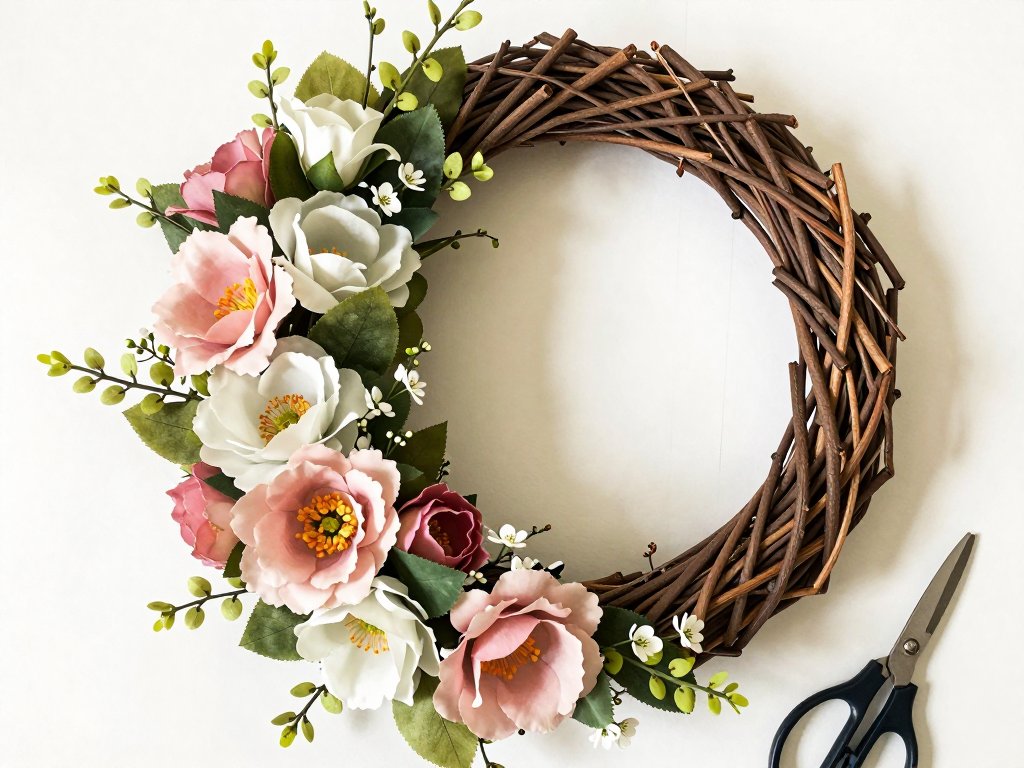
Why a Farmhouse Spring Wreath Belongs on Your Door
The first thing I do every spring—before I even pull out my gardening gloves or dig through the shed for the patio cushions—is swap my wreath. All winter long a pine and evergreen wreath has been hanging on the front door, looking perfectly seasonal and smelling faintly of the forest. But come March, when the last of the frost melts away and the daylight lingers just a little longer, I feel a deep pull to refresh that first impression. The front door wreath is the very first thing guests see, and honestly, it is the first thing I see every single time I come home with an armload of groceries or after a long day running errands. It matters.
A farmhouse spring wreath hits a sweet spot that few other decorations can claim. It is cheerful without being saccharine. It feels intentional and curated without looking like you spent a fortune at a boutique. And it whispers spring in that gentle, welcoming way that farmhouse style is known for—think weathered wood, soft sage greens, faded blush pinks, and creamy whites rather than the electric neons and shock-bright yellows you might find in a more modern spring display.
I started making my own wreaths about seven years ago, back when my youngest was still napping and I had a little pocket of afternoon quiet to myself. My first attempt was a mess, honestly. The flowers were glued on so heavily that the wreath looked like it had exploded in a craft store, and the bow I tied was lopsided enough that my husband gently suggested I might want to rearrange things. But that first wreath hung on my door for two full seasons because I was proud of it, imperfections and all. And somewhere along the way, I figured out the rhythm of it—the right way to prep a base, the way to layer flowers so they look natural rather than staged, and the secret to a bow that actually holds its shape.
Today I want to share everything I have learned so you can make your own farmhouse spring wreath without the frustration, without spending a small fortune, and with a result you will be genuinely proud to hang on your door. Whether you are a complete beginner who has never held a glue gun or a seasoned crafter looking for fresh ideas, this guide will walk you through every single step.
Understanding the Farmhouse Spring Aesthetic
Before we talk about specific materials and techniques, let's get clear on what makes a wreath feel farmhouse rather than just springy. Farmhouse style, at its heart, is about simplicity, natural textures, and a sense of welcome. It is not fussy or overly ornate. It does not try to impress with glitter or gimmicks. Instead, it relies on the beauty of real materials—or convincing faux ones—arranged with intention and restraint.
For spring, the farmhouse palette tends toward soft, muted versions of traditional spring colors. Think of the colors you would find in an old farmhouse garden at the beginning of May: the pale pink of peonies just starting to open, the silvery green of lamb's ear leaves, the creamy white of daffodils, the dusty blue of a faded barn door. These are not the bright primary colors of a child's Easter basket. They are the colors that feel grounded, nostalgic, and soothing.
Texture plays a huge role too. A farmhouse spring wreath should mix soft elements like cotton blooms or velvet leaves with rougher elements like grapevine, rattan, burlap, or twine. That contrast between smooth and rough, between delicate and sturdy, is what gives farmhouse decor its signature warmth. When you look at a farmhouse wreath, you should want to reach out and touch it—and that tactile quality comes from choosing materials that feel as good as they look.
Choosing the Right Wreath Base
The foundation of any great wreath is its base, and this choice matters more than most people realize. I have made wreaths on three different types of bases over the years, and each one gives a completely different result. Let me walk you through the differences.
Grapevine Wreath Bases
Grapevine is the classic farmhouse choice, and for good reason. These bases are made from twisted, dried grapevines that create a natural, rustic texture. The irregular, organic shape of a grapevine wreath is part of its charm—no two are exactly alike. The vines have little gaps and crevices that make it incredibly easy to tuck in stems of flowers, leaves, and other decorations without needing glue for every single piece. You can simply push the stem into the vines and let the natural tension hold it in place.
Grapevine bases come in a range of sizes, typically from 12 inches up to 24 inches or more. For a standard front door, I recommend an 18-inch or 20-inch wreath. That size is large enough to make a statement without overwhelming the door or competing with the house numbers and door hardware. You can find grapevine wreaths at craft stores like Hobby Lobby and Michaels, often for around $8 to $15 depending on the size. During spring clearance sales, I have snagged them for as little as $4.
One thing to know about grapevine: it does shed a little. When you first unwrap your wreath, you will probably find a few tiny twigs and bits of dried vine on your workspace. That is totally normal. I like to give my grapevine base a gentle shake outdoors before I start working with it, just to get the loose pieces out of the way. You will also notice that grapevine is somewhat flexible—you can gently bend and shape it to fit your vision, though you should be careful not to snap the vines.
Foam Wreath Bases
Foam bases (usually made from styrofoam or floral foam) are the most common alternative to grapevine. They are light, inexpensive, and perfectly uniform in shape. A foam base gives you a smooth, even surface that is very easy to work with—you can push flower stems directly into the foam, and hot glue adheres to it beautifully.
However, foam wreaths do not have the same farmhouse aesthetic as grapevine. Because the base is completely hidden under your decorations, it does not contribute to the overall look. That can be an advantage if you are planning a very dense, full wreath where no base shows at all. But for a farmhouse spring wreath, where you generally want some of the natural base to peek through the greenery and flowers, grapevine is the better choice. I reserve foam bases for projects where I know I will be covering every square inch—like a holiday wreath covered in ornaments or a monogram letter wreath.
Wire Wreath Frames
Wire wreath frames are exactly what they sound like: shaped wire in a circular form, usually with multiple rings or a single thick wire. They are most commonly used for making wreaths from scratch with things like deco mesh, ribbon, or garlands wrapped around the frame. Wire frames are sturdy and reusable, but they require you to fully construct the wreath body yourself rather than decorating a pre-made base.
For our farmhouse spring wreath, I recommend starting with a grapevine base. It gives you the most authentic farmhouse look with the least effort, and its natural texture pairs beautifully with the soft spring colors we will be using. If you cannot find grapevine locally, a foam base wrapped in a thin layer of natural burlap can serve as a decent substitute.
Materials You Will Need
Here is a complete list of everything you need to make a beautiful farmhouse spring wreath. I have organized it into categories to make your shopping trip easier. Most of these items are available at any major craft store, and many can be found at dollar stores or discount retailers for a fraction of the price.
Base and Structure
- Grapevine wreath base – 18 to 20 inches in diameter
- Floral wire – 22-gauge or 24-gauge, preferably on a paddle for easy dispensing
- Wire cutters – A good pair that can cut through both thin floral wire and thicker faux flower stems
- Hot glue gun and glue sticks – Low-temperature is safer and works fine for most faux flowers; high-temperature gives a stronger bond for heavier elements
Greenery and Foliage
- 2 to 3 bunches of eucalyptus stems – Seeded eucalyptus has lovely texture; silver dollar eucalyptus adds nice round leaves; true blue eucalyptus brings a cool green tone
- 1 to 2 bunches of fern or lambs ear – These add soft, feathery texture that balances the roundness of flowers
- 1 bunch of Italian ruscus or similar trailing greenery – Great for adding movement and a relaxed, natural feel
Flowers
- 2 to 3 bunches of cream or white blooms – Roses, peonies, or ranunculus work beautifully. Look for stems with multiple flower heads so you get more coverage per stem
- 1 to 2 bunches of blush pink flowers – Peonies are ideal for farmhouse style; garden roses or tulips are also lovely
- 1 bunch of sage green or dusty blue accent flowers – Hydrangea heads in soft sage or dusty blue add wonderful volume and color depth
- Small filler blooms – Baby's breath, wax flowers, or tiny spray roses in white or cream
Ribbon and Embellishments
- Burlap ribbon – 2.5 to 4 inches wide, in natural tan or whitewashed. Burlap is the quintessential farmhouse ribbon choice
- Linen or cotton ribbon – A soft cream or sage green ribbon adds a refined touch alongside the burlap
- Twine or jute string – For hanging or adding small accents
- Wooden sign or cutout (optional) – A small oval or rectangular wood piece with a spring saying like "Hello Spring" or "Welcome" adds instant farmhouse charm
- Small wooden beads or buttons (optional) – These make wonderful subtle accents tucked into the greenery
Tools and Supplies
- Wire cutters – For trimming stems and cutting wire
- Hot glue gun and glue sticks
- Floral tape – Useful for bundling small stems together before inserting into the base
- Scissors – Sharp ones for cutting ribbon
- Command outdoor strip or wreath hanger – For hanging your finished wreath securely on the door
- Newspaper or drop cloth – To protect your work surface from hot glue drips
Color Palette Guidance for a Farmhouse Feel
The colors you choose will set the entire tone of your wreath. Farmhouse spring palettes tend to be calming and cohesive rather than jarring or overly varied. Here are three proven color combinations that always work well together.
The Classic Blush, Cream, and Sage
This is my go-to combination and the one I recommend for anyone making their first farmhouse spring wreath. Start with plenty of greenery in varying shades of green—sage, eucalyptus blue-green, and olive. Layer in cream and white flowers as your main blooms. Then add blush pink flowers as accent pops about a third of the way through the arrangement. The blush adds warmth and softness without overwhelming the neutral tones.
This palette works beautifully because it mirrors the colors you would actually see in a spring garden. It is gentle on the eyes and goes with almost any door color. I have used this combination on a navy blue door, a bright red door, and a natural wood door, and it looked lovely on each one.
The Cream and Greenery Minimalist
If you prefer a more restrained look, go with an all-white-and-green palette. Use cream roses, white ranunculus, and soft white baby's breath against a backdrop of eucalyptus, fern, and olive branches. The key to making this palette work is texture variety—because there is less color contrast, you need interesting shapes and leaf forms to keep the eye engaged. Mix round leaves with spiky ones, large blooms with tiny sprays, and glossy foliage with matte surfaces.
This palette is particularly striking on a dark door, where the pale flowers really pop against the deep background. It also transitions beautifully from spring into early summer without needing any changes.
The Dusty Blue and Lavender Accent
For something a little different, try building your wreath around cream and green and then adding accents in dusty blue and soft lavender. These colors are still within the farmhouse family—they are muted and grayed rather than bright—but they add a vintage, romantic quality that feels completely fresh. Dusty blue hydrangea heads are my favorite way to incorporate this color, and lavender sprigs add a lovely scent if you use real dried lavender.
Step-by-Step: Building Your Farmhouse Spring Wreath
Now we get to the fun part. Set up your workspace with good lighting and plenty of room to spread out. Lay your newspaper or drop cloth down, arrange your materials nearby, and make sure your glue gun is plugged in and heating up. Take a deep breath. We are going to take this slowly, one step at a time.
1 Prepare Your Wreath Base
Start by examining your grapevine wreath. If it has a hanging loop already attached, check that it is secure. If not, you will want to add one before you start decorating, because it is much harder to thread a hanger through a fully decorated wreath. Cut a 12-inch piece of twine or floral wire, thread it through the grapevine at the top of the wreath, and twist the ends together to form a loop. Tuck the twisted ends into the grapevine so they are hidden.
Next, fluff your wreath. Grapevine often arrives slightly compressed from packaging. Gently pull apart the vines in a few places to create natural gaps where you can tuck stems later. Do not force it too much—you just want to loosen the structure a little and make it easier to work with.
2 Create a Greenery Base Layer
The greenery is going to be the backdrop for your flowers, so start here. Take your eucalyptus stems and use your wire cutters to cut them into smaller sprigs, about 4 to 6 inches long. You will get several usable pieces from each stem. Trim the leaves off the bottom inch of each sprig so the bare stem can be inserted into the grapevine or secured with floral wire.
Begin placing the greenery around the wreath in a consistent direction. I like to work in one direction around the circle, placing each new sprig so it overlaps the previous one slightly. This creates a layered, natural look. Tuck the bare stems into the grapevine gaps as deeply as you can. If a stem feels loose, secure it with a small piece of floral wire twisted around the grapevine. You do not need glue for this layer—wire and tucking will hold everything in place.
Work your way around the entire wreath, stepping back every few stems to check your coverage. You want the greenery to be full enough that no large patches of bare grapevine are showing, but you also want some of the vine's natural texture to peek through. Think of it as 70 percent coverage, not 100 percent. The bare spots will be filled with flowers later.
3 Add Your Focal Flowers
Now come the flowers that will draw the eye. These are your largest, showiest blooms—the cream peonies or roses that will serve as the anchor points of your arrangement. I recommend using three to five focal flowers spaced unevenly around the wreath. An odd number of focal points is more visually interesting than an even number.
To prepare each flower stem, cut it to about 3 to 4 inches long with your wire cutters. Remove any leaves that would end up below the flower head, since you do not want foliage sticking out awkwardly from under the bloom. If the flower has multiple blossoms on one stem, you can either use the whole stem as a cluster or cut it into individual flowers.
Position your first focal flower at the bottom center of the wreath (roughly the 6 o'clock position). This gives the wreath a natural weight and anchors the design. Insert the stem into the grapevine, pushing it deep enough that the flower head sits just above the greenery. If the stem is not staying put, add a dab of hot glue where the stem meets the grapevine, hold it for 10 seconds, and release.
Place your second focal flower at roughly the 10 o'clock position and your third at roughly the 2 o'clock position. If you are using four or five, add one at the top center (12 o'clock) and one more between existing flowers. Vary the angles slightly—some flowers facing forward, some tilted a little to the side—to give the arrangement a natural, organic feel.
4 Layer in Accent Flowers
With your focal flowers in place, it is time to add your blush pink blooms and other accent flowers. These should be placed near the focal flowers but slightly offset, creating clusters of color rather than isolated single blooms. For example, if your cream peony is at the 6 o'clock position, place a blush tulip or ranunculus just to its left or right, slightly lower or higher than the main bloom.
The principle here is layering. Think of your wreath as having a front, a middle, and a back plane. The greenery and larger stems are the back plane. The focal flowers are the middle plane. The accent flowers and small filler blooms are the front plane, adding depth and dimension. If all your flowers are at the same height, the wreath will look flat. By varying the depth, you create a lush, garden-inspired arrangement that draws the viewer in.
Continue adding accent flowers until the wreath feels balanced. Step back often to check the overall shape. A common mistake is to work too densely in one area and leave another area sparse. Walk around the wreath, rotate it on your work surface, and look at it from different angles.
5 Fill in with Texture and Detail
This is where your wreath goes from pretty to gorgeous. Take your small filler blooms—baby's breath, wax flowers, or tiny spray roses—and tuck them into the gaps between your larger flowers. These little accents fill the empty spaces and soften the transitions between different flower types.
Do not overlook the value of foliage-only filler sprigs here. A few extra pieces of fern or lambs ear tucked in around the flower clusters can make everything feel more cohesive. I also like to add a few small wooden beads threaded onto thin wire and tucked into the arrangement. They add a subtle farmhouse touch without competing with the flowers.
If you are using a wooden sign or cutout, now is the time to decide where it will go. I usually place a small wooden sign near the bottom of the wreath, nestled among the flowers and greenery so it looks like it belongs there rather than being an afterthought. Secure it with wire threaded through the grapevine behind the sign. A dab of hot glue on the back of the sign where it touches the grapevine adds extra security.
6 Tie the Perfect Farmhouse Bow
A beautiful bow can make or break a wreath. I spent years making sad, floppy bows before I learned the technique that professional florists use, and I promise it is simpler than you think. Let me walk you through it.
Cut a piece of burlap ribbon about 36 inches long and a piece of linen or cotton ribbon about 30 inches long. Lay the linen ribbon on top of the burlap so they are stacked together. Find the center point of the stacked ribbons and pinch it between your thumb and forefinger.
Create your first loop by bringing the ribbon up and over your pinched fingers, making a loop about 6 inches long. Pinch the base of the loop to hold it. Repeat on the other side to create a second loop of the same size. You should now have a figure-eight shape in your hand, with two loops and two tails hanging down.
Now add a second layer of loops on top of the first, making them slightly smaller—about 4 inches. This gives the bow a full, layered look. You can add a third layer too if you want a really lush bow, but two layers is plenty for a farmhouse style.
Once all your loops are arranged the way you like them, wrap a piece of floral wire tightly around the pinched center point. Pull it snug and twist the wire ends together. Do not cut the wire—you will use the tails to attach the bow to the wreath.
Fluff and separate the loops, adjusting them until the bow looks full and even. Trim the ribbon tails at an angle, letting some hang longer than others for a relaxed feel. Take your bow to the wreath and decide where you want it. I usually place my bow at the bottom or offset to one side near the bottom. Thread the wire tails through the grapevine and twist them securely on the back of the wreath.
7 Secure Everything and Add Hanging Hardware
Before you declare your wreath finished, take a few minutes to check every element. Gently tug on each flower stem, each greenery sprig, and each embellishment. If anything moves or feels loose, add a dab of hot glue or tighten the floral wire. There is nothing sadder than watching a beautiful flower tumble off your wreath the first time a breeze hits the door.
Turn the wreath over and check the back. Trim any wire ends that are poking out so they will not scratch your door. Tuck any loose stems or glue strings out of sight. If you used a lot of hot glue, make sure no glue blobs are visible from the front.
For hanging, I recommend using a Command outdoor wreath hook or a simple over-the-door wreath hanger. Command strips are great because they do not damage the door and they hold securely even in wind and rain. If you prefer a more traditional look, a decorative wrought-iron wreath hanger adds to the farmhouse aesthetic.
Tips for Making Your Wreath Look Professional
Over the years I have picked up a handful of tricks that separate an amateur-looking wreath from one that draws compliments from every visitor. Here are my best ones.
Work in threes. Grouping elements in odd numbers—three roses, three eucalyptus sprigs, three accent blooms—creates a more natural, balanced look than pairing things in twos. Nature rarely arranges things symmetrically, and neither should your wreath.
Vary your flower heights. If every flower sits at exactly the same depth, the wreath looks flat. Push some blooms deep into the greenery and let others sit higher. Create dimension by placing a low cluster and a high cluster in the same area.
Use the "one-third rule." Your wreath should be roughly one-third greenery, one-third large blooms, and one-third accent flowers and fillers. This proportion creates visual interest without any single element overwhelming the others.
Do not glue everything. Wherever possible, use the natural grip of the grapevine or floral wire to hold elements in place. Glue is permanent, and you might want to swap out a flower later. By using wire and tucking techniques, you make your wreath reusable and adjustable across seasons.
Step back frequently. I cannot emphasize this enough. It is easy to get tunnel vision when you are working up close. Every five to ten minutes, set the wreath down, walk a few feet away, and look at it from a distance. This will immediately show you any imbalances, bare spots, or areas where the arrangement is too heavy.
Photograph your progress. Take a picture of your wreath at each major step. Photos give you an objective view of the arrangement and help you catch things you miss with your eyes alone. Plus, it is fun to look back at the process once you are done.
Seasonal Variations: Spring, Summer, and Fall
One of the best things about making your own wreath on a grapevine base is that you can easily adapt it for different seasons with just a few changes. The base and greenery stay the same; you swap out the flowers and accents to match the time of year.
Spring Wreath (March through May)
This is the wreath we have been building today. Soft pastels, lots of greenery, natural textures. Use blush and cream blooms, eucalyptus, burlap, and subtle wooden accents. The overall vibe is fresh and gentle, like the first warm day after a long winter.
Summer Wreath (June through August)
For summer, punch up the color palette while keeping the farmhouse feel. Replace blush flowers with sunny yellows, bright whites, and pops of coral or peach. Add sunflowers as focal blooms—they are quintessentially summer and have wonderful farmhouse energy. Swap the burlap ribbon for a crisp cotton ribbon in navy and white stripes or a gingham pattern. You can also incorporate dried grasses, wheat stalks, or small faux lemons for a summer citrus farmhouse look.
Fall Wreath (September through November)
Fall is where farmhouse style really shines. Switch to a warm palette of burnt orange, deep burgundy, mustard yellow, and rust. Use dried hydrangea heads, faux wheat bundles, small pumpkins or gourds, and cinnamon stick bundles. Replace the eucalyptus with preserved oak leaves or magnolia leaves for a richer texture. A plaid or buffalo-check ribbon in rust and cream is a classic farmhouse fall choice. And do not forget small wooden signs—"Give Thanks" or "Hello Fall" are always popular.
The beauty of this system is that you only need to buy a new set of flowers and accents each season while reusing the same grapevine base and greenery. Over time, your initial investment in a good base pays for itself many times over. I have been using the same 18-inch grapevine wreath for three years now, rotating it through the seasons with fresh flowers and ribbons.
Why Handmade Wreaths Mean More
There is a moment every time I finish a wreath when I step back and just look at it. It is a small moment, barely a few seconds, but it is mine. In a world where we can buy almost anything with a tap on our phone and have it delivered to our doorstep within days, there is something quietly radical about choosing to make something with our own hands. It takes time. It requires patience. It does not always turn out exactly the way we imagined. But that is the whole point.
The wreath on your door did not come off a factory assembly line. It was shaped by your choices—the flowers you picked, the way you clustered them, the bow you tied, the little imperfections that make it yours. Every time you walk past it, you will remember the afternoon you spent arranging eucalyptus and roses, the feel of the grapevine under your fingers, the heat of the glue gun, the satisfying moment when everything clicked into place.
That is what farmhouse style is really about, I think. It is not a shopping list of specific products or a strict set of design rules. It is a feeling of home. Of making do with what you have. Of finding beauty in natural materials and honest craftsmanship. A handmade wreath captures all of that in a way that a store-bought one never can.
Conclusion
Creating a farmhouse spring wreath is one of the most rewarding projects you can tackle as a home crafter. It is affordable, achievable for beginners, and endlessly customizable. With a good grapevine base, a handful of faux flowers and greenery, a few basic tools, and about two hours of your time, you can transform a bare front door into a warm, welcoming entryway that celebrates the season.
I encourage you to start with the classic blush, cream, and sage palette I shared above. It is forgiving, beautiful, and unlikely to go wrong. As you gain confidence, experiment with different color schemes, add new textures, and make each wreath reflect your personal style. The skills you learn making this spring wreath will carry you through all the seasons to come.
And please, do not stress about perfection. Your wreath does not need to look like it belongs in a magazine. It needs to look like it belongs on your door. If the bow is a little crooked or the flowers are not perfectly spaced, that is fine. That is handmade. That is yours. Hang it up, step back, and smile. You made that. And that is something to be proud of.
Happy crafting, friends. I cannot wait to see what you create.

