Introduction
There is a decorating style that feels like a hug. It is warm, handmade, and a little whimsical, and it has a name worth knowing: folklectic.
Folklectic blends folk art with eclectic styling. Think hand-painted hearts and tulips sitting happily next to a clean modern sofa. It pairs the charm of grandmother's kitchen with the fresh look of today's homes.
The best part is that you do not need to shop for it. Folk art is meant to be made by hand, and almost every piece in this style starts with simple supplies and a few hours of your time.
This guide gives you the style basics, four beginner-friendly projects, and simple ways to style your finished pieces. By Sunday night, your home will have a brand-new handmade feel.
What Makes Folk Art, Folk Art
Folk art is art made by everyday people, not trained artists. It is honest, direct, and full of personality. Understanding a few of its signatures will help every project you make.
Look for simple, flat shapes. Folk artists draw from memory rather than life, so forms are simplified and sweet. A bird may be two curves and a dot, and that is exactly the point.
Colors are bold and happy. Tomato red, mustard yellow, sage green, sky blue, and cream show up again and again. These are colors that come straight from the garden and the pantry.
Motifs repeat across cultures. Hearts, tulips, suns with rays, stars, birds, houses, and flowering urns appear in folk traditions from Scandinavia to Mexico to the American countryside.
Imperfection is welcome. Wobbly lines and uneven petals are what give folk art its warmth. If your heart is slightly lopsided, you have succeeded.
Supplies for Folk Art Decor
Folk art projects are wonderfully affordable. Here is the starter kit that covers almost everything in this guide.
Materials to gather:
- Wood cutouts, craft wood, or thick cardboard for painting
- Craft acrylic paint in a folk palette: red, mustard, sage, sky blue, cream
- White gesso or white craft paint for priming
- Flat brushes in small and medium sizes
- A liner brush for fine details and dots
- Painter's tape and a foam plate for a palette
- Muslin, gingham, or linen fabric scraps
- Fabric paint or textile medium
- Sandpaper, tacky glue, and picture hangers
Thrift stores are gold mines for this craft. Wooden trays, cutting boards, and picture frames wait there for a folk art makeover. You will spend a few dollars instead of a few dozen.
Set up your painting space with paper towels and a cup of water. Folk painting is forgiving, but clean brushes and thin paint make every stroke easier.
Look for inspiration in the world around you. Quilt patterns, vintage dishware, and old postcards are full of folk motifs you can borrow. Photograph ones you love and keep the pictures in your craft space.
Five Folk Motifs to Try First
If you are not sure what to paint, start with these five classics. Each one is simple, and each one reads instantly as folk art.
The tulip. Draw a stem, add two leaves, and cap it with three petals. Tulips symbolize spring and new life, and they appear in folk traditions around the world.
The heart. Paint a solid heart, then add a smaller contrasting heart inside it. Hearts are the friendliest motif in folk art and the easiest to make symmetrical.
The sun. A circle with straight rays around it brings cheer to any piece. Try it in mustard yellow on a sky blue background for a classic pairing.
The bird. Keep it simple: an oval body, a small head, a beak, and a tail. Two dots for an eye and a wing give it all the personality it needs.
The flowering urn. Draw a small pot, then add three stems with blooms above it. This motif fills a tray or box lid beautifully and feels very traditional.
Practice each motif on paper before you paint your project. Ten minutes of practice will make your final piece look confident and clean.
Project 1: Painted Folk Heart Wall Hanging
A painted heart is the gateway project of folk art. It teaches priming, base coating, and the dotted details that make folk pieces sing.
You will need: a wooden heart cutout, gesso, folk colors, a flat brush, and a liner brush.
Sand the wood lightly, then brush on a coat of gesso. Gesso gives you a smooth, bright surface that makes paint colors pop. Let it dry, and add a second coat if the wood grain shows through.
Paint the heart your base color, such as cream or sky blue. Two thin coats look better than one thick coat. Let each coat dry completely before the next.
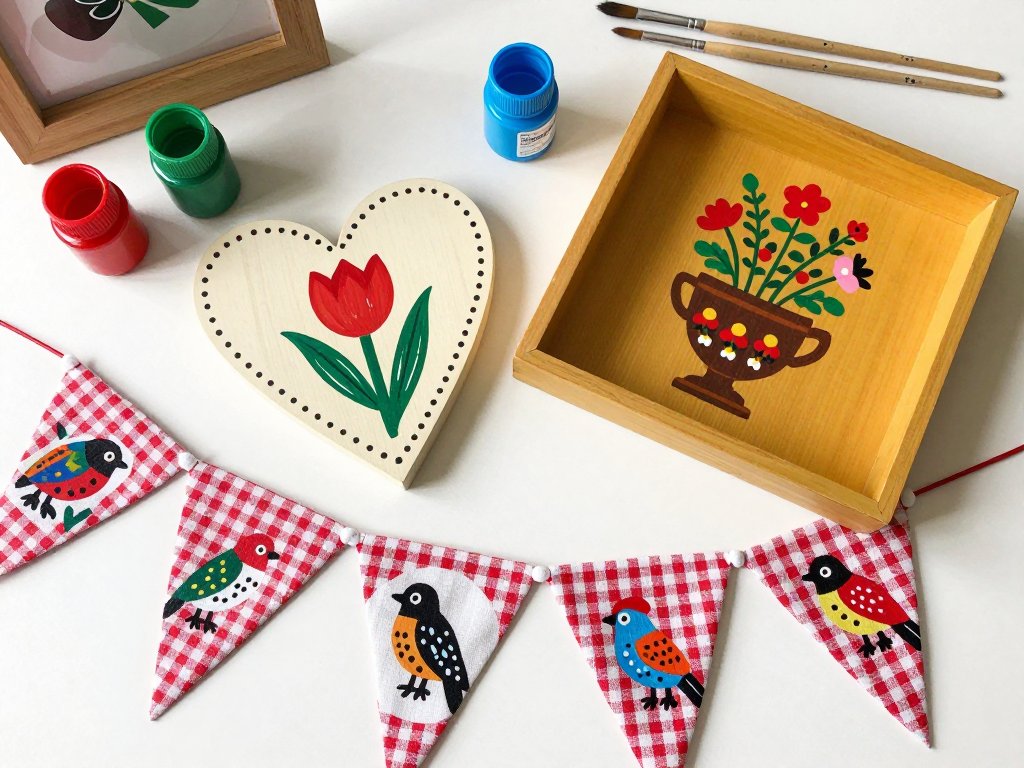
Now add the folk details. Paint a smaller heart in the center in tomato red. Add a tiny flower or tulip inside it, then dot the border with your liner brush.
Dots are the folk artist's signature. Load your brush tip with paint and touch it to the surface gently. Practice a row of dots on paper first so they come out even.
Seal the finished heart with a matte varnish if you like. Attach a small sawtooth hanger or a ribbon loop, and it is ready for the wall.
Project 2: Upcycled Folk Tray
Thrift store trays become heirloom pieces with a folk makeover. This project is quick, useful, and a wonderful gift.
You will need: a plain wooden tray, sandpaper, gesso, folk paint, and painter's tape.
Sand the tray to rough up the finish, then wipe away the dust. Brush on a coat of gesso and let it dry. You are creating a clean canvas over whatever came before.
Paint the outside and rim of the tray in a bold color like tomato red or mustard. Paint the inside base in cream for contrast. Use painter's tape to keep the lines crisp.
When the base is dry, add a folk motif to the center of the tray. A flowering urn, a single tulip, or a sun with rays all work beautifully. Sketch the shape lightly in pencil first, then paint.
Keep the design simple. A large motif with a few dots around it reads clearly from across the room, which is exactly what folk art should do.
Use your finished tray to hold remotes, jewelry, or mail. It will make you smile every single day.
Project 3: Gingham Fabric Pennant Banner
Fabric brings softness to the folklectic look. This banner adds handmade charm to a mantel, nursery, or porch with no sewing required.
You will need: gingham and muslin fabric scraps, fabric paint, a liner brush, tacky glue, and twine.
Cut fabric triangles about five inches wide and seven inches tall. You will want one pennant for each letter or motif in your banner. Pinking shears give the edges a pretty zigzag finish.
Paint simple folk motifs on the muslin pennants. Hearts, tulips, and birds are all perfect at this size. Use fabric paint or add textile medium to regular craft paint.
Let the paint dry completely, then heat-set it with an iron if your paint instructions call for it. This makes the banner washable and long-lasting.
Fold the top edge of each pennant over the twine and glue it down. Alternate gingham and painted pennants for rhythm, and leave a few inches of twine at each end for hanging.
Hang the banner where it catches the light. It instantly warms up a plain wall or a child's room.
Project 4: Folk Painted Terra Cotta Pots
Terra cotta pots are the perfect canvas for folk motifs, and they brighten any windowsill. This project pairs beautifully with houseplants you already own.
You will need: clean terra cotta pots, gesso, folk paint, a flat brush, and a liner brush.
Wash the pots and let them dry completely. Terra cotta is porous, so a coat of gesso keeps your paint from soaking in unevenly. One or two coats will do.
Paint the pots in your base colors. Try sage green, sky blue, or cream for a soft look, or tomato red for a bold pop. Paint the rims in a contrasting color.
Add folk details around the pot body. A row of tulips, a dancing heart, or a simple band of dots all look wonderful. Turn the pot as you work so the design stays even.
Seal the painted pots with a matte varnish made for outdoor use if they will live outside. Indoors, a craft varnish is plenty.
These pots make instant gifts. Pair one with a small herb plant and a handwritten tag for a present that feels personal and generous.
How to Style Folklectic at Home
Making the pieces is only half the fun. Styling them well is what turns scattered crafts into a designed look.
Start with a neutral backdrop. Folk art shines against white walls, linen sofas, and natural wood. The bold colors do the talking, so the room around them can stay quiet.
Group pieces in odd numbers. Three hearts on a wall, or a tray with two pots beside it, always looks more intentional than one lonely piece.
Mix old and new on purpose. Set a folk-painted tray on a sleek modern coffee table, or hang folk art above a contemporary bed. That contrast is the heart of folklectic style.
Repeat one motif to tie a room together. If you paint tulips on a tray, echo them on a pillow or a pot across the room. Repetition makes a collection feel curated rather than random.
Add natural textures. Wood, linen, gingham, and fresh flowers soften the look and keep it from feeling too painted or precious.
Shelves are a wonderful home for small folk pieces. Stand a painted heart against a stack of books, or tuck a tiny folk pot beside a framed photo. Vary the heights and let a little empty space breathe.
Lighting matters more than you expect. A folk art piece near a lamp or window shows off its brushwork, while a dark corner flattens the colors. Give your favorite pieces a spot where the light finds them.
Let pieces evolve. Folk art is personal, so add a new motif to a pot when the mood strikes, or repaint a tray for a new season. Your decor should grow with you.
Common Beginner Mistakes and How to Avoid Them
Every folk artist starts somewhere, and a few early wobbles are part of the charm. Still, these fixes will save you frustration.
Skipping the primer. Paint straight onto raw wood or terra cotta soaks in unevenly and looks patchy. A coat of gesso gives you a smooth, even base every time.
Painting too thick. Thick paint hides your brushwork and dries with lumps. Thin your paint with a drop of water and build color in two light coats.
Overworking details. Folk art is supposed to look simple. When a tulip starts to get fussy, stop and let it dry. Fresh eyes tomorrow will tell you it is finished.
Forgetting to seal. Unsealed craft paint chips on anything you handle daily. A matte varnish protects trays, pots, and hangers from the wear of real life.
Matching instead of mixing. A perfectly matched set can look stiff. Folk art feels alive when colors and motifs mix freely, so trust your instincts.
Giving up after one piece. The first heart or tulip never looks like the vision in your head. Paint two or three small pieces before you judge your skill, and keep your very first one to see how far you have come.
Bringing Folk Art into Every Season
One of the loveliest things about folk art is that it travels through the year with you. The same skills paint a spring tulip or a winter heart.
In autumn, swap your palette for harvest tones and paint pumpkins and birds. In winter, add evergreen sprigs and stars. Your folk art collection becomes a quiet seasonal tradition.
You can also refresh a tired shop-bought piece. If you have painted planters from a store, a folk motif and a fresh coat can make them feel like heirlooms. Many crafters start exactly that way.
So gather your paints and choose a motif you love. Paint a heart for your hallway or a tulip for your kitchen window. Folk art is patient, forgiving, and endlessly joyful, and it is waiting for your hands.

