Introduction
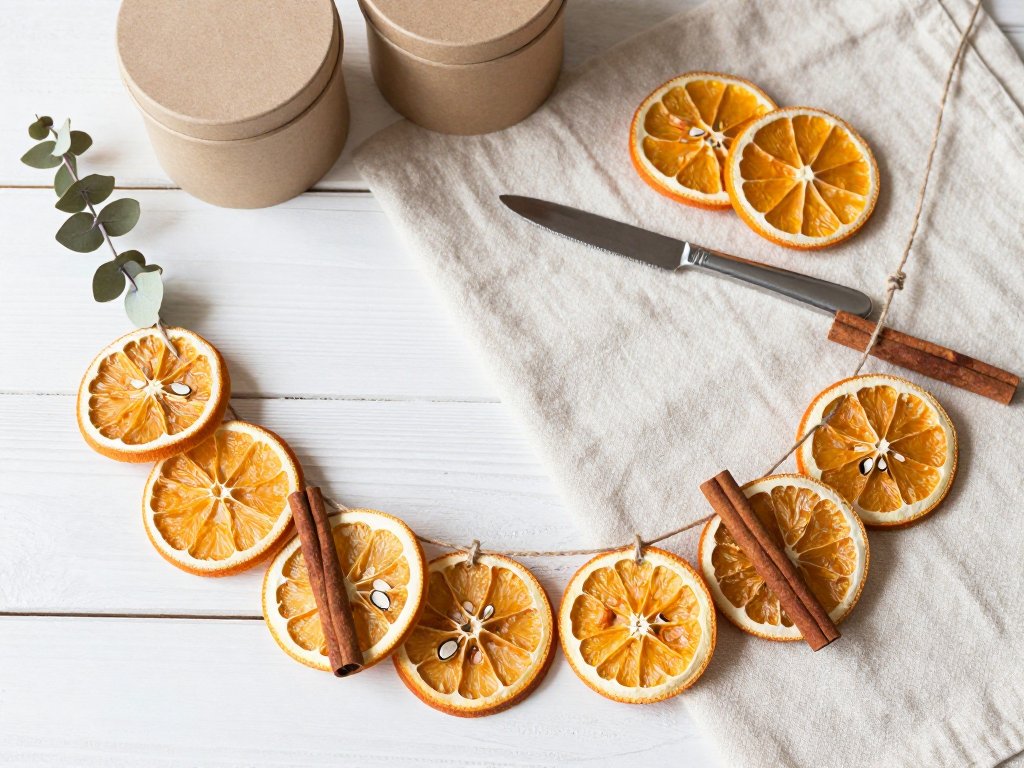
Some autumn decorations announce themselves. A dried orange garland does not. It hangs quietly against the wall, glowing a little whenever the afternoon light reaches it, and people step closer before they work out what they are looking at.
It is just orange slices, dried slowly until they turn the colour of amber glass, threaded onto garden twine with a cinnamon stick here and there. A few dollars of fruit, one long afternoon, and a kitchen that smells better than any candle.
If you have never dried fruit before, you are exactly the right reader. Nothing here needs special equipment beyond an oven, a sharp knife, and a needle with an eye big enough for twine.
Choosing Oranges: Thin Skin, Less Pith, and How Many You Need
Not every orange dries well, and the difference is mostly in the skin. Thin-skinned fruit dries evenly and turns translucent. Thick-skinned fruit fights you the whole way.
Valencia oranges are the reliable choice, and blood oranges are lovely if you can find them, since their flesh dries to a deeper red. Seville oranges work too, though they are bitter and better suited to decoration than to eating.
Navel oranges are the ones to think twice about. They tend to carry a thick white pith, and that spongy layer is the problem. Pith is mostly water and air, so it dries far more slowly than the flesh around it.
The result is a slice that browns at the edges while the pith is still damp in the middle. It also shrinks unevenly, which makes the finished slice cup and twist. Dense pith also blocks the light that makes these slices worth hanging.
Squeeze gently when you shop. A good drying orange feels heavy for its size, with skin that is tight and fine-pored rather than thick and spongy. Scratches and small blemishes are fine; you are not entering it in a show.
As for quantity: a medium orange gives roughly ten to twelve usable slices at a coin's thickness. At comfortable spacing, that is about half a metre of garland per orange.
Six oranges will make a generous swag for a standard mantel, somewhere near three metres once the spices are counted in. Buy one or two extra, because the first slice off every orange usually goes to the compost.
Slicing: Trim the Ends First, Then Aim for a Coin's Thickness
Set up a sturdy board and your sharpest knife. A long chef's knife or a serrated bread knife both work; what matters is that it is sharp enough to glide rather than crush.
Before you cut a single slice, trim the ends. Take about a centimetre off the stem end, then the same off the blossom end, until you are looking at a full circle of flesh rather than a dome of peel.
This one step fixes two problems at once. A trimmed orange sits flat and stops rocking, and every slice after it comes out a clean circle instead of a lopsided oval with a plug of pith in the middle.
Keep those end pieces. They are perfect for a simmer pot with cinnamon and cloves, or for tea, and nothing about them needs to be wasted.
Now cut at a coin's thickness, roughly five millimetres. Thinner than a pencil, a little thicker than a potato chip. If you have a ruler handy, check your first two slices and then trust your eye.
Use one long, steady push rather than a sawing motion. Let the blade travel all the way through before you lift it. Sawing tears the flesh and leaves a ragged edge that dries into a hard, dark rim.
Even thickness matters more than it sounds. A tray of mixed slices means the thin ones scorch while the thick ones are still wet, so you end up pulling the tray out again and again to rescue individual pieces.
Thick slices also curl as they dry, and a curled slice will not lie flat against a wall or hang straight on a string. Uniform slices simply look intentional, which is most of what makes homemade decor read as charming rather than improvised.
Oven Drying: Low Heat, a Long Time, and One Regular Flip
Heat the oven to around ninety to a hundred degrees Celsius, which is roughly two hundred Fahrenheit. If you have a fan-forced oven, drop it another ten degrees, because moving air dries faster and scorches sooner.
Getting the tray right takes four small steps.
- Line a baking tray with parchment, or better, set a wire cooling rack inside the tray so warm air can move underneath. The rack halves the risk of slices welding themselves to the paper.
- Blot each slice with a tea towel. Surface juice is what caramelises and turns brown, so removing it is half the battle.
- Lay the slices in a single layer with space between them — no touching, no overlap. Crowding traps steam and turns drying into steaming.
- Slide the tray into the middle of the oven, not the top. The top rack sits close to the element, and that is where edges brown first.
Now wait. Expect two and a half to four hours depending on your oven, the thickness of your slices, and how juicy the fruit was. This is not a project for a hurried afternoon.
Flip every slice after the first hour, then again every forty-five minutes or so. Flipping is what stops one face from drying to a hard skin while the other stays tacky.
For the first hour, you can prop the oven door open a couple of centimetres with a wooden spoon. This lets the initial steam escape instead of recirculating. Skip it if small children or curious pets are in the kitchen.
Here is the part worth understanding rather than memorising: browning and drying are two different processes, and only one of them is what you want.
Above roughly a hundred and twenty degrees, the sugars in the orange begin to caramelise. The edges darken quickly, which looks like progress and is not. Meanwhile the middle of the slice is still wet.
What you get is a slice that tastes bitter, looks muddy against the light, and will still mould in storage because it never actually dried. Low heat asks for patience and gives you translucency in return.
If you are running two trays, swap them top to bottom halfway through, and rotate each tray front to back. Ovens are uneven, and the back corner is always hotter than you think.
Knowing When a Slice Is Actually Done
A finished slice is leathery, not brittle. It bends without cracking, the way a thick piece of fruit leather does, and it holds its shape when you let go.
Hold one up to a window. Light should come through the flesh in a warm amber glow, and you should be able to see the faint spokes of the centre. If the middle is still a pale, solid disc, it needs more time.
Run a finger along the rind. There should be no sticky beads of juice, and no soft give when you press the thickest part of the flesh.
The most reliable test is the cooling test. Take one slice out, set it on the counter for five minutes, and check it again. Warm slices always feel softer and read as underdone.
When in doubt, give them another half hour. A little extra drying is far easier to live with than a garland that moulds in November.
The Dehydrator Route, and Why Air Drying Usually Disappoints
If you own a dehydrator, use it. Set it to about fifty-seven to sixty degrees Celsius, around a hundred and thirty-five Fahrenheit, and let the trays run for six to ten hours.
You do not need to flip anything, the colour stays brighter, and your kitchen does not heat up on an already warm autumn day. Rotate the trays top to bottom once, halfway through, so everything dries at the same rate.
Air drying, on the other hand, sounds romantic and rarely works. In most homes the air holds too much moisture, and a slice left on a plate grows fur before it grows leathery.
There is also a quieter failure. The outside of the slice dries to a sealed skin while the inside stays damp, and then mould blooms from the centre outward where you cannot see it coming.
Add dust, fruit flies, and a cat who considers the windowsill his, and the case for the oven becomes obvious. A dry, breezy week on a screened rack can work in an arid climate, but for most of us it is a gamble.
Whichever method you use, cool the slices on a wire rack in a single layer for half an hour to an hour. Do not stack them warm, because the trapped steam softens what you just spent hours drying.
Then let them rest. Leave the cooled slices out on the rack, or in a paper bag, for a full day before you string them.
This rest equalises the moisture inside each slice, so the drier edges pull water from the centre and everything settles at the same level. Check them the next morning; if any feel tacky, give them thirty more minutes in the oven.
What to Tuck Between the Slices
An all-orange garland is pretty. A garland with a few other textures in it looks collected rather than bought, and the extras cost very little.
- Cinnamon sticks. Whole sticks about seven or eight centimetres long, one every four to six slices. They add scent, and their stiffness keeps a long garland from twisting as it hangs.
- Star anise. Light enough not to drag on the string, and their dark points read beautifully against amber. Thread them or tie them on with a short length of twine.
- Dried apple rings. Dry them exactly the same way. They are a good way to stretch a garland without buying more oranges, but they dry faster and are more fragile near the needle.
- Bay leaves. Dry them flat between the pages of a heavy book for a week, then thread them in pairs so the garland has a leafy note every so often.
- Dried eucalyptus. Tie small bundles on with twine rather than threading individual leaves, and keep the garland out of reach of pets, since dried eucalyptus is not safe to chew.
- Whole nutmeg or small pinecones. Both work in the same spirit. What does not work is anything sticky or soft, like dried cranberries, which mark the slices and attract insects.
Keep the ratio calm. Roughly one spice element for every four to six slices keeps the orange the star and the spices the punctuation.
Stringing the Garland: Needle, Spacing, Knots, and Length
Use jute twine about two to three millimetres thick, or cotton butcher's twine if you want something softer against the wall. Jute holds knots well and has the rustic look most of us are after.
Cut your string generously: about thirty centimetres longer than the finished length you want, so you have room to tie loops at both ends and still have a tail to work with.
Thread a large-eyed darning needle or tapestry needle. If your needle is blunt, poke the holes first with a skewer or a cake tester, then thread through the guide holes.
Now the detail that decides whether the garland survives the season. Push the needle through the flesh close to the rind, about a centimetre in from the edge, not through the centre.
The outer flesh and rind are the strongest part of a dried slice. The centre is pith, and pith tears. A hole in the middle will widen under the weight of the slices either side of it until the whole thing lets go.
A hole near the edge also makes the slice hang flat and face outward instead of spinning slowly like a pendant. Pierce from the same side every time, so your best-looking face is the one the room sees.
Tie a small overhand knot on each side of every slice and every spice piece. This is the step people skip, and it is the reason garlands end up bunched at one end by the second week.
Space slices five to seven centimetres apart. A pleasant rhythm is three slices, a cinnamon stick, three more slices, a star anise, and so on. It looks deliberate without looking measured.
For length, work backwards from where it will hang. A mantel swag wants one and a half to two times the width of the mantel, so it can drape in two soft curves.
A stair rail needs the full run plus about twenty percent, since the swag dips between the points where you tie it. A doorway needs the width of the frame plus thirty centimetres of overhang on each side.
Finish both ends with a loop big enough for a hook or a nail. If you are short of slices, space them wider and let the cinnamon do more of the work; nobody counts.
Where to Hang It, and How to Store It Between Seasons
The mantel is the obvious home, and it earns the spot. Two small hooks or removable adhesive strips, one at each end, and a swag that dips in the middle. Keep it well clear of any candles on the shelf.
Stairs are the other classic. Tie short twine loops around the spindles at three or four points so the garland follows the rail instead of hanging straight down between ties. Run it along the wall side, not across the handrail where hands slide.
A doorway works beautifully if you have a tension rod or two small hooks above the frame. Leave enough clearance that tall visitors and delivery drivers do not walk into it.
Windows are tempting because the light makes the slices glow. Suction cup hooks will hold a light garland, but direct sun fades the colour within a few weeks, so a north or east-facing window keeps its richness longer.
Laid flat along a table runner, the same garland becomes a centrepiece and needs no hooks at all. Scatter a few loose slices and star anise around it and you have a table setting.
If you want more shapes to try once this one is up — swags, hoops, or something draped over a mirror — these fall garland ideas cover several styles that use the same slices.
Wherever it goes, avoid steam. Above a kettle, in a bathroom, or beside a slow cooker, the humidity will undo your drying in a matter of weeks.
At the end of the season, take the garland down before the first really damp weeks arrive. Coil it loosely rather than folding it, and do not crease the string.
Store it in a cardboard box or a paper bag, with tissue between the coils and a silica packet in the corner. A dry cupboard is ideal; sealed plastic is not, since moisture gets trapped inside.
Expect a good season or two of use before the amber colour softens.
If you want the smell back next autumn, put a drop of orange oil on a cotton ball in the box a few days before hanging. Keep the oil off the slices themselves, since it can leave a dark mark.
Sagging is the most common complaint, and it is almost always the string rather than the fruit. Jute stretches under weight, especially in a warm room.
Untie one end, take up the slack a few centimetres at a time, and re-knot. Work from the high end of a stair rail downward, because that is where the load gathers.
If the slices themselves have gone limp from summer humidity, thirty minutes in a ninety-degree oven will crisp them again. Let them cool completely before they go back on the string.
Keep a few spare slices and a spare cinnamon stick in the storage box. Replacing one crumbled slice takes a minute and saves the whole garland from looking tired.
Troubleshooting: Brown Slices, Sticky Trays, Crumbles, and Mould
My slices went brown at the edges. The oven was too hot, the slices too thin, or the tray sat too high. Trim the dark edges with kitchen scissors, and drop your next batch by ten degrees.
They are stuck to the tray. Usually this means no parchment, or juice that caramelised on contact. Line the tray next time, and lift stuck slices with a thin spatula while they are still warm.
If they have cooled and welded themselves down, put the tray back in a warm oven for five minutes. The gentlest heat releases them without tearing.
They crumble when I string them. Over-dried, or cut too thin. Crush the broken ones into a jar for a simmer pot, and cut the next batch a little thicker, stringing while they are still slightly leathery.
There is mould in a humid climate. This almost always traces back to under-drying, plastic storage, or hanging somewhere steamy. Throw the mouldy slices away rather than wiping them; the spores run deeper than the surface.
Then change one thing at a time: dry an extra hour, store with silica, and hang the garland in the driest room in the house. In really humid places, store it in a sealed jar with silica between seasons instead of leaving it up year-round.
Is the white film mould? Not always. Sugar bloom looks like a faint, powdery haze and is harmless. Mould is fuzzy, raised, and often speckled with green or grey. If you can see individual fibres, it is mould.
My slices curled up. Heat too high, or the slices were uneven. A second wire rack laid on top for the first hour keeps them flat while they set.
A Word About Candles, and a Warm Place to Stop
Dried citrus is tinder. It is thin, dry, sugar-rich, and full of air, and it will catch from a flame far more readily than a fresh branch would.
Keep garlands at least thirty centimetres from any open flame, and never drape one over a candle holder or across a shelf where a candle sits. A draft can move a loose end further than you expect.
Dried eucalyptus deserves the same care, since its oil vapour is flammable. If you want candlelight near your garland, battery candles give you the glow with none of the worry.
With that one caution in mind, this is a forgiving project. The slices that brown, the ones that crack, the ones you thread crooked — none of it shows once the garland is up and the room is warm.
When the last loop is tied, stand back and let it be imperfect. A handmade garland is supposed to look like someone made it on a Tuesday between other things, because someone did.
And when you find yourself with a bowl of leftover slices, the natural next step is a small dried orange wreath for the front door, built on a wire hoop with the same twine and the same spice pieces.
Start saving your peel either way. Once you know how good a kitchen smells while oranges are drying slowly, you will find reasons to make another batch.