Introduction
Every handmade necklace eventually reaches the same small moment. The beads are strung, the pendant is wrapped, the design is finished — and then the piece has to be closed. That closing is where a good necklace becomes a keepsake or a drawer ornament.
The parts that do this work are called findings. They are the least romantic things on the bench: rings, hooks, clasps, pins. They are also the parts that touch skin, take tension, and fail first.
This guide is about choosing them well. Not the whole of metalsmithing, just the small hardware decisions that decide whether the thing you made survives a Tuesday afternoon at the playground.
What Findings Are, and Why Cheap Hardware Fails
Findings is the trade word for every component that is not the stone, bead, or focal piece. Jump rings, clasps, ear wires, head pins, crimp tubes, bead caps, chain, extenders. They are the architecture.
A strand of freshwater pearls has no structural integrity on its own. It becomes a necklace because two crimps hold the ends, two jump rings connect those ends to a clasp, and the clasp carries the weight. Remove any one of those and the piece is a pile.
This is why a bargain assortment is rarely a bargain. A bag of five hundred gold-toned findings for six dollars is brass with a plated skin measured in fractions of a micron. The plating wears exactly where metal rubs metal — the jump ring against the clasp loop.
Under that plating the base metal is soft. A thin ring bends open under the weight of a pendant, the gap widens, and the necklace lets go somewhere between the car and the front door. You will not hear it happen.
Buy fewer findings, in better metal, in the sizes you actually use. That single habit prevents more heartbreak than any technique.
Jump Ring Anatomy: Gauge, Diameter, and Size
A jump ring is a coil of wire cut into a single loop with a saw. It is described by two numbers, and beginners usually learn only one of them.
The first is wire gauge, written in AWG — American Wire Gauge — where the number runs backwards. An 18-gauge ring is made of wire about 1.0 mm thick. Twenty-gauge is roughly 0.8 mm. Twenty-two-gauge is about 0.64 mm. Smaller number, thicker wire, stronger ring.
The second is diameter, usually given as the outer measurement across the ring. Here is the part worth memorizing: what actually matters is the inner diameter, because that is the space your chain, clasp loop, or wire has to pass through.
Two rings can both be called 6 mm and have very different holes. An 18-gauge 6 mm ring has a small opening because the wire eats most of the diameter. A 22-gauge 6 mm ring is nearly all hole.
What Each Size Is Actually For
- 18-gauge, 5–7 mm: the workhorse for pendants, charm bracelets, and any place where weight hangs from one point. Thick enough that it will not straighten under a heavy stone.
- 20-gauge, 4–6 mm: the beginner's default. Right for earrings, light charms, connecting chain to a clasp, and most necklace ends. Easy to open, strong enough for everyday wear.
- 22-gauge, 3–4 mm: delicate work only. Fine chain, tiny seed beads, small gemstone drops, doll-scale pieces. It opens beautifully and bends out of shape just as easily.
- 16-gauge, 8–10 mm: for chunky designs, keyrings, and bag charms where the hardware is meant to be seen.
A useful rule: the ring should be at least as thick as the wire or chain it connects to, and its inner diameter should be roughly three times the thickness of whatever passes through it. Anything tighter will bind and rub.
Open, Closed, and Soldered Rings
Most rings you buy are open — cut once, with a seam you can work apart. A smaller number are closed, meaning the seam has been soldered shut and the ring is a continuous loop of metal.
Open rings are for anything that might be taken apart: a pendant you want to swap, a design you are still deciding on, a repair. They are the correct choice for ninety percent of beginner work.
Closed rings belong where the connection is permanent and load-bearing. The ring that holds a clasp to a chain end is a good example. So is the ring at the top of a heavy pendant that will never be removed. Under repeated pull, an open ring works its gap wider.
You can close an open ring well enough for most purposes by working the seam tight. True soldering needs a torch, flux, and practice, and it is a separate skill. For now, know the difference and choose deliberately.
One more piece of hardware worth naming: the split ring, which is coiled like a tiny keyring. It never opens into a gap, which makes it excellent at the clasp end of a bracelet. It is also fiddly and can fray fine thread, so keep it for metal chain.
The Two-Pliers Technique
This is the single most useful physical skill in the whole of beginner jewelry making, and it takes about ninety seconds to learn properly.
Hold the ring so the seam sits at twelve o'clock. Grip one side of the seam with chain-nose pliers in your dominant hand, and the other side with a second pair. Now twist — one hand toward you, one away, as though turning a tiny steering wheel.
The two ends should pass each other along the ring's own axis, like a spiral staircase. The ring stays round. The metal is stressed along its length rather than levered apart.
What beginners do instead is pull the hands apart sideways. It feels natural and it works, which is the problem. Pulling turns a circle into an oval, and an oval has a bend at each side.
- Seat the seam at the top of the ring, facing you.
- Grip each side of the seam with smooth-jawed pliers, close to the cut.
- Rotate one wrist forward and the other back, so the ends slide past one another.
- Slide your component on while the ring is open, never force it over a gap.
- Reverse the twist exactly, bringing the ends back into alignment.
- Press slightly past flush, then release. The seam should close with a faint click of metal meeting metal.
Use pliers with smooth jaws. Serrated jaws leave tooth marks, and a notch in a jump ring is a stress riser — a place where cracks begin.
Work Hardening and the Cost of Reopening
Metal is not a passive material. Every time you bend it, its internal crystal structure tangles a little more, and it becomes harder and less ductile. This is work hardening, and it is why a paperclip snaps after you flex it a few times.
A jump ring has a small budget for this. Open it once and close it once and it is fine. Open it a third time and you may feel it stiffen. Bend it a fourth and the seam may crack, or the ring may break clean through at the cut.
The practical consequence is simple and slightly strict: decide what the ring is for before you open it. Measure the chain, choose the pendant, then commit.
If you do get it wrong, retire the ring. A new 20-gauge brass ring costs a few cents. A necklace that fails at a birthday party costs considerably more than that, in ways that are harder to price.
This is also why you should not "adjust" a ring by squeezing it in your fingers to make it smaller. Finger pressure work-hardens the whole circumference unevenly and leaves the ring slightly out of round, which is the beginning of a gap.
Clasp Types and What Each One Is For
There is no best clasp. There is only the clasp that matches the weight, the wearer, and the way the piece gets put on. Here are the ones you will actually encounter.
Spring Ring
A small hollow circle with a spring-loaded gate, opened by pulling a tiny lever. It is inexpensive, tidy, and nearly invisible on a fine chain.
It is also the weakest common clasp. The gate is thin, the spring is small, and the whole mechanism is designed for light loads. A spring ring on a heavy pendant is a failure waiting to happen. Use it for delicate necklaces, children's pieces, and anything under about 15 grams.
Lobster Claw
A teardrop-shaped claw with a trigger. It opens wide, closes with a satisfying snap, and can be operated one-handed behind your neck, which matters more than beginners expect.
This is the right default for bracelets and for most necklaces. A 12 mm lobster claw handles a substantial pendant comfortably. Look for one with a closed, well-soldered loop at the top rather than a split one.
Toggle
A ring and a bar. The bar passes through the ring and sits across it under tension, so the clasp holds by geometry rather than by a spring.
Toggles suit casual pieces — leather-look cord, chunky beads, bohemian bracelets — and they are forgiving for hands that struggle with small triggers. But they need a piece that hangs with some weight. On a light necklace the bar can rotate and slip free.
S-Hook
A simple curved hook that catches a ring or a loop of chain. Historically common, visually elegant, and completely without a spring to fail.
It is best on earrings, delicate necklaces, and pieces that are taken off carefully at night. The open hook can straighten under a sharp pull, so it is not the clasp for a bracelet worn by a toddler.
Box Clasp
A rectangular body with a tongue that clicks into a slot, often with a figure-eight safety catch. It is the classic choice for pearl strands and heavy beaded necklaces.
Box clasps are strong and lie flat against the skin, which keeps a heavy strand from rotating. They demand precise sizing — the two halves must meet squarely — and the little tongue tab is the part that wears first.
Magnetic
Two magnets in metal shells that snap together. Wonderfully easy for hands with arthritis or tremor, and genuinely useful on a necklace you put on alone.
They also release under sideways force, which makes them unsuitable for heavy pendants, bracelets on active wrists, or anything irreplaceable. Keep magnets away from pacemakers and mechanical watches.
Hook-and-Eye
A curved hook catching a small loop. Cheap, traditional, and easy to replace. It unhooks under tension, so reserve it for light work and vintage-style pieces where the look is the point.
Matching the Clasp to the Weight of the Piece
Weight is the variable beginners underestimate. A strand of glass beads can weigh forty grams; a fine silver chain with a small stone weighs four. The same clasp cannot serve both.
As a rough guide: under 15 grams, a spring ring or hook-and-eye is fine. Fifteen to forty grams, choose a lobster claw of 10 mm or more, or a toggle. Above forty grams — heavy stone, dense pearls, chunky ceramic — use a box clasp with a safety catch.
Consider the motion too, not just the mass. A bracelet swings, catches on sleeves, and gets pulled by bag straps. It needs a stronger clasp than a necklace of identical weight, which mostly hangs still.
And consider the wearer. A clasp that is difficult to operate will be left undone, and a necklace left undone is a necklace that gets lost. Ergonomics is part of engineering.
Metals: What Tarnishes, What Wears, What Lasts
Brass is the honest beginner's metal. Warm gold color, inexpensive, easy to bend, and it tarnishes to a soft brown that some people prefer. It is ideal for practicing the two-plier twist twenty times without guilt.
Copper behaves similarly but tarnishes green, and it leaves a mark on some skin. It is beautiful in its own right — just know what it does.
Sterling silver is 92.5 percent silver alloyed with copper for strength. It tarnishes black in the presence of sulfur, which is in wool, rubber bands, and some tap water. It polishes back. For daily-wear pieces, sterling is the first metal genuinely worth the money.
Gold-filled is the one most beginners misunderstand. A thick layer of gold — typically 5 percent of total weight, marked 14/20 — is mechanically bonded to a brass core. It is not plating. It wears for years, even at the rub point, for a fraction of solid gold.
Gold-plated is electroplated gold measured in microns. On a jump ring, where metal rubs metal with every movement, that layer can wear through in weeks. Plated findings are fine for photographing a design or for a costume piece worn twice. They are not fine for a gift meant to last.
Stainless steel sits outside this scale: it will not tarnish, it is strong, and it is difficult to bend without proper pliers. Good for men's pieces and for hardware that must survive water.
Building a Starter Findings Kit
The temptation is to buy a large assortment. Resist it. Assortments are mostly sizes you will never use, in metal you will outgrow in a month. Buy small quantities of good things.
- Jump rings: 20-gauge, 5 mm in brass or sterling — twenty of them. Then 18-gauge, 6 mm — ten. That covers pendants, earrings, and necklace ends.
- Clasps: two 12 mm lobster claws, two 8 mm spring rings, one toggle set, one hook-and-eye. Enough to finish six pieces and to compare how they feel.
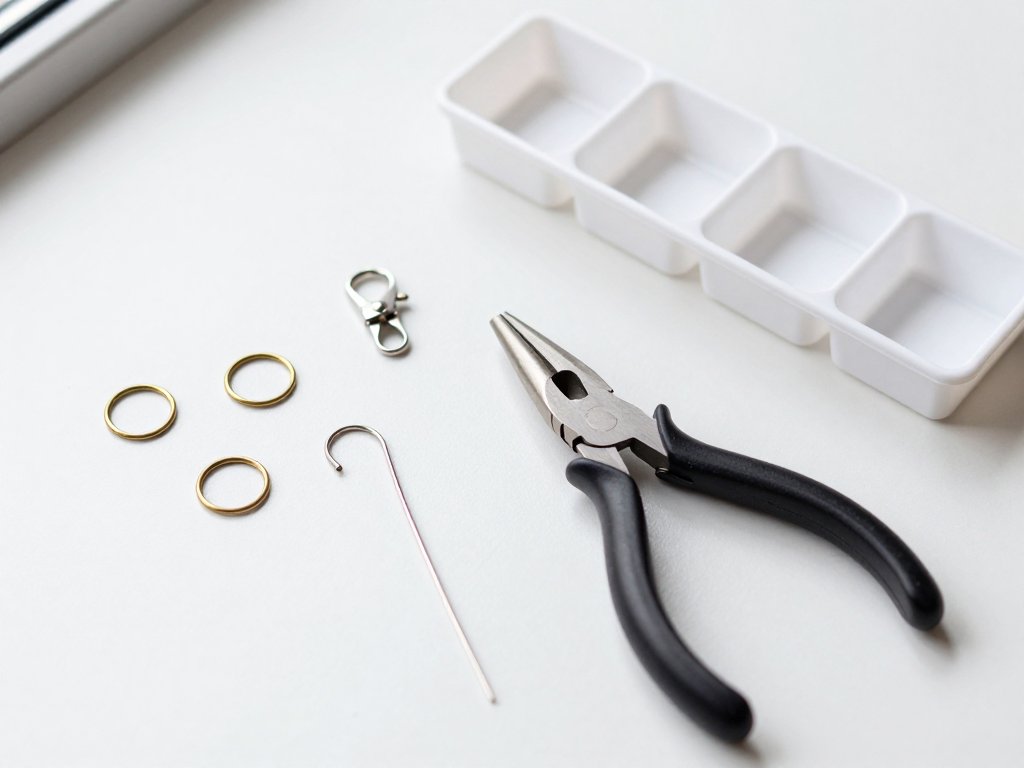
- Pliers: two pairs of smooth-jawed chain-nose pliers. Two, not one — the technique requires both hands, and mismatched jaws will mark your work.
- Storage: a shallow tray with compartments, or a bead organizer. Small parts migrate; a tray stops the migration.
- A magnifier: a cheap jeweler's loupe. You will use it to check seams, and you will be surprised how much you can see at 10x.
Skip the five-hundred-piece plated grab bag. Skip split rings until you are working with chain. Skip magnetic clasps until you have a specific reason. Skip the soldering torch entirely for now — it is a different craft with a different learning curve.
One optional addition deserves mention: an extender chain with a small lobster claw. It turns a necklace that sits slightly wrong into one that fits, and it costs less than a sandwich.
Troubleshooting: Gaps, Loads, and Lost Rings
The ring has a gap that catches hair. The seam is not fully closed, usually because the ring was opened by pulling and is now slightly oval. Run a fingernail across the seam. If it catches, the ring is done — replace it rather than squeezing.
The clasp keeps opening. Either the clasp is undersized for the weight, or the loop it connects to is too thick and is levering the gate. Move up one clasp size and check that the jump ring moves freely inside the clasp loop.
The plating has worn to a dull patch. That is the rub point telling you where the stress is. Replace plated findings with gold-filled or sterling at that joint first; it is the highest-value upgrade in the piece.
A jump ring has vanished. It happens to everyone. This is why a spare bag of twenty 20-gauge rings lives in the tray, and why the clasp end of a bracelet benefits from a split ring, which cannot open into a gap and let go.
The piece twists and the clasp sits on top of the wrist. Usually a sign that the two ends were attached without matching orientation. Reattach one end so both jump rings hang the same way.
Inspecting a Clasp Before You Buy
Open and close it ten times in the shop, or as soon as the parcel arrives. It should move smoothly and return fully every time. Grit or a lazy return means a weak spring.
Look at the seam where the gate meets the body. A well-made clasp closes flush, with no visible step. Run a thumbnail along it; a sharp edge will fray chain and catch clothing.
Check the loop at the top. It should be a closed, soldered loop, not a split one that can pry open. And check the metal where the gate pivots, because that is where plating fails first.
A Quiet Place to Begin
None of this is difficult. It is only unfamiliar, and unfamiliar things always look larger from a distance than they are up close.
Start with one pair of pliers in each hand and a handful of 20-gauge rings. Open ten of them and close them again, and by the eighth you will feel the twist instead of thinking about it. That small physical confidence is the whole foundation.
If you have been working on sea glass wire-wrapping, you already know how a wrapped bail wants to hang. The next step is simply choosing a ring that respects its weight and a clasp that respects its use.
Choose the metal you can afford to be generous with, buy the size that fits the piece rather than the size that is on sale, and close every seam properly. Do that, and the small hardware will disappear into the work. Which is exactly what good hardware should do.