Introduction
Have you noticed the little red-capped mushrooms popping up everywhere? Not in the garden — in home decor.
They sit on shelves, hang in garlands, glow from lamps, and perch on mantels in colors that feel made for autumn.
This is mushroomcore, and it might be the coziest decor trend to come along in years.
If you are a busy mom who loves a warm, inviting home but does not have time for complicated projects, mushroomcore is for you.
It is whimsical without being childish, earthy without being messy, and surprisingly easy to make yourself.
You do not need a craft room or a big budget. You need a few basic supplies, an evening or two, and a love of all things woodland.
In this guide, I will walk you through exactly what mushroomcore is, why it fits fall so perfectly, and the specific supplies you will want.
Then I will share four beginner-friendly projects you can finish this week, along with styling tips that make even a single mushroom look intentional.
By the end, you will have a clear plan and a pretty new corner of your home to show for it.
What Exactly Is Mushroomcore?
Mushroomcore is an aesthetic that centers on mushrooms and woodland imagery. It grew out of cottagecore, the cozy countryside look that celebrates simple, nature-inspired living. Think fairy tales, forest floors, and the soft glow of a lamp shaped like an amanita mushroom.
The trend picked up real momentum on social media, where crafters began sharing mushroom garlands, painted clay mushrooms, and mushroom-themed tablescapes. It suits fall perfectly because mushrooms are a harvest-season symbol. They appear in autumn nature walks, in soups and roasts, and in the golden light of October afternoons.
What makes mushroomcore different from other decor trends is its sense of play. A mushroom lamp is not trying to be sleek or minimal. It is asking you to smile. That gentle humor is exactly what many of us want at home after a long day.
Here is what mushroomcore looks like in practice:
- Color palette: Cream, terracotta, rust, forest green, and warm brown — with pops of red and white for mushroom caps.
- Shapes: Rounded domes, soft stems, arches, and organic, hand-made-looking forms.
- Materials: Wood, ceramic, felt, terracotta, wool, dried moss, and linen.
- Mood: Cozy, storybook, slightly magical, and grounded in nature.
The best part? You do not have to redecorate your whole house. A single shelf styled with mushrooms can capture the whole feeling.
Why Mushrooms Are Made for Fall Decor
Fall decor often leans on pumpkins, leaves, and gourds. Mushrooms add something those classics do not: a sense of wonder.
They are small, so they invite you to look closely. They are organic, so they soften the hard lines of a mantel or shelf.
And they are unexpected, which makes guests pause and smile.
There is also a practical reason mushrooms shine in autumn. Their colors naturally match the season. Terracotta and rust echo the changing leaves. Cream and brown mirror the bark and earth of late-October woods. Even the classic red-and-white toadstool feels festive next to pumpkins and candlelight.
Mushroom decor is also forgiving. Unlike a perfectly carved pumpkin, a slightly lopsided handmade mushroom looks charming, not flawed.
That makes it one of the most beginner-friendly crafts you can try. There is no right way for a mushroom to look, which means there is no way to get it wrong.
Mushroomcore Starter Supplies
Before you start a project, gather your supplies. Here is the exact list I recommend for most mushroomcore projects. Most of these are inexpensive and easy to find.
- Terracotta pots and saucers: Small pots (2 to 4 inches) make perfect mushroom bases. Check dollar stores and garden centers for the best prices.
- Acrylic craft paint: White, cream, terracotta, rust, forest green, and a few shades of red. A basic set covers almost every project.
- Paintbrushes: A flat brush for base coats, a round brush for details, and a tiny liner brush for spots and stems.
- Felt sheets: Wool-blend felt in red, cream, brown, and green for garlands and soft mushrooms.
- Hot glue gun and glue sticks: Your best friend for assembling garlands, wreaths, and almost anything else.
- Scissors: A sharp pair for felt and fabric. Pinking shears are a nice bonus for finished edges.
- Wooden beads and twine: For garlands and hanging accents.
- Dried moss and floral wire: To tuck around bases and add that forest-floor feel.
- Mod Podge or matte sealer: To protect painted pieces and give them a soft, natural finish.
That list covers the four projects below. If you already craft, you probably own most of it already.
Project 1: Painted Terracotta Mushrooms
This is the project I recommend to every beginner. It is quick, cheap, and produces decor that looks like it came from a boutique.
Step 1: Prep your pots. Clean each small terracotta pot and its saucer, then let them dry completely. Paint the pot and saucer with a base coat of cream or white. Two thin coats give the best coverage. Let each coat dry for about an hour.
Step 2: Paint the cap. Turn the saucer upside down. This dome becomes your mushroom cap. Paint it in your chosen color — red, terracotta, or rust are classic. Add a second coat once the first dries.
Step 3: Add the spots. Once the cap is dry, use the liner brush and white paint to add small dots. They do not need to be perfect. Slightly uneven spots actually look more natural, like a real woodland mushroom.
Step 4: Assemble. When everything is dry, hot glue the saucer dome onto the top of the pot. The pot is your stem. You can leave it cream or paint a few soft lines to suggest texture.
Step 5: Finish. Seal with matte Mod Podge, then tuck a little dried moss around the base to hide the glue seam. Group three mushrooms of different heights together on a tray for an instant vignette.
This whole project takes about an hour of hands-on time, spread over a day of drying.
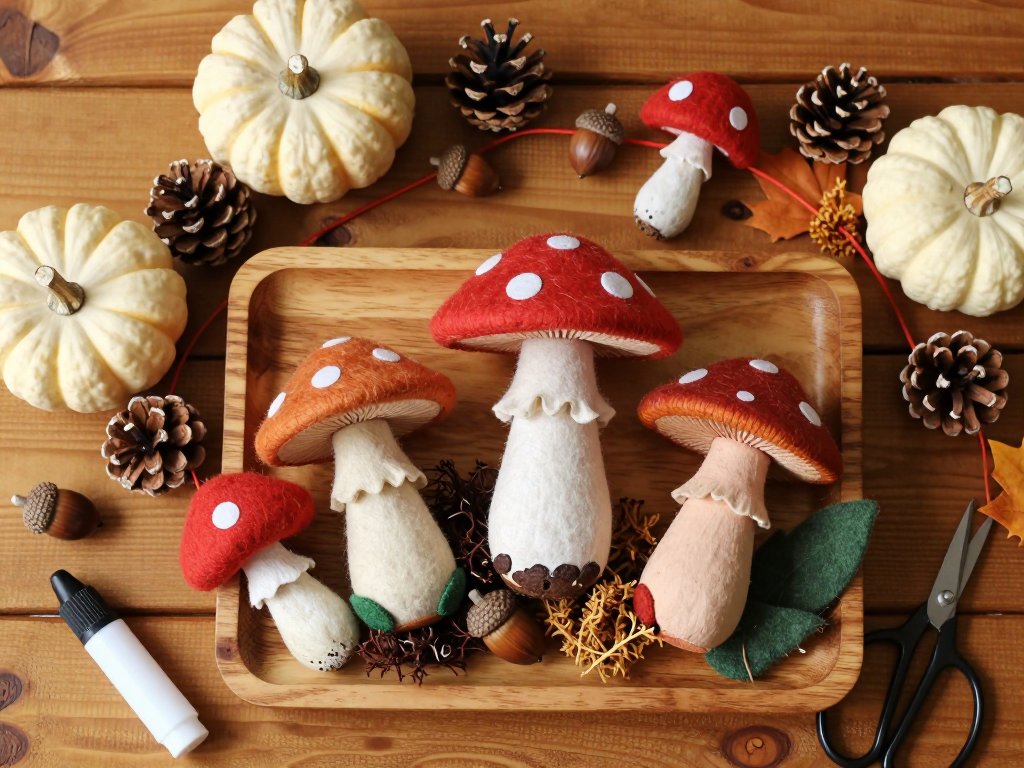
Project 2: Felt Mushroom Garland
Garlands are the quickest way to add mushroomcore to a mantel, doorway, or playroom shelf. This one takes under an hour.
Step 1: Cut your mushrooms. Freehand simple mushroom shapes from felt — a rounded cap and a small stem. You need two matching pieces per mushroom if you want them to look finished on both sides, or you can use single-layer shapes for a simpler look.
Step 2: Add details. Cut tiny white circles from felt and glue them onto red caps. Add a small green leaf or two if you like.
Step 3: Attach to twine. Lay your mushrooms along a length of twine, spacing them evenly. Glue the top of each stem to the twine. If you made two-sided mushrooms, sandwich the twine between the two layers before gluing.
Step 4: Hang and enjoy. Drape the garland over a mantel, along a bookshelf, or across a window. It adds instant whimsy and takes minutes to rearrange.
For extra charm, alternate mushrooms with wooden beads or small felt leaves. You can also make the garland with your kids — felt shapes are easy for little hands to arrange.
Project 3: No-Carve Mushroom Pumpkins
If you love pumpkin decorating but hate the carving mess, this hybrid project is for you. It combines pumpkins with the mushroom trend for a look that is pure fall.
Step 1: Choose your pumpkin. Pick a small, smooth pumpkin or gourd with a sturdy stem. White pumpkins look especially magical, but orange works beautifully too.
Step 2: Paint the cap. Paint the top third of the pumpkin red or terracotta, leaving the lower part its natural color. Use a foam brush and let it dry.
Step 3: Add spots. Dot the painted area with white or cream circles. Let them dry.
Step 4: Style the stem. Wrap a bit of twine around the pumpkin stem and tuck in a few silk leaves or dried moss. Your pumpkin now looks like a giant friendly mushroom.
Place one on your porch or a side table, and pair it with smaller painted terracotta mushrooms for a full mushroomcore scene.
Project 4: Mushroom Table Centerpiece
A centerpiece brings everything together for holiday meals or cozy family dinners. This one is mostly assembly, so it is perfect for a busy week.
Step 1: Build your base. Lay a piece of burlap or a linen runner down the middle of your table. Add a layer of dried moss in a low wooden tray or directly on the runner.
Step 2: Arrange your mushrooms. Place your painted terracotta mushrooms and felt mushrooms in small clusters. Vary the heights by setting some on small wooden blocks or overturned cups.
Step 3: Fill in the forest floor. Tuck in pinecones, acorns, small gourds, and a few cinnamon sticks. These natural elements make the arrangement feel gathered, not staged.
Step 4: Add candlelight. Finish with a couple of taper candles in wooden or amber holders. The warm glow transforms the whole table.
This centerpiece looks wonderful from every side, which matters when guests are seated all around. It also takes under thirty minutes to assemble.
Styling Your Mushroomcore Corner
Once you have made a few pieces, it is time to style them. Here is how to get a magazine-worthy look without overthinking it.
- Group in odd numbers. Three mushrooms of different heights always look better than two identical ones. Use small books or blocks to raise the tallest.
- Mix textures. Pair smooth painted ceramic with rough moss, soft felt with hard wood. Texture contrast is what makes a shelf feel curated.
- Use trays. A wooden tray or cake stand collects all your small pieces into one tidy vignette. It also makes cleanup simple when you want the space back.
- Layer with books. Stack a few autumn-toned books and let mushrooms peek out from between them. Books add height and warmth.
- Add light. A mushroom lamp, a string of warm fairy lights, or a single candle makes the whole display glow after dark.
- Keep it seasonal. Mushroomcore pairs naturally with pumpkins, dried leaves, and pinecones. Add those in fall, then swap in evergreen sprigs for winter.
Remember that a little goes a long way. One well-styled shelf can carry the whole aesthetic.
Mushroomcore on a Budget
You do not need to spend much to embrace this trend. Here are my favorite money-saving strategies.
- Shop the dollar store first. Small terracotta pots, craft paint, felt sheets, and twine are almost always available for a dollar or two each.
- Watch garden centers. At the end of summer, small pots and trays go on clearance. Stock up for fall projects.
- Repurpose what you own. Old jars, candle holders, and wooden blocks can all become mushroom bases with a coat of paint.
- Use nature's supplies. Pinecones, acorns, sticks, and dried moss are free if you collect them on a walk. A quick bake at a low temperature makes them safe to bring indoors.
- Make your own felt. A single felt sheet makes several mushrooms. Compare the cost to buying one ceramic mushroom and you will see the savings add up fast.
The handmade route also means your decor is one of a kind. No one else will have your exact mushroom family.
Mushroomcore Projects with Kids
This trend is wonderfully family-friendly. Children love the fairy-tale shapes, and most of these projects are easy enough for little helpers.
For toddlers: Let them help with felt garlands. They can arrange the mushrooms along the twine while you handle the hot glue. They can also press spots onto painted mushrooms while the paint is wet.
For school-age kids: Painting terracotta mushrooms is a perfect independent project. Give them their own pots and let their imagination run. You may end up with purple mushrooms and rainbow stems — that is the charm.
For family time: Make the centerpiece together. Kids love hunting for pinecones and acorns in the yard, and they feel proud when their finds end up on the dinner table.
These projects also make sweet handmade gifts for grandparents and teachers. A single painted mushroom with a note is a gift that says you took the time.
Where to Shop for Mushroom Decor
If you would rather buy a few pieces than make them, you have plenty of options. Mushroom decor is widely available now that the trend is established.
- Dollar stores and discount shops: Great for bases, felt, and seasonal accents. Check the candle aisle for mushroom-shaped candle holders.
- Garden centers: Look for ceramic mushroom stakes and solar mushroom lights for the porch or garden.
- Craft stores: Felt, paint, and wooden shapes are always in stock. Many craft chains now carry pre-made mushroom decor too.
- Online marketplaces: Search for mushroom lamp, mushroom garland, or mushroom planter to see the full range. Read reviews before buying so you know what you are getting.
- Thrift stores: Vintage mushroom decor from the 1970s is beloved by collectors. Keep an eye out while browsing — it is one of the trend's oldest and sweetest forms.
A mix of handmade and bought pieces gives your home a personal, lived-in look that all-store-bought decor cannot match.
Conclusion
Mushroomcore is more than a trend. It is an invitation to slow down, notice small wonders, and make your home feel like a cozy woodland retreat. Whether you paint one terracotta mushroom or fill a whole shelf, you are creating a space that feels warm, playful, and unmistakably autumn.
Start with the project that sounds most fun. Gather a few supplies, set aside an evening, and let yourself enjoy the process. The mushrooms do not need to be perfect — the slightly imperfect ones are the ones you will love most.
Once your mushroom corner is styled, take a photo and see how it makes you feel. Then try another project, or pass the craft along to a friend. Fall is long, and there is room for plenty of cozy making in it. Happy crafting!