Introduction
There is a moment, somewhere between the wheel slowing and the clay going hard, when a pot is still soft enough to change and already firm enough to hold its shape.
That moment belongs to trimming. It is the second half of wheel work, the part nobody films, and the part that quietly decides whether your pot sits flat on a shelf or rocks gently forever.
If you have thrown a piece and set it aside to firm up, you are already halfway there. This guide picks up exactly where throwing ends: a leather-hard pot, a wheel, and one small loop tool.
Pottery trimming is slow, almost meditative work. It also teaches you more about clay than throwing does, because you finally get to see the wall you made from the outside.
Nothing here requires a perfect pot to begin with. A slightly lopsided bowl is the ideal student, and it will come off the wheel looking far more deliberate than it did going on.
What Trimming Is and Why It Matters
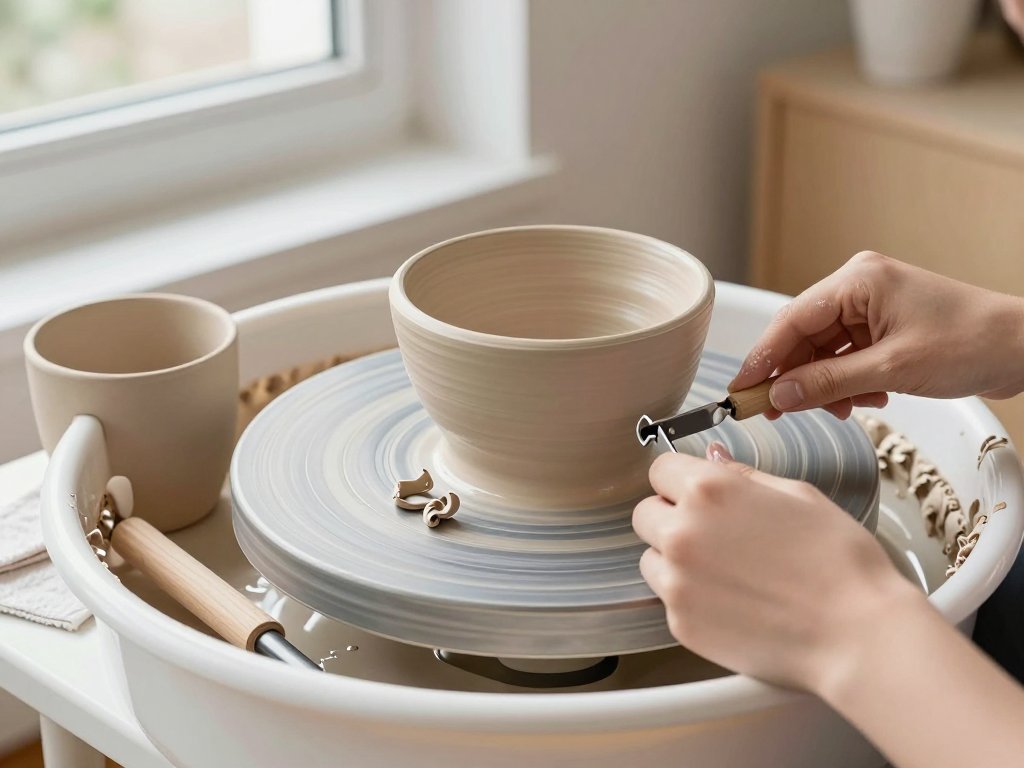
Trimming means turning a leather-hard pot upside down on the wheel and cutting clay away from the base.
You are not decorating. You are editing. The pot already exists; trimming decides how it meets the table, how it feels in the hand, and how much it weighs.
Most pottery trimming problems come down to two things: timing and centring, not talent. Get those right and the cutting almost takes care of itself.
The quiet second step
Throwing is loud and immediate. Trimming is dry and patient — the tool hisses, fine curls of clay peel away, and a shape you thought was finished becomes better than it was.
Many beginners skip it, especially in the first months. The pot looks fine from above, so why bother? The answer arrives the first time someone sets it down and hears a click.
What a foot ring actually does
A foot ring is the raised circle of clay on the base that the pot stands on. It lifts the body slightly, creates a soft shadow line, and gives the piece a deliberate, finished edge.
It also protects the pot. A wide flat base sits in a puddle of glaze during firing; a foot ring keeps the glazed body clear of the kiln shelf.
And it changes the weight. Removing clay from the base moves the visual mass of the pot upward, which is why trimmed pieces feel lighter in the hand even when they weigh the same.
What trimming fixes
- It lightens the base, so the pot feels balanced rather than bottom-heavy.
- It removes throwing lines and the spiral ridges left by your fingers.
- It flattens a warped or uneven bottom so the pot stops wobbling.
- It thins an over-thick floor, which reduces both weight and drying cracks.
- It gives the glaze line a clean place to stop.
Timing: The Leather-Hard Window
Trimming only works in one narrow state. Too wet and the clay smears, dents, and collapses under the tool. Too dry and it chips, cracks, or refuses to cut cleanly.
Leather-hard is the middle: firm enough to hold its shape under your hand, soft enough that a tool slices it like cold butter.
Four ways to test
- Press a thumbnail into the base. It should leave a shallow dent without sinking in.
- Touch the wall with the back of your hand. It feels cool and dry, not damp.
- Look at the colour. The clay has lightened from dark and glossy to a matte, even tone.
- Brush a finger across the rim. It is no longer tacky and leaves no wet smear.
If the pot still feels cold and slightly sticky, wait. If your thumbnail barely marks it, you have likely missed the window and should finish the piece by hand instead.
Humidity changes everything. A piece thrown on a rainy day may take two days to reach leather-hard; in dry winter air it can pass through in a few hours.
A simple trick: wrap the pot loosely in a plastic bag between checks. That slows the drying and buys you hours of working time.
Thin walls dry first, thick floors last. So a pot can feel ready at the rim and still be too soft at the base, which is why the thumbnail test belongs on the bottom.
The Tools You Actually Need
You do not need much, and you certainly do not need the most expensive version of anything. A beginner's trimming kit fits in one hand.
- The wheel. Any wheel that turns slowly and steadily. You will use it at a gentler speed than throwing.
- A bat or wheel head. A bat protects the wheel head and lets you lift the pot off without disturbing it.
- Clay lugs or a coil. Three small worms of soft clay hold the pot in place while you cut.
- Loop and cutting tools. A small loop removes bulk, a wider loop smooths, and a cutting tool squares the outer edge.
- A wooden rib. For compressing and smoothing the foot ring.
- A chamois or sponge. Damp, not wet, for the finishing pass.
- Calipers. To measure the foot so both sides match.
- A needle tool. To check floor thickness and mark the centre.
Buy one good loop tool rather than a set of six cheap ones. A sharp, well-formed loop cuts cleanly; a dull one drags and tears the clay instead of slicing it.
Keep a small dish of water nearby, but use it sparingly. Water softens clay fast, and a wet foot ring smears under your finger.
Securing and Centring the Upside-Down Piece
This is the step beginners rush, and it is the one that ruins the most pots. If the pot is not centred, every cut you make will be off-centre too.
Set the pot upside down on the bat. Press down lightly with both palms and give it one small, firm tap to seat it on the surface.
Spin the wheel slowly and watch the rim. If it moves in a circle, the pot is off-centre. Tap the high side gently until the rim stops wandering.
Gentle pressure, not force
A leather-hard pot is strong but not rigid. Pressing hard distorts the rim you spent so long getting level, and the damage only shows up after firing.
Instead of pushing, tap. Small, repeated taps with the heel of your hand move clay without crushing it. Patience here saves the whole piece.
Making clay lugs
Roll three small coils of soft clay, each about the length of your finger. Press them against the base at even intervals, like a three-point stand.
Press the pot down onto them, then press the lugs outward against the bat. The pot should feel locked, not squeezed.
Never centre by trapping the pot against the wheel head with force. That is how rims go oval and floors crack weeks later in the kiln.
Cutting the Foot Ring, Step by Step
Now the real work. Keep the wheel at a slow speed and brace your hands against each other so the tool travels in a controlled arc rather than a wobble.
- Measure. Open the calipers to the width you want, usually about two-thirds of the pot's base diameter, and set them lightly against the clay so the points just touch.
- Mark the outer edge. With the wheel turning slowly, hold the caliper point against the base and let it scribe a faint circle. Stop and check the mark is even all the way around.
- Cut inward at a shallow angle. Hold the loop tool almost flat, tilted just slightly, and remove the clay outside the line. Shallow angles avoid gouging.
- Define the inside wall. Cut down on the inner side of the ring, angling the tool so the wall tapers outward toward the base. A slight taper looks intentional.
- Keep the floor even. Work in light passes rather than one deep cut, checking with your fingertips as you go.
- Check with a needle tool. Push the needle gently into the floor and feel for resistance. It should meet an even thickness across the whole base.
Cut in passes. Three thin shavings give you far more control than one thick one, and they let you stop the moment something starts to look wrong.
The angle matters more than the depth. A foot ring cut with a sloping outer wall catches light and looks purposeful; a vertical wall often looks abrupt and thin.
Leave the foot ring itself slightly thicker than the floor. It carries the weight of the pot, and a ring that is too thin chips easily in daily use.
Keep your tool hand still and let the wheel do the travelling. Beginners tend to steer the tool around the pot, which produces an oval ring every time.
Refining the Foot: The Finishing Pass
The cut foot ring is functional. The finishing pass is what makes it feel like a pot someone cared about.
Chamfering the edge
Run a damp finger or a soft rib along the outside edge of the foot ring to round it slightly. This is called chamfering, and it prevents chipping.
A rounded edge also feels better in the hand. Sharp clay edges are the first thing a user notices, even if they cannot say why.
Compressing the ring
Press a wooden rib firmly against the foot ring while the wheel turns. This compresses the clay particles and closes the surface.
Compressed clay is denser and less likely to crack during drying. It also takes glaze more evenly if you decide to glaze the foot.
Cleaning the base
Wipe the base with a barely damp sponge to remove clay dust and loose shavings. Dust left behind becomes a rough, gritty surface after firing.
Finally, run a damp chamois around the whole foot in one continuous motion. That is the finishing pass, and it takes about thirty seconds.
Hold the pot up to a window when you are done. A good foot ring has an even shadow underneath it, and that shadow tells you the base is true.
Troubleshooting: When Trimming Goes Wrong
Trimming fails in predictable ways, which is good news. Each problem has a cause, and each cause has a fix you can try on the same pot.
The piece slips or flies off
Usually the clay lugs are too soft, or the pot is too dry to grip them. Re-moisten the lugs slightly, or add a thin coil of fresh clay beneath the rim.
Slow the wheel down. Most slips happen because the wheel is turning faster than the tool can cut.
Chattering or jumping
A jumping tool means you are cutting too deep, too fast, or with too much of the loop engaged. Take lighter passes and brace your hands together.
Chatter marks look like ripples on the base. They can be smoothed with a rib while the clay is still soft, but they are stubborn once the pot dries.
Cutting through the floor
If the needle tool shows the floor is thinner than you thought, stop cutting immediately. A hole in the base is a structural problem, not a cosmetic one.
Patch it by pressing a small coil of soft clay into the hole from both sides, then compress firmly with a rib. Let it dry slowly, wrapped in plastic.
An off-centre foot
If the finished foot ring sits to one side, the pot was not centred before cutting. The pot will rock on any flat surface.
You can rescue it by turning the pot over, re-centring gently, and cutting a slightly smaller ring inside the old one.
Uneven drying
Pots that dry too fast warp, especially when the floor is thin. A foot ring cut thick on one side and thin on the other will pull out of shape as it dries.
Wrap the pot loosely in plastic for a day after trimming. Slow, even drying prevents most of the warping beginners blame on the kiln.
When the foot ring is already wrong
If you cut too deep on one side, you have three options. Even it out into a shallower ring, carve a decorative channel to disguise the unevenness, or simply keep it.
Handmade pots are allowed to be imperfect. A slightly wonky foot ring is a record of a real learning moment, and nobody but you will ever measure it.
After Trimming: Drying, Bisque, and Your Signature
Once trimmed, the pot needs time. Place it somewhere draft-free and cover it loosely with plastic so the outside does not dry faster than the inside.
Check it daily. When the clay is cool and firm all the way through, it is bone dry and ready for the kiln.
Bisque firing, the first firing, happens somewhere around cone 04 to cone 06. It burns out moisture and organic matter and turns the clay into a porous, permanent material.
The foot ring you cut is now structural. If it is uneven, the pot will still rock; the kiln does not fix geometry, it only makes it permanent.
Sign the base before bisque, while the clay can still take an impression. A needle tool or a small stamp pressed into the trimmed base is enough.
Do it after trimming, not before. The trimming pass will erase anything you wrote earlier, which is a lesson most of us learn exactly once.
The No-Wheel Alternative: Hand-Trimming
No wheel? You can still trim, and the results can be surprisingly good.
Place the upside-down pot on a banding wheel or a simple turntable. Hold the pot steady with one hand and cut with a small loop tool in the other.
Turn the turntable slowly with your forearm rather than your wrist, and cut in short, even strokes. Reposition the pot after each pass so your cutting hand stays comfortable.
A cake turntable works fine. So does a lazy Susan, as long as it turns smoothly and does not wobble under pressure.
Hand-trimming is slower and less precise than wheel work, but for a small bowl or a mug it is often good enough, and it is far better than no foot at all.
It is also excellent practice. Without the wheel doing the centring for you, you learn to feel when a shape is true instead of trusting the machine to tell you.
Work in gentle increments and rotate the pot a quarter turn at a time. Four small cuts, checked against each other, will always beat one heroic sweep.
Conclusion
Trimming is the step that turns a thrown object into a considered pot. It takes twenty minutes and a sharp tool, and it changes how the piece sits, feels, and lasts.
Your first foot ring will probably be uneven. That is fine. Cut a second one on the next pot, and a third after that, and you will start to feel the clay respond before your eyes confirm it.
When trimming starts to feel natural, the next wheel project is lidded jars, where a fitted lid teaches you even more about measuring clay.
For now, take one leather-hard pot, centre it gently, and make one clean cut. That small circle of clay is where the craft starts to feel like yours.