Introduction
Every October, I think of my grandmother's kitchen table. The week before Halloween, she would spread old newspaper over the worn wood and set out her tin watercolor box, its little pans worn into soft half-moons of color.
I was seven the first time she let me paint a ghost. She showed me how to make a puddle of gray-blue water and let it spread into a soft, wobbly shape that looked nothing like a ghost and somehow exactly like one.
We hung our paintings on the refrigerator, and I have never forgotten how proud I felt. She never once said the word "wrong."
This is a guide to spooky watercolor for anyone who has ever thought, "I could never paint that."
Here is the promise: these are easy, forgiving, spooky-but-sweet watercolor scenes that anyone can paint in a single evening. Put a cup of tea at your elbow, wait until the house is quiet, and give yourself one unhurried hour.
By the time you finish this Halloween painting guide, you will have at least one little scene you are honestly proud of. That is your first small win.
Gather Simple Supplies
Before we paint, let us talk supplies, starting with this reassurance: you do not need fancy materials.
The first Halloween I painted as a grown-up, I used a child's eight-dollar set and paper from the grocery store. The paintings came out just fine, because the magic was never in the price tag.
Beautiful supplies are lovely to have, but they will never matter as much as showing up with a brush and ten quiet minutes.
Here is what I keep in my own little painting basket:
- Watercolor paper, 140lb cold press. It is thick enough to handle water without buckling, and its gentle texture gives paint something lovely to settle into.
- A basic palette. You truly need only a handful of colors: payne's gray, ultramarine blue, sepia, burnt sienna, yellow ochre, and alizarin crimson. That small family can mix nearly every Halloween color you will ever want.
- Two round brushes: a size 8 for washes and big shapes, and a size 4 for branches, faces, and fine details. That is genuinely all the variety you need.
- Two water jars: one for rinsing your brush and one for clean water. This one habit will save your colors from turning to mud.
- Paper towels, for blotting, lifting mistakes, and drying your brush between colors.
No expensive sets, no twenty-brush roll, no art desk required. A corner of the kitchen table works beautifully.
If you are a watercolor beginner, keep the first palette small. Fewer colors mean fewer decisions, and fewer decisions mean more actual painting.
Spooky but Sweet: Choosing a Palette
The secret to Halloween scenes that feel cozy rather than frightening lives entirely in color. Get the palette right, and even a crooked ghost looks friendly.
Think of two worlds: the cool world of moonlight and the warm world of lit windows.
Cool colors, the blues, purples, and grays, read as night, as sky, as the hush right before bedtime. Ultramarine blue mixed with a little payne's gray makes the kind of moonlit sky that feels soft instead of scary.
Warm colors, the oranges, golds, and deep reds, read as candlelight, as a glowing window, as the safety of home. Burnt sienna and yellow ochre together mix the exact orange of a jack-o'-lantern's smile.
Most of my favorite spooky watercolor paintings use both worlds: a cool blue night holding one warm glowing window tells a whole story.
So before you dip a brush, ask yourself: what color is Halloween to you? The answer will quietly guide every choice you make tonight.
Two mixing tips that keep colors clean
The most common beginner frustration is mud: too many colors meeting in one wet puddle. The best fix is prevention.
Tip one: let colors mix on the paper, not in the pan. Touch two colors side by side in a wet area, and they blend into a fresh third color on their own.
Tip two: rinse your brush between every color change. Keep one jar for rinsing and one for clean water, and treat that second jar as sacred.
And when a passage looks gray and tired, stop adding paint and make a fresh cup of tea.
Your First Scene: Moonlit Tree Silhouette
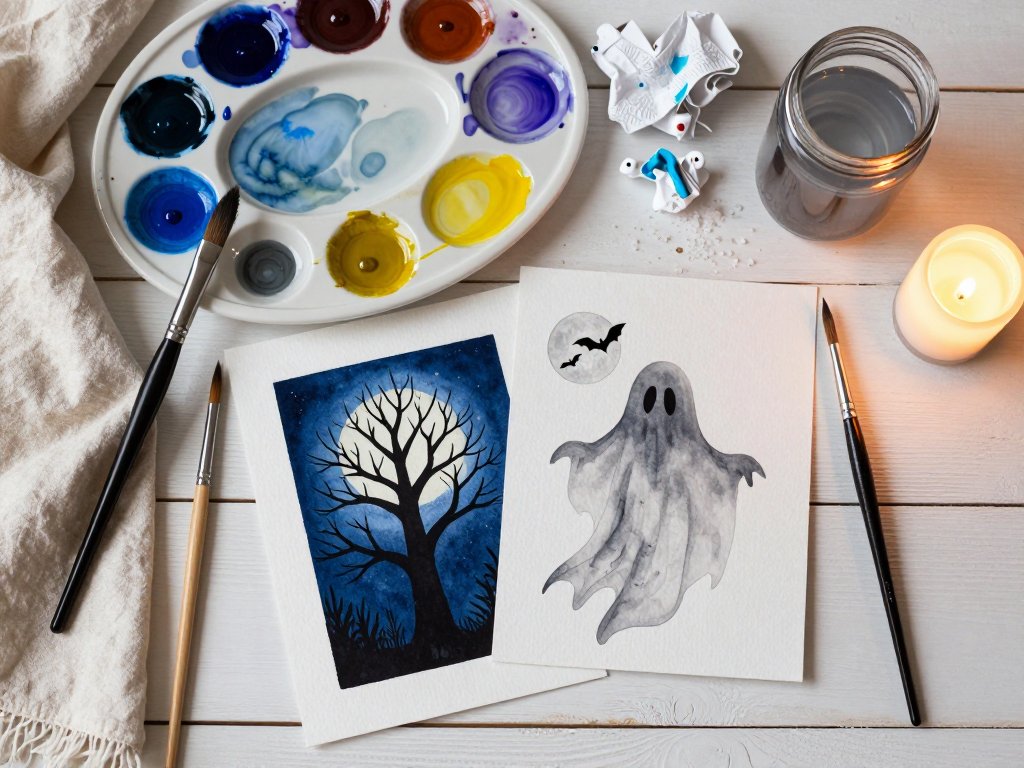
Let us paint a whole scene, start to finish. The moonlit tree is the project I teach first, because it asks for only two things: a soft sky and a dark shape. If you can do those two things, you can do this.
There is something deeply peaceful about watching a night sky bloom across wet paper.
Step one: paint the sky wet-on-wet
Wet-on-wet simply means painting into paper that is already damp, the easiest way to get dreamy, cloudlike skies.
- Wet the sky area with a clean brush loaded with plain water. The paper should glisten like dew, but not pool into puddles.
- Touch ultramarine blue into the wet paper near the top, then add a little payne's gray below. Watch them drift and blend on their own.
- Leave the wash alone while it dries; poking at it only stirs up trouble.
- While you wait, mix your tree color: sepia with a touch of payne's gray makes a rich, soft near-black that feels exactly like night.
Step two: add the silhouette
Here is the one rule that matters: wait until the sky is completely dry before you paint the tree. Damp paper will make your dark branches bleed into soft ghosts of themselves.
- When the sky is dry, load your size 4 brush with the dark mix.
- Paint the trunk starting at the bottom edge of the paper, pressing gently, then pull upward toward the sky.
- Add branches sweeping outward from the trunk, lifting the brush as you go so each one tapers to a delicate point.
- Once the main branches are dry, add smaller twigs for that lovely bare-winter look.
Remember, a moonlit tree is a silhouette, not a botanical drawing.
Paint a second tree slightly smaller behind the first, and your scene instantly gains depth.
If you want a finishing touch, add one tiny warm window glowing in the trunk. Or leave it purely dark; both are right.
Friendly Ghosts That Float
Now for my favorite subject: ghosts, the most forgiving thing in the whole spooky watercolor world.
A ghost is the one subject where a wobbly edge is a feature rather than a flaw. Blurriness reads as haunting, and unevenness reads as drifting, so every accident works in your favor.
The first ghost I ever painted, at my grandmother's table, was supposed to have a pointed head. It came out round and lopsided, and she declared it the friendliest ghost she had ever seen.
How to paint a simple ghost
- Mix a pale, watery gray: payne's gray with a great deal of water, until it looks like weak tea.
- Paint a wet shape with your size 8 brush, a rounded head on top and a soft, wavy bottom, like a sheet caught in a breeze.
- Let the edges blur gently into the paper. For a softer drift, touch clean water along the bottom edge and watch it feather.
- While the ghost is still damp, blot the very bottom with a crumpled paper towel to suggest it fading away at the hem.
- Let it dry completely before you add any details.
Faces are optional. I usually add two tiny dark dots and a small oval mouth with my size 4 brush, because a sweet face keeps the scene gentle for little eyes.
Some nights I leave them blank, and somehow they look even more ghostly.
Paint three ghosts floating up the page at different heights and you have a whole little story. Give one a crooked tilt and it looks like it is waving.
Ghosts cannot be wrong. Whatever shape yours takes is simply what that ghost looks like, and there is genuine freedom in that.
A Harvest Moon with Bats
Nothing says Halloween like a big harvest moon in a cool sky, and it is surprisingly simple: really just a circle with a glow.
You have two easy ways to get the circle right, and neither one requires drawing talent.
Keep the moon white
The simplest method needs no masking at all. Lightly pencil a circle in the sky, with the rim of a jar lid as your guide, then paint your sky wash right over the whole paper.
While the sky is still damp, dab the inside of the circle with a clean paper towel to lift the color away. The moon stays pale and soft-edged while the sky deepens around it.
Or paint the moon warm
Prefer a golden moon? Then paint your sky first and let it dry completely. Mix yellow ochre with a whisper of burnt sienna and plenty of water, then fill in your penciled circle with a soft, even wash.
For the warm glow, add a second, even more diluted ring of the same color around the moon while the first is still damp. It will bloom outward like candlelight through fog.
Either way, step back and ask whether the night feels lit. If it does, the hard part is done.
Tiny bats with a liner brush
Bats are the details that make a harvest moon scene read as Halloween, and they are almost embarrassingly easy.
Load your size 4 brush with the same dark mix you used for the tree. Practice on scrap paper first: a bat is just two little arcs meeting at a point, like a shallow letter M with wings.
Paint three or four tiny bats crossing the moon, small and dark and slightly uneven. That unevenness is exactly what makes them look alive.
Resist painting many: in moonlight, less is more, and three bats tell the story perfectly.
Easy Texture Tricks: Salt, Splatter and Scraping
Here is a secret: texture does half the work in a lovely painting, and three of the best tricks are childishly simple.
Each takes seconds and adds instant atmosphere. Try one at a time.
Salt for stars and snow
While your sky wash is still damp, sprinkle a few grains of table salt across it. As the water dries, each crystal pulls pigment into a tiny pale starburst.
When the paper is dry, brush the salt away and little stars will be waiting. The trick works beautifully for snow drifting past a moonlit tree, too.
Use salt sparingly at first. A pinch is plenty, and you can always add more on the next painting.
Toothbrush splatter for a scatter of stars
For a sky full of tiny stars, load an old toothbrush with fairly thick light paint. Hold it over your dry painting and run your thumb slowly across the bristles, letting fine droplets fall.
Lay scrap paper over the parts you want to protect, and practice first so the surprise happens there instead.
A few dozen tiny specks can turn a plain sky into a glittering night. It is the kind of trick that makes people say, "how did you do that?"
Credit-card scraping for tree trunks
Here is the trick I use for bark and bare branches: paint a dark strip of color, and while it is still wet, drag the straight edge of an old credit card through it.
The card pushes the paint aside in clean, pale lines, leaving instant streaks of texture that look like weathered bark. One smooth drag can even pull several branches out of a trunk.
Any stiff plastic edge works, a loyalty card or a plastic ruler. Just wash it before the paint dries.
Try one texture per painting at first. A single well-placed trick is more effective than three competing ones.
Fixing Common Beginner Worries
Let us talk about the worries I hear most from new painters, because I have had every one of them myself. None means you are bad at this.
"My colors turned muddy"
Mud happens to everyone, and it is almost always the same story: too many colors met in the same wet puddle.
Rinse your brush between colors, let each layer dry before adding the next, and when you are unsure, use fewer colors rather than more.
If mud appears, lift it while wet: blot with a clean damp brush, press a paper towel over the spot, and soften the edges into shadow.
"I used too much water"
Too much water makes colors run pale and paper buckle into hills. It is the most common watercolor beginner struggle, and one of the easiest to fix.
Blot your loaded brush before it touches the paper. If a puddle forms, tilt the paper, or touch its edge with a paper-towel corner to siphon it away.
A little buckling is just paper being paper; it usually relaxes as it dries.
"My lines are wobbly"
Wobbly lines are watercolor's signature, not its failure. No branch in nature is ruler-straight, and no ghost should be either.
If you want steadier strokes, rest your painting hand on your other hand, slow down, and practice swoops on scrap paper.
And remember where you are: this is spooky watercolor, and wobble reads as character. A trembling little bat is ten times more charming than a perfect one.
Here is my grandmother's rule, which I now pass to you: a painting that taught you something is a good painting, no matter what it looks like.
Painting With Little Helpers
Halloween is a season for making things with small people. Some of my happiest evenings have been spent painting spooky pictures with my kids on the kitchen floor, an hour before trick-or-treating.
You do not need to be a teacher for this. You only need paper, paint, and three small ground rules.
- Everyone paints on their own paper, including you. No sharing one masterpiece.
- Nobody touches anybody else's painting. Not to fix it, not to improve it, not even to help.
- Praise the trying, not the result. "Look at how brave that purple sky is" beats "that is so good" every single time.
Give each child the same simple palette and let them decide whether their Halloween is spooky or silly. You may be surprised how often they choose silly.
Expect wet messes, paint in unexpected places, and ghosts that look more like clouds. Laugh at all of it together.
Keep the session to twenty minutes and stop while everyone is still happy; you can paint again tomorrow night.
The painting you make beside your child will not be your finest work. It will be proof of an evening spent together.
When your child holds up a crooked ghost with pride, you will understand why I remember my grandmother's kitchen table.
Conclusion
Tonight, when the house is quiet and your tea has gone cold for the third time, you will paint something that did not exist an hour ago. That never stops feeling like a small miracle.
Your scene does not need to be gallery-worthy. It needs to be yours, painted by your own hand.
When you finish, sign your name small in the corner in pencil; that signature is what makes it a real painting.
Then choose what comes next: frame it where you will see it daily, tuck it into a card for someone you love, or lay it on the counter and try again tomorrow.
Every evening of painting makes the next one easier. Every wobbly ghost teaches your hand something. Every small win stacks up, until one day you realize you are not a person who wishes she could paint; you are a person who paints.
My grandmother's crooked ghosts are long gone, but I still remember exactly how it felt to make one. Now you have that same memory waiting for you, too.
So fill your brush, make a wish on your harvest moon, and happy Halloween painting, friend. I will be at my own kitchen table, painting right along with you.