Introduction
It started with a few photos on social media — friends gathered around a table, paintbrushes in hand, half-finished miniature houses glowing with personality. Within weeks, the DIY birdhouse-making party went viral, popping up in backyards, barns, and living rooms across the country. And it's easy to see why: this trend combines the quiet satisfaction of crafting with the joy of gathering people you love.
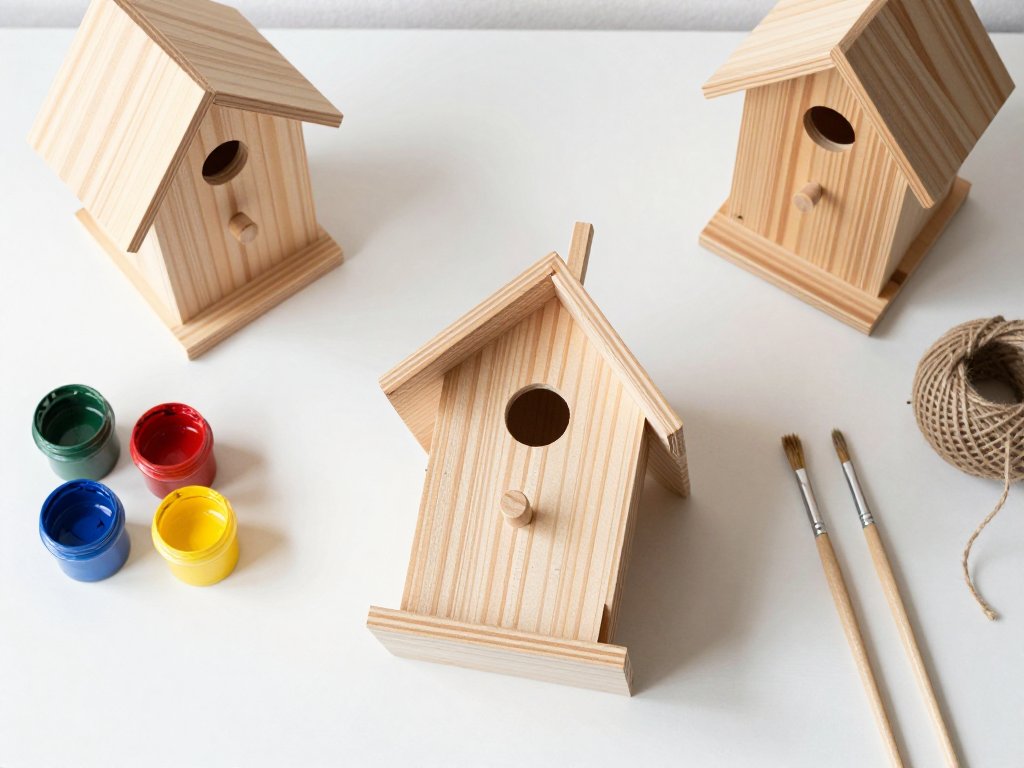
At its heart, a birdhouse party is simple. You bring together a handful of friends, set out pre-drilled wooden birdhouse kits, paint, brushes, and a scattering of decorative bits, and let everyone build their own tiny home for local birds. There is no pressure to be good at crafts. There is no race to finish first. The whole point is to laugh, sip something warm, and walk away with a finished project that feels genuinely yours.
If you have been scrolling past these photos and thinking, I could do that, you are absolutely right. This guide walks you through everything — from the birdhouse kit station you need to set up, to the bird-safe design rules that matter, to the whimsical details that make each house a miniature work of art. Whether you are hosting for a birthday, a ladies' night, or just because spring is in the air, this is the craft trend that delivers every time.
Why Birdhouse Parties Took Off
The pandemic taught us how to find connection in small, intentional gatherings. Birdhouse parties fill that same need now. They are structured enough to feel like an event, but loose enough that everyone — toddlers to grandparents — can join in.
There is also the undeniable pull of building something with your hands. In a world of screens and notifications, sitting down with a piece of untreated pine, a pot of FolkArt paint, and a little jute twine feels grounding. You make something real. You take it home. You hang it in a tree, and months later, you see a chickadee poke its head out of the hole you painted the roof to match.
And then there is the social media factor. Birdhouses photograph beautifully. The tiny scale, the bright colors, the charming imperfections — they beg to be shared. The hashtag #birdhouseparty has exploded with finished houses, group shots, and before-and-after table setups that inspire the next wave of hosts.
The Social Side: Music, Snacks, and Judging Categories
A birdhouse party is not a solo craft project. It is a full-blown social affair, and the best hosts treat it like one.
Set the mood. Build a playlist with acoustic folk, soft indie, or whatever makes your group happy. Keep it background-friendly — something that hums along while people paint. Acoustic guitar playlists, lo-fi beats, or even bird song soundtracks (yes, really) all set a warm tone.
Snacks matter. Finger foods that do not compete with wet paint are ideal. Think mini quiches, cheese boards with crackers, fruit skewers, and cookies. Drinks can be as simple as lemonade and iced tea for daytime parties or a signature mocktail or sangria for evening gatherings. Avoid anything dusty or crumbly that might end up in the paint tray.
Create judging categories. This is where the party really comes alive. At the end of the session, have everyone put their finished birdhouse on a display table and vote. Popular categories include:
- Most Whimsical — for the wildest color combo and most creative tiny details
- Most Bird-Friendly — for the house that follows every bird-safe rule to perfection
- Best in Show — overall favorite, voted by the group
- Honest Effort — a fun category for the person who went full abstract art
The group photo. Before anyone packs up, gather everyone holding their birdhouses. Snap a group shot in natural light. This is the memory that lasts long after the paint dries, and it is exactly the kind of photo that spreads the trend to your friends who missed out — and guarantees a bigger turnout next time.
The Heart of the Party: The Birdhouse Kit Station
The secret to a smooth birdhouse party is the kit station. This is not the place for winging it — having everything laid out and ready before guests arrive makes the difference between a relaxed afternoon and a scramble for supplies.
What goes in each kit bag:
- Pre-drilled wooden birdhouse pieces (untreated pine is the gold standard — no chemicals that could harm birds)
- A small bottle of exterior wood glue
- Fine-grit sandpaper for smoothing rough edges
- One or two small bottles of FolkArt outdoor craft paint in coordinated colors
- A paintbrush set (one flat, one detail brush per person)
- A length of jute twine for hanging or wrapping perches
- A small decor pack with extras: tiny wooden welcome signs, miniature silk flowers, small wooden hearts or stars, and decoupage napkins with floral patterns
Setting up the station: Arrange kits in individual bags or small boxes at each seat. Place a central supply table with extra paint colors, additional brushes, paper plates for palettes, cups of water for rinsing, paper towels, and drop cloths or newspaper for the table surface. A separate drying rack area — an old wire cooling rack works perfectly — gives finished houses a place to sit while paint dries.
Where to find supplies: Many local craft stores now carry pre-cut birdhouse kits, but you can also find excellent untreated pine blanks online. For paint, FolkArt paint at arttools.com offers a wide range of outdoor-safe colors that hold up well against the elements. For jute twine and decor packs, arttools.com craft supplies has everything you need to fill your station without running to three different stores.
Bird-Safe Design Rules You Must Follow
Before anyone picks up a paintbrush, take a moment to go over the bird-safe design rules. This is not just nitpicking — these guidelines protect the birds that will eventually move into your handiwork. A beautiful birdhouse that is unsafe for birds is a beautiful box that no bird should live in.
Rule 1: No paint inside the birdhouse. Birds are sensitive to fumes and chemicals. Paint the exterior only. The interior should remain bare, untreated wood. If you are worried about moisture, a thin coat of natural linseed oil on the inside ceiling is acceptable, but skip the paint entirely.
Rule 2: The entrance hole matters. For small songbirds like chickadees, nuthatches, and wrens, a 1.5-inch diameter entrance hole is ideal. Too large, and larger, more aggressive birds (or squirrels) will move in. Too small, and the birds you want cannot enter. If your kit came with a pre-drilled hole, measure it to be sure. If you need to adjust, a rotary tool with a sanding drum can widen a hole slightly.
Rule 3: Include drainage holes. The floor of the birdhouse needs small drainage holes — about four 1/4-inch holes — so rainwater does not pool inside. If your kit did not pre-drill these, use a drill with a small bit before assembly.
Rule 4: Provide ventilation. Small gaps near the top of the side walls let hot air escape. Many pre-cut kits include these as notches in the design. If yours does not, leave a tiny gap when gluing the side pieces.
Rule 5: Rough interior wall for fledglings. Baby birds (fledglings) need a textured surface to climb up to the entrance hole. If the interior wood is smooth, score it with sandpaper or the tip of a screwdriver to create rough vertical grooves. This simple step is a lifesaver for young birds learning to leave the nest.
Rule 6: Avoid perches at the entrance. This one surprises most crafters. Do not add a perch below the entrance hole. Perches help predators (and invasive species like house sparrows) access the nest. Native songbirds do not need them — they cling to the edge of the hole. If your kit includes a perch piece, skip it or use it as a decorative element elsewhere on the house.
Go over these rules at the start of the party. Print them out as a small card for each guest. The birds will thank you, and your friends will feel good knowing their creations are genuinely safe.
Whimsy Details That Make Each House Special
Once the bird-safe basics are covered, it is time for the fun part — making each house unique. The viral trend is all about whimsy, and the details are what make people stop scrolling to look closer.
Contrasting roof colors. A single-color birdhouse is fine. A birdhouse with a roof painted a contrasting color — soft sage green walls with a creamy white roof, or dusty blue walls with a terracotta roof — is memorable. Use painter's tape to get clean lines along the roof edge. FolkArt outdoor craft paint has a chalky finish that adheres well to untreated pine and comes in dozens of muted, nature-inspired hues.
Tiny welcome signs. Small wooden rectangles (about 1 inch by 2 inches) can be painted to look like miniature welcome mats. Write "Welcome" in fine tip, or keep it simple with a tiny heart or flower. Glue them below the entrance hole with exterior wood glue. Some crafters add a tiny "Home Sweet Home" message — utterly charming at such a small scale.
Jute-wrapped perches or details. Even though you should not add a perch below the entrance hole for safety reasons, you can still use jute twine decoratively. Wrap it around the roof peak, along the bottom edge of the house, or around a decorative branch that you attach to the side of the house as a visual element. A dab of wood glue at the start and end of the wrap keeps the jute in place.
Decoupage floral napkins. This is the detail that elevates a painted birdhouse from cute to gorgeous. Take floral-patterned paper napkins, separate the layers, and cut out small flowers or leaves. Use a thin layer of Mod Podge or decoupage medium to adhere them to the painted wood surface. Add another thin layer on top to seal. The result looks like hand-painted botanical art. Tiny roses, lavender sprigs, and daisy patterns work especially well at birdhouse scale.
Miniature silk flowers. A tiny cluster of silk flowers glued near the entrance or tucked into a small pot attached to the front adds three-dimensional charm. Keep them small — miniature roses, baby's breath, or forget-me-nots. Anything larger than an inch across overwhelms the house.
Painted shingles or brick patterns. For the detail-oriented crafter, use a fine brush to paint individual shingles on the roof or tiny brick lines on the walls. This takes time and patience, but the results are stunning. Offer this as an optional advanced technique for guests who want to go the extra mile.
House numbers. A tiny painted number on the front — "1" or the year — gives the birdhouse personality and makes it feel like a real home.
Step-by-Step Birdhouse Assembly Guide
This section is designed to be printed and set at each guest's station. Walk through it together as a group, or let people work at their own pace.
Step 1: Sand everything. Begin by sanding all wooden pieces with fine-grit sandpaper. Focus on edges, corners, and the entrance hole. This removes splinters and creates a smooth surface for paint. Wipe away dust with a damp cloth.
Step 2: Paint first, assemble second. Paint each piece individually before gluing. This is the most important timing tip of the entire project. Painting after assembly is fiddly, messy, and leads to missed spots. Lay out the four walls, the floor, the roof panels, and any decorative pieces. Paint everything. Let it dry completely — about 30 to 60 minutes depending on humidity. Use a hair dryer on low heat to speed things up if needed.
Step 3: Assemble the walls. Apply exterior wood glue to the edges of the back wall. Attach the two side walls. Hold for 30 seconds. Then attach the front wall (with the entrance hole). Make sure all edges are flush. Check that the walls are square by measuring the diagonals — they should be equal.
Step 4: Attach the floor. Apply glue to the bottom edges of all four walls. Slide the floor piece into place. The floor should sit inside the walls, not underneath them. If your kit has pre-cut tabs and slots, align them and press firmly.
Step 5: Add the roof. This is often the trickiest part. Apply glue to the top edges of the front and back walls. Attach one roof panel, letting it overhang equally on both sides. Hold in place until the glue sets. Then attach the second roof panel, overlapping if the design calls for it. Use painter's tape to hold the roof pieces in place while the glue dries — this prevents slipping.
Step 6: Add decorative details. Once the glue is dry (30 minutes minimum), glue on the tiny welcome sign, silk flowers, jute wraps, or any other decorative elements. This is also the time to add decoupage napkin elements.
Step 7: Attach hanging hardware. If your kit includes a screw eye or hook for the roof peak, screw it in now. Thread jute twine or a small chain through for hanging. Alternatively, you can attach the birdhouse to a post using exterior screws through the back wall.
Step 8: Apply a weather seal. For extra protection, spray a clear, outdoor-safe urethane sealer over the entire exterior — but only if you used paint that is not already labeled as outdoor-grade. FolkArt outdoor paint is formulated to resist fading and peeling, but an additional clear coat adds years of life.
Step 9: Let everything cure. Advise guests to let their birdhouse cure for 24 to 48 hours before hanging it outdoors. This gives the glue, paint, and sealer time to fully set.
Hosting a Birdhouse Party: The Checklist
If you are the host, here is your complete planning checklist to pull off a smooth, memorable event.
Two weeks before:
- Choose a date and send invitations (digital invites with a photo of a finished birdhouse set the tone)
- Order kits and supplies — allow time for shipping
- Decide on a maximum guest count based on your space (10 to 12 is a sweet spot)
One week before:
- Confirm RSVPs
- Plan your snack and drink menu
- Print bird-safe rule cards and step-by-step assembly guides
- Set up your playlist
The day before:
- Pre-sand all wooden pieces (this saves guests time and keeps them focused on the fun part)
- Bag each kit with all pieces and supplies
- Shopping for fresh snacks and drinks
- Set up the drying rack area
- Test one birdhouse yourself so you can answer questions
Party day:
- Cover work surfaces with newspaper or drop cloths
- Set out paper plates for palettes, water cups, paper towels
- Arrange kits at each seat
- Set up central supply table with extra paint colors and brushes
- Prepare snacks and drinks
- Start the playlist
- Welcome guests, review bird-safe rules, and let everyone begin
After the party:
- Take the group photo
- Announce judging winners with small prizes (a gift card to the local craft store or a bag of birdseed works well)
- Send guests home with their finished birdhouse in a box or bag
- Share the group photo and encourage guests to post their finished houses with the party hashtag
Seasonal Variations for Year-Round Fun
Birdhouse parties are not just for spring. The trend works beautifully across all seasons with a few adjustments.
Spring birdhouse party: Focus on pastel colors, floral decoupage, and fresh flowers as table decor. Serve light refreshments — lemon bars, fruit salad, cucumber sandwiches. This is the classic version of the trend and the one that most closely matches the viral posts.
Summer birdhouse party: Move the party outdoors to a patio or shaded lawn. Use bright, bold colors — sunflower yellow, coral, turquoise. Paint tiny flower pots to go alongside the birdhouses. Serve cold drinks and grilled appetizers.
Fall birdhouse party: Warm tones rule here. Paint houses in pumpkin orange, deep burgundy, forest green, and warm brown. Use decoupage napkins with autumn leaves or tiny pumpkins. Add miniature silk autumn leaves as decoration. Serve apple cider and pumpkin bread.
Winter birdhouse party: Paint houses in snowy white, icy blue, and pine green. Add tiny painted snowflakes or use a white paint pen for delicate winter patterns. A miniature wreath made from greenery and a tiny red bow on the front creates a festive look. Serve hot cocoa and cookies. These also make wonderful handmade gifts for the holiday season.
Kids' birdhouse party: Simplify the kits — pre-glue the walls before the party so kids only need to paint and decorate. Use washable, non-toxic paint. Skip sharp tools and small decorative pieces that are choking hazards. Let the kids go wild with colors; the more mismatched, the better. This is a fantastic birthday party option for ages 5 to 10.
Troubleshooting Common Birdhouse Party Problems
Even well-planned parties hit snags. Here is how to handle the most common issues.
Paint is too thick. FolkArt paint and other craft acrylics sometimes thicken in the bottle. Add a few drops of water and stir. For outdoor use, a paint medium designed for exterior applications works even better.
Wood pieces do not fit together. Pre-cut kits are generally accurate, but humidity can cause slight swelling. Sand the edges of the tight-fitting pieces until they slide together comfortably. Do not force them — you risk cracking the wood.
Glue will not hold. Exterior wood glue needs clamping pressure for the strongest bond. If you do not have clamps, use painter's tape or heavy rubber bands to hold pieces together while the glue dries. Be patient — give it at least 30 minutes before handling further.
Paint drips onto the interior. This happens. Wipe it off immediately with a damp paper towel. If it has already dried, sand it away lightly. Remember: no paint inside the house for bird safety.
A guest finishes way ahead of everyone else. Have a backup activity ready. A second small project — painting a wooden garden stake or a small sign — keeps fast finishers engaged without disrupting the group.
A guest is struggling and frustrated. Remind everyone that imperfect birdhouses are charming. Real birds do not judge. Sometimes the wonkiest roof becomes the most loved house. Offer a helping hand, but only if they want it. The goal is fun, not perfection.
What to Do With Your Birdhouse After the Party
Your guests will leave with their creations, but you might end up with a sample house or two. Here is how to put them to good use.
Hang it in your own yard. Choose a spot that is 5 to 10 feet off the ground, facing away from prevailing winds, with some shade during the hottest part of the day. Mount it on a pole or hang it from a tree branch. Avoid direct southern exposure, which can overheat the interior.
Give it as a gift. A hand-painted birdhouse is a thoughtful housewarming gift, teacher appreciation present, or hostess gift. Attach a tag with the bird-safe specs so the recipient knows it is ready to hang.
Donate it. Local nature centers, retirement homes, community gardens, and schools often welcome handmade birdhouses. Call ahead to ask about their needs. Some facilities use them for fundraising auctions or resident activities.
Use it as decor. Even if you never hang it outside, a beautifully painted birdhouse looks wonderful on a bookshelf, mantel, or windowsill. It is a year-round reminder of a great party.
Why This Trend Is Here to Stay
Craft trends come and go, but the birdhouse-making party has something special. It is not about the finished product alone — it is about the afternoon spent together. The moment someone discovers they can actually paint a straight line. The laugh when someone's roof slides off for the third time. The quiet satisfaction of holding something you built with your own hands.
Birdhouse parties work because they meet us where we are. They are beginner-friendly, endlessly creative, and genuinely good for the soul. And every time a chickadee pokes its head out of that 1.5-inch hole, you get a tiny, feathered reminder that making things with people you love is always worth the effort.
So gather your friends. Pick up some FolkArt outdoor paint at arttools.com, stock up on craft supplies at arttools.com, and get ready to host the trend that everyone is talking about. Your birds — and your friends — will thank you.

