Introduction
Every December I buy one of those printed calendars, and every December I regret it. The chocolate tastes like wax, the doors tear on the second morning, and by the fourteenth the whole thing is a flattened sleeve in the recycling.
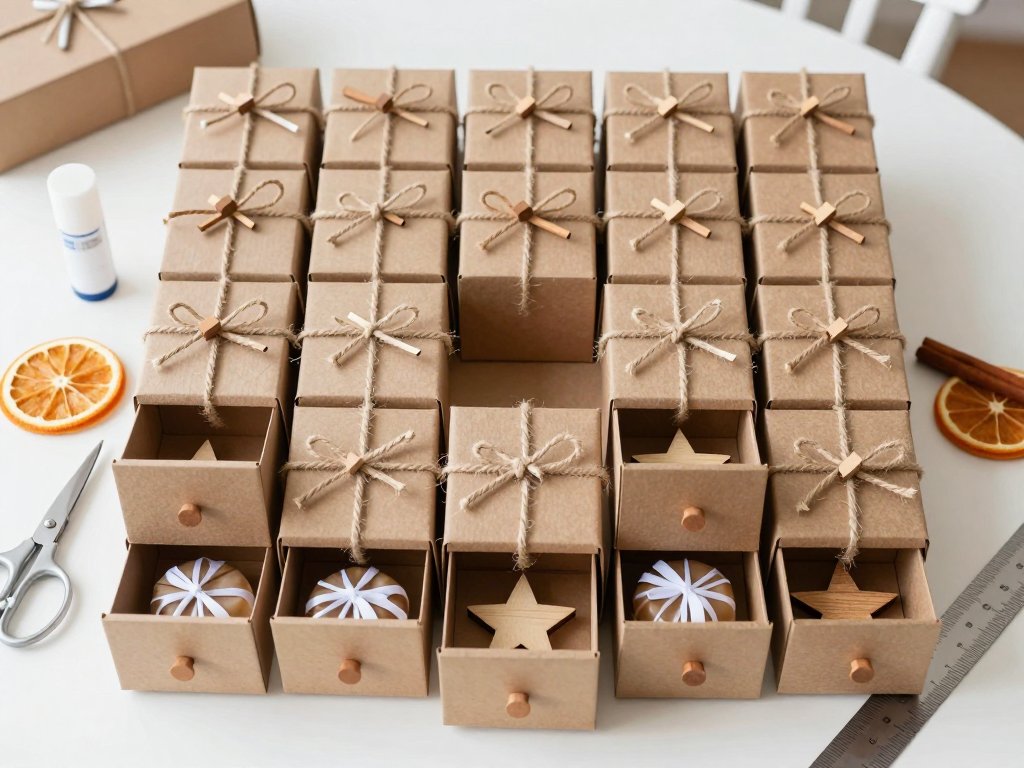
Three years ago I made my own instead: twenty-four small paper drawers in a grid, each one filled by hand. It took an afternoon of cutting and an evening of gluing. My daughter has asked for it every year since.
Here is exactly what you need and exactly what to do next. No workshop, no special talent, no reason to wait until next autumn.
Why a Fill-Your-Own Calendar Beats a Shop-Bought One
Three things, and they are all practical rather than sentimental.
You control what goes inside
A shop-bought calendar gives you one option: cheap chocolate, or an expensive branded set with plastic trinkets nobody keeps. When you fill the boxes yourself, you can put in a note that says "we are baking tonight" instead of sugar.
That matters if your child has an allergy, if you have two children who want different things, or if you simply do not want twenty-four sweets in December.
It works again next year
A printed calendar is packaging. A board with glued sleeves and sliding drawers is furniture. Wipe the drawers, refill them, and it is ready for another December. Mine is on its fourth.
It costs a fraction of a printed set
A decent ready-made calendar with anything worth opening runs twenty-five to forty pounds. Cardstock, glue and board for this project come to under twelve, and the fillings are whatever you choose to spend.
You also get the making, which is half the pleasure and costs nothing extra.
What You Need Before You Start
Buy the cardstock by weight, not by colour. This project lives or dies on stiff paper.
Paper and board
- Cardstock, 250–300 gsm, kraft or white. Twenty-four boxes at 5 × 5 × 4 cm take roughly six to eight A4 sheets, including sleeves. Buy a ten-sheet pack so mistakes are free.
- Backing board: one piece of 5 mm foam core or 2 mm greyboard, at least 40 × 30 cm.
Cutting and folding tools
- A3 cutting mat. A4 works, but a bigger mat stops the card sliding off the edge mid-cut.
- Craft knife with a fresh blade, plus a spare pack. A dull blade tears 300 gsm instead of slicing it.
- Metal ruler, 30 cm. Plastic rulers get nicked and drift.
- Scoring tool, or a blunt knitting needle if you already own one.
- Bone folder. This is what turns a scored line into a crisp edge rather than a soft bulge.
- Small sharp scissors for tabs and curves.
Glue and finishing
- PVA in a fine applicator bottle, or a good glue stick for the sleeves.
- Fine-tip glue pen for small tabs and paper joins.
- Cotton twine or thin ribbon, two to three metres.
- Mini wooden pegs, about twenty-four, if you want the boxes tied shut.
- Pencil, eraser, and a scrap sheet for testing stamps and ink.
Skip anything under 200 gsm. Thin card bows at the walls, the sleeves dent, and the drawers jam within a week.
The Box Size That Actually Works
Make each drawer about 5 × 5 × 4 cm inside. That is generous enough for a wrapped chocolate, a pair of earrings, a wooden star, or a note folded twice.
Smaller boxes look charming and hold almost nothing. Bigger boxes turn the calendar into a wall panel you have nowhere to put.
At that size, a 6 × 4 grid fits a board around 40 × 30 cm with room for gaps and a margin. Six columns across the forty-centimetre width, four rows down the thirty.
How to Make the Drawer Boxes
Each day needs two pieces: a tray that slides, and a sleeve that stays glued to the board.
The tray is the only part with a proper net. If you have folded paper pouches before, the same muscle memory carries over from DIY Halloween treat bags to this December countdown.
Step by step
- Mark the net on the back of the card. Draw a 5 cm square in the centre. Measure 4 cm out from all four sides for the walls. Add a 1 cm tab to two opposite walls only.
- Cut the outline with the knife. Work against the metal ruler in three or four light passes. Do not try to cut through in one go; that is how corners tear.
- Score every fold line before folding anything. Run the scoring tool along the ruler with light, even pressure. Score the face that will become the inside of the box.
- Crease each score with the bone folder. Hold the ruler on the line and press the folder along it. You want a crease you can see, not a groove you can feel through the card.
- Fold up the four walls. Bring them upright one at a time, keeping the tabs inside the box rather than outside.
- Glue the tabs. Run a thin line of PVA on the outside face of each tab, press it against the neighbouring wall from the inside, and hold for ten to fifteen seconds until the glue grabs.
- Check for square. Measure both diagonals of the base. If they match, the drawer will slide. If they differ by more than a millimetre, ease the corner before the glue sets.
- Make the sleeve. Cut a strip 4.2 cm wide and long enough to wrap around the tray with a 1.5 cm overlap. Score at the four corners, fold, and glue the overlap.
- Slide the tray into the sleeve while the glue is still tacky. This is the step people skip, and it is the one that keeps the fit right. A sleeve glued shut around nothing will always be a little too tight.
- Work in batches. Cut all twenty-four nets first, then score all twenty-four, then fold, then glue in batches of six. The first box takes fifteen minutes. The twentieth takes four.
Number the trays as you finish them, on the inside of the base, so you can put them back in order later.
The Faster Route: Upcycled Matchboxes
If cutting twenty-four nets sounds like a December you do not have, use matchboxes instead. The principle is identical; the labour is a fraction.
What to look for
Standard matchboxes are about 5.5 × 3.5 × 1.5 cm, which is too shallow for anything but a chocolate coin or a folded note. Buy the larger kraft matchboxes sold in craft packs, or save the deeper ones from long matches.
The method
- Slide the tray out and discard the matches and the striker strip.
- Wrap the outer sleeve in decorative paper, leaving a millimetre of clearance at each open end.
- Line the tray with tissue or a scrap of wrapping paper.
- Glue the wrapped sleeve to the board, tray removed, and let it set before sliding the tray back in.
Which one should you choose?
Cut-from-scratch gives a cleaner look and a far better fit. Every box is identical, the drawers slide properly, and you can make them any size you like.
Matchboxes are roughly four times faster, and you can build the whole calendar in an evening. The trade-off is that sizes vary between boxes, the trays are shallow, and they will not survive as many Decembers.
My honest answer: make the paper boxes if you want an heirloom, and the matchboxes if you want this to be finished by Sunday night.
Building the Calendar Board
The board is what turns twenty-four small boxes into one object. Get the layout right on paper first and the gluing takes twenty minutes.
Lay out the grid
- Cut the board to 40 × 30 cm with the knife and a fresh blade. Foam core needs three or four passes; do not press hard or the core crushes.
- Mark a 1.5 cm border in pencil around all four edges.
- Draw the grid. Six columns of 5 cm with 1.5 cm gaps between them, four rows the same. Centre the whole block inside the border.
- Make a paper template instead of marking hard. Pencil on foam core smudges and will not erase cleanly. Prick through the template corners with a pin.
- Test one box in place before you glue anything. Glue its sleeve down, slide the drawer in, and check that the front sits flush and the drawer pulls out without catching.
- Glue the sleeves one at a time. PVA on the back of the sleeve, press for thirty seconds, and use the metal ruler as a fence so each row stays straight.
- Weight the board with books for twenty minutes. Then slide every drawer in and out once while the glue is fully set.
If a drawer is tight, sand the tray edge with fine paper rather than forcing it. Forcing it delaminates the corner and you will be re-making the box.
Numbering the Days
Four good options. Pick by temperament, not by what looks best on Pinterest.
Rubber stamps
The quickest consistent result, and the most satisfying. You need a numeral set with two of each digit from 1 to 2. Practise on scrap first; a stamp pressed too hard leaves a halo.
Best for: anyone who owns a stamp set and likes a uniform look.
Printed stickers
Print a sheet of numbers 1 to 24 at about 2 cm tall on matte sticker paper and cut them out. This is the cleanest option and requires no lettering skill at all.
Best for: readers who want it to look shop-bought, and anyone numbering in a hurry.
Hand-lettering
A 0.3 mm fine liner or a brush pen, written directly on the card. Slight unevenness reads as handmade rather than messy, which is the point.
Best for: people who enjoy the writing itself.
Washi tape numerals
Cut short strips and lay them into digit shapes. No tools, no ink, and easy to peel off and redo if a number goes crooked.
Best for: children helping, and anyone who wants to change the look next year.
Put the number on the drawer, not the sleeve
Number the drawer front. The sleeve is fixed to the board, so a number there disappears behind the drawer edge and shifts off-centre the moment a box sits a millimetre differently.
On the drawer front, the number travels with the day. It stays readable when the drawer is pulled out, which is exactly when you need to know which one you are holding.
What to Put Inside
Twenty-four small gifts is a budget question, not a craft question. Sort your fillings into three piles before you start filling.
Tiny and inexpensive
- A single wrapped chocolate, or a chocolate coin.
- Four or five jelly babies twisted into a square of greaseproof paper.
- A wooden star, a felt shape, or a small wooden peg painted gold.
- A mini eraser, a bouncy ball, a sheet of stickers.
- A folded note with an activity for the day: bake cookies, drive to see the lights, read a chapter together.
A little more gift-worthy
- A pair of earrings, or a single pretty stud for a child with pierced ears.
- A mini ornament for the tree, small enough to sit in a 5 cm box.
- A hair clip, a lip balm, a small bottle of nail polish.
- A metre of ribbon, a few beads, or a tiny skein of embroidery floss for a crafty child.
Sorting by age
For a toddler, keep it edible and large: a biscuit, a chunky wooden animal, a board book page cut down. Nothing that fits through a toilet roll tube.
For a six- to nine-year-old, the note is often the best gift. Add stickers, a tiny stamp, or a marble, and let the activities carry most of the excitement.
For a teenager, go practical and small: a phone charm, a nail polish, a folded note promising a shopping trip. Cash works well in the last drawer.
Keeping the weight right
Put the heavier gifts in the bottom row. A top-heavy board tips forward, and heavy drawers drag on their sleeves and stop sliding cleanly.
Nothing should sit taller than the drawer walls, or the sleeve will not close over it.
Check small parts against the age of the child. Loose sweets and tiny beads are not for anyone still putting things in their mouth.
The Kid-Friendly Version
Children can genuinely help with this, not just watch. Give them the flat nets before folding and let them decorate with stickers and crayons.
Crayon takes better on matte kraft than on coated white card, so choose kraft if the decorating matters more than the finish.
Use sticker numbers rather than pen. A five-year-old can place a sticker roughly straight, and can move it if it lands crooked.
Assign days: one child takes odd numbers, one takes even, or each child owns a row. Ownership ends the argument about who fills what.
Accept the wonky ones. A calendar with a lopsided star drawn on day nine is the one they will remember.
Two Formats for Small Spaces
If you have no shelf or wall space for a board, both of these give you the same daily ritual in a fraction of the footprint.
Hanging paper cones
Cut 12–15 cm circles, roll each into a cone, and glue or staple the seam. Fill, pinch the top, and hang from a ribbon with a peg. Twenty-four cones in two rows take up one narrow strip of wall.
Folded envelopes on a string
Twenty-four envelopes or glassine bags, flaps folded down, pegged to a length of twine. This one is best for flat gifts: notes, stickers, tickets, a folded five-pound note.
Both collapse flat in January, which is more than can be said for the board.
Make It Reusable
The whole point of a fill-your-own calendar is that December comes around again. Build for the second year, not just the first.
Instead of gluing sleeves flat to a solid board, glue only the side walls to an open-backed frame, or set them into a shallow tray with a 2 cm lip. The drawers then push out from behind and refill without dismantling anything.
Store it flat, wrapped in tissue, with a note of what went into each day. Next year's refill takes fifteen minutes instead of an afternoon.
When Something Goes Wrong
The boxes collapse
Almost always a scoring problem. A shallow score leaves the card to bend wherever it likes, so the wall bows and the corner opens. Score again, harder, with the ruler held firmly.
The other cause is glue on the wrong tab face. PVA will not grab a coated or waxed surface. Glue the plain side, and hold for a full fifteen seconds.
The drawer fronts stick
Too much glue is the usual culprit: it swells the sleeve by a millimetre and the drawer no longer fits. Use a thin line, not a bead.
If the glue is fine, check for square. A drawer out of true by two millimetres will jam at the third pull. Re-measure the diagonals, or make a fresh sleeve 2 mm larger.
The cardstock is too thin
Under 200 gsm, the walls will not hold and the sleeves dent when you push a drawer in. Either double the walls by gluing two layers back to back, or use the thin card for sleeves only and keep the 300 gsm for trays.
A Small December Ritual
What I did not expect was how much the calendar would change the mornings. There is no tearing, no arguing over whose turn it is, no foil on the floor.
Someone pulls a drawer, reads the note, and the day has a shape. That is worth an afternoon in November.
Make the tea first, clear the table, and cut one net before you decide whether you like the size. You will know by box three.