Introduction
If you have scrolled through social media lately, you have probably noticed them dangling from every tote, crossbody, and work bag: colorful beaded bag charms. They are the defining accessory of 2026, worn by everyone from fashion influencers to busy moms personalizing their everyday carry. And the best part? You can make them yourself in under an hour with materials that cost less than a trip to the coffee shop.
Beaded bag charms are exactly what they sound like — small decorative accessories made from beads, charms, and findings that attach to your handbag via a clip or lobster clasp. Some are subtle, with a single bead in a neutral tone. Others are exuberant cascades of color, tassels, and tiny figurines. Whichever style you prefer, making them yourself means you control the colors, the length, and the cost. You can match them to your favorite outfit, create them as gifts, or even sell them at craft fairs.
In this guide, I will walk you through exactly what you need, three beginner-friendly designs to try, and the simple techniques that will have you making professional-looking charms in your first session.
What You Will Need
Here is the complete supply list. Most of these items are available at any craft store or online bead supplier.
Beads
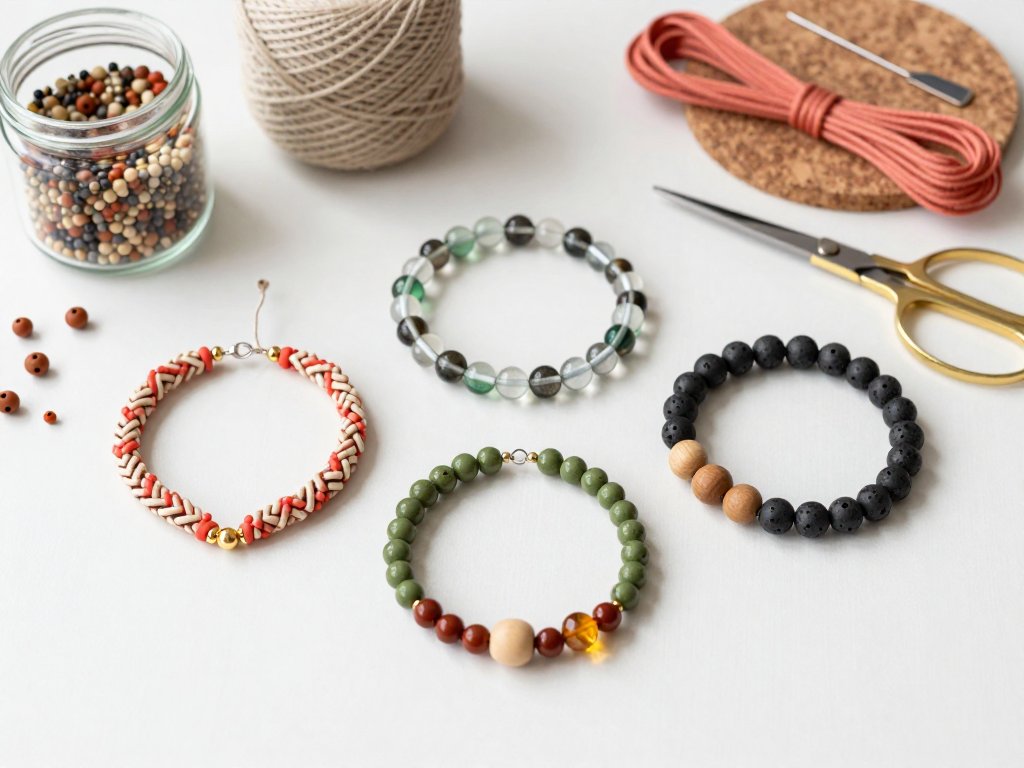
This is where your personality shines. The 2026 trend leans toward organic shapes, mixed textures, and earthy tones, but anything goes. Here is what I recommend keeping on hand:
- Pony beads — Large plastic beads with a wide hole. Inexpensive, lightweight, and available in every color. Great for kids' projects and statement charms.
- Glass seed beads — Small, uniform beads in sizes 6/0 to 11/0. Perfect for adding delicate texture and color transitions.
- Wooden beads — Unfinished or painted. They add a natural, boho element that complements leather bags beautifully.
- Acrylic charms — Tiny stars, hearts, fruit slices, or letters. These are the "character" pieces that give your charm personality.
- Metal spacers and beads — Gold, silver, or antique brass. A few well-placed metal beads elevate the whole design.
Findings and Hardware
- Lobster clasps (8mm to 12mm) — The clasp that attaches the charm to your bag
- Jump rings (6mm to 8mm) — For connecting the clasp to your charm
- Split rings — A more secure alternative to jump rings for heavy charms
- Bead cord or wire — Stretch cord (elastic), beading wire (coated stainless steel), or leather cord depending on the style
- Crimp beads — For securing beading wire ends
- Chain (optional) — A short length of chain (2 to 4 inches) to hang beads from
Tools
- Wire cutters — For cutting beading wire and chain
- Round-nose pliers — For opening and closing jump rings
- Flat-nose pliers — For crimping and flattening
- Bead mat or towel — To keep beads from rolling away
- Small scissors
Estimated total startup cost: About fifteen to twenty dollars for a starter kit that will make five to ten charms. Individual charms cost between one and three dollars in materials.
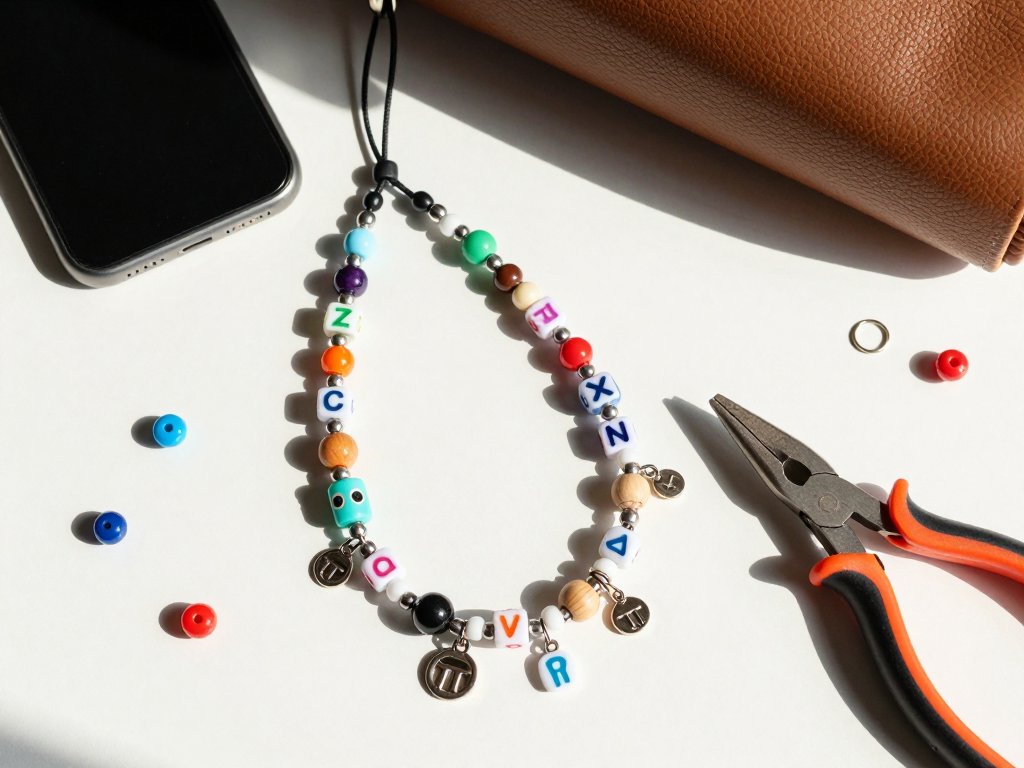
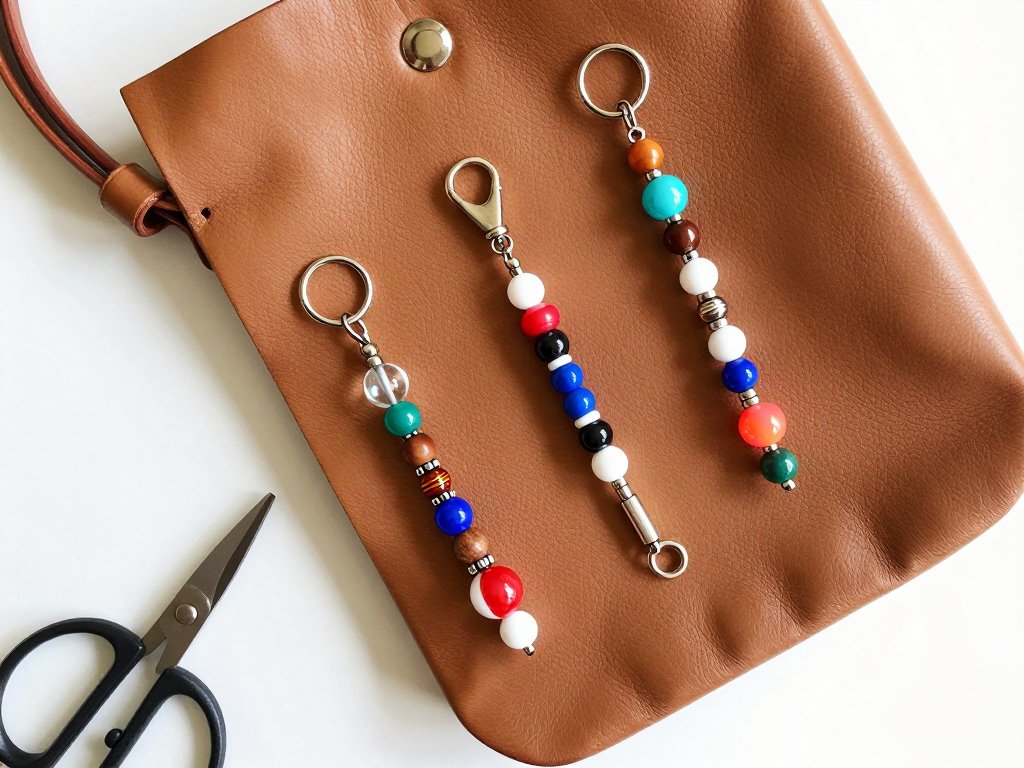
Design 1: The Simple Single-Strand Charm
This is the perfect first project. It takes about fifteen minutes and teaches you all the techniques you need for more complex designs.
What You Will Need for This Design
- 12 to 18 inches of beading wire
- 10 to 15 beads in graduated sizes
- 1 lobster clasp
- 2 jump rings
- 2 crimp beads
Instructions
- Cut your wire. Start with fourteen inches of beading wire. This gives you plenty to work with and trim later.
- String your beads. Plan your arrangement before you start. A common pattern is: small spacer bead, larger focal bead, medium bead, small bead, and repeat. Leave about two inches of wire free at each end.
- Attach the clasp. Slide a crimp bead onto one end of the wire, then pass the wire through the jump ring and back through the crimp bead. Use your flat-nose pliers to crimp the bead flat, securing the jump ring. Trim excess wire.
- Finish the other end. Repeat step 3 on the opposite end with the second jump ring.
- Attach the lobster clasp. Open one jump ring, slide on the lobster clasp, and close the ring securely.
That is it. Your first bead charm is ready to clip onto a bag. Try it on a plain tote and see how much personality a single strand adds.
Design 2: The Multi-Strand Cascade
This design is the current trending style on social media. It features three to five strands of beads hanging at different lengths, creating a waterfall effect. It looks intricate but is surprisingly simple to assemble.
What You Will Need for This Design
- 2 to 3 feet of beading wire (total across all strands)
- 30 to 50 beads in mixed sizes and colors
- 1 lobster clasp
- 2 jump rings (one large, one small)
- 1 decorative top bead or cap (optional)
- Crimp beads (one per strand)
Instructions
- Plan your strands. Decide on three to five strands. The shortest should be about three inches long, and the longest about six inches. Each strand gets its own piece of wire.
- String the shortest strand. Start with the shortest strand (three inches). String your beads in a pattern that looks good on its own. Finish with a crimp bead and jump ring at both ends, just like Design 1.
- String the next strand. Make the second strand about four inches long. Use beads that complement the first strand — same color family but different shapes, or a gradient effect.
- Continue with remaining strands. Each strand gets longer by one inch. Keep a consistent color story across all strands so the charm reads as a single piece.
- Assemble. Gather all the top jump rings onto one large jump ring. Add the lobster clasp to the same large jump ring. Close it securely.
- Add a top bead (optional). Slide a decorative bead onto the large jump ring before closing it. This hides the attachment point and gives the charm a finished look.
Multi-strand charms work best on larger bags — totes, beach bags, and diaper bags. They make a wonderful statement piece and are always a conversation starter.
Design 3: The Leather Cord Charm with Pendant
For a more sophisticated look, skip the beads entirely on the main cord and use a leather or faux-suede cord with a single statement pendant. This style is particularly popular on work bags and structured handbags.
What You Will Need for This Design
- 12 inches of leather cord (2mm to 3mm thickness)
- 1 large pendant bead or charm (at least 15mm)
- 2 cord ends (clamshell or knot covers)
- 1 lobster clasp
- 1 jump ring
- Jewelry glue
Instructions
- Slide on your pendant. Thread the leather cord through your pendant bead. Center it on the cord.
- Tie knots on either side. Tie an overhand knot on each side of the pendant, close enough to hold it in place but loose enough that it can shift slightly.
- Attach cord ends. Apply a drop of jewelry glue inside each cord end. Insert the leather cord ends and clamp the cord end closed with flat-nose pliers. Let the glue dry for ten minutes.
- Attach the clasp. Open a jump ring, slide on the lobster clasp and one cord end, then close the jump ring.
- Add a small accent bead (optional). If the knot-side of your charm looks bare, slide a small metal bead or spacer onto the jump ring before closing it.
This minimalist style is perfect for gifting. A leather cord charm with a personalized letter pendant or a natural stone bead makes a thoughtful, handmade present.
Finding Your Supplies
Most craft stores carry everything you need for beaded bag charms, but the selection varies. Here is where to find the best options:
- Michaels or Joann — Excellent for pony beads, basic seed beads, and findings. Their jewelry section has lobster clasps, jump rings, and beading wire in multiple gauges. Look for the 49-cent bead bins for inexpensive accent beads.
- Hobby Lobby — Strong selection of wooden beads and natural stone beads. Their half-off findings sale rotates every other week; stock up on clasps and crimp beads then.
- Etsy — The best source for unique acrylic charms (tiny fruit slices, stars, letters). Search for "bulk acrylic charms" to get ten to twenty pieces for five to eight dollars.
- Bead-specific online retailers — Fire Mountain Gems and Beadaholique carry professional-grade seed beads in every color imaginable. They also sell kits that include everything for a specific charm design.
If you are just starting out, buy a mixed bead pack rather than individual colors. You will get a variety of shapes and sizes to experiment with, and the cost per bead is much lower. A one-dollar bag of mixed pony beads from the craft store can make three or four charms.
How to Choose a Color Palette
The most common question I hear from new beaders is, "How do I pick colors that look good together?" Here is a simple system that works every time.
Start with one bag. Choose the bag you want to accessorize. Pull three colors from it — the main color, a secondary color, and an accent. For example, if you have a tan tote with brown leather trim and gold hardware, your palette is tan (main), brown (secondary), and gold (accent). Your charm should use these three colors in roughly that proportion.
Use the 60-30-10 rule. Sixty percent of your beads should be the main color, thirty percent the secondary, and ten percent the accent. This creates a balanced, intentional look. An all-pink charm reads as monochromatic and flat; a charm with sixty percent pink, thirty percent white, and ten percent gold feels curated.
For 2026 trending palettes, try these:
- Desert Bloom: Terracotta, cream, sage green, and a touch of rust
- Ocean Drive: Navy, white, coral, and gold
- Forest Floor: Olive, mushroom brown, moss green, and amber
- Lavender Sky: Soft purple, dusty rose, silver, and pale gray
Stick to one palette per charm. Mixing warm and cool tones in the same piece can look unintentional. If you are unsure, pick one color family and vary the shades within it.
Attaching Your Charm to Different Bag Types
Not every bag has an obvious place to clip a charm. Here is how to attach yours securely based on the bag style:
- Tote bags with top handles: Clip the charm to the metal D-ring where the handles attach. This is the most common attachment point.
- Crossbody bags: Clip to the strap connector ring (where the strap meets the bag body). Avoid clipping directly to the strap itself, which can stretch or damage it.
- Backpacks: Use the zipper pull on the main compartment. A charm on the zipper makes the bag easier to open and adds personality.
- Belt bags: Clip to the belt loop or the zipper pull. Keep the charm small so it does not swing into things as you move.
- Bags without hardware: If your bag has no exposed metal rings, tie a small fabric loop onto the handle with matching ribbon, then clip the charm to the ribbon loop.
Tips for Beautiful, Long-Lasting Charms
Choose Your Attachment Method Wisely
A lobster clasp is the most versatile option — it clips onto any bag loop, zipper pull, or handle. If you are making a charm for someone else, always use a lobster clasp so they can move it between bags. For a permanent charm, you can attach a split ring directly to the bag hardware.
Watch Your Weight
Beaded charms can get heavy. A charm with fifty glass beads and metal findings can weigh several ounces. On a delicate chain strap, that much weight can cause discomfort. Stick to lightweight beads (acrylic, wood, plastic) for small or delicate bags. Reserve glass and metal beads for sturdy leather totes.
Use a Color Story
The most professional-looking charms use a deliberate color palette. Choose two to three colors and stick with them throughout the charm. For example: warm terracotta, cream, and gold, or cool sage, white, and silver. The 2026 trend leans toward earthy neutrals with a single pop of color — think olive and rust with one bright turquoise bead.
Test Your Length
A bag charm should dangle between two and six inches from the bag. Too short, and it disappears against the bag surface. Too long, and it gets caught on things. Three to four inches is the sweet spot for most bags.
Where to Wear Your Bag Charms
Bag charms are not just for handbags. Here are some other ways to use the ones you make:
- Keychains — Attach a small charm to your key ring for a splash of color
- Zipper pulls — Clip a charm onto a jacket or backpack zipper
- Lanyards — Add a charm to your work ID lanyard
- Gift wrapping — Use a handmade charm as a reusable gift topper
- Phone straps — A small charm on a phone crossbody strap adds personality
Conclusion
Beaded bag charms are one of those rare trends that are both fashionable and genuinely practical. They protect your bag hardware from scratches, make your bag easy to spot in a crowd, and give you a creative outlet that fits into a busy schedule — each charm takes fifteen to forty-five minutes from start to finish.
Start with the single-strand design to get comfortable with the techniques, then try the cascade or leather cord version. Before long, you will have a collection of charms for every bag and every season. And when someone compliments your charm, you get to smile and say, "I made it."