Introduction
There is something deeply soothing about the ocean. The way light filters through turquoise water, the gentle sway of sea fans, the intricate architecture of coral branches — it is a world that has inspired artists and artisans for centuries.
And here is the wonderful news: you do not need a scuba certification or a trip to the Great Barrier Reef to bring that underwater magic into your home.
With just a handful of beads, some wire, and a quiet afternoon, you can create your very own coral reef in miniature.
Beaded coral reef decor sits beautifully at the intersection of jewelry making and sculptural art.
A single coral branch can become a statement necklace, a pair of earrings, or a tabletop sculpture that draws the eye and starts conversations.
The technique is surprisingly accessible, requiring no special tools beyond what most bead enthusiasts already have in their craft box.
And because coral naturally takes so many forms — branching staghorn, delicate fan shapes, knobby brain coral — each piece you make will be as unique as the reef itself.
In this guide, we will explore three distinct approaches to beaded coral: free-form wire sculpture for dramatic statement pieces, wrapped coral branches for jewelry, and clustered fringe coral for earrings and ornaments. By the end, you will have a new skill set and, quite possibly, a whole new obsession.
Why Coral? The Appeal of an Ocean Palette
Before we dive into technique, let us talk about what makes coral such a compelling subject for beadwork.
Coral reefs are home to some of nature's most extraordinary colors: the flamingo pink of organ pipe coral, the electric orange of sun coral, the deep violet of sea fans, and the soft peach of rose coral.
These are colors that translate beautifully into glass, crystal, and ceramic beads.
There is also a wonderful textural dimension to coral-inspired beadwork. Real coral has a porous, organic surface that feels alive.
By mixing bead sizes, shapes, and finishes — matte rounds alongside faceted crystals, seed beads next to larger focal beads — you can mimic that tactile richness.
The result is jewelry and decor that begs to be touched as much as it is admired.
And let us be honest: coral-themed pieces have a timeless appeal. They work with summer whites and linens, add warmth to neutral winter layers, and bring a pop of joyful color to any room.
They also make thoughtful, handmade gifts — a small coral tree on a desk, a pair of coral branch earrings for a friend who loves the sea.
Materials: Building Your Coral Kit
One of the great virtues of this craft is that the materials are modest and forgiving. You may already have most of them. Here is what you will need to begin:
Beads. The star of your coral reef. Look for beads in coral-inspired colors: pinks from blush to magenta, corals from salmon to deep orange, aquas and teals, soft purples, and whites.
Mix sizes from 4mm to 10mm, and include seed beads (size 11/0) for fine detail.
Crystal, glass, ceramic, and wooden beads all work beautifully. Avoid plastic if you can — the weight and feel of glass or ceramic make a noticeable difference in the final piece.
Wire. For sculptural coral, you will want 24-gauge or 26-gauge craft wire in a neutral color — silver, gold, or copper.
The wire needs to be stiff enough to hold its shape but flexible enough to bend easily.
For wrapped coral branches, 28-gauge wire works well for securing beads to a thicker base wire.
Findings. If you are making jewelry, gather ear wires, jump rings, clasps, and head pins. For tabletop sculptures, you will need a small base or container — a ceramic dish, a small vase, or even a painted tin.
Tools. Round-nose pliers, wire cutters, and chain-nose pliers are the essentials. A bead mat or towel to keep beads from rolling away is always a good idea. Optional but helpful: a small ruler or measuring tape and a pair of tweezers for tight spots.
Optional accents. Tiny shells, small pearls, clear crystal drops (to represent water droplets), and green leaf beads all add wonderful detail to your underwater scene.
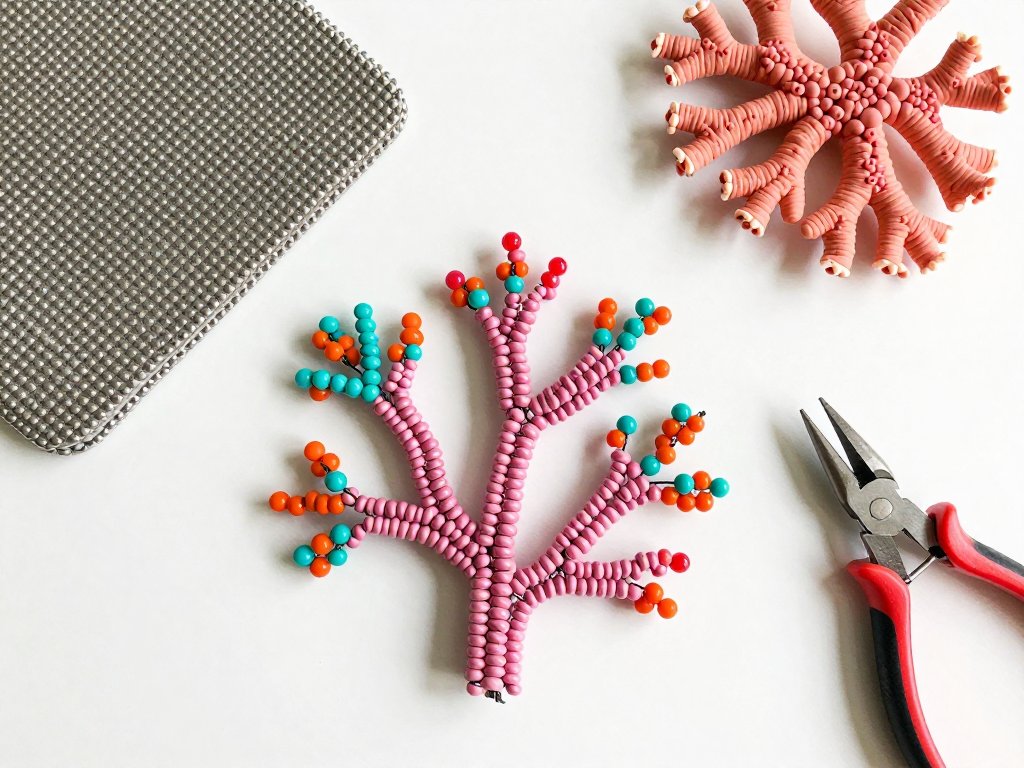
Technique One: Free-Form Wire Coral Sculptures
This technique is the most artistic and the most forgiving. You are essentially drawing with wire and beads, letting the form emerge as you work. It is perfect for tabletop decor, statement necklaces, and brooches.
Getting Started
Cut a length of 24-gauge wire about 18 inches long. String a bead onto the wire and push it to the center.
Bend the wire on both sides of the bead so the bead sits at the top of a gentle curve — this will be the tip of a coral branch.
Now twist the two wire tails together for about half an inch to form the branch stem.
Add another bead to one of the wires, push it up alongside the first bead, and twist again.
Continue this process, adding beads and twisting, creating branches that split and rejoin organically. The key is to vary the direction of each branch.
Let some reach upward, let others curve to the side or droop slightly, as real coral does in the current.
Building Complexity
Once you are comfortable with the basic branch, try these variations:
Clustered tips. Instead of one bead at the end of a branch, string three or four small beads and arrange them in a small cluster. This mimics the polyp structure of real coral. Use contrasting colors for the cluster — pink branches with bright orange tips, for example.
Mixed bead sizes. Alternate large and small beads along a branch. A large focal bead followed by three seed beads creates a knobby, organic rhythm that feels very natural. Real coral is irregular, and your beadwork should be too.
Wrapped joints. Where two branches meet, wrap fine 28-gauge wire around the junction several times before continuing. This not only strengthens the piece but also adds a visual detail that resembles the way coral tissue grows over its skeleton.
Finishing a Sculpture
When your coral form feels complete — whether it is a single elegant branch or a dense thicket — gather all the wire tails at the base and twist them into a firm stem.
Trim the excess wire and tuck the end under. If you are making a tabletop piece, press the twisted stem into a small blob of polymer clay or modeling wax in your chosen container.
Arrange a few pebbles or small shells around the base to conceal the clay. Allow the clay to cure according to the manufacturer's instructions.
For a necklace, attach a bail or a jump ring to the twisted wire base before securing it, then thread your chain or cord through. The coral branch becomes the pendant — organic, sculptural, and entirely your own.
Technique Two: Wrapped Coral Branches for Jewelry
Where free-form wire sculpture is loose and expressive, wrapped coral branches are more structured. This technique produces elegant, delicate pieces that are lightweight and comfortable to wear. It is ideal for earrings, delicate pendants, and charm bracelets.
The Wrapping Method
Start with a piece of 20-gauge or 22-gauge wire as your base — this will form the skeleton of the branch. Cut it about 6 inches long. Using round-nose pliers, create a small loop at one end to prevent beads from sliding off.
Thread a selection of beads onto a separate piece of 28-gauge wire, about 10 inches long.
Leave a 2-inch tail. Hold this beaded wire against the base wire and begin wrapping the fine wire around the base, pulling snugly after each wrap.
The beads will sit on the outside of the branch, while the wire wraps secure them in place.
As you wrap, occasionally slide a bead up from the wrapping wire onto the outside of the branch.
Continue wrapping for another quarter inch, then add another bead. The spacing is up to you — beads clustered closely together look like dense coral, while wider spacing creates a lighter, airier effect.
Creating Branches
To branch off, bend the base wire at a 45-degree angle. Continue wrapping beads along this new direction. The wrapped wire technique makes it easy to create three-dimensional forms because the base wire holds its shape while the wrapping wire secures everything in place.
Try making a Y-shaped branch for earrings: a single stem that splits into two arms, each tipped with a bead. The symmetry is pleasing, and the lightweight construction means even large earrings are comfortable to wear.
Finishing
When you reach the end of your branch, wrap the fine wire tightly around the base wire three or four times, then thread the tail through a few of the wraps to hide it.
Trim any excess. Use round-nose pliers to create a small loop at the top of the base wire, and attach your ear wire, clasp, or jump ring.
For a cohesive set, make a pair of earrings and a matching pendant using the same bead palette. The wrapped branch technique produces pieces that look delicate and intricate, yet they are surprisingly quick to make once you have the rhythm.
Technique Three: Clustered Fringe Coral
This technique takes inspiration from the way soft corals and sea fans spread their branches in feathery, fan-like formations. It is built on the classic bead fringe technique, but arranged in radiating patterns to mimic coral growth. The result is textured, flowing, and absolutely gorgeous in motion.
Building a Fan
Start with a focal bead or cabochon that will serve as the center of your coral form. Using a needle and thread or fine wire, create a base row of seed beads around the focal element. This ring of beads will anchor the fringe.
From each bead in the base row, create a fringe strand: string a sequence of beads — perhaps five seed beads, a small accent bead, and three more seed beads — then stitch back up through the base bead, leaving the fringe dangling.
Continue around the entire base, varying the length and color of each fringe strand.
To create a fan shape, make the fringe strands in the center longest and gradually shorten them toward the edges. Alternate between solid-color strands and mixed-color strands. The result resembles the feathery fronds of a sea fan or a soft coral polyp.
Layering for Depth
Real coral reefs have incredible depth, with some branches in sharp focus and others receding into the background.
You can achieve a similar effect by layering multiple rows of fringe. Complete one full row, then add a second row slightly behind the first, using darker or lighter shades of the same color to suggest depth.
For earrings, keep the fringe to two or three layers so the piece remains lightweight.
For a brooch or a wall hanging, you can build four or five layers for a truly lush, dimensional effect.
The key is to let each layer be visible — do not pack them so tightly that they become a single mass.
Designing Your Coral Palette
Color is where your coral reef truly comes alive. Here are some palette ideas to inspire you:
Classic Reef. Soft coral pink, salmon, peach, and cream. Add touches of turquoise and seafoam green for contrast. This palette feels warm, sunlit, and nostalgic — like a summer spent snorkeling.
Deepwater. Magenta, deep violet, indigo, and silver. This is the coral of the twilight zone, mysterious and dramatic. Use faceted beads for extra sparkle in low light.
Sunset Reef. Orange, gold, coral, and amber. Think of a coral garden catching the last rays of the evening sun. Mix transparent and opaque beads for a luminous effect.
Bleached Coral. White, cream, pale blush, and soft gray. This palette is elegant and modern, and it carries an important message about coral conservation. Pair it with clear crystal accents for an ethereal, ice-like quality.
Whichever palette you choose, aim for balance. Let one or two colors dominate, with the others playing supporting roles. This is the same principle artists use in painting, and it applies beautifully to beadwork.
Caring for Your Coral Creations
Beaded coral jewelry and decor are surprisingly durable, but a little care goes a long way.
Store pieces in a soft pouch or a compartmented box to prevent scratching and tangling.
Keep them away from direct sunlight for extended periods — some glass beads can fade, and wire can become brittle with prolonged UV exposure.
To clean, use a soft, dry cloth. If needed, a barely damp cloth with a tiny drop of mild soap can remove smudges from glass beads. Never submerge wire-wrapped pieces in water, as moisture can become trapped in the wire wraps and cause tarnishing over time.
For tabletop sculptures, a gentle dusting with a soft paintbrush or compressed air keeps the beads sparkling.
If the piece is displayed in a bathroom (a popular spot for ocean-themed decor), be aware that humidity can eventually dull some metal components.
A light coat of clear jewelry sealer on exposed wire can help.
Beyond the Reef: Variations to Explore
Once you have mastered these three techniques, a whole ocean of possibilities opens up. Try making a coral-inspired mobile for a nursery, using the free-form wire technique with baby-safe materials.
Create a series of small coral sculptures in different colors and arrange them as a reef tableau on a shelf or mantel.
Combine your coral pieces with actual seashells and sea glass for mixed-media wall art.
Coral motifs also pair beautifully with other jewelry-making techniques. A coral branch pendant on a leather cord has a natural, bohemian feel.
Add coral-inspired bead clusters to a wire-wrapped crystal necklace for extra texture. Use the fringe technique along the edge of a bracelet cuff for a piece that moves and catches the light with every gesture.
Conclusion
There is a profound satisfaction in creating something beautiful from simple materials. A handful of beads, a length of wire, and your own two hands are all it takes to grow a coral reef that will never fade, never bleach, and never stop delighting.
Each piece you make is a small act of creation — a reminder that beauty, like the ocean itself, begins with small, simple elements that come together to form something extraordinary.
So the next time you find yourself drawn to images of coral reefs, pick up your bead tray instead of your phone.
Let your fingers do the exploring this time. You might be surprised at what grows from that first bead, that first wire twist, that first small leap of faith in your own creativity.
The reef is waiting.