Introduction
Do you ever finish a scarf and think, "This is lovely, but it's a little plain"?
That happened to me with my first adult-sized project. I had knit a long, soft rectangle in plain stockinette, and while my sister was kind about it, we both knew the truth. It looked like something you would find in the bottom of a donation bin.
I wanted texture. I wanted squish. I wanted a stitch that looked impressive without requiring me to learn cables or lace.
That is exactly what bubble stitch gave me. It is a knit-and-purl pattern that creates raised, rounded bumps across your fabric. It feels wonderful in your hands, looks complicated, and honestly could not be simpler once you see the rhythm.
In this guide, I will walk you through everything you need to knit your first bubble stitch swatch, plus easy projects where this texture truly shines.
Grab a skein of yarn you love, pour yourself something warm, and let's make something squishy together.
What Is Bubble Stitch?
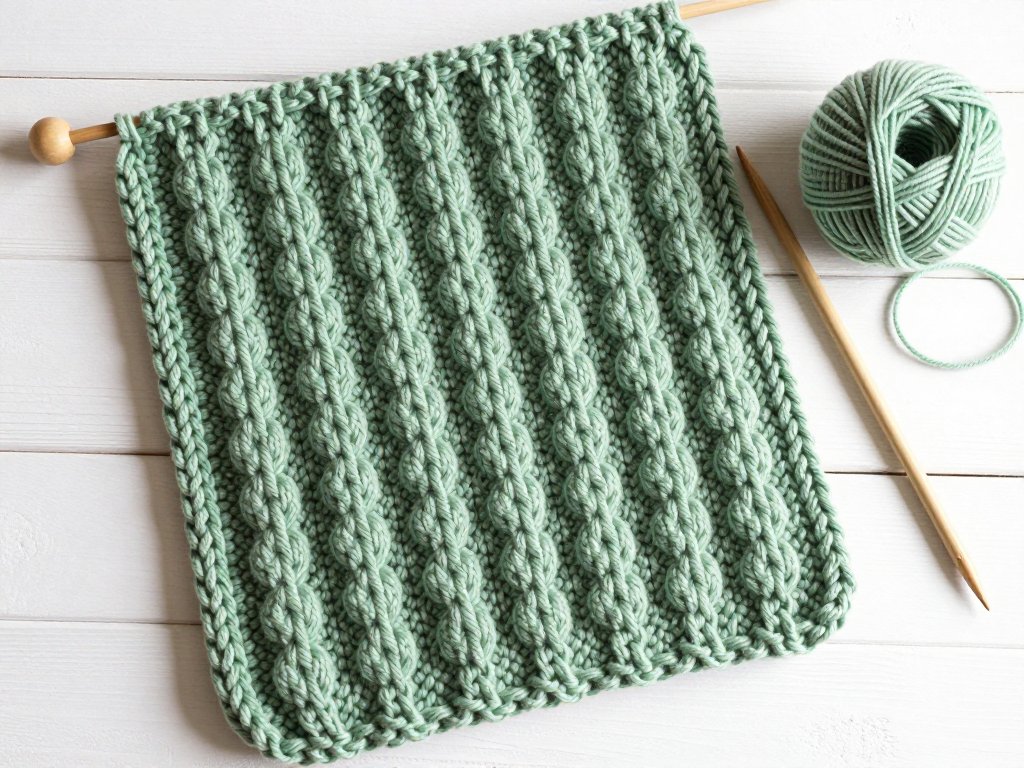
Bubble stitch is a textured knit pattern built from groups of purl stitches sitting against a smooth background. Those little purl panels puff forward and read as soft bubbles or pebbles across the right side of your work.
There is a whole family of bubble-style stitches. Some use bobbles, which involve working several stitches into one and then decreasing them back down. Bobbles are lovely, but they can be fiddly, especially on a busy afternoon with little ones nearby.
The version I teach here is the no-bobble bubble stitch. It creates a similar bumpy texture using only knit and purl stitches. If you can knit a stitch and purl a stitch, you can knit this pattern tonight.
Because the bubbles are worked over just a few rows, the stitch is easy to memorize. Once the rhythm clicks, you will find yourself knitting without looking at the pattern.
Why Knitters Love It
Texture is one of the fastest ways to make a handmade piece feel special. A simple pattern knit in bubble stitch suddenly looks like something you would pay a lot for at a boutique.
The stitch is also wonderfully forgiving. There are no tricky increases, no dropped-stitch rescue missions, and no counting beyond a simple four-row repeat.
Bubble stitch fabric has a lovely squishy thickness. It traps warmth beautifully, which makes it a favorite for winter accessories and baby blankets.
It works with almost any yarn, too. Solids show off the texture best, but gentle variegated yarns create a soft, dreamy effect that many knitters adore.
What You'll Need
One of my favorite things about bubble stitch is that the supply list is short. You probably have most of it already.
- Yarn. A worsted weight yarn in a solid or lightly variegated color shows the bubbles best. About one skein is plenty for a swatch or a small cowl.
- Knitting needles. Use the size recommended on your yarn label, usually US 7 to 9 for worsted weight. Straight or circular needles both work.
- A tapestry needle. You will use this to weave in your ends when you finish.
- Scissors. Any small pair you have on hand will do.
- Stitch markers (optional). Handy if you are knitting a wide piece and want to mark your repeat.
That is genuinely all you need. No special tools, no chart-reading skills, no counting gadgets.
If you are knitting for a brand-new baby, choose a soft, machine-washable yarn in a gentle color. Parents will thank you later.
Choosing Yarn and Needles
If you are shopping for yarn rather than raiding your stash, here is how to pick a good match for bubble stitch.
Worsted weight and aran weight yarns are the sweet spot. They are thick enough that the bubbles feel substantial, but not so chunky that the pattern gets lost. DK weight works too; just know the texture will read as finer and more delicate.
Fiber matters less than you might think. Wool and wool blends hold their shape and block beautifully. Cotton gives crisp, defined bubbles and is lovely for washcloths. Acrylic is perfectly fine for beginners and stands up to repeated washing.
Choose a yarn where the stitch definition is visible. Very fuzzy yarns like mohair will blur the bubbles into a soft haze. That can be pretty, but it hides the texture you worked to create.
As for needles, the yarn label is your friend. Use the recommended size to start. If your bubbles look stretched and floppy, go down a needle size. If the fabric feels stiff and board-like, go up a size.
A quick gauge note: because bubble stitch is denser than stockinette, your piece will be narrower than the same number of stitches knit flat. If size matters for your project, measure as you go rather than assuming.
The Bubble Stitch Pattern
Ready for the exciting part? Here is the pattern, written out row by row.
Cast On
Cast on a multiple of 4 stitches, plus 1 extra. For a practice swatch, cast on 21 stitches. That gives you five full bubbles with a tidy edge on each side.
Use a cast-on you already know, like the long-tail method. If you are brand new to casting on, a simple backward-loop cast-on works fine for a swatch.
The Four-Row Repeat
Row 1 (right side): Knit 1, then repeat *purl 3, knit 1* across the row to the end.
Row 2 (wrong side): Purl 1, then repeat *knit 3, purl 1* across the row to the end.
Row 3: Repeat Row 1.
Row 4: Repeat Row 2.
Keep repeating these four rows, and the bubble columns will grow right before your eyes.
Here is the secret that makes the pattern easy to remember. On the right side, you are always working the same sequence. On the wrong side, you simply knit the knits and purl the purls as they appear to you.
Binding Off
When your piece reaches the length you want, bind off loosely on a right-side row using your usual bind-off method. If you bind off tightly, the edge will pull in and the bubbles will look flattened.
Weave in your ends with the tapestry needle, give the piece a gentle block if you like, and admire your handiwork. You just knit bubble stitch!
Reading Your Stitches
The most common question I hear from new bubble stitch knitters is, "How do I know which row I'm on?"
Look at the side facing you. On the right side, you will see tidy knit columns with purl bumps grouped between them.
If the last row you worked ended with the purl bumps facing you as little raised ridges, you just finished a right-side row. The next row will be a wrong-side row.
Many knitters place a locking stitch marker on the front of their work when they finish Row 1. That way, they always know which side is which, even after the baby interrupts for the third time.
If you lose your place completely, gently pull your needle out and count the ridges. Each pair of rows adds one bubble row. You can always frog back a row or two without harm.
Simple Projects to Try
Once your swatch feels comfortable, here are easy ways to use bubble stitch in real projects. All of these are beginner-appropriate.
Bubble Stitch Washcloths
Cast on 33 stitches and work until the piece is square. The texture is gentle enough for the face and sturdy enough for the kitchen. They also make wonderful handmade gifts tucked into a gift bag with a nice bar of soap.
A Squishy Scarf or Cowl
Cast on 25 stitches for a narrow scarf or 80 stitches joined in the round for a cowl. The bubbly fabric is thick, warm, and cozy against your neck. Knit until you run out of yarn or reach your desired length.
A Baby Blanket
Cast on a multiple of 4 plus 1, anywhere from 81 to 121 stitches depending on how big you want the blanket. The bubbles give babies something interesting to touch, and the dense fabric keeps them snug.
Decorative Cushion Cover
Knit two matching rectangles in bubble stitch, then seam three sides, insert a pillow form, and seam the fourth. The texture turns an ordinary cushion into a cozy statement piece for your sofa.
A Cozy Headband
Cast on 13 stitches and knit until the band wraps comfortably around your head. Seam the ends together and you have a quick, thoughtful gift that uses almost no yarn.
Ways to Make Bubble Stitch Your Own
Once the basic rhythm feels easy, you can play with the pattern in small ways. Each variation uses the same knit-and-purl logic, so there is nothing new to memorize.
Try wider bubbles. Work purl 5 instead of purl 3 between your knit columns, over a multiple of 6 stitches plus 1. The bumps grow rounder and more dramatic, perfect for a cozy blanket.
Try a stripe sequence. Work eight rows of bubble stitch, then four rows of plain stockinette or garter stitch, then eight more rows of bubbles. The plain bands give the eye a rest and make the texture pop.
Frame your bubbles with a border. A few rows of garter stitch at the top and bottom of a washcloth or blanket create a tidy finish and help the edges lie flat.
Knitting in the round is just as easy as knitting flat. Cast on a multiple of 4 stitches, join without twisting, and work every round exactly like Row 1: knit 1, then purl 3 all the way around. Because you never turn your work, the rhythm becomes almost hypnotic.
Turn the fabric sideways. Knit bubble stitch panels horizontally and seam them together, so the bubbles run across a cushion cover instead of down it. Small changes like this make each project feel fresh.
And do not forget the wrong side. It has its own softly textured surface that many knitters find just as pretty as the front. Some people deliberately use it as the right side for a subtler, quieter look.
Fixing Common Mistakes
Even seasoned knitters drop a stitch now and then. Here is how to handle the hiccups that come up most often.
Your edges look messy. This usually means you are accidentally adding stitches at the start of a row. Count your stitches after each row until the rhythm feels natural.
The bubbles look flat. You may be purling on the wrong rows, or your purl tension is looser than your knit tension. Try a slightly smaller needle, or simply block the piece and see if the texture pops.
You lost your place in the repeat. Look for the gap in the pattern and tink back stitch by stitch until the sequence looks right again. Tinking is just un-knitting, and it is a skill worth practicing.
Your fabric curls at the edges. Bubble stitch curls less than plain stockinette, but edges can still roll. A simple border of a few knit rows, or blocking, usually tames it.
There is a hole where a stitch dropped. Catch the runaway loop with your needle and ladder it back up. If that feels too fiddly, unravel to the row below the mistake and re-knit those few stitches.
Tips for a Relaxing Rhythm
Part of the joy of bubble stitch is how meditative it becomes. After a few repeats, your hands learn the pattern and your mind is free to wander.
This makes it perfect knitting for quiet evenings. I love working on a bubble stitch cowl while the kettle heats and the kids are finally asleep.
Here are a few small tips that make the experience even calmer:
- Keep a small notebook nearby and jot down which row number you are on when you set the work down.
- Choose a yarn color that makes you happy. Texture shows best in lighter shades, but the project should delight you.
- Knit a swatch first, even for a small project. It gives you confidence and lets you practice the rhythm without pressure.
- Remember that your first bubble stitch piece does not need to be perfect. It needs to be yours.
Conclusion
Bubble stitch is one of those rare patterns that delivers maximum charm for minimum fuss. With nothing but knit and purl stitches, you can transform everyday yarn into fabric that begs to be touched.
Start small. Cast on 21 stitches, work the four rows a few times, and enjoy watching the bubbles appear. Before you know it, you will be planning washcloths, cowls, and blankets in your favorite colors.
And when someone asks where you learned such an impressive stitch, you can smile and tell them the truth. It is just knits and purls, arranged with love.
One more thought before you begin. Texture is a gift you give yourself as much as the person who receives the finished piece. Every time your fingers find those little bubbles, you will remember the quiet evening you made them.
So choose a color that makes you smile, cast on, and let the four-row rhythm carry you. Your first bubble stitch project is closer than you think.
Happy knitting, friend. Your needles are waiting.