Introduction
I'll be honest with you: my first concrete planter cost me about sixty dollars. Not the materials — the lesson.
I'd spent weeks eyeing a chunky modern pot at a home goods store. Sixty dollars for a bowl with a hole in it.
I finally caved, brought it home, and knocked a chip out of the rim the first time I moved it.
That's when I thought: I could make this. I could make ten of these.
That was three years ago. Since then I've cast planters from teacup succulents to floor pots big enough for a fiddle leaf fig, and every single one cost less than that one store-bought pot.
The good news: you don't need a workshop, a kiln, or special skills — just a bag of cement, sand, water, and containers you already own. If you can make pancake batter, you can make a concrete planter.
Why Bother? The Math on Store-Bought Planters
Let's talk money first, because that's why most of us are here. A plain, nice-looking concrete planter at a decor store runs $25 for a small one to $80 or more for something that fits a real plant. They're heavy, shipping is expensive, and that cost lands on you.
Now the DIY side. A bag of portland cement runs about $8 to $12 at a hardware store.
A bag of sand is another $3 to $5. That's the whole material list for the concrete itself.
Depending on your molds, that combination makes between six and a dozen planters — about $10 to $15 worth of materials for several planters, even after you add a bucket and mixing sticks.
When you can make three matching planters for the price of one, the choice stops being about frugality and starts being common sense.
Safety First: Cement Is Alkaline, Not Mean
Before we mix anything, let's talk safety. I don't want to scare you, but take it seriously — nobody warned me, and I learned the hard way.
Wet cement is alkaline — very alkaline, around pH 12 or 13. It can irritate and burn skin, especially if it sits against you for a while.
It's not dangerous if you treat it with respect; it's dangerous if you mix it bare-handed and wonder why your fingers feel raw an hour later.
Here's your minimum setup:
- Nitrile or latex gloves — the cheap disposable kind, a box for a few dollars.
- A dust mask or N95 respirator when mixing dry cement powder. You don't want that dust in your lungs.
- Good ventilation — open a window, or work outside.
- Long sleeves and old clothes. Cement splatters, and once it dries on fabric, it's there forever.
Wear gloves when handling wet pieces, wash any skin that gets touched, and keep kids and pets away from the mixing area. Five minutes of preparation keeps a fun afternoon from turning into a miserable week.
What You'll Need: The Shopping List
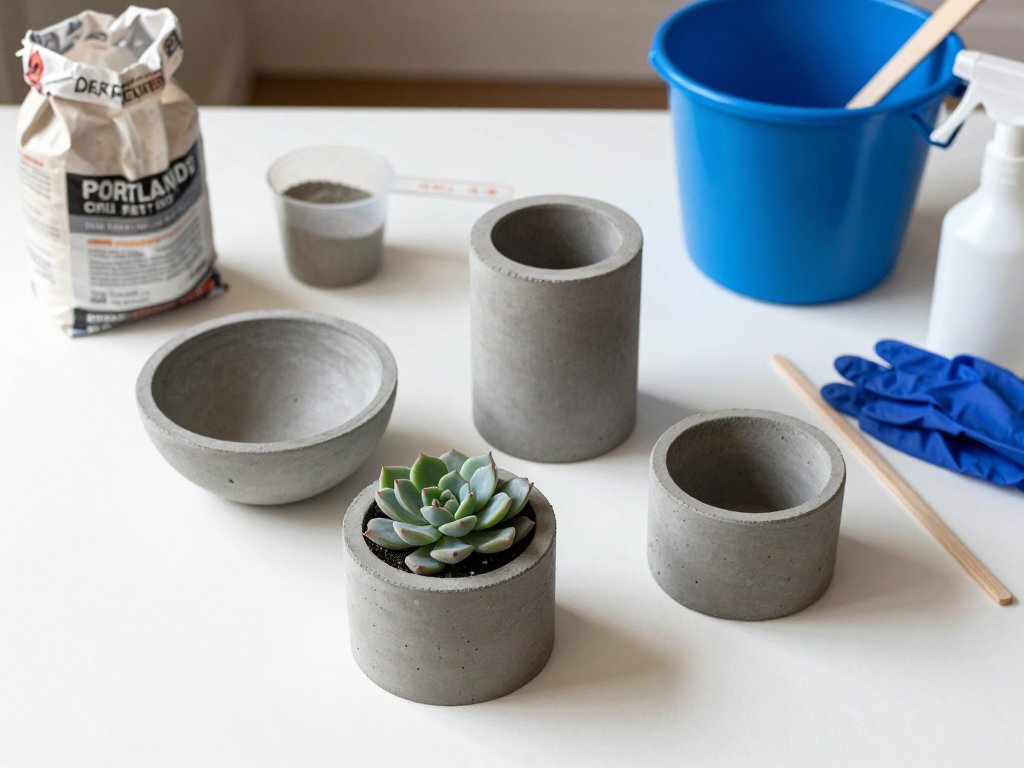
Here's the full list — everything except the cement and sand is probably already in your house.
- Portland cement — one bag. Type I/II general purpose is fine.
- Sand — play sand, builder's sand, or masonry sand, about half as much as your cement by volume.
- Water — from your tap.
- A mixing container — a plastic bucket or old wash basin. Never your good kitchen bowl; once cement touches it, it's a cement bowl.
- A stirring stick — a paint stirrer, old wooden spoon, or scrap wood.
- Molds — plastic containers, silicone bakeware, cardboard boxes, takeout containers, juice cartons. More below.
- Cooking spray or light oil — to help the concrete release.
- Gloves, dust mask, old clothes — from the safety section.
- Plastic wrap or a garbage bag — for curing.
- A spray bottle — for misting.
One shopping note: buy plain portland cement, not concrete mix or mortar mix — concrete mix has gravel and makes rough pots, while mortar mix has lime and changes the color.
The Mix: Why Ratios Actually Matter
Here's the recipe: one part cement to two to three parts sand. Add water slowly until the mix is about the consistency of peanut butter — thick enough to hold its shape, wet enough to slump a little. The ratio isn't arbitrary. Here's why.
Cement is the glue; sand is the filler. The glue needs enough filler to keep it from shrinking and cracking as it dries, but not so much that there isn't enough glue to hold everything together.
Too much sand and your planters crumble at the edges. Too much cement and they shrink and crack, and you spend more than you need to.
The one-to-two-or-three range is the sweet spot.
The peanut butter consistency isn't fussy either. Too wet — soupier than pancake batter — and the cement particles float apart, giving you weak, crumbly walls with water pooling in the bottom.
Too dry, and the mix won't pack into the corners of your mold, leaving voids and rough spots.
Peanut butter is wet enough to flow into every corner and dry enough to stay where you put it.
Trust the peanut butter.
Mix in small batches — about a cup of cement and two cups of sand at a time. You can always mix more, but you can't un-mix it.
Picking Molds: Look Around Your Kitchen
Your mold is the shape of your planter, and you probably have ten good options in your house right now.
The rule is simple: whatever you use needs to release the pot later. Rigid containers with straight sides can trap a pot, so pick shapes that taper — wider at the top than the bottom — or use containers you're willing to cut open.
Flexible molds just peel away.
Ideas that work:
- Plastic food containers — yogurt tubs, sour cream cups, deli containers. Tapered ones pop right out; cut the rim off straight-sided ones and slide the pot out.
- Silicone bakeware — loaf pans, muffin tins, bundt pans. The easiest thing in the world to unmold; the concrete just peels out.
- Cardboard boxes — shipping boxes, cereal boxes, milk cartons. Tear the cardboard away after curing. For a big floor planter, a sturdy box is your best friend.
- Takeout containers — the black plastic ones with clear lids are perfect small molds.
- Tetra-pak cartons — juice and milk cartons make tall, slim planters and hold wet concrete fine. Peel the carton off at the end.
Give the inside of your mold a light coat of cooking spray before you pour — it's not required for flexible molds, but it makes everything easier.
And match the mold to the plant: a succulent likes a shallow, wide dish; a snake plant likes tall and narrow.
Casting Step by Step
Alright, let's actually make something. Here's the whole process, start to finish.
Step one: prep. Lay down newspaper or a plastic drop cloth — dust and drips will happen. Put on gloves and mask. Set your molds nearby, already sprayed with oil.
Step two: mix dry. Combine one part cement with two to three parts sand and stir until the color is uniform.
Step three: add water slowly. Pour a little in, stir, pour a little more, aiming for peanut butter. If you overshoot and it gets soupy, add dry mix to bring it back.
Step four: fill the mold. Scoop the mix in and tap the mold firmly on the table a few times to settle it and push out air bubbles — for a bigger pot, fill partway, tap, fill more, tap again. Bubbles are the enemy; they leave pockmarks.
Step five: smooth the top. Wet your gloved finger or a small trowel and run it across the open surface. You want a clean rim, because that's what people will see.
Step six: set aside and wait. Leave the molds out of the way and resist poking at them.
Now the drainage hole, because timing matters. Plants need drainage — water sitting in the bottom rots roots, and a planter with no hole is just a very heavy way to kill a houseplant.
For an open-top pot, press the hole into the wet mix within the first hour or two: take a dowel, pencil, or chopstick, push it through the center of the bottom, and twist gently as you pull it out so the sides stay smooth.
If you forget (I forget), don't panic. Once the pot is cured, drill a hole with a masonry bit in a regular drill — mark the spot, start slow, and wear your dust mask. Drilling is a fine fallback; it just takes longer.
Curing: The Step Everyone Skips
Here's the part that separates planters that last for years from planters that crack in a month: curing. It's also the easiest step in the whole project, which is why it's so frustrating when people skip it.
Here's what's happening. Cement doesn't dry — it cures. It's a chemical reaction between cement and water, and the reaction needs water to keep going.
If the surface dries out too fast, the reaction stops early, and you get a weak, crumbly, cracked shell that looks fine for a week and then falls apart.
The fix is embarrassingly simple: keep the concrete moist. Here's my routine:
- As soon as the mix has set enough to hold its shape — usually a few hours — cover the molds loosely with plastic wrap.
- Mist the surface with water from a spray bottle once or twice a day.
- Keep it covered and misting for about three days.
- Let the pots cure a full seven days before you put weight on them or move them around much.
Cover, mist, wait. The plastic keeps moisture in, the misting replaces what evaporates, and seven days lets the reaction finish.
A week feels long when you're excited to see your pots, but it's one week of patience for years of use.
Set the molds where you'll see them, so misting becomes part of your morning routine.
Unmolding and Finishing
After seven days, the fun part: taking your planters out of their molds. This should feel like opening a present, and it usually does.
For flexible molds — silicone, plastic takeout containers — just flex and peel. For rigid containers, run a butter knife around the inside edge to break the seal, then tip the pot out. For cardboard, tear it away; for tetra-paks, cut the carton open.
Freshly unmolded concrete is rough and porous, with a light dusting of cement residue. Rinse it under water and scrub gently with an old brush. For rough edges, a concrete file or sandpaper will smooth them down. Don't sand aggressively — you're tidying, not sculpting.
Sealing is a choice, not a requirement. It darkens the surface slightly, protects against water stains, and makes the pot easier to clean.
Leaving it unsealed keeps the matte, raw-concrete look that's so popular right now, at the cost of a few water spots over time.
If you seal, use a water-based concrete sealer from a hardware store — brush it on thinly, let it dry, add a second coat if you like.
My take: seal the pots that hold real soil, leave the decorative ones raw.
Mistakes Beginners Make (And How to Avoid Them)
Let me save you the trouble of learning these the way I did. These four mistakes cause almost every disappointing planter I've ever seen.
Mistake one: too much water. It's the most common by a mile. People see a dry, crumbly mix and add water until it looks like soup, then wonder why their pot crumbled.
Remember the peanut butter. If you're in doubt, err on the dry side — you can add a splash more, but you can't take water out.
Mistake two: unmolding too early. I know it's exciting, but pulling a pot out at day two is how you get one that cracks in half when you pick it up. The seven-day cure isn't a suggestion. Wait the week.
Mistake three: no drainage hole. Your plant will quietly die of root rot, and you'll blame yourself instead of the missing hole. Press it in early or drill it after — just make the hole.
Mistake four: forgetting the safety basics. Bare hands, no mask, mixing indoors. It all works until it doesn't. Gloves and a mask cost a couple of dollars and take thirty seconds. Just wear them.
Decorating: Paint, Whitewash, and Stains
Raw concrete is beautiful, but it's also a blank canvas. Here are the three easiest ways to give your planters a finish that matches your living room.
Terracotta paint
Yes, you can make concrete look like a classic clay pot. Any latex or acrylic paint in a terracotta shade works — or mix your own by blending orange and brown craft paint.
Two thin coats, letting the first dry completely, gives you that warm clay color without hiding the concrete texture — the paint soaks in and looks dyed rather than painted.
Whitewash
Mix one part white latex paint with one part water, brush it on, then wipe it off with a rag while it's still wet.
The white settles into the crevices and highlights the texture, leaving a soft, aged, farmhouse look.
It's the cheapest finish on this list — leftover paint from any other project works — and nearly impossible to mess up.
Concrete stains
For color with the concrete look, use a concrete stain or a heavily diluted acrylic wash instead of paint.
A dark gray or charcoal stain deepens the color while keeping the matte texture; a diluted earth tone gives a soft tint.
Test on the bottom of a pot first — the porous surface soaks up color fast, and the result is always a little darker than it looks wet.
Two Projects to Start With
These two projects use the same mix from earlier — only the mold differs.
Project one: small succulent pots
Grab a few tapered plastic food containers — yogurt cups and deli containers are perfect.
Mix a small batch, fill each cup about two-thirds full, and press a hole in the bottom with a chopstick before the mix sets.
You'll get a matching set of tiny pots for succulents, air plants, or windowsill herbs.
Do this one first: it's fast, cheap, and you'll learn the feel of the mix.
Make six and keep the best four — the imperfect ones become gifts.
Project two: a large floor planter
Find a sturdy cardboard shipping box and tape the bottom well. For drainage, press a hole through the wet mix from the outside with a dowel, or cast the pot solid and drill after.
Mix in bigger batches: about four cups of cement to eight to twelve cups of sand, water to peanut butter, and fill the box, tapping it firmly as you go to settle the mix.
Give it ten days to cure to be safe. The payoff is a statement piece for your living room that would have cost $80 at a store, for a few dollars in materials.
Start small, and let the big project wait until you've done one successful batch — there's no rush.
Conclusion
Here's the thing: the first planter is never perfect, and that's exactly the point. The second is better. By the third batch, you'll be eyeing containers around the house and seeing planters everywhere you look — and you'll be right.
You're not just saving money, though that part is real: a bag of cement and a bag of sand, about $10 to $15 total, will make you a shelf full of planters.
You're also making something that didn't exist before, with your own hands, in your own kitchen.
That's a good feeling, and it doesn't fade when the concrete cures.
So gather your containers, put on your gloves, and mix yourself a batch of peanut-butter concrete. Your plants deserve a better home, and your wallet deserves a break. You've got this.