Introduction
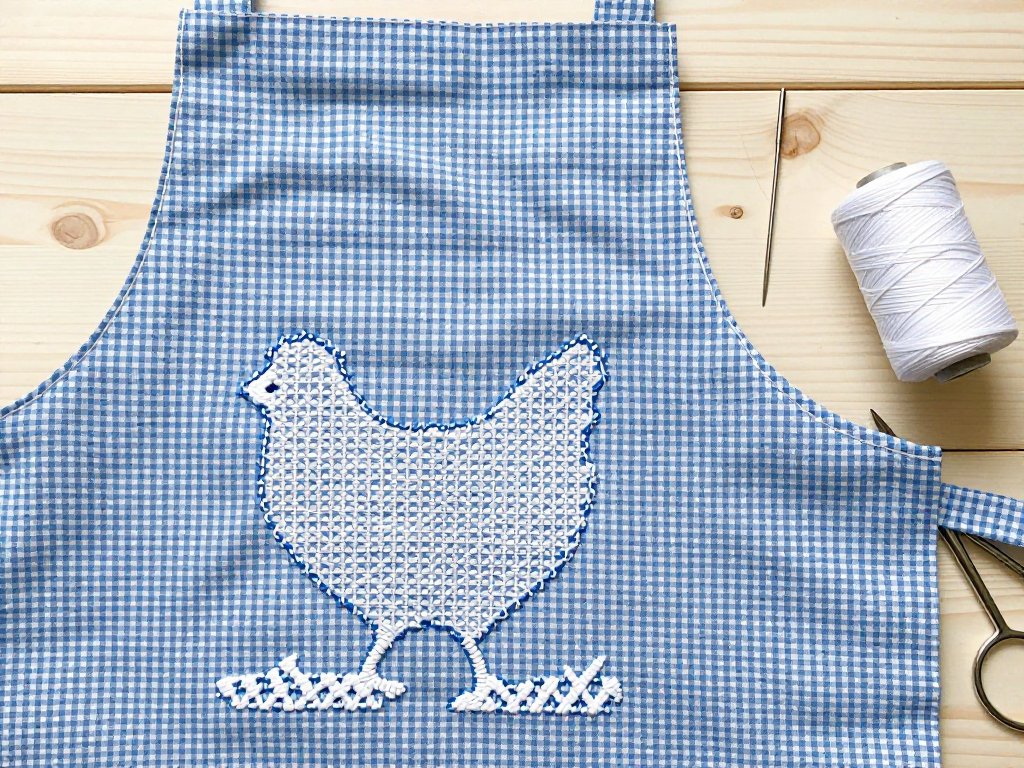
There is a particular kind of quiet that comes from a needle, a square of checked cloth, and nothing else to do for twenty minutes. Chicken scratch embroidery is that quiet, stitched.
It is also one of the most forgiving crafts I know. You do not trace a pattern. You do not transfer a design or buy a kit. The fabric already carries the graph paper, printed right into the weave.
Here is exactly what you need, what to buy, and how to work your first motif today.
What Chicken Scratch Embroidery Actually Is
Chicken scratch is white thread worked over the grid of gingham fabric. The checks act as the pattern, and the stitching fills selected squares until the cloth looks like white lace laid over color.
You will also find it called Depression lace, Amish embroidery, gingham lace, or snowflake embroidery. Same craft, different names depending on the region and the family that taught it.
The tradition is usually traced to the Depression era, when farm wives turned feed sacks and flour sacks into aprons, curtains, and children's dresses. Gingham was cheap and sturdy. White thread was already in the sewing box.
I want to be honest here: the exact origin story is family history as much as recorded history. Many women remember a grandmother working these patterns, and the details differ from kitchen table to kitchen table.
What is certain is that it was a make-do craft. No pattern book, no fancy supplies, no wasted cloth. That is still the spirit of it.
Why Gingham Is the Whole Trick
Ordinary embroidery asks you to decide where every stitch goes. Chicken scratch does not. The dark checks tell you where to stitch, and the light checks tell you where to leave air.
Count the checks, follow the grid, and a pattern appears without a single pencil mark. This is the reason beginners can finish a recognizable motif in under an hour.
It also means your work is repeatable. Once you have counted a motif on one square, you can count the same squares on the next one, and the next, with the same result every time.
And because the grid is printed rather than drawn, nothing rubs off, smudges, or washes away. The pattern lives in the cloth for as long as the cloth lasts.
Choosing Your Gingham
Not all gingham behaves the same way, and this is where most frustrating first attempts go wrong.
- Check size: 1/8 inch or 1/4 inch checks. Smaller checks make finer lace; larger checks work up faster and are easier to count.
- Fiber: 100% cotton. A polyester blend resists the needle, puckers oddly, and will not press crisply.
- Color: classic blue, red, or black. Pale colors are prettiest but show mistakes less; deeper colors give the white thread more contrast.
- Weave: a smooth, firmly woven quilting cotton. Loose weave lets stitches slide and looks messy.
Pre-wash and press your gingham before you stitch. Cotton shrinks, and a finished apron pocket that shrinks around its embroidery will pucker for good.
Buy a half yard to practice on. That is enough for several motifs, a border band, and a few honest mistakes.
One more thing to check in the store: hold the fabric up to the light. If you can see straight through the weave, the checks will shift under a hoop and your squares will go crooked.
Wash new gingham in cold water with a color catcher sheet, dry it flat, and press. Colored checks can bleed slightly on the first wash, and you want that to happen before your white thread is anywhere near it.
Thread, Needle, and Hoop
Use white or cream perle cotton, size 5 or size 8. Perle cotton has a soft twist and a slight sheen that reads as lace rather than floss.
Size 8 is thin and delicate, best for 1/8 inch checks. Size 5 is thicker and covers more cloth, which is what you want on 1/4 inch checks.
Thicker thread matters more than beginners expect. Chicken scratch works by covering the dark check so completely that only white shows. Thin thread lets the check peek through and the pattern turns grey.
If you only buy one spool, buy size 5 in white. It is the most forgiving choice and works on both check sizes.
For needles, a sharp embroidery or between needle with a large enough eye for perle cotton. Size 5 or 7 between needles suit most hands.
A small 4 to 6 inch hoop keeps the cloth taut without stretching the checks out of shape. You will also want small sharp scissors and a water-soluble marker for marking hems, not patterns.
Reading the Gingham Grid
Look closely at your fabric and you will see three tones, not two. Dark checks, white checks, and the pale middle tone where a colored thread crosses a white thread.
Those middle squares are the ones that make chicken scratch look like lace. Counting them correctly is the entire skill.
Hold the cloth so the grid runs straight up and down in front of you. Turn the fabric, not your head, until the checks are square to your eye.
Then read the pattern as a row of numbers. "Three dark, one light, three dark" is easier to follow than any printed chart.
Before you thread a needle, count out your motif on the cloth and touch each check with the needle tip. Ten seconds of counting saves ten minutes of unpicking.
It helps to pin a small scrap of paper to the fabric with the count written on it: five dark, two light, five dark. Your eyes will believe the paper faster than they will believe the cloth.
The Four Stitches You Need
Chicken scratch uses a very small vocabulary. Learn these four and you can work almost any traditional pattern.
- Single cross-stitch: one X worked corner to corner across a single check. The basic building block.
- Double cross-stitch: a cross-stitch with a second cross worked through the same center at a different angle, so one check becomes an eight-pointed star.
- Running stitch: small even stitches worked along the lines between checks, not across them. Used to outline, connect, and draw borders.
- Woven square: the lace stitch. A square is outlined with running stitches, then thread is laced back and forth under those stitches to create open white lace.
Notice that only the cross-stitches go through the fabric squares. Running stitches travel on the grid lines, which is why the outlines stay crisp.
Your First Motif: A Woven Lace Square
This is the stitch that makes people say "that looks like lace." Work it once and the whole craft clicks.
- Choose a block of checks five squares wide and five squares tall. Count twice.
- Thread your needle with about 18 inches of perle cotton. Knot the end, or leave a tail to catch under later stitches.
- Bring the needle up at the bottom left corner of the block, on the grid line.
- Work a running stitch along the bottom edge, one stitch per check, ending at the bottom right corner.
- Turn and run stitch up the right edge, across the top, and down the left edge. You now have a square outline.
- Bring the needle up at the bottom left corner again and slide it under the top edge running stitches, diagonally to the top right corner. Do not pierce the fabric.
- Lace the opposite diagonal, then two more passes through the middle of each side, until the square is filled with crossing white threads.
- Take the needle to the back and secure the thread with two small backstitches under the motif.
That is one lace square. It should look open in the center and firmly outlined at the edges.
If your first one is slightly lopsided, good. Every one I have made is slightly lopsided, and no one has ever noticed on a finished apron.
Building a Border Row
Borders are where chicken scratch starts to look like an heirloom. They are also the easiest thing to practice because they repeat.
Pick a band of cloth about one inch wide, following the checks. A border band of five checks tall is a comfortable beginner width.
- Run a line of running stitch along the top edge of the band, one stitch per check.
- Work a double cross-stitch in every other dark check along the band.
- Between each star, place a single cross-stitch in the light check to connect the row.
- Add a second running stitch line along the bottom edge to close the band.
- Repeat the sequence across the width, counting aloud if it helps.
Keep your stitches the same size as you go. Even tension matters more than perfect placement in a repeating border.
Making the Pattern Repeat
A repeating pattern is just one motif plus a decision about spacing. That is the whole secret.
Count the number of checks in your motif, then choose a gap. A four-check motif with a two-check gap gives a tighter, lacier band. A four-check motif with a four-check gap looks more open and modern.
Write the count on a scrap of paper and pin it to your work. You will forget by row three, and nobody has to know.
When you reach the end of a row, do not force a partial motif. Leave the last few checks plain, or center the pattern and let both ends match.
Blank space is part of the design in this craft. The white shows best when it has somewhere quiet to sit.
Three Beginner Projects
These three build on each other. Start with the smallest, and you will have a finished object the same week you learn the stitch.
An Apron Pocket
Work a lace square on a plain cotton pocket before you attach it to the apron. Stitching a flat piece is far easier than wrestling a finished apron in a hoop.
Center one five-check motif and add a running stitch outline one check outside it. Press, then sew the pocket in place by machine or hand.
A Tea Towel Band
Buy a plain cotton tea towel with a woven stripe or hem band, or make your own from a half yard. Mark a band two inches up from the hem with pins.
Work a repeating double cross-stitch border along that band. A tea towel takes an evening, and it is the project people ask to keep.
A Quilt-Square Sampler
Cut a six inch square of gingham and divide it mentally into a grid of four smaller squares. Work a different motif in each quarter: a lace square, a star, a border row, and a single cross-stitch diamond.
Finish the edges with a narrow hem and you have a sampler, a coaster, or the center of a small quilt.
Finishing and Washing Your Work
Chicken scratch is sturdy, but it is still white thread on colored cotton. Treat it like a nice shirt, not like a dishrag.
- Wash in cold water with a mild detergent. Never hot.
- No bleach, no brighteners, no fabric softener. Bleach yellows white cotton over time.
- Do not wring or twist. Press the water out gently against the side of the sink.
- Roll the piece in a clean towel to absorb moisture, then unroll while still damp.
- Press face down on a terry towel so the embroidery sits into the pile and stays raised.
Press on the wrong side with a warm iron, not hot. Steam helps relax hoop marks and small puckers.
If the piece will be washed often, like an apron or towel, sew a small hem or finish the raw edges before you stitch. Loose cotton edges fray faster once they have been handled.
Troubleshooting: When It Doesn't Look Right
Almost every problem in chicken scratch comes from one of four causes. Here is how to read them.
The Check Shows Through
Your thread is too thin for the check size, or your stitches are too small. Move up to size 5 perle cotton, or work a double cross-stitch instead of a single.
The Stitches Pull the Fabric
You are pulling too hard. Let the thread lie on the cloth rather than tightening it, and loosen the hoop by a turn. Fabric should feel like a drum, not a board.
The Squares Are Uneven
You are counting by eye instead of by check. Count each side aloud and touch the cloth with the needle tip before every stitch. Also check that the fabric is not stretched off grain in the hoop.
Hoop Marks Won't Come Out
Take the hoop off between sessions instead of leaving it on for days. If marks remain, dampen the area with cool water, press face down on a towel, and let it dry flat.
A Word About Slow Crafts
Chicken scratch is not a fast craft, and that is the point. It rewards the kind of attention that has become hard to find in a day full of notifications.
You will count checks. You will unpick a row. You will notice, around the third motif, that your hands have gone quiet and your shoulders have dropped.
That is worth more than a perfect border. The apron will be charming even with a wobbly square in it, and your family will not be grading your tension.
Start with one five-check lace square on a scrap of gingham this week. Keep it if it is crooked. Especially keep it if it is crooked.
Then make the next one. That is how every heirloom in a linen closet began.
If you enjoyed this project, you might also like our guide to Couching Stitch: Lay Threads in Place.