Introduction
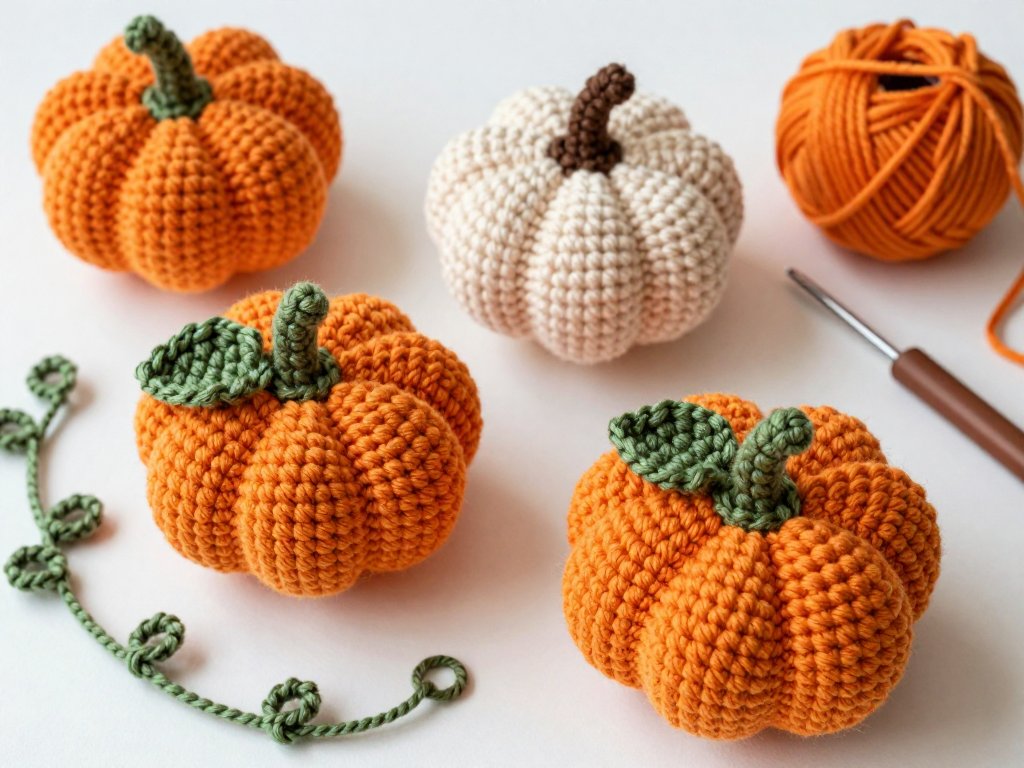
Is there anything cozier than a bowl of tiny handmade pumpkins on the mantel? Crochet pumpkins are the perfect fall project: cute, quick, and impossible to resist squeezing.
The best part? They are genuinely beginner-friendly. If you can single crochet, you can make a pumpkin this weekend. No complicated shaping, no fiddly seams, just a few basic stitches and a clever little trick that gives each pumpkin its classic ridged shape.
This guide gives you everything you need: the exact supplies, the stitches, a complete step-by-step pattern, and plenty of ideas for using your finished pumpkins around the house.
Let's make some fall magic.
What You Will Need
Here is the complete supply list. Most of these items are inexpensive, and you may already own them.
- Worsted weight yarn in orange. One skein makes several pumpkins. Acrylic yarn works beautifully and washes easily.
- A small amount of green or brown yarn. This is for the stem. Leftover scraps work perfectly.
- A 4mm crochet hook (US G-6). A slightly smaller hook than usual for the yarn weight creates tight stitches so the stuffing does not show through.
- Polyester fiberfill. One small bag stuffs many pumpkins.
- A yarn needle. For sewing pieces together and weaving in ends.
- A stitch marker. A scrap of contrasting yarn works just as well.
- Scissors.
That is the whole list. You can make your first pumpkin for the cost of a single skein of yarn and some stuffing.
The Stitches You Need to Know
Amigurumi sounds fancy, but the word simply means crocheted stuffed toys, a craft that comes from Japan. The technique uses only a handful of stitches, worked in a continuous spiral.
Magic ring (MR). This is the starting loop for most amigurumi. Wrap the yarn around your finger, insert the hook, and work your first stitches into the ring. Pull the tail to close it tight, and you have a hole-free start.
Single crochet (sc). The workhorse of amigurumi. Insert the hook, yarn over, pull through, yarn over, and pull through both loops. Every round is made of these.
Increase (inc). Simply work two single crochets into the same stitch. This widens your piece.
Decrease (dec). Work two stitches together so they become one. This narrows your piece and is essential for closing the pumpkin.
Slip stitch (sl st). A tiny connecting stitch used to join rounds and finish off.
If the magic ring feels awkward at first, do not worry. Everyone struggles with it. You can also start with a chain of two and work into the first chain, then pull the tail to close the gap.
How to Crochet a Pumpkin: Step-by-Step
This pattern makes a pumpkin about four inches wide, perfect for tabletop decor. The whole project takes a relaxed afternoon, which makes it a wonderful weekend project.
Step 1: Crochet the Pumpkin Body
Work in a continuous spiral with your orange yarn. Do not join rounds; just keep going and place a stitch marker at the start of each round so you can track your progress.
Round 1: Make a magic ring and work 6 single crochets into it. (6 stitches)
Round 2: Increase in every stitch. (12 stitches)
Round 3: Sc in the next stitch, then increase; repeat around. (18 stitches)
Round 4: Sc in the next 2 stitches, then increase; repeat around. (24 stitches)
Round 5: Sc in the next 3 stitches, then increase; repeat around. (30 stitches)
Rounds 6-10: Sc in every stitch around. (30 stitches each round)
This creates a bowl shape. The increases flatten the bottom, and the plain rounds build the pumpkin's sides.
Round 11: Sc in the next 3 stitches, then decrease; repeat around. (24 stitches)
Round 12: Sc in the next 2 stitches, then decrease; repeat around. (18 stitches)
Now is the time to stuff the pumpkin firmly with fiberfill. It should feel plump and smooth, like a real pumpkin.
Round 13: Sc in the next stitch, then decrease; repeat around. (12 stitches)
Round 14: Decrease around until the opening closes. (6 stitches)
Fasten off, leaving a long tail. Weave the tail through the front loops of the last round and pull tight to close the hole completely.
Step 2: Add the Stem
With your green or brown yarn, make a magic ring and work 6 single crochets into it. Then work 4 rounds of 6 single crochets each, without increasing.
This creates a little tube. Stuff it lightly, flatten it, and sew it to the top center of your pumpkin with the yarn needle.
For a curly stem, chain 8, then work 2 single crochets into each chain. Curl the chain into a spiral and sew it in place. This looks adorable on mini pumpkins.
Step 3: Shape the Ridges
This is the trick that turns a plain ball into a pumpkin. Cut a long piece of orange yarn, about 18 inches, and thread it through your yarn needle.
Insert the needle through the center top of the pumpkin, next to the stem, and pull it out through the center bottom. Now pull gently to create a slight dent.
Move the needle up the side about a third of the way around the pumpkin and push it through from bottom to top again. Pull gently, and you have created a segment.
Repeat this three or four times around the pumpkin, spacing the segments evenly. Each pull creates one of the classic pumpkin ridges.
When you have the number of segments you like, tie off the yarn securely at the top and hide the knot under the stem.
Stand back and admire your work. You just made a pumpkin from a ball of yarn.
How to Make Mini Pumpkins
Mini pumpkins are irresistible, and they follow the exact same pattern with fewer rounds. Here is the adjustment.
Mini version: Work rounds 1 through 4 of the body pattern, then two plain rounds, then decrease rounds to close. Add a tiny stem and one or two creases.
Mini pumpkins take about twenty minutes each. Make a dozen and fill a wooden bowl for instant fall charm.
Jumbo version: Use bulky yarn and a 6mm hook, and add two extra increase rounds and six plain rounds. A jumbo pumpkin makes a wonderful floor accent beside a fireplace.
The pattern is endlessly scalable. Change the yarn weight, add or remove rounds, and the pumpkin grows or shrinks to fit your space.
Creative Ways to Use Your Crochet Pumpkins
Once you have a pile of pumpkins, you will want to show them off. Here are some of my favorite ideas.
Fill a bowl. A mix of mini pumpkins in cream, burnt orange, and mustard looks beautiful on a coffee table or entryway bench.
Make a garland. Crochet a chain of pumpkins separated by simple chain loops and hang it across a mantel or window.
Top a gift. Instead of a bow, tie a mini pumpkin to a wrapped present. It is a gift and a decoration in one.
Create a tablescape. Scatter pumpkins down the center of your Thanksgiving table between candles and leaves.
Attach a keyring. Sew a small ring to a mini pumpkin and carry fall in your pocket all season.
Build a pumpkin patch. Arrange pumpkins of three different sizes on a wooden tray with a few pinecones and a sprig of dried grass. It makes a gorgeous centerpiece that lasts all season.
Give them as gifts. A handmade pumpkin is a thoughtful hostess gift for any autumn gathering.
Color and Yarn Ideas
Traditional orange is lovely, but the fun really starts when you play with color and texture.
Soft neutrals. Cream, oatmeal, and blush pink pumpkins look chic on modern shelves and match any decor.
Muted harvest tones. Burnt orange, sage green, and mustard yellow give a vintage farmhouse feel.
Textured yarns. Chenille or velvet yarn makes the softest, most huggable pumpkins. They feel like plush toys.
Sparkle yarn. A strand of metallic yarn held together with orange creates subtle glitz for holiday tables.
Striped pumpkins. Alternate two rounds of orange with two rounds of cream for a two-tone pumpkin.
Ombre pumpkins. Change to a lighter shade of the same color every few rounds. The gradient looks soft and modern, and it is an easy way to use up partial skeins.
Do not be afraid to experiment. Yarn is forgiving, and the worst outcome is a pumpkin in a color you love a little less.
Common Mistakes and Quick Fixes
Even experienced crocheters make mistakes on amigurumi. Here are the ones I see most often, with the fixes that work.
My stitches are too loose and the stuffing shows. This is the most common issue. Switch to a smaller hook, one size down from what the yarn label recommends, and keep your tension even.
I lost my place in the round. Use a stitch marker every round, or count your stitches after each round. Fifteen seconds of counting saves fifteen minutes of frogging.
My pumpkin is lopsided. This usually means you missed an increase or decrease. Check your stitch count at the end of each round and fix it before moving on.
My decreases look bumpy. Use the invisible decrease: insert your hook into the front loop of the first stitch, then the front loop of the second stitch, yarn over, and pull through both. This makes the decrease nearly invisible.
I overstuffed and the shape looks stretched. Gently remove a little stuffing and reshape with your fingers. Firm but not bulging is the goal.
My pumpkin looks more like an egg. This happens when the plain rounds are too short. Add one or two extra plain rounds before the decreases, and re-stuff for a rounder shape.
My ridges are uneven. That is completely fine. Real pumpkins are not perfectly symmetrical either. Pull the yarn a little tighter on the side you want to indent more.
A Note on Safety for Little Hands
If your pumpkins will be near babies or toddlers, a few small changes make them safe for play.
Use embroidered features instead of plastic safety eyes if you are making animals or faces. Sew all parts very securely, and choose stuffing labeled safe for children's toys.
Fiberfill can be a choking hazard if a toy is torn open, so supervise toddlers and inspect your pumpkins regularly for loose stitches.
For everyone else, enjoy the softness. Crochet pumpkins are made to be squeezed.
How to Crochet a Leaf and Curly Vine
A little green leaf takes your pumpkin from cute to absolutely charming. Here is a simple pattern that uses the same basic stitches you already know.
Leaf. Chain 8. Work 1 single crochet into the second chain from the hook, 1 half double crochet, 2 double crochets, 1 half double crochet, 1 single crochet, and a slip stitch into the last chain. This makes a small pointed leaf.
For a fuller leaf, work down the other side of the chain too. Chain 8, then work the same sequence back along the bottom edge of the chain. The leaf gets a soft, oval, real-pumpkin look.
Curly vine. Chain 20 with your green yarn. Work 3 single crochets into each chain across. The extra stitches make the work curl naturally into a spiral.
Sew the leaf and vine to the top of your pumpkin next to the stem, and arrange them so they look natural. A tiny bit of curling vine is all it takes to make your pumpkin look like it just came from the patch.
For a jack-o'-lantern look, embroider a simple face onto the front with black yarn before you add the stem. A little triangle smile makes everyone smile back.
Final Thoughts
You now have everything you need to fill your home with handmade fall charm. One pumpkin is lovely; a whole patch is magic.
Start with a single pumpkin in the classic orange, and once you feel the shape come together, make a few more. Try a mini, a jumbo, a cream-colored one for the bedroom shelf.
Crochet has a wonderful way of turning quiet evenings into something to be proud of. Every pumpkin you make carries a little of your time and care, and that is what makes handmade decor special.
So pick your yarn, make your magic ring, and enjoy the process. Your fall pumpkin patch is waiting.
Happy crocheting!