Introduction
Here is the honest truth about crochet tops: most of them are rectangles. Some are two rectangles. A few are rectangles with a granny square on top. The crochet world has made this simple garment feel complicated, but it does not have to be.
If you have been scrolling through social media watching makers flip their cameras to show off crochet tops in every color of the rainbow, here is your invitation to join them.
Every single one of those tops started with a chain, a hook, and a maker who believed she could figure it out.
You can too.
In this guide, I am going to give you exactly what you need: five genuinely easy crochet top patterns, the supplies list for each, the stitches to practice first, and the sizing math — all in plain language.
No mysterious abbreviations, no "just trust the process" vagueness. By the end, you will know which pattern to start with and exactly how to make it fit you.
Before You Begin: The Four Things Every Top Needs
Every pattern in this list shares the same short list of basics. Gather these once, and you can make all five tops.
Yarn. For summer tops, choose cotton or a cotton blend. Cotton is breathable, washes well, and holds its shape in a way that synthetic yarns cannot.
Worsted weight cotton (a 4 on the label) is the easiest to work with and the most forgiving for beginners.
DK weight works beautifully too, if you prefer a finer fabric — just use a slightly smaller hook and know that your top will take a little longer.
Hook. For worsted weight yarn, a 5mm (H-8) or 5.5mm (I-9) hook is your best friend.
For DK, reach for a 4mm (G-6). The yarn label always suggests a hook size, and for garments you will often want to go up one size from the label for a softer drape — I will show you how to check with a gauge swatch below.
Extras. A tapestry needle for weaving in ends, small scissors, stitch markers (or safety pins — they work perfectly), and a measuring tape. That is the whole kit.
The four stitches. Every pattern in this article uses only four stitches: chain (ch), single crochet (sc), double crochet (dc), and slip stitch (sl st).
If you can make a chain and a double crochet, you can make every single top on this list.
If you have never made a double crochet, spend ten minutes practicing a row of them before you start — that ten minutes will save you an hour of frustration.
How to Check Your Gauge (Five Minutes That Save a Whole Top)
I know, I know. Gauge sounds like the boring part. But here is the thing: gauge is the difference between a top that fits and a top that becomes a gift for someone taller than you. It takes five minutes.
Make a swatch about four inches square using the yarn, hook, and stitch your pattern calls for.
Measure how many stitches and rows you get across four inches. Compare that number to the pattern's gauge.
If you have more stitches than the pattern says, your stitches are too tight — go up a hook size.
If you have fewer, your stitches are too loose — go down a hook size.
Re-swatching once or twice is completely normal; it is what experienced makers do too.
For rectangle-style tops, there is a shortcut that many beginners love: you can skip the swatch entirely and simply crochet until your fabric measures the width you need. We will cover that in the first pattern.
Pattern 1: The Simple Rectangle Top
This is the top I recommend to every single beginner, because it has exactly one shape: a rectangle. If you can crochet a straight line, you can make this top. It is the pattern equivalent of training wheels, and it produces something genuinely wearable.
What you need. Worsted weight cotton, 5mm hook, measuring tape.
The math. Measure around the fullest part of your chest. Add two inches for comfortable ease. That number — in inches — is the width of your rectangle. If your chest measures 36 inches, you are aiming for a rectangle that is 38 inches wide.
Step 1. Chain until your foundation chain measures that width when laid flat and slightly stretched. Do not count stitches — measure the chain itself. This is the forgiving magic of the rectangle top.
Step 2. Work double crochet rows back and forth until the fabric, folded in half, reaches from your underarm down to your hip.
Turn each row with a chain 2 (or chain 3 — whichever keeps your edges even).
Try the fabric against your body as you go; this is your top, and your body is the best measuring tape.
Step 3. Fold the rectangle in half, right sides together. Seam the two sides with slip stitches or a whip stitch, leaving about eight inches open at the top on each side for the armholes.
Seam the shoulders — a few inches on each side at the top — leaving the middle open for your neckline.
Step 4. Turn it right side out. For straps, chain a strap from the front corner to the back corner, or simply try it on and adjust. Weave in your ends, and you are done.
That is it. A rectangle, four seams, and a top. Make this one first, and you will understand crochet garments from the inside out.
Pattern 2: The Granny Square Top
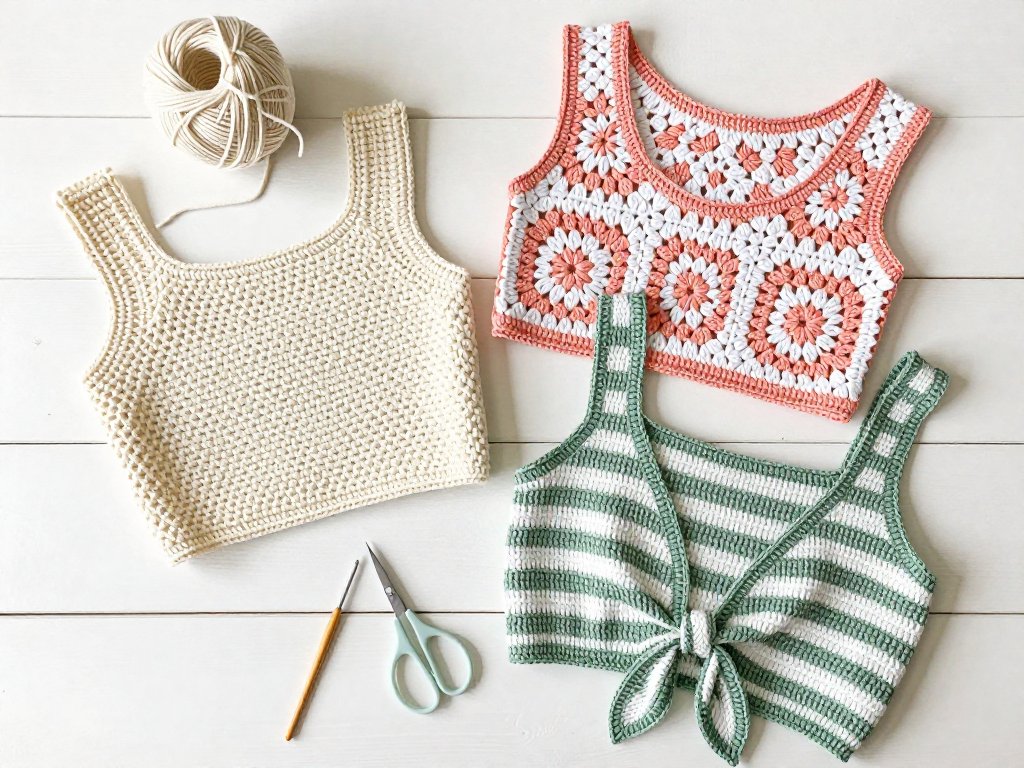
If you have been on social media at all in the past two years, you have seen this top.
The granny square top is the pattern that made crochet cool again, and for good reason: it is made of small, portable squares that come together into a top with almost no shaping.
What you need. Worsted weight cotton in one or two colors, 5mm hook, tapestry needle.
The square. A classic granny square works like this: chain 4 and join with a slip stitch to form a ring.
Chain 3 (counts as your first double crochet), then work two double crochets into the ring, chain 1, and repeat three more times — three double crochets and a chain 1 in each corner.
Join with a slip stitch. Each round adds clusters of three double crochets in the corners and sides, growing the square outward.
Work four rounds for a top-sized square.
Putting it together. Make two squares the same size. Lay them side by side and join them along the top edge for a few inches in the center — that becomes your neckline opening, with the un-joined corners becoming your shoulders.
Seam the sides from the bottom up, leaving the top open for armholes. Add a row of single crochet around the armholes and neckline to keep the edges tidy, and weave in your ends.
Style it. Two-color squares — a solid center with a contrasting border — give the classic two-tone granny look.
Make the squares slightly larger than your chest measurement, and the top will sit like a boxy crop.
Add a couple of extra rounds to the bottom of each square and the top becomes a longer tunic.
Pattern 3: The Shell Stitch Tank
Ready for a pattern that looks fancy but is secretly simple? Meet the shell stitch tank.
The shell stitch — a group of five double crochets worked into a single stitch — creates a lovely scalloped texture that looks like it took real skill.
It took about ten minutes to learn.
What you need. DK or worsted cotton, hook one size up from your yarn label for drape, stitch markers.
The shell pattern. The repeat is easy: skip two stitches, work five double crochets into the next stitch (that is your shell), skip two stitches, single crochet into the next stitch.
Repeat across. On the next row, work your shells into the single crochets of the row below.
That is the whole pattern — a two-row repeat that grows upward as a lovely, airy fabric.
Shaping the tank. Start with the same width math as the rectangle top: chain your chest width plus two inches.
Work the shell pattern straight for a few inches, then try the fabric on. For a simple tank shape, you can work the body straight and add thin straps at the top, or you can decrease at the armholes — work a partial row that starts with slip stitches to "step down" into the row, and stop a few shells before the end to create the armhole curve.
A slightly looser shell tank with straight sides and straps is the friendliest beginner option.
Finish it. Add a few rows of single crochet around the neckline and armholes — this keeps the shell fabric from stretching out of shape and gives it a polished edge. Block lightly, and the scallops will lie flat and even.
Pattern 4: The Classic Mesh Top
Summer heat and crochet do not always get along — until you discover mesh. This top is made of open, airy stitches that let the breeze through, and it is the fastest top on this list to make.
What you need. Cotton or cotton-linen blend, 4.5mm or 5mm hook.
The mesh stitch. The simplest mesh is a two-stitch repeat: double crochet, chain 1, skip one stitch, double crochet.
Worked in rows, this creates a grid of little windows — breathable, stretchy, and wonderfully forgiving of gauge mistakes.
For a slightly different look, try the V-stitch mesh: work a double crochet, chain 1, double crochet all into the same stitch, skip two stitches, and repeat.
Making the top. Chain your chest width plus two inches and work the mesh pattern straight until the fabric reaches your hip.
Seam the sides leaving armhole openings, and add simple chain straps — the mesh pattern makes strap placement easy because you can see exactly where to attach them.
A row of single crochet around the neckline keeps the mesh from curling.
Wear it. A mesh top is made to be layered — wear it over a tank or bralette in bright summer colors, and let the mesh do the talking.
It also works beautifully as a beach cover-up over a swimsuit, which is the fastest way to get compliments on a hand-made piece.
Pattern 5: The Striped Tie-Front Top
Last but very much not least: the tie-front top. This is the pattern for the maker who wants something a little more fashion-forward — a cropped top with long ties at the bottom that you knot at the front. It is trending on every platform, and it is genuinely easy.
What you need. Worsted weight cotton in two or three colors, 5mm hook, stitch markers.
Step 1: The panels. Make two rectangles — front and back — using your chest-width math, in any stitch you like. Alternating rows of color creates the classic striped tie-front look. Keep the panels a few inches shorter than your hip, since the ties add length.
Step 2: The ties. Instead of seaming the bottom edge closed, work long chains from the bottom corners of the front panel — about fifteen to twenty inches each.
Make four ties in total, two at each bottom corner of the front. Work a row of single crochet along the bottom edge between the ties to keep it tidy.
Step 3: Assembly. Seam the sides of the two panels, leaving armholes at the top, and seam the shoulders. Add single crochet edging around the neckline and armholes.
Step 4: The tie. Put the top on and bring the four ties to the front, knotting them in a bow at your waist.
The gathered look — where the front fabric ruches softly under the bow — is exactly the style everyone is after, and it hides a multitude of fit sins.
A crop-length top with a high-waisted skirt or jeans, and you have an outfit that looks like it came from a boutique.
Choosing the Right Pattern for You
Not sure where to start? Here is the honest guide to picking.
If you have never made a garment before: start with Pattern 1, the rectangle top. It teaches you the essential skill — fitting a flat piece to your body — with the least risk.
If you want something portable and social-media-famous: choose Pattern 2, the granny square top. Little squares travel in a bag beautifully, and the joining is satisfying.
If you want texture without complexity: Pattern 3, the shell stitch tank, looks advanced but is only a two-row repeat.
If it is hot and you want quick gratification: Pattern 4, the mesh top, is the fastest and most breathable.
If you want the trend piece: Pattern 5, the striped tie-front, is the one that gets the compliments.
Whichever you choose, remember: crochet tops are forgiving. Cotton yarn is cheap, the stitches come out easily if you need a do-over, and a top that does not fit you perfectly will fit someone else — or become a lovely market bag.
There is no such thing as wasted yarn in this craft.
Finishing and Caring for Your Crochet Top
The difference between a handmade top that looks homemade and one that looks boutique is almost always finishing. These few minutes of care are worth every second.
Weave in your ends properly. Thread your tapestry needle and weave each yarn tail back and forth through the wrong side of the fabric for about two inches, catching the stitches. Trim close, but not flush — a tiny tail is fine and safer than a cut that slips.
Block your top. Wet blocking works wonders on cotton. Soak the top in lukewarm water with a drop of mild soap, gently press out the water (never wring), lay it flat on a towel, and shape it to the measurements you want.
Let it dry completely. Blocking evens out stitches, relaxes the fabric, and gives your top a professional drape.
Wash and dry with kindness. Cotton tops can go in the washing machine on a gentle cycle in a mesh bag, but hand washing is gentler on your stitching.
Dry flat, reshaping as it dries. Do not tumble dry on high — cotton will shrink and your careful gauge will be history.
Store it folded, not hung. Crochet stretches under its own weight on a hanger. Fold your tops and stack them, and they will keep their shape season after season.
Common Beginner Questions
Before you cast on — well, chain on — here are the questions every new top-maker asks, answered in plain language.
"My edges are curling." This is normal. A row of single crochet around any edge tames the curl, and blocking finishes the job. Curled edges are a sign you are making real crochet fabric, not a mistake.
"My top is too big." This is the happiest problem to have. Crochet fabric has give, and a slightly oversized top reads as intentional and stylish.
If it is really too big, unravel and redo with a smaller hook or fewer chains — cotton unravels cleanly, and the yarn is not wasted.
"My top is too small." First, check whether blocking can stretch it — cotton can often be gently stretched a size when wet.
If not, add a border of single crochet around the edges, or unravel and add a few more chains to the width.
Remember: measure the chain itself, not your counting, and add that two-inch ease.
"The armholes look uneven." Try the top on and mark the armhole openings with stitch markers before you seam — markers never lie. A slightly larger armhole is also easier to fix than a too-small one.
"How long will this take?" A rectangle top or mesh top in worsted cotton takes most beginners four to eight hours spread over a few evenings.
A granny square top is even easier to break into bite-sized sessions — one square at a time.
There is no deadline; the top will be waiting for you, and so will the yarn.
Your Next Step
Here is the plan, in one sentence: pick one pattern — the rectangle top — gather cotton and a 5mm hook, and chain your chest width plus two inches tonight.
That first chain is the only hard part. After it, the top is just rows of double crochet, the same stitch you will use a thousand times, and suddenly a rectangle becomes a garment and a chain becomes a wardrobe.
The makers you admire on social media started with exactly this — a chain, a hook, and the small brave decision to begin.
Make the rectangle top first. Wear it. Notice how people ask where you bought it, and how good it feels to say, "I made it." Then pick the next pattern from this list, and the next, and watch your summer wardrobe grow one chain at a time.