Introduction
Fresh flowers are beautiful, but they wilt. They cost money, require maintenance, and die in a week. Origami paper flowers solve all of that. They last forever, cost pennies to make, and you can create them in any color imaginable.
I have been folding paper flowers for over a decade, and I still get the same thrill watching a flat square of paper transform into a three-dimensional bloom.
The best part? Anyone can learn. You do not need artistic talent or expensive supplies.
You just need paper, patience, and a willingness to try.
In this guide, I will walk you through everything you need to make your first origami paper flower bouquet.
We will cover three classic flowers — tulips, roses, and lilies — plus how to arrange them into a gorgeous bouquet you can display or gift.
Each project is beginner-friendly and designed to be completed in under an hour.
Why Origami Paper Flowers?
Before we dive into folding, let us talk about why paper flowers deserve a spot in your crafting rotation. The first reason is obvious: they never die. A paper bouquet from a special occasion becomes a permanent keepsake. That wedding centerpiece? It still sits on my shelf years later.
The second reason is cost. A pack of origami paper costs five to ten dollars and contains dozens of sheets. You can make an entire bouquet for the price of a single grocery-store bunch. That is hard to beat when you are on a budget.
Third, origami is a meditative practice. The repetitive folding motions quiet your mind. There is something deeply satisfying about watching precise creases build into something beautiful. It is crafting as mindfulness, and you end up with a present at the end.
Finally, paper flowers give you total creative control. Want a purple and orange bouquet? Go for it. Need flowers that match a specific paint swatch? Print your own paper. Fresh flowers cannot compete with that level of customization.
Materials and Tools You'll Need
One of the best things about origami is the minimal supply list. Here is exactly what you need to get started:
- Origami paper — Standard 6-inch squares in your choice of colors. Kami paper is great for beginners. You can find a wide selection of paper at the arttools.com origami paper collection.
- A flat work surface — A hard table or desk works best. Soft surfaces make precise folds difficult.
- A bone folder or craft stick — Optional but helpful for creasing sharp folds. Any hard, smooth edge will do.
- Floral tape — Green floral tape for wrapping stems. Available in the floral supplies section at arttools.com.
- Floral wire or wooden skewers — For stems. 18-gauge floral wire works well for most flowers.
- Hot glue gun — For attaching stems to finished flowers.
- Scissors — Standard craft scissors for cutting stems and trimming paper.
- Ruler — For measuring stems to consistent lengths.
- Vase or wrapping paper — For displaying or gifting your finished bouquet.
That is it. Nine items, most of which you probably already own. The total investment is under twenty dollars, and you will have enough paper to make dozens of flowers.
Getting Started: Basic Folds
Every origami flower builds on a handful of fundamental folds. Master these four, and you can fold almost any bloom. Practice each one a few times before moving to the projects.
Valley Fold. Fold the paper toward you so the crease forms a V shape. This is the most basic fold in origami. Run your fingernail or bone folder along the crease to make it sharp.
Mountain Fold. Fold the paper away from you so the crease forms an upside-down V. Think of it as the opposite of a valley fold. Mountain folds create structure and dimension in your flowers.
Reverse Fold. Fold a flap of paper in one direction, then reverse the crease to fold it in the opposite direction. This sounds tricky, but it is just folding inside out. Practice on scrap paper until the motion feels natural.
Squash Fold. Open a pocket of paper and press it flat so it forms a symmetrical shape. This is the fold that turns flat paper into three-dimensional petals. It is the secret to most origami flowers.
Take fifteen minutes to practice these folds. Use cheap paper or scrap printer paper cut into squares. The muscle memory you build now will make every project smoother. For more foundational techniques, check out the beginner origami tutorials at arttools.com.
Project 1: Origami Tulip
The tulip is the perfect starter flower. It uses only twelve folds and takes about ten minutes to complete. You will make two pieces: the flower head and the stem with leaf.
Supply checklist for one tulip:
- One 6-inch square of origami paper (any color for the flower)
- One 6-inch square of green origami paper (for stem and leaf)
- Floral wire or skewer
- Hot glue
Step 1: Fold the flower head. Start with your colored paper color-side down. Fold it in half diagonally to form a triangle. Crease well and unfold. Fold it diagonally the other way and unfold again. You should have an X-shaped crease pattern.
Step 2: Flip the paper over. Fold it in half horizontally, crease, and unfold. Fold it vertically, crease, and unfold. You now have a grid of creases that will help the paper collapse into shape.
Step 3: Push the center of the paper inward while bringing the four corners together. The paper should collapse into a smaller square shape. This is called a preliminary base. Smooth it flat and make sure all edges align.
Step 4: Fold the bottom corners of the top layer toward the center crease. Repeat on the other side. Flip the model over and repeat. You should now have a diamond shape with all points meeting at the bottom.
Step 5: Fold the front flap upward, creasing at the bottom edge. Repeat on the back. This creates the classic tulip cup shape. Blow gently into the opening at the bottom to inflate the flower. Gently curl the four petals outward with your fingers.
Step 6: Make the stem. Take your green square. Fold it in half diagonally. Fold the two outer points toward the bottom point to form a diamond shape. Fold the diamond in half lengthwise. This creates a long, thin stem with a pointed leaf attached.
Step 7: Insert the floral wire into the stem piece. Apply a small dab of hot glue to the top of the wire and attach it to the inside of the tulip head. Hold for ten seconds until set.
You just made your first origami tulip. Make three or four in different colors, and you already have the start of a bouquet.
Project 2: Origami Rose
The rose is slightly more advanced than the tulip but still well within beginner reach. It takes about twenty minutes and requires fifteen to eighteen folds. The result is stunning — a fully dimensional rose with layered petals that look almost real.
Supply checklist for one rose:
- One 6-inch square of origami paper (red, pink, or white works beautifully)
- Green floral tape
- Floral wire
- Hot glue
Step 1: Start color-side up. Fold the paper in half horizontally, crease, and unfold. Fold vertically, crease, and unfold. You should have a plus-sign crease pattern.
Step 2: Fold all four corners to the center point. This is called a blintz base. Your paper should now be a smaller square with triangular flaps pointing inward.
Step 3: Fold the new corners to the center again. You will have an even smaller square. Flip the paper over.
Step 4: Fold the corners to the center one more time. The paper will be quite thick now. Crease firmly using a bone folder if you have one.
Step 5: Here is the tricky part. Unfold the last two sets of folds partially. You want to lift the center flaps and pull them outward to create the petal layers. Work slowly and gently. The paper should begin to form a rounded, cup-like shape.
Step 6: Curl the outer edges of each petal around a pencil or your finger to give them a natural, organic curve. This step makes the difference between a stiff paper flower and a beautiful one.
Step 7: Attach the wire stem with hot glue. Wrap the base of the flower and the top inch of the wire with green floral tape to create a clean transition from flower to stem.
The first rose might not look perfect. That is normal. Make two or three, and you will notice your folds getting cleaner and your petals more shapely. Each one teaches your hands something new.
Project 3: Origami Lily
The origami lily is a classic. It uses the same preliminary base as the tulip but adds petal-folding steps that create the elegant, pointed lily shape. Plan for fifteen minutes per flower.
Supply checklist for one lily:
- One 6-inch square of origami paper (white, yellow, or pink)
- One 4-inch square of contrasting paper (for the stamen, optional)
- Floral wire
- Hot glue or floral tape
Step 1: Create a preliminary base just like you did for the tulip: fold both diagonals, flip, fold both axes, then collapse into a square. Place the open end pointing downward.
Step 2: Fold the top layer's right edge to the center crease. Repeat with the left edge. Flip the model and repeat on the other side. You now have what looks like a kite shape.
Step 3: Fold the top point down as far as it will go. Crease firmly and unfold. This creates guidelines for the next step.
Step 4: This is called a petal fold. Lift the top layer from the bottom point and pull it upward while bringing the sides inward along the creases you just made. Flatten everything neatly. Repeat on the other three sides.
Step 5: Fold the bottom edges of each petal toward the center line. This narrows the petals and gives the lily its characteristic slender shape. Repeat on all four petals.
Step 6: Curl each petal outward using a pencil or your finger. For a realistic lily, curl the tips backward slightly more than the rest of the petal.
Step 7 (optional): Cut a thin strip of contrasting paper, fringe it with scissors, and roll it into a small bundle. Insert it into the center of the lily as a stamen before attaching the stem.
The lily is my favorite flower to fold. The petal fold step feels like magic every time — flat paper suddenly becomes a flower.
For a visual reference of the lily and other intermediate projects, the paper flower templates at arttools.com include diagrams that can help clarify tricky folds.
Arranging Your Bouquet
You have folded your flowers. Now comes the fun part: turning them into a beautiful arrangement. A well-composed bouquet elevates individual flowers into something greater than the sum of their parts.
Start with a focal flower. Choose your best rose or largest lily and place it at the center. This is the anchor of your bouquet. Everything else radiates from here.
Build in odd numbers. Groups of three, five, or seven flowers look more natural than even-numbered clusters. The human eye finds odd-numbered groupings more visually pleasing.
Vary heights. Cut your stems to different lengths. Tall flowers at the back, medium in the middle, short at the front. This creates depth and dimension. Use your ruler to measure consistent height differences — about one inch between each layer works well.
Add filler. Origami leaves, small folded buds, or even curled paper strips can fill gaps between main flowers. You can fold simple leaves using the same green squares by folding them diagonally and accordion-pleating the edges.
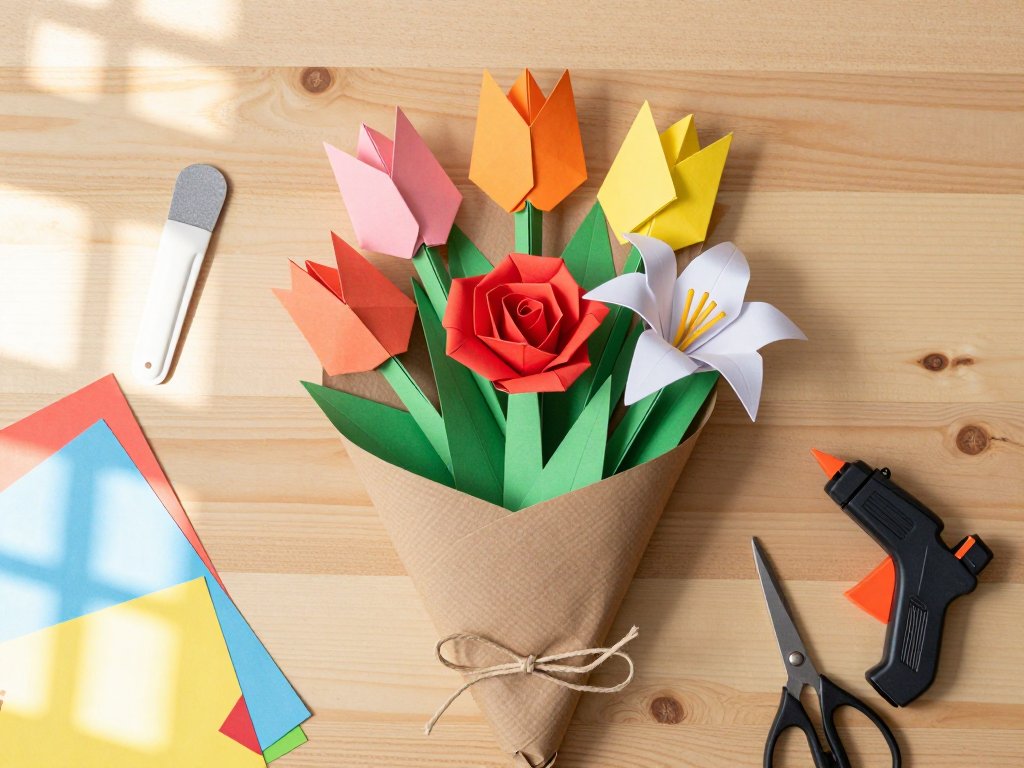
Wrap or vase. If you are gifting the bouquet, wrap the stems in brown kraft paper and tie with twine. If displaying at home, trim stems to fit your vase and arrange from tallest to shortest.
Secure the stems. Wrap floral tape around the bundle of stems about two inches below the flower heads. Work your way down the bundle to keep everything in place. Finish with a ribbon if desired.
For more arranging ideas and inspiration, browse the DIY flower arrangement gallery at arttools.com.
Tips for Success
After folding hundreds of paper flowers, I have learned a few things the hard way. Here are my top tips to save you frustration and help you create better blooms from the start.
- Crease like you mean it. Weak creases cause collapsed flowers. Run your fingernail or a bone folder firmly along every fold. Sharp creases hold their shape longer.
- Use the right paper weight. Standard 60 to 80 gsm origami paper is ideal. Too thin and the flower flops. Too thick and the folds fight you.
- Work on a hard surface. Carpet, beds, and soft mats absorb your creasing pressure. A hard table gives you crisp, clean folds every time.
- Start with larger paper. 6-inch squares are standard, but beginners may find 8-inch squares easier to handle. The folds are more forgiving when the paper is bigger.
- Watch your paper grain. Some papers fold more easily in one direction than the other. If a fold feels resistant, try the opposite direction.
- Keep a reference photo handy. Having a picture of the finished flower on your phone helps you visualize where each fold is leading.
- Embrace imperfection. Handmade means human. Slightly uneven petals give your bouquet character. No two flowers in nature look identical, and your paper ones should not either.
- Practice in batches. Fold five of the same flower in a row. The first will be rough. The third will be passable. The fifth will be beautiful. Repetition is the fastest path to improvement.
- Store finished flowers carefully. Paper flowers crush easily. Store them in a box with tissue paper or hang them upside down from a clothes hanger.
If you get stuck on a fold, do not force it. Gently unfold and try again. Origami paper is surprisingly forgiving — you can refold the same sheet multiple times before it shows wear.
Conclusion
Origami paper flower bouquets are one of the most rewarding paper crafts you can learn. They cost almost nothing, require minimal supplies, and produce beautiful results you can keep forever or give as heartfelt gifts.
The three projects in this guide — tulips, roses, and lilies — give you a solid foundation. Master these, and you can move on to more complex flowers like orchids, hydrangeas, and cherry blossoms. Each new flower teaches you new folding techniques that make the next one easier.
I recommend making your first bouquet with three tulips, a rose, and a lily. That gives you variety without overwhelming you. Display it in a simple glass vase on your dining table or desk. Every time you see it, you will remember what your hands learned to create.
Paper flowers are not a substitute for real ones. They are their own thing — a celebration of geometry, patience, and the human ability to make something beautiful from almost nothing. I hope this guide helps you discover that joy for yourself.
Ready to fold your first bouquet? Grab paper from the arttools.com origami paper collection, clear your table, and start with the tulip.
You will have your first flower in ten minutes. Share what you make in the comments below — I love seeing what our crafting community creates.