Introduction
Summer is here, and if you're anything like me, you want your home to feel light, bright, and festive — without blowing your grocery budget.
Between keeping the kids entertained, managing summer schedules, and trying to squeeze in a few minutes of quiet with a glass of iced tea on the porch, the last thing any of us needs is another expensive home decor splurge.
The good news? You can give every room in your house a fresh, sun-drenched summer makeover for pocket change.
I'm talking about projects that cost less than a trip through the drive-thru — and look like you spent a whole lot more.
Over the past few weeks, I've been experimenting with supplies from Dollar Tree and Dollar General, and I keep being amazed at what a little paint, twine, and creativity can do.
Today, I'm sharing five of my favorite Dollar Store summer decor DIYs, each one coming in at under $10 from start to finish.
I've priced everything out at real Dollar Store prices (most items are $1.25 each as of 2026), so you can follow along knowing exactly what you're spending before you walk through those sliding glass doors.
Whether you're a seasoned crafter or someone who hasn't picked up a hot glue gun since summer camp, these projects are designed to work for you.
Before we dive in, here's my best piece of advice for Dollar Store crafting: keep an open mind and give yourself grace.
Your painted pot doesn't have to look like it came from a boutique. It just has to make you smile when you walk past it.
That's the whole point.
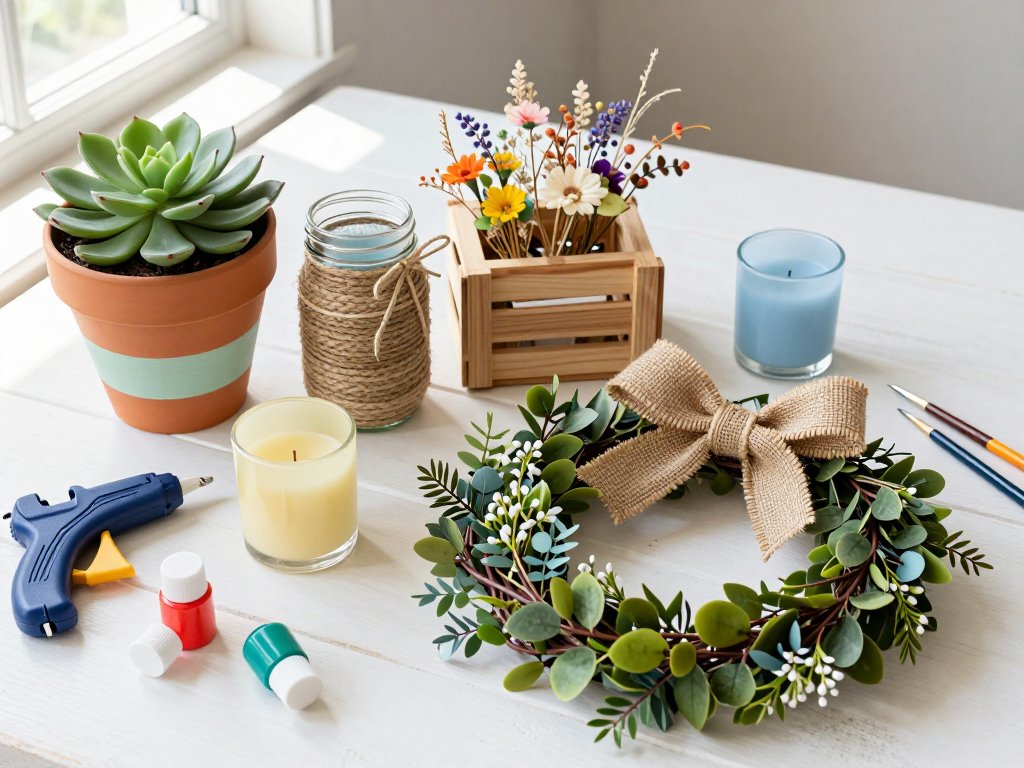
Project 1: Painted Terracotta Pots with Succulents
Estimated cost: $6.25 (terracotta pot $1.25, acrylic paint set $1.25, paintbrush set $1.25, faux succulent $1.25, decorative sand or pebbles $1.25)
Few things say "summer" quite like a cluster of cheerful pots on a front porch or kitchen windowsill.
Terracotta pots are one of the best values at the Dollar Store — they're inexpensive, versatile, and take paint like a dream.
This project is so forgiving that my seven-year-old made three of them for her bedroom bookshelf last weekend, and honestly?
Hers turned out better than mine.
Here's how to make them your own. Start by giving your terracotta pot a quick wipe-down to remove any dust.
You don't need primer — just grab a Dollar Store acrylic paint set in your favorite summer colors.
I'm partial to coral, soft yellow, and a pale sage green that reminds me of sea glass.
Paint the outside of the pot in even strokes, letting each coat dry before adding another.
Most Dollar Store acrylics are a bit thin, so plan on two to three coats for solid coverage.
That's not a flaw — it actually makes blending and layering much easier if you want to try an ombre effect.
Once your base coat is dry, the real fun begins. You can add stripes with painter's tape (also available at the Dollar Store), try a simple polka-dot pattern with the end of a paintbrush, or go freehand with little flowers or geometric shapes.
My personal favorite? A dipped look where the bottom third of the pot is painted and the top remains the natural terra cotta.
It gives off that modern farmhouse vibe without any effort at all.
For the plant, I recommend Dollar Store faux succulents. They're surprisingly realistic these days, and you don't have to worry about watering schedules or summer heat.
Fill the pot with decorative sand or small pebbles (another Dollar Store find), nestle the succulent in place, and you're done.
Group three pots of varying sizes on a tray for an instant centerpiece, or line them up along a sunny windowsill for a pop of color that lasts all season.
If you want to get a sense of how different color combinations might look before you start painting, try our color palette generator over at arttools.com — it's a fun way to experiment without committing brush to clay.
Project 2: Mason Jar Vases with Twine and Ribbon
Estimated cost: $5.00 (mason jar $1.25, twine $1.25, ribbon $1.25, faux flowers or fresh cuttings $1.25)
Mason jars might be the single most versatile item at the Dollar Store. I keep a stash of a dozen in my craft closet at all times because they're the answer to so many decorating questions.
For summer, I love dressing them up as simple vases that look equally charming on a dining table, a bathroom counter, or a patio side table.
The process couldn't be simpler. Start with a clean, dry mason jar. Wrap natural jute twine around the middle of the jar, about an inch below the rim, securing it with a dab of hot glue on the back.
Continue wrapping until you have a band about an inch wide, then snip the twine and glue the end in place.
If you want to add a ribbon on top of the twine, choose something in a summer print — gingham, stripes, or a cheerful floral.
Tie it in a simple bow, and let the tails hang loose for that casual, undone look that's so popular right now.
For the flowers, you have options. Dollar Store faux flowers have come a long way — look for stems of sunflowers, daisies, or lavender for a fresh summer feel.
A single generous stem per jar keeps it simple and modern. Or, if you have a garden or a farmer's market nearby, fill the jar with fresh cuttings: zinnias, cosmos, herbs like mint or rosemary, or even wildflowers gathered on a family walk.
The twine-wrapped jar elevates even the most humble roadside bloom.
One of my favorite tricks is to make a whole row of these jars in different heights and use them as a table runner down the center of a picnic table.
They're sturdy enough for outdoor use, easy to move around, and if one breaks? You're out a dollar, not a heartbreak.
That's the beauty of Dollar Store crafting — it takes the pressure off and lets you enjoy the process.
Speaking of taking pressure off, if you're ever unsure about how to arrange your flowers or balance colors in a room, our home decor planner can help you visualize your space before you start crafting.
Project 3: DIY Wooden Crate Centerpieces and Shelves
Estimated cost: $6.25 (small wooden crate $1.25, wood stain or acrylic paint $1.25, sandpaper $1.25, faux greenery or flowers $1.25, small accessories $1.25)
Dollar Store wooden crates are a bit of a hidden gem. They're small — usually about the size of a shoebox — but they pack a huge decorating punch.
I've used them as centerpieces, as wall-mounted herb gardens, as bookends, and even as risers for tiered tray displays.
They're raw, unfinished wood, which means they're ready for whatever finish you want to give them.
Let me walk you through my favorite approach: a rustic summer centerpiece. Pick up one or two small crates from the Dollar Store (they're usually in the craft aisle).
Give them a light sanding with sandpaper — just enough to smooth any rough edges.
Then apply a coat of wood stain if you want a rich, weathered look. Dollar Store craft paint thinned with a little water works beautifully as a whitewash if you prefer a coastal vibe.
I've also seen bloggers paint them in bright tropical colors for a more playful feel.
Once the crate is dry, you have so many options for styling. Fill it with faux greenery cascading over the edges.
Layer in a few of those painted terracotta pots from Project 1 for a cohesive look.
Add a pillar candle surrounded by seashells collected on vacation. The crate keeps everything contained and intentional-looking, even if you just tossed things in there in five minutes flat.
For a more ambitious take, you can mount the crates on the wall as DIY shelves.
A single crate screwed into a wall stud makes a charming little shelf for a bathroom or entryway.
Two crates side by side create a mini bookshelf for a child's room. Three stacked vertically with a coat of paint becomes a statement piece in a living room.
The hardware will add a dollar or two, but you're still well under our $10 target.
I should mention: if you're planning to use these crates outdoors for a summer party, give them a coat of outdoor sealant (Dollar General carries small bottles for around $3). That way they'll survive the occasional splash or dewy morning and be ready for next summer too.
Project 4: Summer Wreath from Dollar Store Supplies
Estimated cost: $7.50 (wire wreath form $1.25, burlap ribbon roll $1.25, faux flower stems $2.50 for two, hot glue sticks $1.25, accent picks or berries $1.25)
I know what you might be thinking — a wreath for summer? Aren't those just for Christmas?
Not anymore. A fresh, bright wreath on your front door is one of the warmest welcomes you can give, and a summer wreath made from Dollar Store supplies costs less than a bouquet from the grocery store.
Start with a basic wire wreath form. The Dollar Store carries two sizes — grab the larger one for a full-looking wreath.
You'll also want a roll of burlap ribbon or mesh. If you've never made a burlap wreath before, let me reassure you: it is much easier than it looks.
Cut the ribbon into strips about six inches long, then fold each strip in half and pull the folded end through the wire ring, feeding the loose ends through the loop.
Pull tight. Repeat until the whole ring is covered. This part is wonderfully meditative — perfect for doing while listening to a podcast or keeping an eye on kids playing in the yard.
Once your base is covered, it's time for the fun part: adding flowers. Dollar Store faux flowers are my secret weapon.
Look for stems of sunflowers, daisies, hydrangeas, or eucalyptus. Snip the stems short with wire cutters (or heavy scissors) and arrange them in a cluster at the bottom left or top right of the wreath — whatever feels balanced to your eye.
Hot glue each stem in place, and don't worry about perfection. Nature isn't symmetrical, and your wreath doesn't have to be either.
Add accent pieces for depth: little berry picks, tiny wooden cutouts, or a bow made from a contrasting ribbon.
I recently made a wreath using a lemon-themed ribbon and yellow daisies that cost exactly $7.50 total, and it gets compliments from every delivery person who comes to the door.
It's hanging there now as I write this, and honestly? It makes me happy every single time I walk past it.
Want to plan out your wreath color scheme before you shop? Check out our craft budget calculator — it lets you price out each component before you hit the store, so you know exactly what your total will be before you check out.
Project 5: Painted Glass Candle Holders for Outdoor Ambiance
Estimated cost: $7.50 (glass candle holders or votives $1.25 for a pair, glass paint $1.25, paintbrush set $1.25, tea light candles $1.25 for a pack, decorative ribbon or twine $1.25, optional glass etching cream $1.50 at Dollar General)
There's something magical about candlelight on a summer evening — the way it flickers across a patio table, the gentle warmth it brings to an outdoor gathering.
But nice candle holders can be shockingly expensive. Not these. Dollar Store glass candle holders, transformed with a little paint, become the centerpiece of your evening setup without any of the boutique markup.
Here's my favorite technique. Pick up clear glass votives, cylinder vases, or even small drinking glasses from the Dollar Store — anything with a smooth surface will work.
Clean them thoroughly with rubbing alcohol (a Dollar Tree find) so the paint adheres properly.
Then use glass paint, which is specially formulated to bond to smooth surfaces without peeling.
Dollar General carries small bottles of Martha Stewart glass paint for around $1.25, or you can find similar options at Dollar Tree's craft section.
For a simple look, paint the bottom half of the glass and leave the top clear — the dipped effect again.
For something more festive, use painter's tape to create stripes, or dip a natural sea sponge into white paint and dab it on for a frosted, beachy texture.
My kids love making polka-dot candle holders by dipping the eraser end of a pencil into paint and dotting it around the glass.
It's not fancy, but it's adorable, and they beam with pride every time we light them at dinner.
Once the paint is dry (follow the instructions on the bottle — usually 24 to 48 hours for full curing), wrap a piece of jute twine or thin ribbon around the rim of each holder.
Pop in a tea light or a small pillar candle, and you're ready for a warm summer evening on the patio.
A few safety notes from one busy mom to another: always place glass candle holders on a stable, heat-safe surface, especially outdoors where a breeze could tip things over.
Never leave burning candles unattended — I know we all get distracted, so I keep a little timer on my phone as a mental nudge.
And if you're crafting these as gifts (they make wonderful hostess presents), consider using battery-operated tea lights instead.
Dollar Tree carries packs of LED tea lights for $1.25, and they flicker convincingly enough that no one will know the difference.
These candle holders pair beautifully with the mason jar vases from Project 2. Arrange them together on a wooden crate from Project 3, and suddenly your entire patio looks like it was styled by a professional — for less than you'd spend on a single magazine.
Bonus Tips for Dollar Store Summer Decorating
Before I send you off to gather supplies, here are a few extra tips I've learned from years of Dollar Store crafting with three kids, a dog, and a schedule that rarely goes according to plan.
Shop your local stores first. Dollar Tree and Dollar General have slightly different stock, and the selection varies wildly by location.
I keep a little notebook in my purse (okay, it's the notes app on my phone) with a running list of what each store near me carries.
One location near my house has amazing faux flowers; another has better glassware. Knowing your stores saves you a second trip.
Check the seasonal aisle. Dollar Store inventory rotates quickly, and the seasonal aisle is where you'll find the best summer-specific items — tropical leaves, seashell decor, bright outdoor-safe containers, and even little string lights. Grab them when you see them, because they'll be gone by August.
Embrace the imperfections. Dollar Store items aren't going to be heirloom quality, and that's exactly the point.
A slightly crooked paint line on a terracotta pot isn't a flaw — it's handmade charm.
A glue string on your wreath isn't a mistake you need to hide. This is crafting for joy, not for publication.
Give yourself permission to make things that are pretty enough, good enough, you enough.
Get the kids involved. Every single project in this article is family-friendly. The painted pots are a staple of my summer rainy-day activity list.
The mason jars are easy enough for little hands to wrap with twine (with supervision on the glue gun).
Even the wreath can be a team effort — you handle the hot glue, and let them choose where the flowers go.
Some of my favorite summer memories are from afternoons spent crafting side by side with my kids, mess and all.
Final Thoughts
Summer decorating doesn't have to mean spending a small fortune on trendy pieces that will feel dated by August.
With a few Dollar Store supplies, an afternoon of creative time, and the willingness to enjoy the process instead of stressing about the result, you can transform your home into a warm, welcoming summer haven — and still have plenty of budget left for ice cream and pool passes.
I'd love to hear which project you try first. Drop a comment below if you're reading this on the site, or tag us on social media with your Dollar Store summer creations.
There's something so wonderful about seeing how different crafters interpret the same idea — the color combinations, the little personal touches, the stories behind each project.
Until next time, happy crafting — and here's to a summer full of simple beauty, small joys, and projects that make you smile every time you walk past them.
— Clara