Introduction
There is something quietly magical about drying flowers. A bouquet that would fade in a week becomes a keepsake that lasts for months, and every bloom carries the memory of the day you picked it.
Dried flower crafts are some of the oldest crafts there are, and they suit a busy season perfectly. The projects are gentle, the supplies are simple, and the results are genuinely beautiful.
In this guide we will cover how to press flowers, how to air-dry blooms for wreaths, and four easy projects to try this week, including one you can make with the kids in an afternoon.
A Short History of Pressed Flowers
Pressed flower art has a long and lovely past. In Japan, the art of oshibana has been practiced since the sixteenth century, when samurai reportedly used it as a discipline to cultivate patience, concentration, and harmony with nature.
Centuries later, European botanists pressed specimens to document new plants, and during the Victorian era pressing garden flowers became a popular home art. Families filled albums with blooms, and travelers tucked pressed flowers into letters sent home from abroad.
Knowing this history makes the craft feel meaningful. When you press a flower, you are taking part in a tradition that has soothed busy hands for hundreds of years.
Why Dried Flower Crafts Belong in Your Season
Pressed flower art, known in Japan as oshibana, has been practiced since the sixteenth century. Samurai once used it as a discipline for patience and concentration, and Victorian families pressed garden blooms into albums and letters.
That history is part of the charm. When you press a flower, you join a tradition of people who slowed down long enough to notice something small and lovely.
Dried flowers are also wonderfully forgiving for beginners. If a stem breaks or a petal shifts, you adapt. The craft asks for patience, not perfection.
Choosing Flowers for Drying
Some flowers dry beautifully, and some turn to sad brown mush. Choosing well from the start saves you disappointment.
Best for pressing: flat, thin blooms like pansies, violets, daisies, cosmos, and Queen Anne's lace. Single layers of petals press more reliably than fluffy ones.
Best for air-drying: sturdy stems like roses, hydrangeas, statice, lavender, baby's breath, and strawflowers. These hold their shape and color as they dry.
Pick flowers in the morning after the dew has dried, and choose blooms that are not fully open. They continue to open slightly as they dry.
You can also dry flowers you already have. Wilted bouquets, wedding flowers, and grocery-store stems all press or hang beautifully if they are not already brown.
How to Press Flowers
You have three good options, from free to slightly fancy.
The book method. Place flowers between two sheets of paper towel or parchment inside a heavy book, then stack more books on top. Wait one to two weeks. This costs nothing and works beautifully.
The flower press. A wooden press with layers of cardboard and blotting paper gives flatter, more even results. It is a lovely tool to own if you plan to press often.
The microwave method. For impatient crafters, a microwave flower press dries blooms in minutes. Follow the press's instructions carefully, and let the flowers cool before touching them.
Whichever method you choose, check your flowers after a few days. If they still feel damp, let them dry longer. Patience is the secret ingredient.
While you wait, keep a small notebook with the date and the flower names. In a month you will be glad you recorded which blooms pressed well and which crumbled into confetti.
One detail worth knowing: flowers pressed with their petals facing up keep a rounder face, while flowers pressed sideways keep a flatter profile. Choose the orientation that suits the project you have in mind.
How to Air-Dry Flowers for Wreaths
Air-drying is the simplest way to preserve stems for wreaths and arrangements.
Strip the lower leaves from each stem, gather a small bunch, and tie the stems with twine or a rubber band. Hang the bunch upside down in a dark, dry, well-ventilated place.
Darkness matters more than people expect. It keeps colors from fading. After two to three weeks, the stems should feel crisp and papery.
For flat flowers like strawflowers, you can also dry them upright in a jar with an inch of water, letting the water evaporate. They dry with their heads up and faces open.
Drying Flowers in Silica Gel
For plump flowers like roses, peonies, and dahlias, silica gel gives the most lifelike results. It is a sand-like substance that draws moisture out gently while the flower keeps its shape.
Pour a layer of silica gel into a container, place the flower face up, and slowly cover it with more gel until it is buried. Seal the container and wait three to five days.
Silica gel costs a little more than books and twine, but it can be reused again and again, which makes it economical over time.
Use gel-dried flowers for wreaths, arrangements, and keepsake projects where you want the bloom to look almost fresh.
Drying Flowers Through the Year
Every season offers something worth preserving. In spring, press apple blossoms and wild violets. In summer, dry roses, lavender, and statice while they are at their peak.
Fall brings golden leaves, seed pods, and the last hardy blooms, while winter is the perfect time to dry store-bought flowers or evergreen sprigs for wreaths.
Keeping a small drying corner means you always have materials ready. A basket of stems waiting by the window becomes next month's project, and the habit of noticing what is blooming becomes its own quiet pleasure.
Project 1: Pressed Flower Cards
This is the perfect first project. It takes an afternoon and uses supplies you already have.
You will need pressed flowers, blank cards or folded cardstock, craft glue or a glue stick, and a small paintbrush for pressing petals down.
Arrange your flowers on the card before gluing anything. Play with the layout until it feels balanced, then glue each piece gently into place.
Let the card dry flat under a book for an hour. Add a handwritten note inside, and you have a gift that costs pennies and means everything.
Project 2: Pressed Flower Art
Once your cards feel easy, try a small framed piece. This is oshibana in its simplest form.
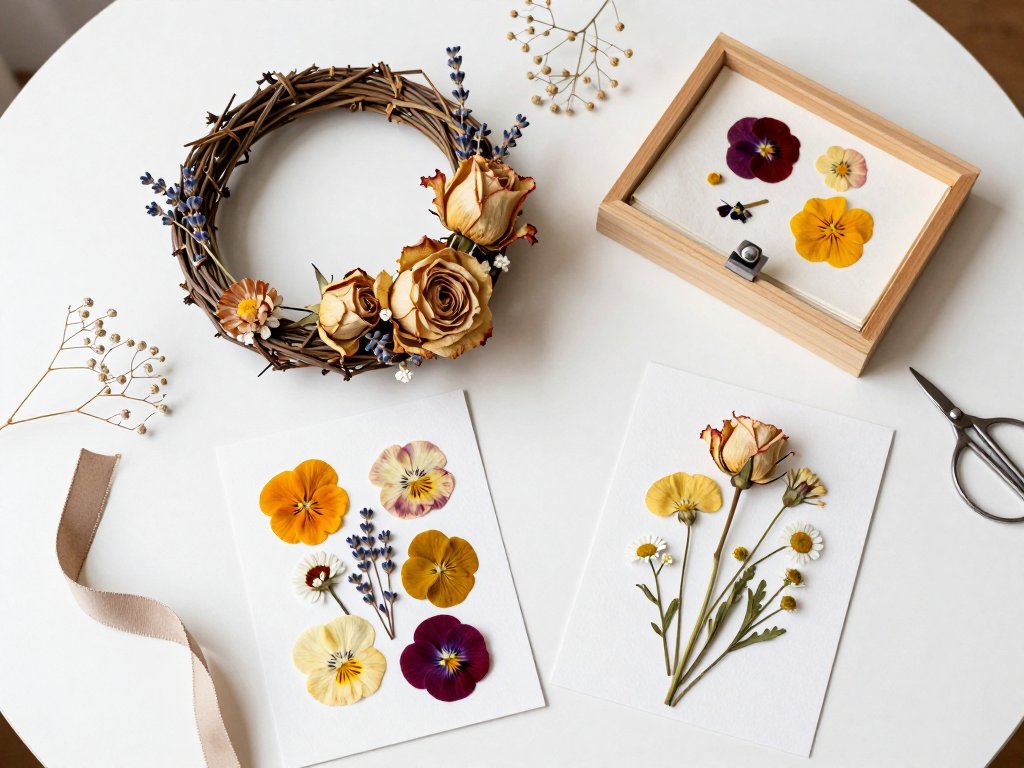
Choose a piece of plain paper that fits your frame, and arrange pressed flowers into a composition: a single stem, a small bouquet, or a wreath shape.
Glue the flowers down, let the piece dry flat, and frame it. A simple frame with a white mat makes even a modest arrangement look gallery-ready.
Pressed flower art makes a thoughtful gift for a new mother, a teacher, or anyone who loves the garden.
Project 3: Dried Flower Wreath
A dried flower wreath is the project people notice on your front door. Here is how to make one from start to finish.
Gather your materials. You will need a wreath base (grapevine, wire, or foam), dried stems, floral wire or a hot glue gun, and ribbon for hanging.
Build a base layer. If using a grapevine wreath, tuck the dried stems into the vines, working in one direction around the circle. This gives you a full, lush foundation.
Add focal flowers. Once the base is full, add your largest blooms in groups of three, spaced evenly. Step back often to check the balance.
Fill the gaps. Tuck smaller stems and filler like lavender or baby's breath into any bare spots. The wreath should look full from every angle.
Finish and hang. Secure any loose stems with floral wire, add a ribbon bow, and hang your wreath away from direct sun to keep the colors true.
For a seasonal twist, change the ribbon and a few focal flowers as the year turns. A good wreath base can be dressed up for every holiday.
Project 4: Flower Sachets and Potpourri
If you have petals that did not press well, put them to work in sachets.
Mix dried petals with a few drops of lavender essential oil in a bowl, then spoon the mixture into small muslin bags or squares of fabric tied with ribbon.
Tuck sachets into drawers, linen closets, or a suitcase before a trip. They are quick, inexpensive, and make lovely hostess gifts.
This project is especially good for kids, since there is no glue and no fragile petal to fuss over.
What to Make with Dried Flowers
Once you have a stash of dried blooms, the possibilities multiply. Here are a few favorite uses.
- Bookmarks. Laminate a pressed flower between two strips of contact paper for a durable gift.
- Candle toppers. Press flowers onto the top of a plain pillar candle for a fast centerpiece.
- Resin jewelry. Encased in clear resin, small pressed blooms become pendants and earrings.
- Scrapbook accents. A single petal tucked beside a photo brings a page to life.
- Gift tags. Glue a tiny flower to a plain tag and write the recipient's name beside it.
- Table scatter. A few petals around a dinner plate add an elegant touch for almost no money.
Keep a small box of your prettiest dried pieces organized by color. You will reach for it again and again.
Dried flowers also pair beautifully with other crafts. Add them to a scrapbook page, tuck a bloom into a handmade card, or press a sprig into the wax of a homemade candle for a delicate seasonal detail.
Preserving Your Finished Projects
Dried flowers last longest when you keep them away from humidity, direct sun, and dust.
Spraying finished arrangements lightly with hairspray or a craft sealant helps petals stay in place, though it will not stop all fading over time.
Framed art should be sealed behind glass. Wreaths should live on a covered porch or indoors, and they can be refreshed with a gentle dusting using a soft brush.
Crafting with Kids
Dried flower crafts are wonderfully family-friendly. Pressing flowers teaches patience, and arranging them teaches composition without any pressure.
Let young children choose their own blooms and layout. Their arrangements will not look like yours, and that is exactly right.
Keep projects short and celebrate the process. A lopsided card made by a five-year-old is worth more than a perfect one made by anyone else.
Try a flower hunt first: give each child a small basket and a rule to collect only what is already fallen. It turns the craft into an outdoor adventure.
Common Mistakes and How to Fix Them
Every beginner presses a flower too early or over-glues a petal. Here are the fixes that matter most.
Flowers turning brown. They were likely pressed while damp, or left in a damp spot. Dry in a warm, dry place and always start with dew-free blooms.
Petals falling off. Use a tiny bit more glue and let it dry flat under weight. A small brush helps you place glue exactly where you want it.
Colors fading. Keep finished pieces out of direct sunlight and high humidity. Some fading is natural; that is part of the charm of real flowers.
Wreath looking flat. The fix is almost always more stems. Build the base layer thicker than you think you need, then add the focal flowers on top.
Final Thoughts
Drying flowers slows you down in the best way. You notice the shape of a petal, the weight of a stem, the small changes from day to day.
Start with whatever blooms you can find, even a single flower from the garden or a bunch from the grocery store. Press them in a heavy book tonight, and you will have something to make with next week.
The season will not wait, but that is the beauty of it. A few patient evenings now become a whole shelf of quiet treasures to enjoy all winter.
Start small, press often, and give your first finished piece away. Sharing a handmade flower gift is the fastest way to fall in love with this gentle, old-fashioned craft.