Introduction
There is something quietly magical about taking two crafts that have existed for centuries and bringing them together in a single piece.
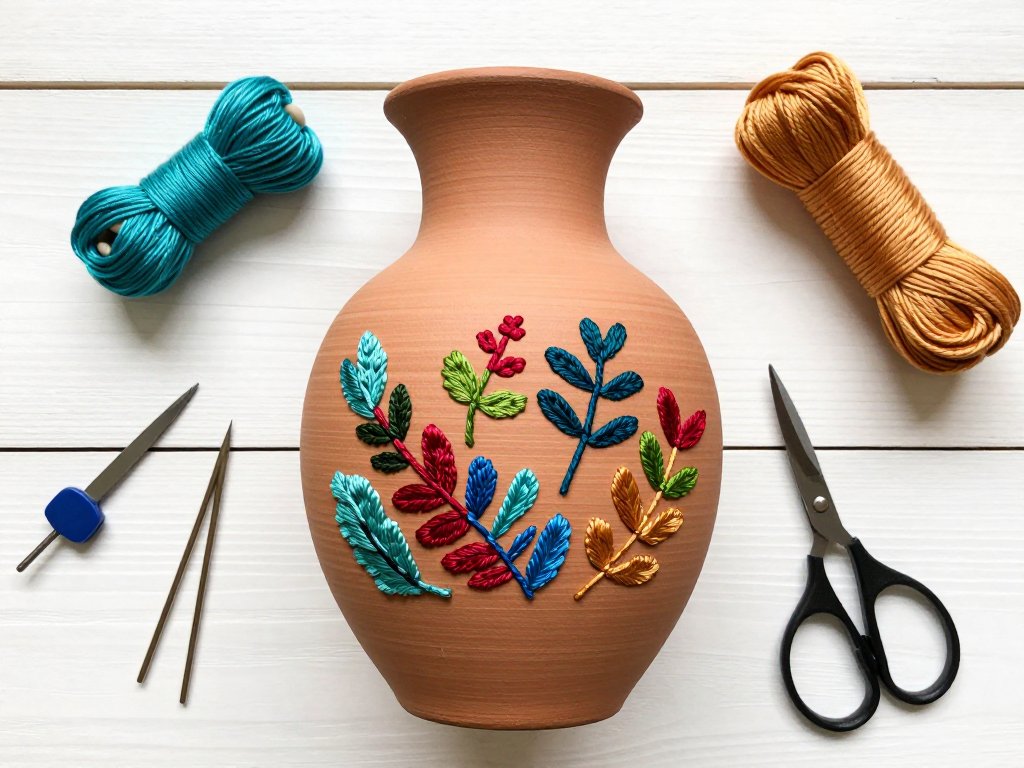
Embroidery on ceramic vessels — sometimes called embroidered pottery or stitched ceramics — is one of those cross-disciplinary techniques that feels both ancient and refreshingly new.
If you love the tactile satisfaction of needlework and the grounded permanence of clay, this mixed media art form offers a wonderful way to combine them.
I first encountered embroidered ceramics years ago at a small gallery show in the Cotswolds.
The artist had taken simple stoneware vases and added delicate cross-stitch patterns across their surfaces.
The stitching softened the hard clay edge, and the clay gave the thread an unexpected structure.
I remember standing there longer than I meant to, studying how the light fell on the thread against the glaze.
It was one of those moments that makes you want to rush home and try something new with your own hands.
This guide will walk you through everything you need to know to create your own embroidered ceramic vessels.
We will cover the tools and materials, the preparation steps, two main stitching approaches, design considerations, and finishing techniques.
By the end, you will have the confidence to turn a simple ceramic piece into a stitched heirloom.
A Brief History of Mixed Media in Ceramics
Before we dive into the practical steps, it helps to understand where this technique comes from.
Ceramics and textiles have shared space in human material culture for thousands of years. Ancient pottery was sometimes wrapped in woven fibres for carrying purposes, and medieval pilgrims would attach cloth badges to clay vessels.
But the deliberate, decorative combination of thread and fired clay as an art form is a more modern development.
The embroidered ceramics movement gained momentum in the 1960s and 1970s when studio potters and fiber artists began crossing disciplinary boundaries.
Artists like Gretchen Bellinger and Peter Voulkos explored what happened when soft materials met hard ones.
In Japan, the tradition of kintsugi — repairing broken pottery with gold — influenced a broader acceptance of visible mending and mixed materials.
Today, the technique appears everywhere from high-end gallery pieces to weekend craft projects, and it has become especially popular among makers who love combining traditional handwork with contemporary design.
What makes embroidered ceramic vessels so compelling is the dialogue between the two materials. The clay provides structure and weight. The thread brings colour, texture, and a sense of softness. Together, they create pieces that feel complete in a way neither material achieves alone.
Tools and Materials
You do not need a lot of specialised equipment to begin embroidering ceramics, which is one of the reasons this craft is so accessible. Here is what you will need.
Ceramic Vessels
Start with unglazed or bisque-fired ceramic pieces. Unglazed clay has a porous surface that grips the thread and makes drilling or gluing much easier.
You can find bisque pots at most pottery supply shops, or you can fire your own if you have access to a kiln.
Terracotta flower pots, unglazed vases, and simple ceramic cups all work beautifully. Avoid glossy glazed pieces for your first project — the smooth surface makes it harder for thread to stay in place, and drilling through glaze can cause chipping.
If you want to try the technique before committing to clay, you can also work with air-dry clay vessels. These are softer and easier to drill, though they are less durable over time. For a first project, a small unglazed terracotta pot about ten centimetres tall is ideal.
Thread and Needles
Embroidery floss is the most common choice. Cotton floss in six-strand divisible form lets you adjust the thickness of your stitches.
Pearl cotton (size 5 or 8) is another excellent option — it has a subtle sheen and does not split as easily as standard floss.
For a more rustic look, try linen thread or even thin yarn.
You will need a sharp embroidery needle that can pass through the ceramic holes or penetrate the clay if you are using the drill-free method.
A size 5 or 7 crewel needle works well for most threads. For thicker threads, a tapestry needle with a larger eye is more comfortable to work with.
Drilling and Adhesive Tools
If you choose to drill holes in your ceramic vessel, you will need a small rotary tool with a carbide or diamond-tipped drill bit.
A Dremel or similar tool set to a low speed works well. You will also need safety goggles and a dust mask — ceramic dust is fine and should not be inhaled.
For the no-drill approach, a strong craft adhesive such as E6000 or jewellers glue is essential. You will also need a small applicator or toothpick for precise placement.
Additional Supplies
Have a soft pencil or chalk pencil for marking your design on the clay surface.
Painter's tape helps hold threads in place while you work. A small pair of sharp scissors and a thimble will make the stitching process more comfortable.
If you are drilling, a shallow dish of water to keep the drill bit cool is also important.
Two Approaches to Embroidering Ceramic
There are two main methods for attaching embroidery to ceramic vessels. Each has its own advantages, and the one you choose depends on the look you want and the tools you have available.
Method One: Drilled Holes
This is the traditional approach and produces the most secure, permanent results. You drill small holes through the ceramic wall at predetermined points, then stitch through them just as you would through fabric.
Step 1: Plan your design. Sketch your pattern on paper first. Keep in mind that every stitch requires a hole, so simpler patterns work best for your first project.
A geometric border around the rim, a line of running stitch down the side, or a single flower motif in the centre of the piece are all good starter designs.
Step 2: Mark the hole positions. Transfer your pattern to the ceramic surface using a soft pencil or chalk pencil. Mark each point where a hole will go. Measure carefully — once you drill, you cannot move the hole.
Step 3: Drill the holes. Put on your safety goggles and dust mask. Fill a shallow dish with water.
Dip the drill bit in the water frequently to keep it cool. Start drilling at a low speed with gentle pressure.
Let the drill do the work — pushing too hard can crack the clay. Drill from the outside in, and work on a soft surface that supports the interior of the vessel.
Wipe away the slurry with a damp cloth as you go.
Step 4: Clean the vessel. Once all holes are drilled, rinse the piece thoroughly and let it dry completely. Use a soft brush to remove any remaining dust from the holes.
Step 5: Stitch. Thread your needle and begin stitching. Work from the inside out so that the knot is hidden inside the vessel. For most stitches, you can work in the same way you would on fabric. A simple running stitch, cross-stitch, or backstitch are all excellent choices for ceramic.
Step 6: Secure the threads. When you finish stitching, tie off the thread inside the vessel. Add a small drop of clear adhesive to each knot to keep it from coming loose over time.
Method Two: Glue-Down Technique (No Drilling)
If the idea of drilling into ceramic makes you nervous, or if you are working with glazed pieces that could chip, the glue-down method is a wonderful alternative. It is also faster and requires no special tools.
Step 1: Design and mark. As with the drilling method, begin with a paper sketch. Transfer the design to the ceramic surface using a soft pencil or chalk. For the glue-down method, you can use more intricate designs because you are not limited by hole placement.
Step 2: Prepare your thread. Cut lengths of thread slightly longer than the line you plan to stitch. It is easier to glue shorter sections than to manage a long, tangled thread.
Step 3: Apply adhesive. Using a toothpick or small applicator, apply a thin line of craft adhesive along your design line. Work in small sections — about two to three centimetres at a time — so the glue does not dry before you place the thread.
Step 4: Lay the thread. Gently press the thread into the adhesive, following your marked line. Use the blunt end of a toothpick or a pair of tweezers to guide the thread into place. Wipe away any excess glue with a damp cotton swab before it dries.
Step 5: Create stitches. To mimic the look of stitching, you can place short segments of thread at regular intervals rather than one continuous line.
This creates the appearance of running stitch or chain stitch without needing holes. You can also build up layered designs by adding threads in different colours once the first layer is dry.
Step 6: Let it cure. Allow the adhesive to cure for at least 24 hours before handling the piece. Follow the manufacturer's instructions for your specific glue — some adhesives require longer curing times for a full bond.
Essential Stitches for Ceramic Embroidery
You do not need to be an experienced embroiderer to create beautiful stitched ceramics. A handful of basic stitches will take you a long way, and each has a different visual effect on the clay surface.
Running Stitch. The simplest of all embroidery stitches, running stitch creates a dashed line that works beautifully as a border or outline. It is also the easiest stitch to adapt to both the drilling and glue-down methods.
Cross-Stitch. Perfect for geometric patterns and grid-based designs. On a ceramic surface, cross-stitch has a delightful pixelated quality that contrasts nicely with the organic texture of the clay.
Backstitch. Creates a solid, continuous line. Use it for lettering, outlines, and fine details. It reads clearly on ceramic surfaces and gives a polished, intentional look.
French Knots. Small, textured knots that add dimension. They work particularly well as the centre of flower motifs or as accent dots. On ceramics, French knots read as tiny raised beads of thread.
Satin Stitch. A filling stitch that covers an area with parallel threads. It works well for solid shapes like leaves or petals but requires careful tension management on a curved ceramic surface.
Practice each stitch on a small scrap piece of bisque before you begin your main project. The rhythm of stitching into clay is different from stitching into fabric — the surface is unyielding, which means your tension must be consistent and your needle movements deliberate.
Design Considerations
Designing for embroidered ceramics requires thinking about both the vessel shape and the visual weight of your stitching. Here are a few principles to guide you.
Follow the form. Let the shape of the vessel inspire your design. A tall, slender vase calls for vertical lines or spiralling patterns. A round, bulbous pot suits circular motifs or radiating designs that follow the curve. Work with the vessel's silhouette rather than against it.
Negative space matters. Unlike stitching on fabric, where you can cover an entire surface, stitching on ceramic benefits from breathing room. The clay surface is part of the design. Leave plenty of empty space so the ceramic body remains visible and the stitching stands out as an accent.
Colour contrast. Choose thread colours that contrast clearly with the clay. White or cream thread on terracotta clay creates a folk-art feel. Bright turquoise or deep indigo on pale bisque reads as contemporary and bold. Earth tones like ochre and rust on natural clay create a harmonious, organic look.
Texture as a design element. Consider how the texture of your thread interacts with the glaze or finish of the clay.
A smooth, glossy vase paired with a matte cotton thread creates a pleasing tactile contrast.
A rough, unglazed surface with a lustrous pearl cotton offers a different sort of visual interest.
Caring for Embroidered Ceramic Vessels
Embroidered ceramics require a bit more care than regular pottery. The thread is vulnerable to moisture, dust, and direct sunlight.
Display your pieces in a dry location away from windows where they will not collect dust.
If you use the vessel as a vase, take care not to let water wick up into the stitching.
A simple solution is to place a small glass or plastic liner inside the vessel to hold the water, keeping the thread dry.
To clean stitched ceramics, use a soft, dry paintbrush or a low-suction vacuum with a brush attachment to remove dust from the threads.
Never submerge an embroidered ceramic piece in water — the thread may shrink, the colours may bleed, and the adhesive in glue-down pieces may weaken over time with repeated wetting.
If a thread becomes loose over time, a small drop of clear craft adhesive applied with a toothpick will re-secure it. For drilled pieces, you can re-tie the knot inside the vessel and add fresh adhesive to the knot.
With gentle care, your embroidered ceramic pieces will last for many years and become treasured objects in your home.
Finding Inspiration
One of the best parts of working in mixed media is seeing how other artists combine materials.
Look at traditional embroidery patterns from different cultures and consider how they would translate to a curved ceramic surface.
Scandinavian folk motifs, Mexican embroidery, Japanese sashiko patterns, and Eastern European geometric designs all offer rich source material.
Nature is also an endless source of ideas. The veining on a leaf, the spiral of a seashell, the pattern of cracks in dry earth — these natural textures translate beautifully to thread on clay. Take photographs of patterns that catch your eye and keep a sketchbook of ideas.
Social media platforms like Pinterest and Instagram are excellent places to find embroidered ceramic inspiration.
Search for terms like "embroidered pottery," "stitched ceramics," and "mixed media ceramic art" to see what contemporary makers are creating.
You will quickly develop a sense of the styles and techniques that appeal to you most.
Conclusion
Embroidery on ceramic vessels is one of those crafts that feels like a discovery. It is not a mainstream technique, which means every piece you make will feel uniquely yours.
The combination of two ancient handcrafts — stitching and pottery — creates something that neither discipline achieves alone, and the process of bringing them together is deeply satisfying.
Whether you choose to drill and stitch in the traditional way or prefer the gentle approach of gluing thread to the surface, the result will be a vessel that holds not just flowers or trinkets but also the story of your hands at work.
Start with a simple piece. Let the clay guide your design. And do not be afraid to let the thread wander where it wants to go.
The first time you finish a stitched ceramic vessel and hold it up to the light, you will understand why this quiet, cross-disciplinary craft has been capturing hearts for decades.
