Introduction
There is a particular kind of magic in a craft that connects us across centuries, and punch needle embroidery carries that magic in every loop of yarn.
What began as a practical way to reinforce fabric edges in nineteenth-century textile mills has blossomed into a beloved fiber art that modern makers are embracing with fresh enthusiasm.
And for good reason: punch needle work is deeply satisfying, surprisingly quick to learn, and produces a dense, textured surface that feels almost like a woven rug on your lap.
I discovered punch needle on a rainy Saturday two years ago, when my youngest was napping and the house was quiet in that rare, suspended way that only a summer storm can bring.
I had a wooden frame, a strange hollow needle, and a skein of coral-colored yarn that I had bought on a whim at a closing-down sale.
I had no idea what I was doing. But within an hour, I had created a small, imperfect square of looped texture that felt alive under my fingers.
I set it on my desk and looked at it all week. It was not a picture of anything in particular — just a field of color — but it made me happy every time I walked past.
That is the gift of punch needle. It does not require you to draw well, or to plan meticulously, or to have years of stitching experience.
It asks only that you push a needle through fabric and pull it back out again, over and over, building a surface that is as much about touch as it is about sight.
And for summer wall art — bright, cheerful, full of floral color — it is one of the most satisfying crafts I know.
A Brief History of the Punch Needle
Before we pick up a needle, I think it is worth understanding where this tool comes from.
The punch needle as we know it today evolved from the tambour hook, a tool used in eighteenth-century France for chain-stitch embroidery.
Tambour work spread across Europe and eventually made its way to America, where it was adapted into a tool for rug hooking — a practical craft born of necessity, using fabric scraps to create warm floor coverings.
By the late 1800s, commercial punch needles were being manufactured in the United States. The earliest patents describe a hollow needle with an eye at the pointed tip, designed to push loops of yarn or thread through a woven foundation fabric.
These tools were used in textile mills for creating decorative trims and in home workshops for making rag rugs.
The craft experienced a revival in the 1970s, when punch needle kits became popular as a form of handcraft decoration, and it is enjoying another renaissance today as makers rediscover the pleasure of working with texture and color in a slow, immersive way.
What I love about this history is that the fundamental tool has barely changed in over a century.
The punch needle I use today — a simple hollow tube with a wooden handle and an angled tip — is almost identical to the ones sold in catalogs in the 1890s.
There is something grounding about working with a tool that has been used in the same way for generations.
It connects my small, quiet afternoon at the kitchen table to a long line of makers stretching back through time.
What You Will Need to Begin
One of the things that makes punch needle so accessible is how little you need to start. A basic kit can be put together for under thirty dollars, and most of the supplies are available at any craft store.
A punch needle tool. These come in two main varieties: adjustable and fixed. An adjustable needle lets you change the loop height, giving you control over the texture of your finished piece.
A fixed needle is simpler and less expensive. For a beginner, I recommend an adjustable needle with at least three depth settings, so you can experiment with different loop heights from the start.
The most common brand is the Oxford punch needle, which is widely available and comfortable to hold for extended periods.
A frame or hoop. Unlike regular embroidery, punch needle requires the fabric to be held taut at all times.
A spring-tension embroidery hoop works well for small projects, but for wall art, I prefer a gripper-frame system — a wooden frame with a strip of rubber that grips the fabric firmly on all four sides.
These frames keep the fabric drum-tight, which is essential for consistent loops. You can find them online or at specialty needlework shops.
Foundation fabric. Monk's cloth is the traditional choice for punch needle. It is a heavyweight cotton fabric with an even, open weave that allows the needle to slide through easily while holding the loops securely.
Weaver's cloth is another excellent option, with a slightly tighter weave that works well for finer details.
Avoid using standard quilting cotton or linen, which are too tightly woven for punch needle work.
Yarn. Worsted-weight yarn is the best starting point. It is thick enough to fill the fabric weave nicely but not so bulky that it becomes difficult to pull through.
Acrylic yarns are affordable and come in a wide range of colors. Wool yarns give a softer, more matte finish and are traditional for rug projects.
For summer wall art, I love using cotton yarn in bright, cheerful shades — coral, sunflower yellow, sky blue, and leaf green.
Scissors and a yarn needle. A small pair of sharp embroidery scissors for trimming ends, and a large-eye tapestry needle for weaving in tails.
That is truly all you need. No special lighting, no expensive setup. Just a quiet afternoon and the willingness to try something new.
Setting Up Your First Project
Before you begin punching, take a moment to prepare your materials properly. Good preparation makes the difference between a frustrating first experience and a magical one.
Stretching Your Fabric
Cut a piece of monk's cloth about four inches larger than your frame on each side.
Center the fabric over your frame and press the gripper strips down firmly on all four sides, working from the center outward.
The fabric should feel as tight as a drumhead. If it wrinkles or sags, lift the gripper and try again.
Tight fabric is the single most important factor in successful punch needle work — loose fabric causes loops to slip out or become uneven.
Threading the Needle
Thread your yarn through the hollow handle of the punch needle, then guide it through the eye at the tip.
The needle has a beveled side and a flat side. The bevel always faces the direction you are stitching — usually upward if you are working with the fabric stretched horizontally.
Insert the needle into the fabric until the handle touches the surface, then pull it back out just far enough that the tip clears the fabric.
Move to the next position and repeat. Each insertion creates a loop on the underside of the fabric, and the loops build up to create the textured surface.
Choosing Your Design
For your first project, keep it simple. A basic shape — a circle, a leaf, a simple flower — will teach you the rhythm of the needle without the frustration of complex outlines.
I recommend starting with a cluster of daisy-like flowers in two or three colors. Draw your design directly onto the monk's cloth with a washable fabric marker or a fine-tipped pencil.
The lines will be covered by your loops as you work, so do not worry about making them perfect.
The Basic Punch Needle Technique
Holding the needle like a pen, with your hand relaxed and your wrist supported on the edge of your frame, insert the needle through the fabric at a ninety-degree angle.
Push it down until the wooden handle touches the fabric surface. This is your depth stop — the handle hitting the fabric tells you the needle has gone deep enough to create a full loop.
Lift the needle just enough to clear the fabric, move about one-eighth of an inch along your drawn line, and punch again.
The rhythm is surprisingly meditative. Punch, lift, move, punch. Punch, lift, move, punch. After a few minutes, your hand learns the motion and you stop thinking about it.
The loops begin to build up on the back of your fabric, and the design appears gradually, like a secret being revealed from the other side.
A few tips for consistent loops:
- Keep your needle perpendicular to the fabric. Angling it produces uneven loops.
- Space your punches about one-eighth of an inch apart. Too close, and the loops push each other out. Too far apart, and the fabric shows through.
- Work in a consistent direction. Following the outline of your shape first, then filling the interior with parallel rows, gives a uniform texture.
- Do not pull the needle back too far. Just lift it enough to clear the fabric. If you pull it high, you risk pulling the previous loop out.
The most important thing to remember is that your first few rows will look messy.
This is normal. The loops need the neighboring loops to hold them in place, so the edges only become neat once you have worked back in the opposite direction.
Trust the process. Keep punching. The texture will come together.
Designing Summer Wall Art
Summer offers such a rich palette of colors and forms that designing a wall hanging is a joy in itself. I like to think of punch needle wall art as a way of capturing a season's feeling — not just its appearance, but its texture and warmth.
Choosing a Summer Theme
Think about what summer looks like to you. Is it a field of wildflowers? A bowl of ripe peaches on a wooden table?
The pattern of sunlight through leaves? The best punch needle designs are simple enough to translate into loops but evocative enough to bring a smile every time you walk past.
A cluster of sunflowers against a sky-blue background. A row of lavender sprigs in soft purple and green.
A single, oversized daisy with petals that seem to glow in the afternoon light.
For a first wall art project, I recommend a design with three or four elements: a central flower, a couple of leaves, and a simple background. This gives you practice with outlines, fills, and color changes without being overwhelming.
Color Planning
Punch needle is wonderfully forgiving of bold color choices. Because the loops create texture and shadow naturally, even simple color combinations look rich and dimensional.
For a summer theme, try pairing a bright warm color with a soft neutral. A coral flower against a cream background.
A butter-yellow bloom against soft sage green. The loops catch the light differently depending on the direction you have stitched, so the same color can appear to shift as you move around the piece.
If you are unsure about color combinations, look at your garden or a bunch of fresh flowers from the market.
Nature has already solved the color problems for you. A zinnia's magenta petals against its green stem.
The golden center of a daisy against white. These are combinations that work, and they will work in punch needle too.
Project: Sunflower Summer Wall Hanging
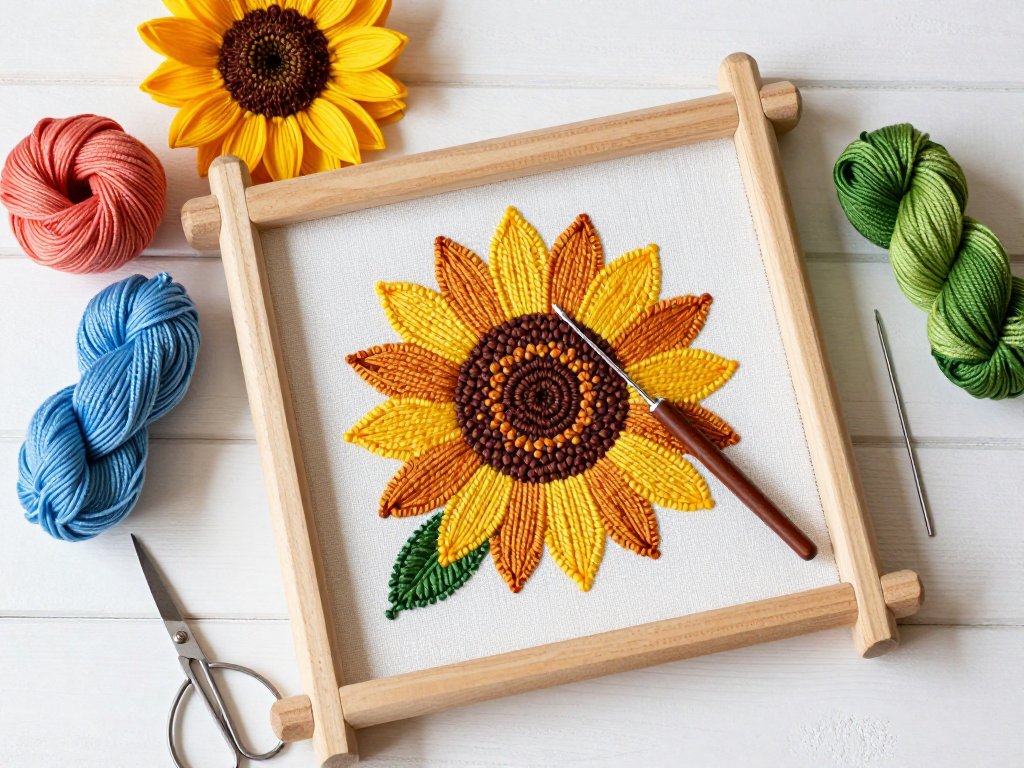
Let me walk you through a specific project that is perfect for a beginner and makes a stunning piece of summer wall art: a sunflower wall hanging about eight inches in diameter, finished in a wooden embroidery hoop.
Materials
- Adjustable punch needle set to medium loop height
- 12-inch gripper frame or spring hoop
- Piece of monk's cloth, 14 x 14 inches
- Worsted-weight yarn in: bright yellow (for petals), warm brown (for the center), leaf green (for stems and leaves), sky blue (for background)
- Fabric marker
- Scissors and tapestry needle
- 8-inch wooden embroidery hoop for display (optional, but gives a clean finished edge)
Step 1: Prepare and Design
Stretch your monk's cloth tightly on your frame. Using your fabric marker, draw a large circle about five inches in diameter in the center of your fabric.
This will be the sunflower's center. Around it, draw eight to ten petal shapes radiating outward, each about two inches long and one inch wide at the widest point.
Draw a simple stem descending from the bottom of the flower, with two or three leaf shapes branching off.
Keep the lines loose and organic — sunflowers are not perfectly symmetrical in nature, so your design should not be either.
Step 2: Outline the Flower Center
Thread your needle with the warm brown yarn. Starting at the edge of the center circle, punch a line of loops around the entire circumference.
Work slowly and keep your needle perpendicular. This outline will define the shape of your flower center and give you a boundary to fill against.
Once the outline is complete, fill the interior of the circle with parallel rows of brown loops, working back and forth like a lawnmower cutting grass.
Step 3: Add the Petals
Switch to bright yellow yarn. Outline each petal shape, one at a time, starting at the base near the flower center and working outward to the tip.
After outlining, fill each petal with parallel rows of yellow loops. The petals can overlap slightly at the base — this gives the flower a natural, layered look.
Work all the petals before moving to the stem and leaves.
Step 4: Stitch the Stem and Leaves
Switch to leaf green yarn. Outline the stem first, working from the base of the flower downward.
Then fill the stem with green loops. Follow the same process for the leaves: outline each leaf shape, then fill with parallel rows.
If you want to add a bit of visual interest, you can angle the rows in different directions for adjacent leaves — this creates subtle light-catching variation.
Step 5: Fill the Background
This is the most time-consuming step, but it is also the most satisfying. Switch to sky blue yarn and fill all the remaining empty space on your fabric with blue loops.
Start around the edges of your design elements and work outward to the edges of your frame.
The blue background makes the yellow sunflower and green leaves pop beautifully, and the contrast between the textured loops and the eventual empty border adds a professional finish.
Step 6: Finish and Display
Once all the punching is complete, remove the fabric from your frame. Trim any loose yarn tails and weave them in with your tapestry needle.
If you have used a gripper frame, the edges of your fabric may have small holes from the gripper strip — you can trim these away or hide them behind your display hoop.
Place your finished piece in the 8-inch wooden embroidery hoop, centering the sunflower, and tighten the screw.
Trim the excess fabric from the back, leaving about an inch of margin. Your sunflower wall hanging is ready to hang.
Caring for Your Punch Needle Art
Punch needle pieces are surprisingly durable, but they do benefit from gentle care. Dust your finished wall hanging occasionally with a soft brush or a lint roller.
Avoid hanging it in direct sunlight for extended periods, as some yarns can fade over time.
If the loops become flattened from handling, you can gently steam the back of the piece (not the looped side) and fluff the loops with a soft brush.
For deeper cleaning, hand wash in cool water with mild soap, press gently in a towel to remove excess water, and lay flat to dry.
Avoid wringing or twisting, which can distort the loops.
Beyond the First Project
Once you have completed a sunflower wall hanging, a world of possibilities opens up. You can experiment with different loop heights to create dimensional effects — shorter loops for background elements, taller loops for foreground details.
You can combine punch needle with traditional embroidery, adding embroidered details on top of the punched surface.
You can create larger pieces, like a summer meadow scene or a set of botanical panels.
You can even make functional items like cushion covers, rug-sized pieces, or decorative baskets.
One of my favorite projects after mastering the basics was a series of small punch needle squares, each one a different summer flower — a daisy, a lavender sprig, a poppy, a bluebell.
I mounted them in separate small hoops and hung them in a cluster on a bare wall in my hallway.
They catch the afternoon light and remind me, even in the depths of winter, that summer always comes back around.
The Quiet Joy of Repetitive Stitching
There is a reason punch needle has survived for over a century while countless craft trends have come and gone.
It is not because the finished pieces are beautiful — though they are — but because the process itself is so soothing.
The rhythm of the needle. The soft pull of yarn through fabric. The gradual emergence of color and texture under your hands.
In a world that constantly demands speed and productivity, punch needle invites you to slow down and make something, one small loop at a time.
I think about the women who used these same tools a hundred years ago, making rugs for their homes from scraps of fabric because nothing could be wasted.
I think about how that same motion — punch, lift, move, punch — connected them to their own creativity in a time when women had few outlets for self-expression.
And I think about how that connection is still there, waiting for us, in the simple act of pushing a hollow needle through cloth.
This summer, I hope you give yourself the gift of a quiet afternoon with a punch needle, some soft yarn, and a design that makes you smile. The texture you create will be beautiful. But the peace you find in creating it might be the real treasure.