Introduction
There is something quietly revolutionary about hand embroidery. In an age of instant everything, here is a craft that asks you to slow down, to push a needle through fabric one deliberate stitch at a time, and to watch a pattern emerge not in seconds but in the quiet accumulation of small, careful movements.
Embroidery has been practiced for thousands of years, from the intricate silk work of medieval European convents to the vibrant floral motifs of Indian phulkari, and yet it remains one of the most accessible and forgiving crafts a beginner can learn.
Summer is the ideal season to pick up a needle and thread. The long, unhurried evenings, the abundance of floral inspiration in gardens and meadows, and the simple pleasure of sitting on a porch with a hoop in your lap — it all conspires to make embroidery feel natural and inviting.
If you have never embroidered before, or if it has been years since you last tried, this tutorial is for you.
We will start with the very basics and work our way through a sweet summer flower pattern that you can finish in an evening or two.
I have always loved that embroidery requires almost nothing to begin. A needle, some thread, a scrap of fabric, and a hoop are all you truly need.
There is no expensive equipment to buy, no complicated setup. Just you, your hands, and a pattern that grows more beautiful with every stitch.
Let me show you how.
A Brief History of Embroidered Flowers
Before we thread our first needle, I want to share a little of the history behind the craft we are about to practice. Knowing where a technique comes from somehow makes the stitches feel more meaningful, as though we are continuing a conversation that began long before us.
Floral embroidery is among the oldest decorative traditions in human history. The earliest surviving embroidered flowers date to the 5th century BCE in China, where silk threads were used to depict blooming peonies and plum blossoms on ceremonial robes.
In medieval Europe, nuns in convents across France, Italy, and England created stunning altar cloths and vestments covered in embroidered roses, lilies, and ivy, each flower carrying symbolic meaning.
The rose represented divine love, the lily stood for purity, and the ivy spoke of eternal faithfulness.
By the 18th century, floral embroidery had spread beyond religious and royal circles into everyday life.
Young women in England and America were taught embroidery as part of their education, creating samplers that showcased their skill with flowers, leaves, and vines.
These samplers were not just decorative — they functioned as records of family history, often including dates, names, and significant events worked in delicate stem stitch and satin stitch.
Today, when we embroider a summer flower, we are connecting to this long tradition. The stitches we use — the lazy daisy, the French knot, the satin stitch — have been passed down through generations of hands.
There is something beautiful about that continuity, and I hope it brings you the same quiet sense of belonging it has brought me.
What You Will Need
The beauty of hand embroidery is its simplicity. Here is everything you need to get started with your summer flower project:
Embroidery hoop. A 6-inch or 8-inch wooden or plastic hoop will hold your fabric taut and make stitching much easier. Wooden hoops are classic and comfortable to hold. They cost just a few dollars at any craft store.
Fabric. Beginners do best with a medium-weight, tightly woven cotton. Quilting cotton, muslin, or a plain cotton fat quarter from the fabric store are all perfect choices. Avoid stretchy fabrics like jersey until you have more experience. A piece about 12 inches square gives you plenty of room to work.
Embroidery floss. Six-strand cotton embroidery floss is the standard. For summer flowers, choose a palette of bright colors: sunshine yellow, petal pink, coral, leaf green, sky blue, and a soft lavender.
You will need only one skein of each color for this project. DMC is the most widely available brand, and their color numbers are reliable across batches.
Needles. A pack of embroidery needles (also called crewel needles) in sizes 5 to 7 is perfect for beginners. These needles have sharp points and large eyes that are easy to thread with six-strand floss.
Scissors. Small, sharp embroidery scissors with curved blades make cutting thread clean and easy. A regular pair of household scissors works fine in a pinch.
Water-soluble fabric marker. This is a wonderful tool for transferring your pattern onto fabric. The ink disappears with a light mist of water, leaving no trace on your finished piece. A regular pencil works too, but the marks are harder to remove.
Optional but nice to have. A needle threader (invaluable if your eyesight is anything like mine), a small pincushion or magnet to hold your needles, and a thimble if you tend to push the needle with your fingertip.
The Four Essential Stitches for Summer Flowers
You can create an astonishing variety of flowers with just four basic stitches. Practice each one on a scrap of fabric before you begin your project.
Run your needle through the fabric a few times, get a feel for the rhythm and the tension.
Embroidery is a tactile craft, and your hands need a moment to learn the movements.
Lazy Daisy Stitch
The lazy daisy stitch is the foundation of floral embroidery. It creates a small petal shape with a single loop of thread, and it is surprisingly easy to master.
To make a lazy daisy: bring your needle up through the fabric at the base of the petal.
Insert it back down very close to where you came up, but do not pull the thread all the way through — leave a small loop.
Bring your needle up again at the tip of the petal, passing through the loop.
Pull gently to tighten the loop into a teardrop shape, then take a small anchor stitch over the loop at the tip to secure it.
Practice making a circle of five or six lazy daisy petals around a central point. This is the simplest daisy flower, and it is endlessly charming. Vary the size of your petals by adjusting the length of your loop. Small petals for delicate flowers, larger petals for bold blooms.
Satin Stitch
Satin stitch is used to fill shapes with smooth, solid color. It is perfect for larger petals, leaves, and flower centers.
To work satin stitch: bring your needle up at one edge of the shape you want to fill.
Insert it at the opposite edge, laying the thread flat against the fabric. Bring it up again right next to where you started, and insert it right next to where you ended.
Continue laying parallel stitches side by side until the shape is completely filled. The stitches should lie close together with no fabric showing between them.
The key to beautiful satin stitch is keeping the edges neat and the tension even. If your stitches are too loose, they will sag. If they are too tight, the fabric will pucker. Aim for a firm, smooth surface that feels almost like woven satin — hence the name.
French Knot
The French knot makes a small, textured dot that is perfect for flower centers, buds, and delicate accents. It is the stitch that beginners often find frustrating, but once you learn the trick, it becomes second nature.
To make a French knot: bring your needle up where you want the knot. Wrap the thread around the needle two or three times, holding the wraps close to the fabric with your other hand.
Insert the needle back down very close to where it came up — almost in the same hole — and pull the thread through gently.
The wraps will form a small knot on the surface.
The trick is to hold the thread taut as you pull the needle through. If the wraps loosen, the knot unravels.
Keep practicing, and do not be discouraged if your first few knots look more like small blobs than perfect spheres.
They still add lovely texture, and your stitches will get neater with practice.
Stem Stitch
Stem stitch creates a thin, slightly twisted line that is perfect for flower stems, vines, and outline work. It is one of the most versatile embroidery stitches.
To work stem stitch: bring your needle up at the start of your line. Take a small stitch forward along the line, about one-eighth of an inch.
Bring your needle up again about halfway back along the previous stitch, piercing the thread.
The result is a smooth, slightly overlapping line that looks like a twisted vine.
For stems, work stem stitch in two shades of green — a lighter green for the main stem and a darker shade for the smaller side stems and tendrils. This subtle variation in color gives your flower a more natural, dimensional look.
Project: A Summer Posy in Three Flowers
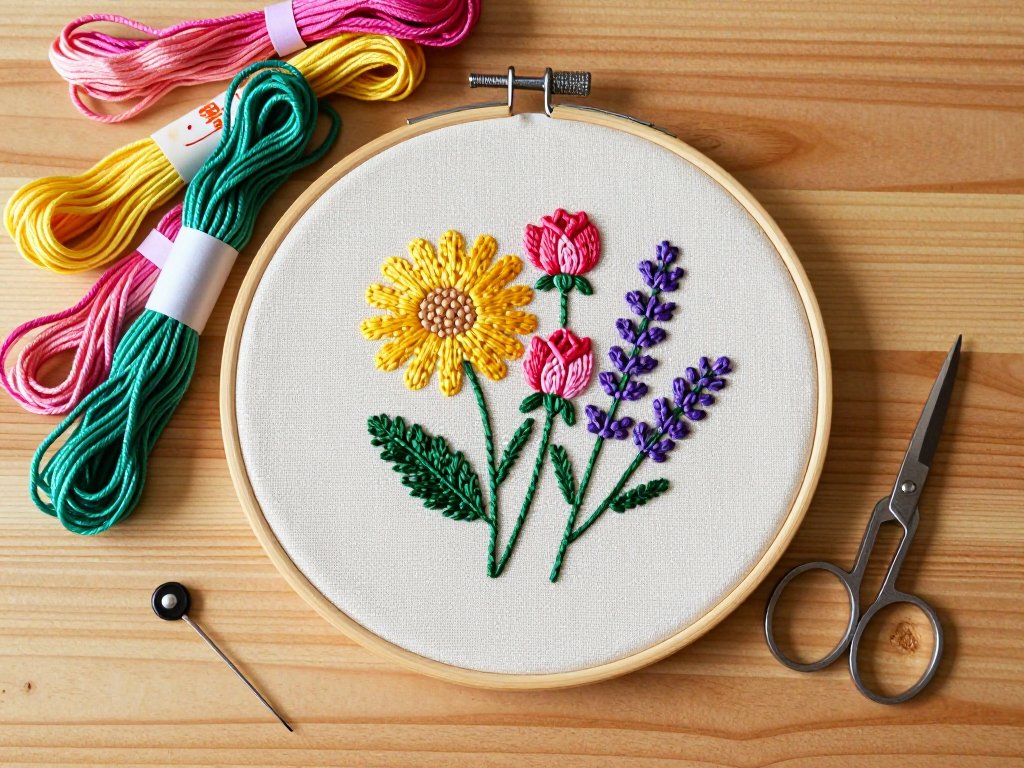
For our project, we will embroider a small bouquet of three summer flowers: a daisy (using lazy daisy and French knot stitches), a rosebud (using satin stitch), and a sprig of lavender (using stem stitch and small French knots).
Together, these three flowers will teach you all four essential stitches and give you a beautiful finished piece you can frame, sew onto a pillow, or turn into a gift for someone special.
Step One: Transfer Your Pattern
Using your water-soluble fabric marker, lightly draw three simple shapes onto your fabric: a circle about an inch in diameter for the daisy (leave the center empty for French knots), a small oval for the rosebud, and a few thin vertical lines for the lavender stems.
Keep your lines loose and approximate — embroidery is forgiving, and you can adjust as you stitch.
Center your design in the hoop and tighten the screw until the fabric is drum-tight. A taut fabric surface makes every stitch easier and more consistent. If the fabric loosens as you work, just tighten the hoop again.
Step Two: Stitch the Daisy
Thread your needle with two strands of bright yellow or white floss. Work six lazy daisy stitches in a circle around the center mark.
Keep the petals evenly spaced by imagining a clock face — one petal at twelve o'clock, one at two o'clock, and so on.
Each petal should be about half an inch long.
Once your petals are complete, switch to a single strand of dark yellow or orange floss. Work three or four French knots in the center of the daisy, clustering them close together. The French knots create a textured, dimensional center that makes the daisy feel alive.
Step Three: Stitch the Rosebud
Thread your needle with two strands of pink or coral floss. Using satin stitch, fill the oval shape from edge to edge with parallel stitches.
Start at the narrowest point (the tip of the bud) and work toward the wider base.
Keep your stitches at a slight angle to suggest the spiraling petals of a rose.
For a more dimensional look, use a darker pink at the base of the bud and a lighter pink near the tip.
You can achieve this by threading your needle with one strand of each color and stitching them together, creating a subtle gradient.
Add two small green satin stitches at the base of the bud to represent the sepals — the tiny leaves that cradle the flower.
Step Four: Stitch the Lavender
Thread your needle with two strands of green floss and work three or four stem stitches in a gently curving line for each lavender stem. The stems should rise from the same general area as the daisy and rosebud, as though they are all part of the same small bouquet.
Switch to a single strand of purple or lavender floss. Along the upper half of each stem, work small French knots clustered close together.
Use two wraps per knot for a petite lavender bud. Space them irregularly to mimic the organic pattern of real lavender — nature is not perfectly symmetrical, and your stitches should not be either.
Continue until each stem is topped with a soft purple cluster.
Step Five: Add Leaves and Finishing Touches
Using two strands of green floss, add a few leaf shapes near the base of the bouquet.
Fill each leaf with satin stitch in a medium green, or use lazy daisy stitches to create elongated leaf shapes.
A small stem stitch vein down the center of each leaf adds a professional touch.
Once all your stitching is complete, gently mist the fabric with water to dissolve the marker lines. Pat the fabric dry with a clean towel and press it with a warm iron on the reverse side. Your embroidered posy is ready to display, gift, or enjoy.
Caring for Your Embroidered Piece
Hand embroidery is surprisingly durable, but a little care will keep your stitches looking fresh for years.
Wash your finished piece by hand in cool water with a gentle detergent if it becomes soiled, and lay it flat to dry away from direct sunlight.
Store it flat or rolled (never folded) to prevent crease lines that can weaken the threads over time.
If you frame your embroidery, mount it with a piece of acid-free mat board behind the fabric to prevent the fabric from yellowing.
Beyond the Posy: More Summer Flower Ideas
Now that you have mastered the four essential stitches, the possibilities are endless. Try embroidering a sunflower using long satin stitches for the petals and a dense cluster of dark brown French knots for the center.
Stitch a field of tiny wildflowers using only lazy daisy stitches in different colors. Create a monogram surrounded by small embroidered blossoms for a personalized gift.
Each project will deepen your understanding of how thread behaves, how tension affects a stitch, and how color choices transform a simple pattern into something uniquely yours.
Keep your hoop and needles in a small basket by your favorite chair, and pick them up whenever you have a few quiet minutes.
Fifteen minutes of embroidery can feel as restorative as a cup of tea.
Conclusion
The first time I embroidered a flower, I was sitting in my grandmother's sunroom, the afternoon light falling across a hoop that held a piece of pale linen.
She showed me the lazy daisy stitch with hands that had been embroidering for over sixty years, and I remember thinking, I will never be that good.
But she laughed and said, "Every stitch you make is one more than you had before.
That is how it happens."
She was right. Embroidery is not about perfection. It is about presence — the feel of the needle sliding through fabric, the quiet satisfaction of a completed petal, the way a few simple stitches can transform a blank piece of cloth into something beautiful.
Your stitches may not be even at first. Your French knots may look more like tiny noodles than perfect spheres.
But every one of those stitches is yours, and they are all part of your learning.
Summer is the perfect time to begin. The flowers are blooming outside your window, and inside, you are creating your own — one stitch at a time.