Introduction
The first cool evening of autumn asks for something quiet to do with your hands. Embroidery answers that call. A wooden hoop, a sharp needle, and a few skeins of floss turn the kitchen table into a small, peaceful studio.
This guide is written for fall embroidery beginners, especially mothers who stitch in the margins of a busy day. Ten minutes here, twenty minutes there, is genuinely enough to finish something lovely.
You will learn where autumn needlework comes from, which motifs belong to the season, and the six stitches that do most of the work. Then you will transfer a pattern and finish your first leaf or pumpkin.
Everything here is gentle. If you can thread a needle, you can make something worth hanging on the wall by the end of the month.
A Short History of Autumn Needlework
Long before embroidery was a hobby, it was a household skill. In dim autumn and winter light, women gathered to sew, mend, and decorate. Needlework was practical, social, and quietly beautiful.
Young girls practiced on samplers, long strips of linen covered with rows of stitches. A sampler was a practice piece. It taught alphabets, borders, and motifs before a girl worked on real household linens.
Samplers were not decoration for their own sake. They were a working reference, a record of stitches a young woman could copy onto linens for the rest of her life.
Many surviving samplers include a line of verse, a stitcher's name, and a date. The maker marked the moment in thread, so that a hundred years later we know exactly who she was.
Seasonal motifs appear again and again in that old work. Leaves, wheat, acorns, and vines show up in needlework across many cultures, from English schoolgirl samplers to Eastern European folk embroidery.
Autumn is the harvest season, and stitchers have always honored it. Wheat stood for abundance. Acorns stood for patience and future growth. A falling leaf stood for change.
Those meanings traveled with the motifs from household to household. When you stitch a wheat sheaf today, you join a very long line of hands doing the same quiet work.
There is comfort in that idea. The stitches you learn this month were learned by women by candlelight, in kitchens that smelled of apples and woodsmoke.
The Classic Autumn Motif Palette
Autumn embroidery has a recognizable cast of characters. They are simple shapes, which is exactly why they suit beginners. A leaf is a curve. An acorn is two shapes stacked together.
The core autumn motifs are maple and oak leaves, acorns, pumpkins, wheat sheaves, sunflowers, mushrooms, bittersweet berries, and corn stalks.
Maple leaves give you a star shape with pointed lobes. Oak leaves are rounder and softer. Both are forgiving, because no two real leaves ever match each other.
Acorns are small and satisfying. A capped acorn is a quick stitch, and a pair of them fills a corner beautifully.
Pumpkins are the season's warmest shape. A round body, a few vertical ribs, and a curly stem are really all you need.
Wheat sheaves are a harvest classic. A bundle of straight stalks tied in the middle reads instantly as autumn abundance.
Sunflowers bring late-season gold. Even a single large bloom makes a striking centerpiece for a hoop.
Mushrooms are humble and charming. A simple cap and stem, or a cluster in three sizes, feels like a walk through the woods.
Bittersweet berries add color and movement. Small orange berries on a twisting vine give contrast to all the leaves. Corn stalks are tall and graphic, good for borders and vertical designs.
Scale matters as much as shape. One large leaf can fill an entire hoop. A handful of small motifs scattered loosely reads like fallen leaves drifting across the fabric.
Outlines for Leaves, Fills for Pumpkins
There is a simple rule that keeps autumn designs looking right. Outlines suit leaves. Fills suit pumpkins.
Leaves are mostly shape and vein. A clean outline shows the pointed tips and the central vein without hiding the fabric beneath. Leaves want air around them.
Pumpkins and berries are about volume and color. They want to be filled solid, so their roundness reads clearly. Dense stitching gives them weight and warmth.
Mixing the two creates lovely contrast. Outline the maple leaves, then fill the pumpkin beside them. The eye enjoys the difference between open and solid.
The Six Stitches Every Beginner Needs
You do not need dozens of stitches to make autumn look beautiful. Six will carry you through almost every beginner pattern in this article.
Learn one at a time. Practice on a scrap of fabric before you touch your real project. Muscle memory builds faster than you expect.
Backstitch
Backstitch makes the cleanest outlines. Bring the needle up one stitch ahead, then back down behind it, so each stitch touches the last. The result is an unbroken line.
Use backstitch for leaf edges, stems, and lettering. A practical tip: keep stitches short on curves. Tiny stitches follow a leaf tip far better than long ones do.
Stem Stitch
Stem stitch creates a smooth, slightly raised line. Work it from left to right, bringing the needle up halfway back through the previous stitch. Each new stitch overlaps the last.
It is perfect for curving stems and vines. A practical tip: keep the floss on one side of the needle as you work, and the line will stay even and neat.
Satin Stitch
Satin stitch fills a shape with flat, side-by-side threads. Work straight across the shape, keeping the threads snug and parallel. The surface becomes smooth and glossy.
It is the classic choice for filling a pumpkin or a solid leaf. A practical tip: use fewer strands than you think. Too many strands make satin stitch lumpy.
Lazy Daisy
Lazy daisy makes a single teardrop or petal in one loop. Bring the needle up, form a loop, and tack it down with one small stitch at the tip. Repeat around a center.
It is ideal for individual leaves and flower petals. A practical tip: space the petals evenly before stitching them, so your flower stays balanced.
French Knot
A French knot is a tiny raised dot of floss. Wrap the thread once or twice around the needle, then push the needle back down near where it emerged. Pull gently to seat the knot.
Use French knots for acorn caps, berries, and sunflower centers. A practical tip: hold the wrapped thread taut with your thumb as you pull through, or the knot will slip.
Fishbone Stitch
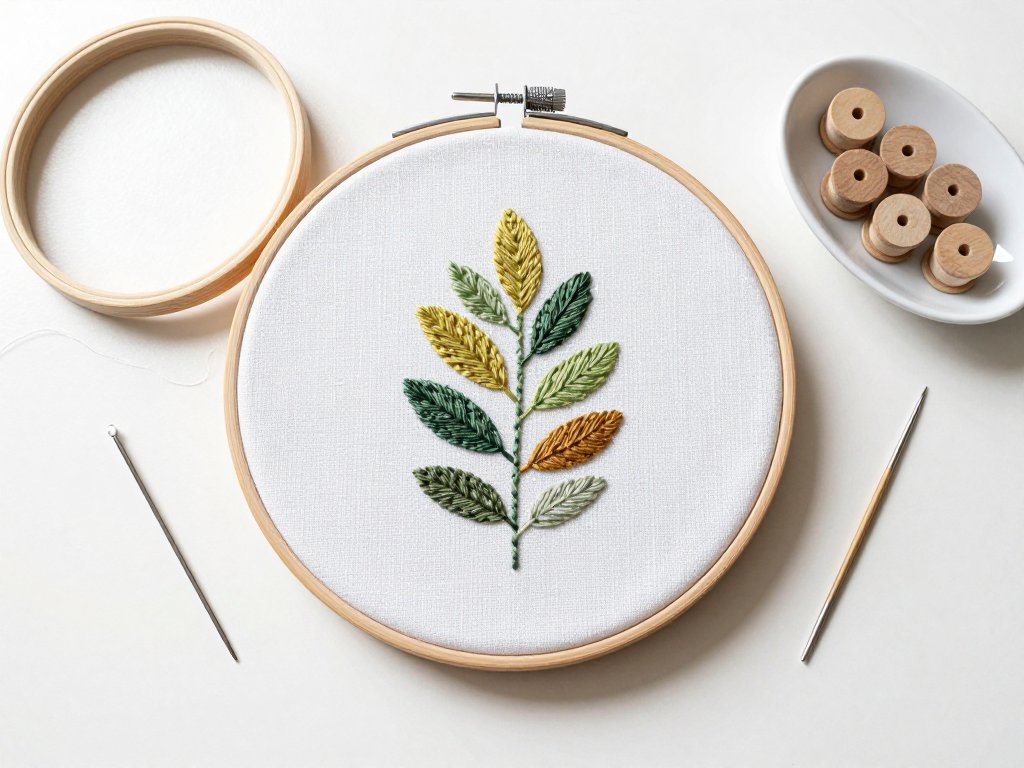
Fishbone stitch creates a leaf with a visible central vein. Stitches angle from the outer edge down to the middle line, alternating left and right. The center stays open and raised.
It gives a leaf real texture and a botanical feel. A practical tip: draw a light center line first, and aim every single stitch at it.
Choosing Fabric and Thread
Fabric sets the mood of a project before you make a single stitch. The right cloth makes stitching easier and the finished piece more beautiful.
Linen gives a fine, heirloom look. Its natural slubs hold thread well and feel timeless. Cotton is smoother and more even, with a crisp, clean surface.
For a rustic feel, choose osnaburg or wool felt. Osnaburg has a rough, homespun texture that suits harvest designs. Felt is soft and sturdy and needs no edge finishing.
Medium-weight cotton is easiest for beginners. It does not slip, it does not stretch much, and it holds a mark clearly. Start there, and move to linen once your stitches feel steady.
Buy a little extra fabric every time. Leftover cotton and linen become your practice scraps, and practice scraps are where confidence is quietly built.
Floss is the other half of the equation. DMC is the standard brand, widely available and consistent in color. Six strands separate easily, and you usually stitch with two or three.
Autumn has its own palette. Rust, olive green, gold, deep red, and warm brown cover almost every motif in this guide.
DMC rust sits near 920 and 921, olive near 469, gold near 3852, deep red near 816, and a rich brown near 433. These are guides, not rules. Trust your eye over any number.
Use fewer strands for delicate outlines and more for bold fills. Two strands read soft and fine. Three strands read solid and bold. Experiment on a scrap first.
Moving the Pattern onto Your Fabric
You need a guide on the fabric before you stitch. There are several gentle ways to transfer a fall embroidery pattern, and none of them require special talent.
The simplest is tracing on a bright window. Tape the printed pattern to the glass, lay the fabric over it, and the daylight comes right through. Trace the lines directly onto the cloth.
A light box does the same job on a table. It is easier on your back and works on cloudy days, when window light is weak.
A water-soluble marking pen is the stitcher's friend. Draw your lines, stitch over them, then rinse the marks away with cool water. Test the pen on a scrap of the same fabric first.
For dark, textured, or felted fabric, use a stabiliser. A tear-away stabiliser is drawn or printed on and peeled off after stitching. A water-soluble stabiliser dissolves completely in water.
One important warning. A heat-transfer pen leaves permanent marks. The lines may seem to fade, but they can return with heat or over time. Avoid them on finished pieces you care about.
Keep your transfer lines light. A faint guide is easier to cover with stitches than a heavy one, and heavy ink can bleed into the cloth.
If you draw your own pattern, sketch it in soft pencil on paper first. Refine the shape on paper before it ever touches your fabric.
Your First Project: A Simple Autumn Leaf
Let us put everything together. This first project is a single autumn leaf in a five-inch hoop. It uses backstitch, satin stitch, and fishbone stitch.
Choose a simple maple or oak leaf outline. A clean, bold shape works best for a beginner. Avoid fine-toothed leaves for your very first attempt.
Set aside an hour. You may not finish in one sitting, and that is perfectly fine. Embroidery rewards patience far more than speed.
- Choose a simple leaf pattern and size it to fit a five-inch hoop, leaving a border of fabric around the design.
- Press the fabric flat with an iron, then let it cool completely before you handle it.
- Tape the pattern to a bright window or place it on a light box, lay the fabric over it, and line up the fabric grain.
- Trace the leaf outline and its central vein with a water-soluble marking pen, keeping the lines light and even.
- Place the fabric in the hoop, centering the design, and tighten the screw until the surface is taut like a drum.
- Thread your needle with two strands of rust or gold floss, knot the end, and bring the needle up at the leaf tip.
- Work backstitch around the entire leaf outline with small, even stitches, following the curves slowly.
- Stitch the central vein with backstitch or stem stitch, working from the stem end toward the tip.
- Fill one half of the leaf with fishbone stitch, angling every stitch toward the central vein.
- Fill the other half the same way, or switch to satin stitch for a solid color, then add a short stem in warm brown.
- Add two or three French knots in brown along the stem for texture, or leave them off for a cleaner look.
- Weave the loose ends through the back of existing stitches, trim them, rinse the marks with cool water, and finish the hoop back with felt.
If you would rather stitch a pumpkin, the steps are almost the same. Outline the round body, fill the ribs with satin stitch, and add a small curly stem in green or brown.
Do not worry if the first half of your leaf looks better than the second. That is completely normal, and it is how every stitcher learns.
Pattern Ideas to Grow Into
A Wheat-Sheaf Border
A wheat-sheaf border suits the edge of a tea towel, a napkin, or the hem of a table runner. Mark a light horizontal guide line first to keep your stalks straight.
Work the straight stalks in stem stitch, using gold and warm brown floss. Tie the bundle at the middle with a few wrapped stitches, then add small lazy daisy stitches at the top for the grain.
Repeat the sheaf at even intervals along your line. A border like this is forgiving, because small differences in spacing look handmade rather than wrong.
A Mini Pumpkin Trio
Three pumpkins in a row make a charming little hoop. Vary their sizes so the group looks natural. A large pumpkin in the center with two smaller ones beside it works well.
Outline each pumpkin body in backstitch, then fill the ribs with satin stitch in rust and deep red. Add a short curly stem in green or warm brown.
Keep the ribs slightly curved. Straight ribs look like a balloon. Gently curved ribs look like a real pumpkin sitting in a field.
An Acorn Pair
A pair of acorns is a small, quick project, perfect for a first bookmark or the corner of a larger design. One acorn set slightly ahead of the other suggests they have just fallen.
Fill the acorn cap with satin stitch or a dense cluster of French knots in brown. Fill the body below in a softer tan or gold.
Add a thin stem and perhaps one small oak leaf beside them. Because acorns are small, two or three strands give them just enough weight.
A Bittersweet Vine
A bittersweet vine is the most colorful autumn design. Its twisting stems and bright orange berries bring movement to a hoop that might otherwise feel still.
Work the main vine in stem stitch, curving it loosely across the fabric. Add side tendrils in a thinner thread or fewer strands.
Stitch the berries as small satin circles or clusters of French knots in orange and deep red. Leave a few branches bare, the way real bittersweet looks in late autumn.
Finishing and Displaying Your Work
A finished hoop does not need a frame. The hoop itself, tightened and neat, is a lovely piece of wall art. Hang it by the screw at the top, or prop it on a shelf.
Small pieces make wonderful bookmarks. Trim the fabric to a narrow rectangle, stitch the raw edges by hand or machine, and press it flat. An acorn pair suits this beautifully.
You can also stitch directly onto useful linens. A tea towel, a linen napkin, or a pillow cover turns your practice into something the family actually uses every day.
If you stitch onto a tea towel, work near a corner or along the hem. Keep the design small, and the towel stays washable when you use colorfast floss.
Finishing the back of a hoop takes only a few minutes, and it protects your work. Cut a circle of wool felt slightly smaller than the hoop, and whipstitch it to the back edge.
An easier option is a simple running stitch. Sew a loose running stitch around the excess fabric near the hoop edge, pull the thread to gather it, and tie it off. The back becomes a neat little purse.
Press the finished hoop from the back on a soft towel. Never press directly on the front, or your stitches will flatten and lose their raised texture.
Sign and date the back of the fabric with a marking pen before you cover it. Years later, you will be glad you did.
A Closing Thought
Your first autumn hoop will not look like a magazine photograph, and honestly, it should not. It will look like something a real person made with real hands.
Hand-stitched work is imperfect by nature. A stitch slightly too long, a leaf a touch lopsided, a berry a little off-round — these are the marks of a handmade thing.
From a step back, none of that matters. A shape built from imperfect stitches still reads as a warm autumn leaf. The eye sees the whole, not the tiny flaws.
The women who stitched harvest samplers by candlelight were not chasing perfection either. They were keeping their hands busy and their hearts steady through the dark evenings.
That is the real gift of fall embroidery. It gives you a quiet hour, a small finished thing, and a little more patience for everything else in your day.
Choose a leaf. Thread your needle. The season is already here, and it is waiting to be stitched.