Introduction
When I was a girl, my grandmother kept a small wooden plate on her kitchen windowsill. It was painted with a lopsided red bird and a cluster of tulips that did not match any tulip I had ever seen in a garden.
I asked her once who the famous artist was. She laughed until her teacup rattled. She had painted it herself, she said, at a church craft night, with a brush from the hardware store and paint left over from the porch swing.
That plate taught me something I have never forgotten. You do not need to draw like a master to make art that people treasure. You need heart, a few simple shapes, and the courage to let the paint dry without "fixing" everything.
That is the spirit of folk art, and it is why I love teaching it to beginners. In this guide, I will show you the whimsical naive style, the simple supplies you need, and easy motifs you can paint this weekend.
What Folk Art Is (and Isn't)
Folk art is the art of everyday people. It is the work of farmers, grandmothers, sailors, and schoolteachers who picked up a brush without any formal training.
Museums sometimes call it naive art or primitive art. Those words sound like criticism, but they are really descriptions. Naive art does not worry about realism, perfect perspective, or photographic likeness.
Instead, it charms us with flat shapes, bold colors, and a direct, honest way of seeing the world. A folk artist paints a bird the way they feel a bird, not the way a camera sees it.
Every culture has its own folk painting traditions. Pennsylvania Dutch hex signs, Swedish painted furniture, Norwegian rosemaling, Mexican folk retablos, and American colonial theorem paintings all share that same warm, handmade spirit.
What unites them is a love of decoration, pattern, and storytelling. And here is the beautiful part: because there is no "wrong" way, folk art is one of the most forgiving painting styles a beginner can try.
Why Folk Art Is Perfect for Beginners
If you have ever set up a canvas with big dreams and then frozen, afraid to make the first mark, folk art is your gentle invitation back to the table.
There is no perspective to learn, no anatomy to master, and no color-mixing exam. The shapes are simple, the palette is small, and the style actually celebrates the wobbles that realism would call mistakes.
Folk painting is also wonderfully fast. A small piece can go from blank surface to finished treasure in a single afternoon, which makes it a satisfying weekend project for busy moms.
It is a natural craft to share, too. Kids love the bright colors and simple shapes, and there is no step that requires adult-level skill. My own children painted their first folk birds before they could tie their shoes.
What You'll Need
Here is the honest supply list for your first folk art piece. You may already own most of it.
- Acrylic craft paint. Small bottles in folk colors: barn red, mustard yellow, sage green, cream, and black. Cheap craft paints work beautifully here.
- Flat brushes. A small and a medium flat brush for filling shapes. Synthetic brushes are affordable and easy to clean.
- A liner brush. This thin brush makes the delicate outlines and dots that give folk art its charm.
- A surface to paint. Canvas board, a wooden plaque, an old plate, or a smooth piece of wood all work. Sand rough wood lightly first.
- A palette. A paper plate or a piece of wax paper is perfect.
- A cup of water and a rag. For rinsing and blotting your brushes between colors.
- A pencil. For sketching your motif lightly before you paint.
- Tracing paper (optional). Handy if you want to copy a motif you love.
- Water-based sealer (optional). A matte sealer protects your finished piece if it will be handled.
That is genuinely all you need. No fancy easel, no expensive pigments, no artist-grade brushes.
Choosing Your Folk Palette
Close your eyes and picture an old folk painting. The colors that come to mind are probably reds, greens, yellows, creams, and blacks, with maybe a soft blue for contrast.
Those colors come from history. Before modern paint shops, folk artists mixed pigments from the earth and the garden: ochre for yellow, umber for brown, indigo for blue, and madder root for red.
You can honor that tradition with a simple modern palette. Choose two or three warm colors, one cool accent, and a dark color for outlines.
My favorite combination is barn red, mustard yellow, sage green, and cream, with black for the final outlines. The colors look like they have known each other for a hundred years, because they have.
If you are unsure, let the surface guide you. A pale wood plaque begs for rich reds. A dark green keepsake box glows with yellow and cream motifs.
Simple Folk Motifs to Start
Every folk tradition has favorite motifs, and they all begin as simple shapes. Here are five that are perfect for your first attempts.
Hearts
Paint a heart with two plump bumps and a pointy bottom. Fill it in with red, let it dry, then add a tiny white dot in each side and a black outline. A row of small hearts makes a lovely border.
Tulips
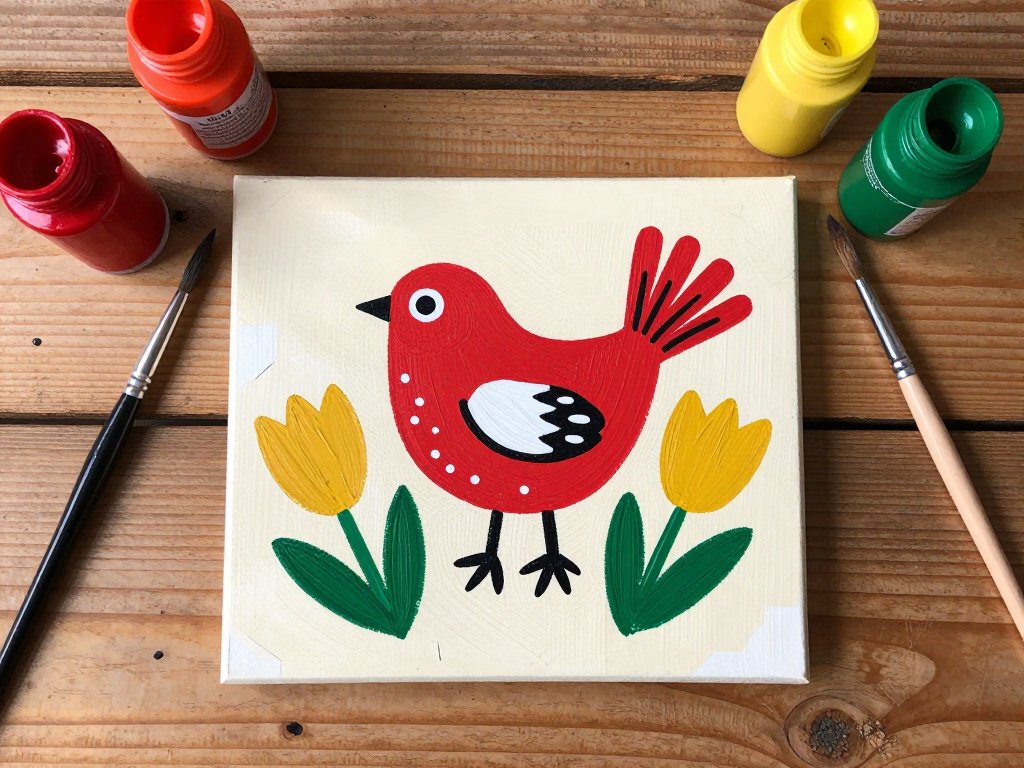
A folk tulip is just a cup shape on a stem, with two leaves that curve away from the stalk. The petals do not need to be realistic. Paint the flower red, the stem and leaves green, and finish with an outline.
Birds
The classic folk bird is a plump oval body, a small round head, a triangle beak, and a tail that fans like a feathered teardrop. Paint it one solid color, then add a wing shape and an eye.
Stars
Five-pointed stars are everywhere in folk art, from hex signs to painted furniture. Sketch yours lightly with a pencil first, fill it in, and outline it in black. Cluster three stars of different sizes for instant charm.
Pomegranates
This old symbol of abundance looks like a rounded fruit with a little crown on top. Paint the body red, add the crown in green, and split it open with a simple line if you want to show the seeds.
Practice each motif on paper until it feels friendly. Remember, folk motifs are supposed to look hand-drawn, so perfection is not the goal.
Painting Your First Folk Piece: Step by Step
Now comes the joyful part. I will walk you through a simple project: a folk bird with tulips, just like the one on my grandmother's plate.
Step 1: Prepare Your Surface
Wipe your surface clean. If you are painting on raw wood, a light sanding and a coat of cream paint gives you a smooth, bright background.
Step 2: Sketch Lightly
With your pencil, draw your bird in the center and a tulip on each side. Keep the lines soft and light. They will disappear under the paint.
Step 3: Paint the Big Shapes
Using your flat brush, fill in the bird's body, the tulips, and the stems with their base colors. Two thin coats are better than one thick coat, and they dry in minutes.
Step 4: Add the Details
When the base colors are dry, add the wing, the beak, the leaves, and any little decorative strokes. This is where the piece starts to feel alive.
Step 5: Outline with Dark Paint
This is the magic step. With your liner brush and black paint, trace around the main shapes and add the eye. Outlining is what makes folk art pop and look intentional.
Step 6: Finish with Dots
Dip the handle end of your brush into the paint and dot tiny circles around your piece. Dots are folk art's favorite punctuation mark, and they fill empty spaces beautifully.
Step 7: Let It Cure
Let your painting dry completely, then brush on a coat of water-based sealer if you like. Admire your work, sign the back, and date it like the folk artists of old.
Make It Yours: Whimsy and Wonkiness
Here is the secret that separates folk art from every other painting style. The wonkiness is the point.
A bird with one wing higher than the other looks alive. A tulip that leans like it is reaching for the sun looks like it grew in a real garden. A heart that is not perfectly symmetrical looks handmade, because it is.
When you catch yourself frowning at a wobbly line, try saying what my grandmother said: "It's folk style now." Then paint a second wobbly line right next to it on purpose, and suddenly it looks like a design choice.
This forgiving attitude is why folk art is so good for the soul. It asks nothing of you except presence, a little paint, and the willingness to enjoy the process.
If you paint alongside your children, resist the urge to correct their birds or straighten their tulips. Their wonky versions are often the most beautiful ones of all, and the confidence they build at the kitchen table will outlast any painting.
Folk Art Projects to Try
Once you have one happy little painting, you will want to folk-ify everything in sight. Here are gentle projects to work through.
- A keepsake box. Paint a simple wooden box with a folk motif on the lid. It makes a beautiful gift for a wedding or a new baby.
- Painted trivets. Buy plain wooden or ceramic trivets and paint matching motifs. A set of four tied with twine is a hostess gift that feels personal.
- Wooden spoons. Paint a folk design on the handle of a wooden spoon for a cheerful kitchen decoration. Use a food-safe sealer if you plan to use it.
- Picture frames. Paint a folk border around a plain frame and slip in a favorite family photo.
- Flower pots. Give plain terracotta pots a coat of cream paint and a folk flower. They brighten a windowsill and make charming gifts for plant-loving friends.
- Seasonal decorations. A folk pumpkin in October or a folk heart for Valentine's Day is a sweet way to mark the seasons.
Each project teaches the same shapes in a new context, and each one becomes a gift that carries a little piece of you.
Troubleshooting Your Folk Painting
Every painter hits a few snags. Here is how to solve the most common ones without losing your calm.
My paint is too thick and gloopy. Thin it with a drop of water on your palette. Folk art likes smooth, even coats, not heavy texture.
My lines shake. Rest your painting hand on your other hand, breathe out slowly as you stroke, and pull the brush toward you. Practice loops on scrap paper first.
My colors look muddy. You are probably not waiting for each coat to dry before painting the next one. Acrylics dry fast, so a short tea break between colors works wonders.
My outline bled into the paint. The base coat was still damp. Next time, wait until the paint feels dry to the touch, then outline with a lightly loaded brush.
I made a mark I hate. Let it dry completely, then paint over it with the background color. Folk art forgives almost everything, including this.
I do not know what to paint next. Copy a motif you love from a book or the internet, then change one thing: the color, the size, or the surface. It becomes yours the moment you change it.
Conclusion
My grandmother's wooden plate still sits on my shelf today, red bird slightly lopsided, tulips blooming in colors that never existed in nature.
It is not a masterpiece by museum standards. It is something better. It is proof that an ordinary woman with an ordinary afternoon made something beautiful and gave it away with her whole heart.
That is what folk art offers you, too. A way to make beauty without waiting for permission, talent, or the perfect brush. Just shapes, colors, and you.
This weekend, set aside an hour, squeeze out some paint, and paint a folk bird of your own. Make it wonky. Make it yours. And if you feel like it, sign the back and date it, the way the old folk artists did.
Somewhere down the line, someone will look at your little painting and smile. That is the whole tradition, carried on by your hands.