Introduction
Three Novembers ago I spent $27 on printed Christmas wrap in one trip. Three rolls, the shiny kind, bought in a panic the week before I needed them.
I got home and unrolled one. It was creased along the whole length, and narrower than the box I had bought it for. The second roll tore at the tube. The third looked like someone had already used half of it.
Then I did the math I should have done in the aisle. Twenty-seven dollars for about twenty-one square feet of paper that fought me the whole way.
That night I pulled out a roll of plain kraft I already owned, a chunk of craft foam, and a two-dollar pot of teal acrylic. I stamped four sheets at the kitchen table in under half an hour.
They looked better than anything I had bought. Not tidier — better. Loose, hand-made, actually considered.
This is the version of gift wrap I have used ever since, for birthdays, teacher gifts, and the wrapped sets I sell at markets. Cheap paper, one stamp, a little paint, and a pattern you can repeat without measuring.
Everything below is the version I wish someone had handed me before that $27.
What Printed Wrap Actually Costs You
Let us put real numbers on the table, because this is where the whole argument lives.
A standard roll of printed wrapping paper is 30 square feet and costs anywhere from $5 to $9. That is roughly $0.20 per square foot at the low end.
A sheet big enough for a shirt box is about 20 by 30 inches. Call it 4.2 square feet. So one gift costs you around $0.83 in paper alone.
Now the kraft roll. A 30-inch by 100-foot roll is 250 square feet and runs about $18. That is $0.07 per square foot, or roughly $0.30 for that same 20 by 30 sheet.
Same sheet size. One is 83 cents. One is 30 cents. And the printed roll gives you about seven sheets total, while the kraft roll gives you sixty.
Sixty sheets. That is a full year of birthdays, a school year of teacher gifts, and a Christmas morning, from one purchase.
Add a stamp you made from scrap foam and a paint pot that cost less than a coffee. Your cost per sheet lands near $0.37 once you spread the paint and the stamp across a hundred prints.
Your cost per sheet, if you sell: 37 cents. Your cost per sheet if you buy printed: 83 cents, in a pattern every second table at the fair is also using.
Which one is the premium product now?
Choosing the Paper: Kraft, Newsprint, or Tissue
Paper choice decides whether your paint sits on the surface or soaks in and disappears. This is the part beginners skip, and it is the part that ruins prints.
Kraft Rolls
Kraft is the workhorse. Look for 70 to 90 gsm for wrapping — thick enough not to tear at the corners, thin enough to fold crisply.
Heavier 120 gsm kraft is lovely for flat sheets and tags but fights you on a curved edge. Start at 80 gsm and you will be happy.
Unwaxed, uncoated kraft absorbs acrylic slightly. That slight absorbency is exactly what makes a stamp look printed rather than painted on.
Newsprint
Newsprint is around 45 to 50 gsm, so it is thin, cheap, and takes paint fast. It also wrinkles if your paint is too wet and tears if you pull tape off it.
Use it for small parcels and for practising a new stamp. It is the cheapest way to find out whether a design works before you commit to kraft.
Plain Tissue
Tissue at 17 to 20 gsm is for lining and for the smallest gifts. It will not hold a wet stamp — the paint wicks straight through and glues the layers together.
If you want patterned tissue, stamp it with a nearly dry stamp pad and unfold it fully before it dries.
Why Shiny Paper Refuses Paint
Coated or glossy wrap has a clay coating that seals the fibres. Acrylic cannot sink in, so it sits on top in a puddle and dries into a film that flakes off when you fold the paper.
Gloss also makes paint bead. You will watch a drop pull itself into a circle and refuse to hold a shape.
Test any paper before you commit: put a fingernail of paint on a corner and rub it after ten minutes. If it lifts, that paper is for buying, not stamping.
Paints and Inks That Actually Stay Put
You need three things from a paint: it holds a shape, it dries without smearing, and it survives being folded and handled. Most craft paints fail at least one.
Acrylic, Thinned Slightly
This is my default. Cheap acrylic, thinned with a single drop of water per blob, gives a clean impression with visible brush marks at the edges.
Too thin and it wicks into the kraft fibres and feathers. Too thick and it sits up in a lump that cracks when the gift is carried.
Aim for the texture of heavy cream. If it drips off your brush, it is too wet.
Fabric Paint
Fabric paint is thicker and more pigmented, so it holds fine detail on coarse paper. It also takes longer to dry and will transfer if you stack sheets too soon.
Good for a design with small shapes. Bad for a batch run you want to roll up in an hour.
Stamp Pads
Dye stamp pads are the fastest option and the least permanent. Ink sinks into kraft and looks soft and even, but it fades in sunlight and smears under a wet thumb.
Pigment stamp pads are slower to dry and hold up better. If you are printing a hundred sheets for a market, a pigment pad and a heat-free drying overnight is the sane combination.
Why Watercolour Fails Here
Watercolour never cures. It stays water-soluble forever, which is the whole point of it on paper and the whole problem on wrapping paper.
One damp hand and your pattern is on the gift instead of the paper. Save the watercolours for cards.
Making Stamps for Almost Nothing
You do not need a stamp collection. You need one good shape and the patience to repeat it.
Craft Foam on a Wood Block
Foam is closed-cell, so it holds paint on the surface instead of drinking it. Cut a shape with scissors, glue it to a scrap of wood or a thick piece of cardboard, and you have a stamp.
Mount it flat. A foam shape glued down with a wrinkle will print a hard line where the wrinkle is, every single time.
A foam leaf, a foam circle, a foam triangle: three shapes make a dozen patterns.
A Carved Eraser
A block eraser and a linocut gouge give you crisp edges and real detail. Draw on the eraser in pencil, carve away everything you do not want printed.
Carve shallow. Deep gouges undercut the shape and it collapses after twenty prints.
One eraser carves into two or three small stamps if you plan the cuts.
A Cut Potato
The classic. Halve a potato, press a cookie cutter into it, and cut away the outside with a knife. Blot the wet face on a towel before the first print.
Potatoes weep water and go soft, so they are a one-session tool. Perfect for a single afternoon of wrapping with kids, useless for a market batch.
Hot Glue for Texture
Squeeze hot glue in swirls or a rough grid onto a scrap of cardboard. Let it set hard.
It will not give you a clean shape, and that is the point. You get a broken, organic texture that reads as handmade from across the room.
One warning: glue lines are rounded, so you need a light touch and very little paint or the pattern turns to mush.
Stencils: Cut, Stick, and Stipple
Stencils give you the shapes foam cannot — long borders, repeating arches, a proper band across the sheet.
Cutting the Stencil
Mylar is reusable and wipes clean. Card stock is free and works three or four times before the edges soften.
Print or draw your shape, tape the sheet to a cutting mat, and cut with a sharp craft knife. Change the blade often. A dull blade tears the edge and torn edges bleed.
Sticking It Down
This is the step everyone skips. A stencil that lifts at the edge lets paint creep underneath, and you get a fuzzy halo instead of a crisp line.
Lightly spray the back with repositionable adhesive, or run thin double-sided tape around the outer border only. Never tape across the cut shapes.
Press the stencil down, then press again along every edge with your fingertip.
The Stipple, Not the Swipe
Load a foam brush or stencil brush with a small amount of paint, then offload most of it onto a scrap of paper. You want the brush nearly dry.
Hold it upright and bounce it straight up and down over the opening. Never drag sideways.
Sideways motion pushes paint under the stencil edge. Bouncing drops it in place.
Two thin passes beat one wet pass, every time. If the first pass looks patchy, let it dry for a minute and go again.
Repeating a Pattern Without Measuring
The reason hand-stamped paper looks homemade in a bad way is uneven spacing. The reason it looks homemade in a good way is rhythm. You need a method, not a ruler.
The Spacer Strip
Cut a strip of card stock and mark your spacing on it once with a pen. Line it up with the edge of the sheet, tick the position with a pencil dot, and stamp on the dots.
Ten minutes of setup, then you never measure again. Make one strip per pattern and keep it in the box with the stamps.
The Accordion Fold
Fold the sheet into even panels, press the creases, then stamp on the fold lines. The folds give you perfect spacing for free.
Unfold and the creases relax out. Any that remain read as part of the handmade finish.
Stamp Off the Edge
Deliberately run your pattern past the paper's edge. It hides small spacing errors and makes the sheet look like a piece cut from a longer bolt of fabric.
This one trick has saved more of my batches than any measuring device.
Work in a Grid, Break It Later
Stamp a rough grid first, all one direction, then go back and add a second shape on the diagonal. Two passes hide the wobble in either one.
Three Designs to Try
Start with these. Each one uses a single stamp or a single stencil, so you are not juggling tools while you learn the rhythm.
The Leaf Sprig
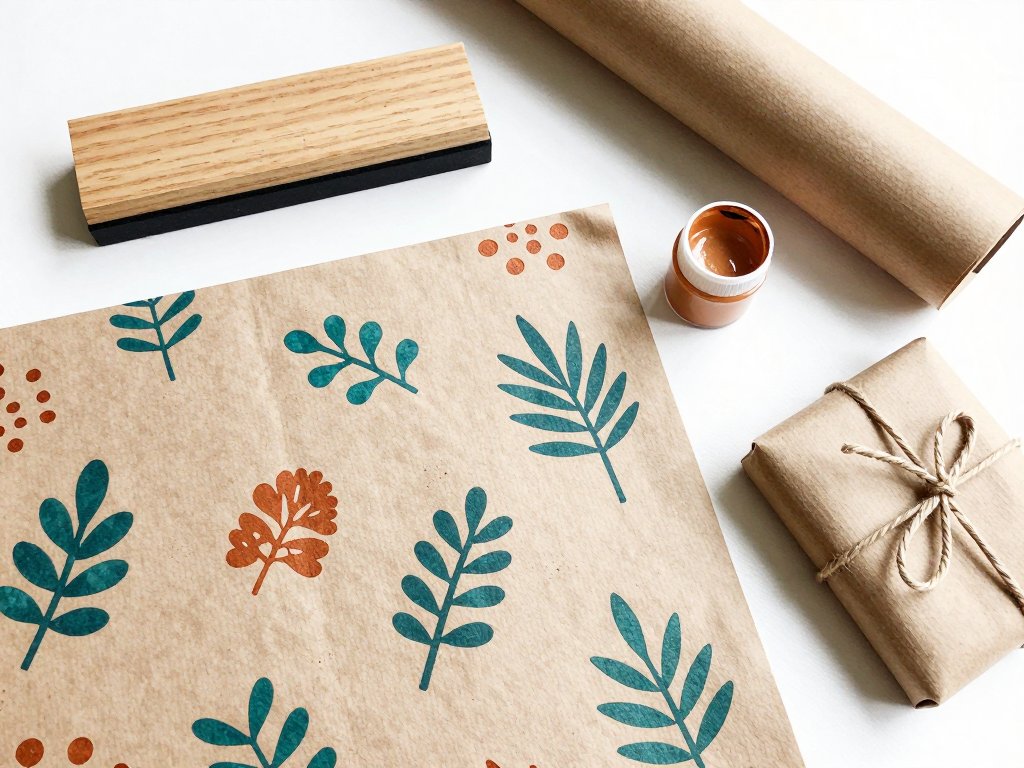
Carve a simple stem with four leaves on an eraser, or cut the same shape from foam. One sprig per print.
Stamp in rows, alternating the direction every other print so the sprigs lean left, right, left. That alternation is what makes it look drawn rather than duplicated.
Two colours work beautifully here: teal sprigs with a single copper one every fifth print.
Scattered Dots
A round foam stamp, a small paint pot, and no plan at all.
Stamp clusters of three dots at varying distances. Then step back and add singles in the empty gaps.
Resist the urge to make it even. Evenly scattered dots look like a machine did it badly. Loose clusters look like confetti.
The Border Band Stencil
Cut a repeating arch or a row of small triangles into a long strip of mylar. Stencil a band along two opposite edges of the sheet, leaving the middle plain.
The plain centre is what makes it look expensive. Pattern on the edges, quiet in the middle, is how printed wallpaper has worked for two hundred years.
Drying, Setting, and Stacking Without Smudges
Wet acrylic on kraft is fragile for longer than you think. Twenty minutes to touch, and a full day to stop transferring.
Lay every sheet flat, printed side up, on a table or the floor. Not on a radiator, not in the sun, not stacked.
If a print looks heavy, blot it once with a scrap of plain paper while it is still wet. Press gently and lift straight up.
After an hour, you can move a sheet by the corners. Do not stack them yet.
For a faster finish, lay a sheet of brown paper over the print and press it under a couple of heavy books for ten minutes. The brown paper wicks the last of the surface moisture and the weight flattens the curl.
What you must not do is run a hot iron over the print. Acrylic softens with heat, sticks to the soleplate, and takes the pattern with it.
If you truly need to flatten a sheet, iron the back only, on the lowest setting, with brown paper between the iron and the paper. No steam. Ten seconds at a time, checking constantly.
Storing Paper and Stamps So They Get Used
Stamped paper that gets crushed in a drawer is money you already spent. Store it the way you would store fabric.
Roll finished sheets loosely, printed side out, around a cardboard tube. Printed side in means the pattern presses against itself and sticks.
Or keep them flat in a shallow box, interleaved with plain scrap paper. This is better for large sheets you plan to cut.
Give everything 24 hours before it goes in the box. Paper stacked wet will weld itself into a block, and there is no rescuing it.
Stamps need the opposite treatment. Wash foam and eraser stamps in cool water immediately after use, blot them, and dry them face up.
Never let acrylic dry in foam. It fills the cells and the stamp prints a blur from then on.
Wood blocks should not be soaked. Wipe the face, keep the block dry, and store stamps face up so the foam is not compressed under other tools.
The Budget Breakdown, Per Sheet
Here is the whole thing in one place, using the numbers above for a 20 by 30 inch sheet.
- Kraft paper: $0.30 per sheet at $18 for a 250 square foot roll.
- Acrylic paint: about $0.04 per sheet. A $2 pot covers well over a hundred prints when you are not slopping it on.
- Stamp: $0.02 per sheet if you carve one eraser and print a hundred sheets from it. Free if the foam came out of a packaging box.
- Stencil: $0.01 per sheet. A sheet of mylar costs a few dollars and lasts dozens of runs.
- Twine and tag: $0.15 per gift, if you want the full finished look.
Total for the paper: about $0.37 a sheet. Total for a finished wrapped gift, including twine: about $0.52.
Compare that to $0.83 for printed paper alone, in a design that is already on three other tables at the fair.
Your batch of sixty sheets costs you roughly $22 in paper and paint. The same coverage in printed wrap would be about $50, and you would be buying it seven sheets at a time.
Selling Wrapped Sets at Craft Fairs
If you sell, this is not just cheaper for you. It is a product.
A bundle of three stamped sheets plus a length of twine sells comfortably at $8 to $10. Your material cost is about $1.30. Your time is four to five minutes a sheet once you have the rhythm.
That is a healthy margin on something you can batch in an evening in front of the television.
Wrapped boxes sell better than flat sheets. Shoppers cannot picture what a flat sheet becomes. Put one finished parcel on the table, wrapped and tied, and the sheets beside it suddenly make sense.
Run your batch in one colour family per season and change the stamp, not the paper. Bulk kraft is cheaper by the case, and one palette keeps your table looking intentional.
Label the bundle by sheet count, not by metre. Nobody at a craft fair knows what a metre of wrapping paper is.
When It Goes Wrong: Troubleshooting
Almost every failure here has one cause: too much paint, or too much water.
Smudged Stamps
A smudged print is usually an overloaded stamp. Press it onto scrap paper once before it touches the sheet.
Do not rock or slide the stamp. Press straight down, hold for two seconds, lift straight up.
If the shape is filled in and blobby, your paint is too thick. Add a single drop of water and stir.
Paint Bleeding Under the Stencil
Three culprits: a stencil that is not stuck down, a brush that is too wet, or a sideways stroke.
Re-spray the adhesive, offload the brush until it is nearly dry, and bounce instead of dragging.
Paper Curling
Curling means water. Thin your paint less, or skip the water entirely and work with the paint straight from the pot on a dry brush.
Dry sheets flat and weight them under books once they are touch-dry. Do not try to flatten wet paper.
Stamps Drying Out
Foam stamps clog fast. Wash them the moment you finish, not after you tidy up.
If a foam stamp has already clogged, soak it in warm water for ten minutes and scrub gently with an old toothbrush. Most will come back.
Stamp pads left open for an afternoon are usually finished. Snap the lid shut between prints, every time.
The Math That Changed How I Wrap
Sixty sheets for $18 against seven sheets for $6. That is the whole story, and it took me three Novembers to notice it.
But the money was never the part that stuck. The part that stuck was that wrap I made myself made the gift look like I had thought about the person receiving it.
Nobody has ever complimented a roll of printed paper. People notice a stamped sheet, because it is slightly imperfect and clearly made by hand.
One roll of kraft, one stamp, two paint pots, and a spacer strip in a shoebox. That is the entire kit, and it lasts most of a year.
Start with a single sheet tonight. Cut one foam leaf, stamp a row of six, and see how it looks wrapped around a box with a length of twine.
The aisle will still be there next November, charging $0.83 a sheet. You will not need it.
If you enjoyed this project, you might also like our guide to Advent Calendar DIY: Fill Your Own Countdown Boxes.