Introduction
You have bound off the last stitch and woven in the ends. You hold the piece up to the window, and it is almost right. But the edges curl, the sides wobble, and the whole thing looks smaller and lumpier than the pattern photograph promised.
Nothing is wrong with your knitting. Knitted fabric is a field of interlocking loops, and loops move. Blocking is simply the gentle business of persuading those loops to settle exactly where you want them.
It is the quiet step that turns a homemade knit into a handmade one. It costs a basin of cool water, an evening of patience, and no special talent whatsoever.
This guide walks through how to block knitting in real detail: the three main methods, which fibers want which treatment, the tools worth owning, and what to do when something goes sideways. Beginners are welcome at every step.
Why Knitted Fabric Changes Shape
Woven cloth holds still because its threads cross at right angles, like a basket. Knitting is built differently. Every stitch is a loop pulled through another loop, and loops can slide.
That structure is why a knit feels so forgiving in the hand. It is also why the same sweater can measure eighteen inches across on the needles and twenty-two inches after a week of wear.
Yarn adds its own temperament. Animal fibers are spun from crimped hair, and that crimp wants to spring back. When the fiber relaxes in water, the yarn puffs up and fills the spaces between stitches. Knitters call it blooming.
Your hands are a variable too. Tension shifts with mood, with the time of day, with the cup of tea beside you. No two knitters produce identical fabric, and even you are not perfectly consistent.
Stockinette curls because knit and purl stitches are structurally unbalanced. A stockinette scarf would rather roll into a tube than lie flat. Blocking cannot undo that physics, but it can calm the curl considerably.
Blocking flatters texture most of all. Cables rise, lace opens, ribbing evens out, and colorwork squares up. If your piece uses braided stitch patterns, our guide to Cable Knitting for Beginners will show you how blocking makes every twist read crisply.
Think of blocking as a reset rather than a permanent change. You are teaching the fabric its intended shape. Washing, wearing, and time will soften that memory, and you will teach it again.
How Makers Set Their Work Before Blocking Mats
Blocking mats and bottled wool wash are recent comforts. For centuries, knitters set their work with whatever the kitchen and the household already held.
The most common method was steam from a kettle. A knitter would hold a finished piece over the rising steam, patting the fabric flat, letting the damp heat relax the stitches without soaking them.
Others used a damp cloth and a heavy iron. The cloth lay over the knitting, the iron pressed on top of the cloth, and the steam passed through. This is pressing, a tailoring skill far older than knitting patterns.
Tailors had sponged and pressed wool cloth for generations before cutting it. They knew that damp heat settles a fabric and stops it from shifting later. Knitters inherited that knowledge the way families inherit recipes.
Pinning was equally improvised. Pieces went onto a wool blanket, a spare mattress, or a folded quilt. Some makers weighted the edges with books, and some pinned lace to the curtain in a sunny window.
Before gentle wool washes, knitters used soap flakes, a little borax, or nothing but cool water and their own two hands. The chemistry was rough, but the principle was exactly the one you will use today.
What has changed is the equipment. What has not changed is the idea that fiber, warmth, water, and patience will bring a knit to its proper size. That knowledge is yours now, and it is very old.
What You Need to Block Knitwear
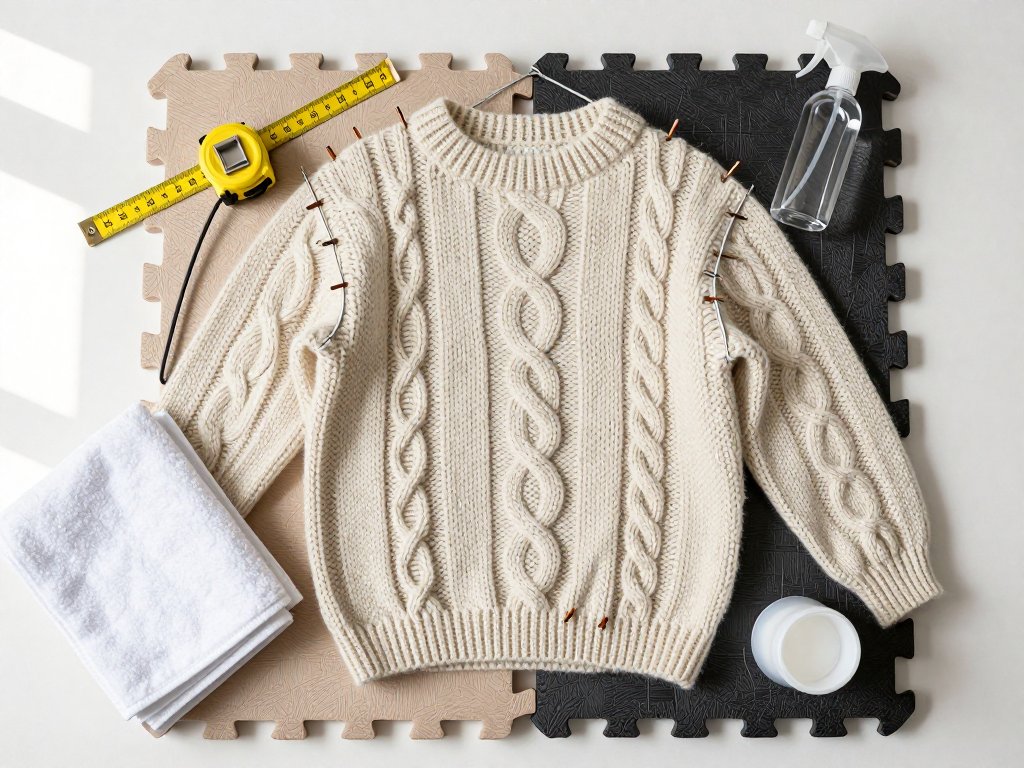
You can block beautifully with very little. A clean towel on a spare bed has served knitters for a hundred years. But a few modest tools make the work easier and the results more even.
Blocking mats. Interlocking foam puzzle mats are the modern standard, usually twenty-four inches square. They hold pins, they protect the table, and they let you build the surface size you need. Children's play mats work perfectly.
Rustproof T-pins. Look for stainless steel or nickel-plated brass. Ordinary pins rust, and a rust stain on a cream sweater is a small heartbreak. Buy more than you think you need.
Blocking wires. These are flexible stainless steel wires, often twelve inches long, with a small loop at each end. You thread the wire through the edge stitches, then pin only the wire at a few points.
Wires are the secret to straight edges and open lace. Instead of a scalloped line of pin marks, you get one clean, level edge.
A tape measure. Pins follow numbers, not hope. You will consult the tape measure more than any other tool on this list.
A spray bottle. Any clean plant mister will do. Set it to a fine mist for spray blocking.
Two clean towels. One to roll the wet knitting in, one to lay underneath it as a forgiving, absorbent base.
A gentle wool wash. Choose a pH-neutral formula with no enzymes and no bleach. A single capful in a basin is plenty. Dish soap is too harsh and will strip the natural oils from wool.
A basin or tub. A clean sink, a plastic tub, or a large bowl all work. It only needs to be big enough to let the piece float freely.
A mesh drying rack. Useful for small pieces like mittens, swatches, and baby booties that need air on both sides.
Optional: a garment steamer, or an iron with a good steam setting. Both serve steam blocking, which we will cover in a moment.
Method One: Wet Blocking
Wet blocking is the full soak, and it is the gold standard for wool, cotton, linen, and any natural fiber that can take water. It gives you the most control over final size and the most even fabric.
Here is the calm sequence, step by step, with the reason behind each move.
- Fill your basin with cool water and add a capful of gentle wool wash. Swish with your hand until it dissolves. Cool water matters because heat plus agitation is exactly how wool felts.
- Lower the piece into the water and press it down gently with flat hands. Do not dunk or swish it around. Let it sink on its own and soak for fifteen to thirty minutes.
- Lift the piece out supporting it with both hands, never by one corner. Wet wool is heavy and will stretch under its own weight if you dangle it.
- Squeeze the water out gently, in handfuls, without twisting. Never wring a knit. Wringing distorts stitches and invites felting.
- Lay the piece on a clean towel and roll the towel up like a jelly roll. Press down along the length with your palms. The towel will drink most of the water.
- Repeat with a second dry towel if the piece still feels heavy. The drier it is, the faster it dries to shape.
- Lay the piece on your blocking mats and begin pinning it to the measurements in your pattern. Use blocking wires along straight edges and lace.
- Place pins every two to three inches along a straight edge, and pin the corners firmly. For a curved or shaped edge, use more pins, spaced closely, following the outline.
- Leave the piece to dry flat at room temperature, away from direct sun and radiators. Expect twenty-four to forty-eight hours, longer for thick wool.
Why does the soak work? Water relaxes the fiber, the wool wash helps it slide, and gravity pulls the fabric open. As it dries, the fibers lock into their new arrangement. The shape you pin is the shape you keep.
Method Two: Steam Blocking
Steam blocking is the fast route, and for some fibers it is the only route that works. It takes minutes instead of days and needs no basin at all.
The rule is simple and strict. The iron or steamer never touches the fabric. You hold it one to two inches above the knitting and let the steam do the work.
- Pin the dry piece to its finished measurements on the mats, exactly as you would for wet blocking.
- Fill your iron or garment steamer and let it come fully to temperature.
- Hover the iron an inch or two above the fabric. Do not press down. Never let the soleplate touch the stitches.
- Move slowly across the piece, letting the steam penetrate. Work in sections until the fabric feels damp and relaxed, not soaked.
- Let the piece cool completely before you remove a single pin. This is essential. Synthetic fibers set as they cool, so unpinning early undoes the work.
Why does heat set acrylic and synthetic blends? Acrylic is a plastic fiber. Warm steam softens it just enough that the stitches relax, and as it cools, the fiber hardens into the shape it is held in.
Wet blocking does nothing permanent for acrylic, because acrylic does not absorb water or bloom the way wool does. Water simply runs off. Heat is what acrylic understands.
One caution: too much heat can kill acrylic, meaning the stitches relax permanently and lose their bounce. Test your steam setting on a leftover swatch before you commit a finished sweater to it.
Method Three: Spray Blocking
Spray blocking is the lightest touch of the three. You mist the surface with water, pat the piece into shape, and let it dry. No soaking, no iron, no fuss.
It suits small pieces and quick touch-ups. A finished mitten, a headband, a swatch, a gift that needs to look tidy by tomorrow all respond well to a fine mist and a few pins.
- Lay the piece flat on the mats or on a towel.
- Set your spray bottle to a fine mist and dampen the fabric evenly. Aim for damp, not dripping.
- Pat and smooth the piece into shape with clean hands, then pin the edges to your measurements.
- Leave it to air dry completely, then unpin.
Spray blocking is also the friendliest option for acrylic, because a light mist plus a little pinning smooths the surface without risking heat damage. It will not open lace the way a full soak does.
Think of spray blocking as a refresh rather than a reset. It tidies what is already nearly right, and it is perfect for the piece you do not want to get fully wet.
Let the Fiber Choose the Method
Here is the single most useful idea in this whole guide. The fiber decides the method, not your schedule. Wool and acrylic are not the same material and cannot be treated the same way.
Wool and Other Animal Fibers
Wool, alpaca, cashmere, and mohair love water. Wet blocking or steam blocking both work beautifully, and the soak lets them bloom into a fuller, softer fabric.
Lace in wool is a special joy. Pin it out firmly, use blocking wires, and stretch it past where you think it should go. The holes open into patterns you could not see before, and the shape holds.
Cool water only, and never agitate. Wool fibers have scales that lock together under heat and friction, and that is felting. Be gentle and wool will reward you.
Acrylic and Synthetic Blends
Acrylic, nylon, and polyester do not absorb water the way wool does, so wet blocking has little lasting effect. A soak will not hurt them, but it also will not hold a shape once the piece dries.
Steam blocking is the answer. Heat softens the fiber, and cooling sets it. Pin your measurements first, steam, then wait for the piece to cool completely before unpinning.
Keep the iron well above the surface. Acrylic melts before it burns, and a shiny, flattened patch is impossible to undo.
Cotton and Linen
Cotton and linen are plant fibers, strong and heavy, and they drink a surprising amount of water. Wet blocking suits them perfectly.
Be warned that they also grow. Both fibers relax in water and stretch under their own weight, so a cotton sweater blocked damp can dry longer than intended.
Pin them firmly to the numbers, dry them flat, and expect to re-block after washing. Cotton likes a firmer hand than wool and will happily take it.
Silk and Alpaca
Silk and alpaca are luxurious and a little delicate. Treat them with cool water, no agitation, and no heat.
Alpaca has little natural memory, so it drapes rather than springs back. Block it gently, support it fully when lifting, and dry it flat. Silk can water-spot, so dampen it evenly rather than in patches.
Superwash-Treated Wool
Superwash wool has been treated to stop the scales from locking, which means it will not felt in the wash. That is wonderful for busy households and small children.
It also means the fiber holds shape less stubbornly. Superwash often grows after blocking and may need re-blocking more often than untreated wool. Expect to refresh it after a few wears.
Reading Finished Measurements and Pinning to Them
Every well-written pattern includes a finished measurements line: the chest width, the body length, the sleeve length of the garment once it is blocked. That number is the target.
It is not the measurement on the needles, and it is definitely not the measurement on the hanger. It is the blocked measurement, and pinning to it is the whole point of this work.
Read the numbers before you touch a pin. Write them on a scrap of paper and keep it beside the mats. Looking at the pattern through a fog of wet wool is no fun at all.
Measure across the middle of the piece, not at the pinned edge. Pins pull corners outward, and an edge measurement will flatter you falsely. The center is the truth.
Block one dimension at a time. Set the width first, checking with the tape measure, then work along the length and check again. Adjust as you go, moving pins rather than stretching fabric.
Pin to the numbers, not to the shape of the pins. A straight line of pins along a curved edge looks tidy and blocks wrong. Follow the outline your pattern describes, corner by corner.
Finally, resist forcing. If a piece will not reach the stated measurement without straining, the issue is gauge, not blocking. Between a stretched sweater and an honest one, always choose the honest one.
When Blocking Goes Wrong
Most blocking troubles have a calm fix. Here are the ones knitters meet most often, with the reason behind each and the way back.
The piece will not hold its shape. This usually means the fiber is acrylic or a synthetic blend, which needs heat rather than water. Try steam blocking instead, pinning thoroughly and letting the piece cool fully before unpinning.
Stitches look stretched or distorted. You have pulled too hard while pinning. Re-wet the piece, let it relax for a few minutes, and re-pin more gently. Wool is forgiving and will often recover completely.
Edges flare or ripple. This is usually a pinning problem rather than a knitting problem. Use blocking wires along the edge, and pin more frequently, every inch or two near curves.
The yarn feels squeaky or has felted. Squeeaky yarn means soap residue. Rinse the piece again in cool water. If fibers have actually matted, the damage is permanent, but a gentle soak and careful drying will soften any light felting.
You blocked too aggressively and lost stitch definition. Over-stretching flattens texture and blurs cables. Re-wet the piece, let it dry without stretching, and pin it only to the stated measurements next time.
The blocked piece came out too big. Wet it again and re-pin it slightly smaller than the target, then dry it flat. Note the correction in your pattern so the next version starts right.
The blocked piece came out too small. Wet it once more and pin it out further, coaxing the fabric gently. Wool can usually gain an inch or two this way.
If it still will not reach, treat the piece as a gift for a smaller frame, and check your gauge on the next one.
Drying, Weights, and How Long the Shape Lasts
Dry everything flat. Hanging a wet knit on a hanger is the fastest way to stretch a shoulder line into a sad, drooping curve.
Most pieces dry in twenty-four to forty-eight hours. Thick wool, dense cables, and humid weather all slow the process. Flip the piece once, halfway through, so the underside gets air too.
Weights are useful only in narrow cases. A stubborn rolled hem or a rolling stockinette edge can be tamed by laying a light weight, such as a book wrapped in a towel, along the edge while it dries. Do not weight the body of a garment.
Never wear or fold a piece that is still damp. Even slight dampness will stretch under wear, and the shape you worked for will quietly drift away.
How long does the shape last? For untreated wool, blocking generally holds until the next wash. Superwash wools relax sooner, and cotton grows again over time. Acrylic holds well until heat or hard wear intervenes.
The honest answer is that blocking is not a one-time event. You will re-block after every wash, and each time it takes less effort because you already know the numbers.
Store finished knits folded, in a breathable cotton bag with a cedar block or a lavender sachet. Rethread and re-pin whenever the piece looks tired, and it will look new again.
A Gentle Finish
The first time you block a piece, it feels like a leap of faith. You submerge something you spent weeks making, then stretch it out on the floor and hope.
Trust the process. Fiber, water, warmth, and patience have set knitted work for centuries, long before anyone sold a blocking mat. You are joining a very long line of makers.
Your first block will not be perfect, and it does not need to be. A slightly uneven edge, a corner pulled a little far, a scarf that dried a touch wide: nobody will notice these things but you.
What people notice is the drape, the even stitches, and the way a hand-knit sweater finally looks like it was made on purpose. Blocking is what puts that confidence into the fabric.
So soak the piece, squeeze it gently, roll it in a towel, and pin it to the numbers. Then walk away and let time do the quiet work.
Tomorrow you will unpin something that fits, that hangs right, and that looks exactly like the knit you meant to make. Small win, well earned, and entirely yours.