Introduction
Have you ever held a piece of old handwritten letter and felt a story in your hands?
That is the magic at the heart of junk journaling. This craft transforms vintage papers, postcards, ticket stubs, and found objects into layered, one-of-a-kind journals that feel like a collection of treasured memories.
Unlike traditional scrapbooking, junk journaling embraces imperfection. Torn edges, ink smudges, and mismatched papers are part of the charm.
And the best part? You can start with materials you already have around the house or pick up for pennies at thrift stores.
If you have been curious about this trending craft but felt overwhelmed by the elaborate spreads you see online, I am here to tell you that your first junk journal does not need to be a masterpiece.
It just needs to be yours. In this guide, I will walk you through exactly what you need to get started, the core techniques for building beautiful pages, and how to find or make your own ephemera without spending a fortune.
By the end of an afternoon, you will have a completed journal filled with pages that tell your own story.
What Exactly Is Junk Journaling?
Junk journaling is the art of creating handmade journals using recycled and repurposed materials. Think of it as a creative blend of scrapbooking, collage, and bookbinding, but with a distinctly vintage, imperfect aesthetic.
The "junk" in the name refers to the materials themselves: old book pages, sheet music, maps, envelopes, fabric scraps, and any other paper ephemera you can find.
These are not trash at all. They are treasures waiting to be transformed.
What makes junk journaling so appealing for beginners is the complete absence of rules. You do not need perfect handwriting, expensive supplies, or artistic training.
A junk journal is deeply personal. Some people use them as daily diaries, others as art portfolios, and many simply enjoy the process of assembling beautiful pages.
The freedom is the point.
This craft has seen a surge in popularity over the past few years, driven by social media communities on YouTube, Instagram, and Pinterest.
The trending hashtag #junkjournal has millions of posts, and for good reason. It is accessible, sustainable, and endlessly creative.
Whether you are drawn to shabby chic florals, grunge textures, or minimalist vintage, there is a junk journaling style waiting for you.
Essential Supplies for Your First Junk Journal
One of the best things about junk journaling is that your supply list is refreshingly short. You truly do not need much to create something beautiful. Here is exactly what you need to gather before you begin.
Paper and Ephemera
This is the heart of your journal. Start by collecting a variety of papers in different textures and weights.
Look for old book pages from thrifted novels, sheet music, vintage maps, and pages from old dictionaries.
Envelopes add wonderful pockets for hiding notes or small treasures. Tea bags or coffee filters can be crumpled and flattened for interesting distressed paper.
Wrapping paper, doilies, and scrapbook paper remnants all work beautifully too. The key is variety.
Mix thin tissue papers with thicker cardstock for visual and tactile interest.
For ephemera, think small printed pieces that tell a story. Postage stamps, vintage postcards, tickets from shows or travel, seed packets, botanical prints, and handwritten letters are all wonderful additions.
You can find these at thrift stores, estate sales, or online marketplaces. Many crafters also print images from public domain archives like the Internet Archive or Wikimedia Commons.
Adhesives
You will need a few different types of glue depending on what you are sticking together.
An acid-free glue stick works well for lightweight paper on paper. Matte Mod Podge or gel medium is excellent for sealing collages and adhering heavier items.
Double-sided tape is great for quick, clean bonding. A craft glue like PVA works for attaching thicker items like buttons or lace.
Avoid regular school glue, which can wrinkle thin paper and may not be acid-free.
Tools
Your tool kit does not need to be elaborate. Scissors with a sharp point are essential for cutting small details.
A craft knife with a self-healing cutting mat gives you more precision for cutting straight lines and shapes.
Bone folders are wonderful for creating crisp creases in paper. A ruler helps with measuring pages and cutting guides.
Needle and thread or a simple stapler will serve for binding your journal. And tweezers are surprisingly useful for handling small ephemera pieces.
Binding Materials
This is what holds your journal together. For a simple first project, a few sheets of coordinating cardstock and a stapler with long reach are enough.
If you want to try stitching, waxed linen thread and a darning needle create beautiful exposed bindings.
Elastic bands can also be used to create a no-sew binding that allows you to add and remove pages later.
If you are using an existing vintage book cover as your base, you may not need additional binding materials at all.
Preparing Your Workspace and Materials
Before you start assembling pages, take a moment to prepare your materials. This step makes the actual journaling process much smoother and more enjoyable.
Spread out all your collected papers and ephemera on a clean table so you can see everything at once.
Sorting by color, theme, or texture helps you quickly find pieces that work together as you build each spread.
If you want to add an aged patina to new or modern papers, try a simple tea or coffee staining technique.
Brew a strong cup of black tea or coffee, let it cool, and then dip or brush the liquid onto your paper.
Blot off the excess and let the paper dry flat. The result is a warm, sepia-toned surface that looks like it has been sitting in an attic for decades.
You can speed up the drying process with a hairdryer on a low setting. Crumple papers before staining for a more textured, weathered look.
Sand the edges gently with fine-grit sandpaper to reveal the fibers underneath and create that authentic worn feel.
Set aside a small pile of papers and ephemera for your cover and binding if you are making those from scratch. Having everything organized before you begin keeps the creative flow going and prevents you from searching for supplies mid-project.
Building Your Journal Structure
Now comes the exciting part: constructing the actual journal. There are several approaches, and I will walk you through the most beginner-friendly options so you can choose what feels right for your project.
Option One: The Simple Staple-Bound Journal
This is the fastest and easiest method, perfect for your first journal. Fold several sheets of paper in half to create signatures.
A signature is simply a group of folded pages nested inside each other. Stack three to five signatures together.
Open them at the center fold and staple along the crease using a long-reach stapler.
If you do not have one, you can use a regular stapler by opening the stapler flat and stapling from the inside of the center spread.
Cover the stapled spine with a strip of decorative paper or fabric tape for a finished look.
Option Two: The No-Sew Elastic Binding
This method allows you to rearrange or replace pages later, making it a flexible choice for beginners.
Punch three or four holes along the folded edge of each signature using a hole punch or awl.
Stack your signatures together, aligning the holes. Thread a thin elastic cord or ribbon through the holes and tie it securely on the outside of the spine.
You can tie a bow for an adjustable fit or knot it tightly for a permanent binding.
This method works beautifully with a vintage book cover that already has a spine you can work around.
Option Three: Simple Pamphlet Stitch
For those who want to try hand stitching without complicated techniques, the pamphlet stitch is perfect.
Fold your pages into a single signature. Open it to the center and mark three evenly spaced points along the fold.
Use an awl to poke holes at each mark. Thread a needle with waxed linen thread about three times the height of your journal.
Starting from the outside center hole, stitch through, then out the top hole, back through the center, out the bottom hole, and finally back through the center to tie off on the outside.
This creates a simple yet beautiful three-hole stitch that lies flat when the journal is open.
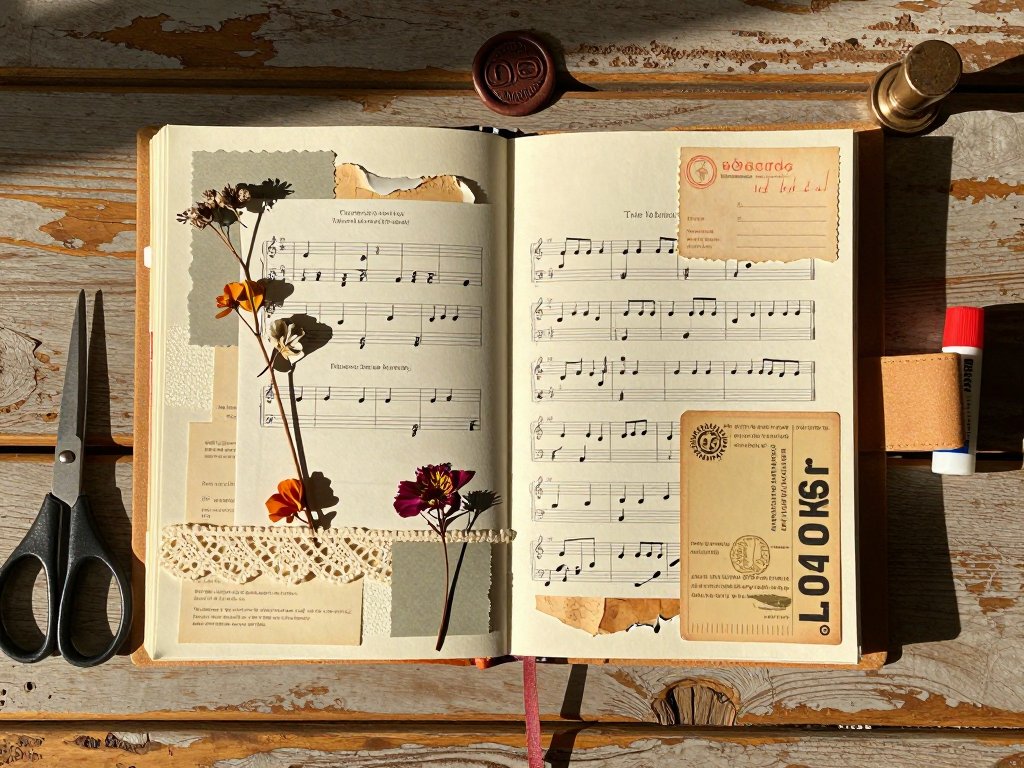
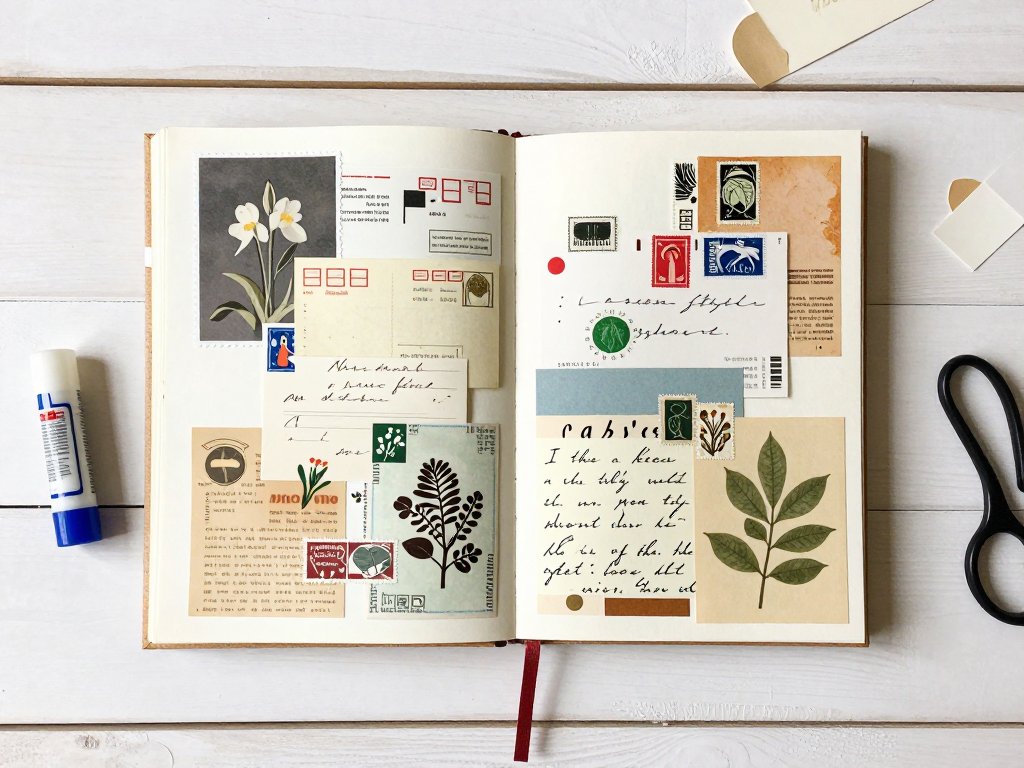
Designing Your First Spread
With your journal structure ready, it is time to create your first page spread. A spread is the two open pages you see when your journal is opened flat. Approach it without pressure. The goal is not perfection but expression.
Start with a background. Choose a paper that covers most or all of each page.
It can be a book page, a piece of scrapbook paper, or a tea-stained napkin.
Tear it rather than cutting it for softer, more organic edges. Adhere the background to your page using a glue stick or Mod Podge applied with a brush.
Smooth out any bubbles with a bone folder or the side of your hand.
Next, add your focal layer. This is the main element that draws the eye. It could be a vintage postcard, a botanical print, a handwritten letter, or a photograph.
Position it slightly off-center for a more dynamic composition. You do not need to mount it perfectly straight.
A slight tilt adds to the handmade charm. Adhere it with gel medium for a strong bond.
Build depth with layering. Place smaller ephemera pieces around your focal point, overlapping edges to create visual interest.
Tuck a ticket stub under the corner of your postcard, place a stamp at an angle, or add a piece of lace peeking out from behind a letter.
Each layer tells a small part of a larger story. Use foam tape or cardboard spacers under some pieces for a subtle three-dimensional effect.
Add details and embellishments. This is where your journal becomes truly personal. Stamp a date or a short phrase.
Add a button tied with thread. Tuck a small envelope into the binding to create a hidden pocket.
Write a line or two in your own handwriting. These small touches make the journal uniquely yours.
Gathering and Creating Ephemera on a Budget
One of the most common questions I hear from beginners is where to find enough ephemera without spending too much.
The wonderful news is that beautiful ephemera is everywhere once you start looking. Thrift stores are your best friend.
Look in the book section for old novels, dictionaries, and atlases that cost a dollar or two each.
Sheet music is often available in stacks for very little money. Vintage postcards and photograph collections can sometimes be found in mixed lots for pennies apiece.
Estate sales and flea markets are goldmines for paper ephemera. You can often find entire boxes of letters, postcards, and documents for a few dollars.
Ask the seller if they have any paper items tucked away. Many people do not think to display them, but they are happy to sell them once asked.
Online marketplaces like Etsy have dedicated shops selling vintage ephemera packs curated for junk journalers.
These are convenient if you want a themed collection without hunting.
Do not overlook free sources. Your own mailbox produces interesting pieces. Junk mail with vintage-style illustrations, interesting typography, or textured paper can be repurposed.
Printed shipping receipts and kraft paper packaging have a lovely utilitarian aesthetic. Friends and family might have old letters, postcards, or travel souvenirs they are happy to pass along.
And of course, you can make your own ephemera. Print free public domain images from the Internet Archive or New York Public Library's digital collection.
Use a printer with sepia or grayscale settings for an aged look. Create your own handwritten notes on tea-stained paper.
The possibilities are limited only by your imagination.
Common Techniques for Beautiful Pages
As you create more spreads, you will develop your own favorite techniques. Here are a few that consistently produce lovely results.
Tearing vs. Cutting
Tearing paper creates a soft, feathered edge that looks organic and aged. This is perfect for backgrounds and layers where you want a seamless blend.
Cutting with scissors or a craft knife creates clean, sharp lines that work well for geometric layouts or when you want a specific shape.
Mix both techniques in the same spread for contrast.
Using Gesso and Paint
A thin layer of white or neutral gesso over your background paper creates a surface that accepts paint, ink, and markers without bleeding.
You can then add watercolor washes, acrylic paint splatters, or ink stamps directly onto the page.
This technique is especially useful if you want to unify a collection of mismatched papers under a cohesive color scheme.
Pockets and Tuck Spots
Envelopes, folded paper, and fabric scraps can be turned into pockets for holding tags, photos, or notes.
Simply adhere three edges of a piece of paper or envelope to your page, leaving the top open.
Tuck a small tag or card inside. These interactive elements make your journal more engaging to flip through and provide hidden surprises for future readers.
Stitching on Paper
Hand stitching adds texture and a handmade touch to your pages. You can sew directly through paper using a needle and thread.
Try a simple running stitch along the edge of a postcard or a cross-stitch pattern through a piece of fabric adhered to your page.
The holes from the needle become part of the design, and the thread adds a tactile element that photographs beautifully.
Finding Your Personal Style
As you create more pages, you will naturally gravitate toward certain colors, textures, and themes.
Some crafters love the romantic shabby chic look with soft pinks, lace, and floral imagery.
Others prefer a grungy, industrial aesthetic with dark browns, rust tones, and mechanical imagery. Still others enjoy a clean, minimalist approach with plenty of white space and simple black-and-white imagery.
Do not feel pressured to commit to one style. Many journalers switch between aesthetics depending on their mood or the theme of a particular spread.
A nature-themed spread might lean toward botanical prints and earthy colors, while a travel spread could feature maps and ticket stubs in bold primary colors.
Your journal can contain many different voices, just like a real collection of memories.
If you are not sure where to start, try creating a mood board before you begin a spread.
Gather a few pieces of ephemera that appeal to you and arrange them on a table.
Look for a common color, subject, or era tying them together. Let that theme guide your choices as you build the spread.
Over time, you will develop an instinct for which papers and objects work well together.
Troubleshooting Common Beginner Challenges
My Pages Are Too Bulky
Layering too many thick items in one spread can make your journal difficult to close.
Stick to thin papers and ephemera for the bulk of your layers. Use thick items like buttons or metal charms sparingly, and place them where they do not interfere with the journal's closure.
If your journal is already too full, consider removing a signature or using a thicker spine binding.
The Glue Is Making My Paper Wrinkle
Thin papers wrinkle easily when over-saturated with wet glue. Apply adhesive sparingly, and use a glue stick or double-sided tape instead of liquid glue for thin papers.
If you do need liquid glue for a heavier item, apply it to the item rather than the page and use just enough to hold it in place.
Press the page flat under a heavy book while the glue dries.
My Journal Does Not Look Cohesive
A common concern for beginners is that the pages look too mismatched. The solution is often simpler than you think.
Choose a unifying element that appears across all your spreads. It could be a dominant color, a repeated image type (like postage stamps), or a consistent background paper.
When each spread shares at least one visual thread, the journal as a whole reads as intentional and cohesive.
I Am Afraid to Ruin a Page
This is perhaps the most common hesitation among new junk journalers. Here is a secret: there is no such thing as a ruined page in junk journaling.
If you do not like how a spread turned out, you can cover it with another layer, glue a pocket over it, or cut it down to use as an element in a different project.
Nothing is permanent, and every page is a learning experience. Give yourself permission to create pages that are not perfect.
Some of the most beautiful spreads come from happy accidents.
Conclusion
Junk journaling with ephemera is a craft that invites you to slow down, look closely at the small beautiful things around you, and create something uniquely your own.
The supplies are simple, the techniques are forgiving, and the results are deeply personal. Whether you fill your pages with vintage postcards and pressed flowers or with modern ticket stubs and handwritten notes, every journal tells a story that only you can tell.
Your first journal does not need to be perfect. It just needs to be started.
Gather a few papers, choose a binding method that feels comfortable, and let your intuition guide the rest.
The more you create, the more your style will develop, and the more you will fall in love with this gentle, rewarding craft.
I hope this guide has given you the confidence to begin. Your first spread is waiting.