Introduction
Every fall, I find myself standing at the kitchen counter with a bowl of onion skins and a pile of avocado pits, wondering why I ever throw them away. They are not scraps. They are a dye pot waiting to happen.
Natural fabric dyeing sounds like something you need a chemistry degree to attempt, but the truth is much friendlier.
You need a pot, some water, a few kitchen scraps, and a piece of natural fabric.
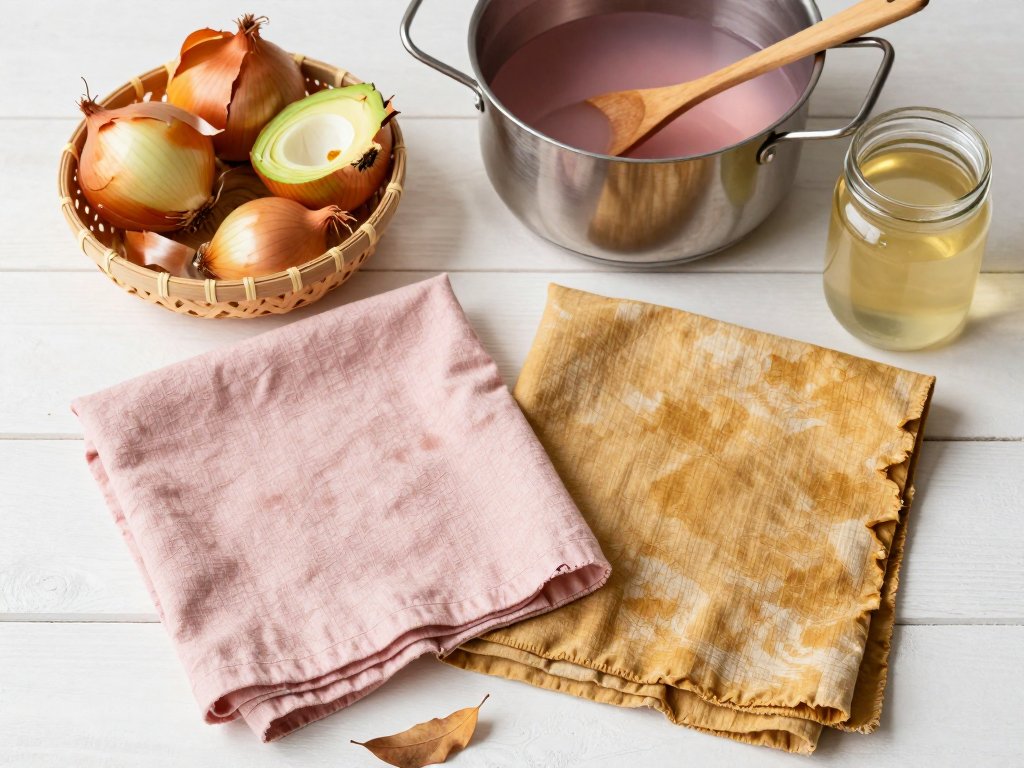
That is it. The colors you can coax from onion skins and avocado pits are genuinely beautiful: warm golden yellows, soft copper browns, and the most delicate blush pink you have ever seen.
This guide walks you through both dyes from start to finish, with the kind of honest, real-world detail I wish someone had given me the first time.
No complicated equipment. No scary chemicals. Just a slow afternoon, a simmering pot, and the quiet satisfaction of making color with your own hands.
And if you have little ones underfoot, bring them along. Dyeing is one of those crafts that feels like magic to a child, even when all they do is drop the avocado pits into the pot and watch the water turn pink.
Why Dye with Kitchen Scraps?
Before we get to the how, let us talk about the why. Because once you understand what makes this craft special, the extra effort of a simmering pot feels completely worth it.
First, it is wonderfully budget-friendly. A bundle of yellow onions costs a couple of dollars and gives you both dinner and a dye bath. Avocado pits are free if you eat avocados anyway, which means your grocery routine quietly stocks your craft supply cabinet.
Second, it is a gentle way to craft. There are no harsh synthetic dyes here, no plastic gloves and respirator masks, no stains on your hands that take a week to fade.
Natural dyes are forgiving, and the process itself is slow and soothing in a way that feels almost meditative.
Third, every batch is a surprise. Natural dyes are alive. The exact shade depends on your water, your fabric, the age of your onion skins, and even the season.
You are not reproducing a factory color; you are coaxing a one-of-a-kind color out of nature.
That unpredictability is not a flaw. It is the whole charm.
And finally, it connects you to something older. People have been dyeing fabric with plants for thousands of years, long before synthetic dyes existed. When you simmer those onion skins, you are doing exactly what a grandmother somewhere was doing a century ago. There is something quietly lovely about that.
What You Will Need
Here is the full supply list. Most of it is probably already in your kitchen or laundry room.
- Dye materials. The skins of 6 to 8 onions, or the pits (and skins, if you like) of 5 to 6 avocados. Save them up in a paper bag in the fridge for a week or two.
- Natural fabric. Cotton, linen, hemp, wool, or silk. Synthetic fabrics like polyester will barely take the color, so stick with natural fibers for your first batches.
- A dye pot. A large stainless steel or enamel pot you do not mind staining. Avoid aluminum, which can dull colors. If you use your kitchen pot, wash it well afterward, or keep a dedicated dye pot in the garage.
- Mordant. Alum (aluminum potassium sulfate), available online or at craft stores, helps color stick to plant fibers. For wool and silk, you will also want cream of tartar.
- Mild soap. A pH-neutral soap or a little dish soap for scouring the fabric first.
- Rubber gloves and an apron. Natural dyes are not toxic, but they can stain your hands and clothes.
- A strainer, wooden spoon, and kitchen scale. For straining dye baths and measuring fabric weight.
That is genuinely everything. If you have ever made soup, you already own most of this.
Choosing and Preparing Your Fabric
The golden rule of natural dyeing is that the fiber matters as much as the dye. Cotton and linen take onion skin yellows beautifully, while avocado pits are famous for their blush pinks on cotton. Wool and silk are the most eager of all, drinking up color quickly and richly.
Before you dye anything, the fabric needs a good wash. New fabric often has sizing and finishes that block dye from soaking in.
Give it a warm wash with a mild, pH-neutral soap, and rinse until the water runs clear.
This step is called scouring, and it is the difference between a deep, even color and a pale, patchy one.
If you are upcycling an old white cotton shirt or a set of linen napkins, wash them the same way. The dye does not care whether your fabric is brand new or ten years old, as long as it is clean and natural.
One more thing worth knowing: wet fabric takes dye more evenly than dry fabric. So after scouring, keep your fabric damp, or soak it in warm water while you prepare the dye bath.
The Secret to Lasting Color: Mordants
Here is the honest truth about natural dyes: without a little help, the color can wash right out. That help is called a mordant, a word that comes from the Latin for "to bite." A mordant helps the dye bite into the fiber so it stays put.
For cotton and linen, the classic beginner choice is alum. You can buy a small bag of aluminum potassium sulfate online or at a craft store for just a few dollars, and one bag will last you dozens of dye sessions.
To mordant cotton or linen, dissolve about one tablespoon of alum per pound of fabric in hot water, add enough cool water to cover the fabric, and let it soak for at least an hour, or overnight for the richest results.
Then rinse gently and move on to dyeing. That is the whole process.
If you would rather keep things fully plant-based, soy milk is a lovely alternative. Soak your fabric in plain soy milk for a few hours, let it dry, and cure it for a few days before dyeing.
It takes a little more planning, but many dyers swear by the soft, slightly creamy colors it produces.
Do not worry about getting this perfect. Mordanting is forgiving, and even a quick half-hour soak gives you color that lasts far longer than no mordant at all.
Method One: Onion Skin Dye
Yellow onion skins give you warm golden yellows and soft copper tones. Red onion skins lean toward deeper, rustier shades. Both are wonderful, and both are almost embarrassingly easy.
Step 1: Make the dye bath
Peel the dry papery skins from 6 to 8 onions and put them in your dye pot.
Cover them with plenty of water, about four times as much water as skins. Bring everything to a gentle simmer, not a rolling boil, and let it go for thirty to sixty minutes.
You will watch the water turn from pale straw to deep amber, and that amber water is your dye.
Step 2: Strain and add your fabric
Strain out the onion skins, leaving just the clear, warm liquid. Add your damp, scoured fabric, making sure it is fully submerged and can move around freely. Push it down gently with your wooden spoon.
Step 3: Simmer, then cool slowly
Simmer the fabric in the dye bath for thirty to sixty minutes, stirring now and then so the color develops evenly.
Then turn off the heat and let everything cool in the pot. This slow cooling is important: it gives the dye time to really settle into the fibers.
Leave it for a few hours, or overnight if you can.
Step 4: Rinse and wash
Take the fabric out and rinse it in cool water until the water runs clear.
Then wash it gently with a pH-neutral soap and hang it to dry out of direct sunlight.
The color will look deeper when wet, so do not panic if it seems to lighten as it dries.
That is normal.
And there you have it. A piece of fabric colored by the peel of an onion, in a shade no store can quite replicate.
Method Two: Avocado Pit Dye
This is the one that feels like magic. Avocado pits, which you have been tossing into the compost for years, produce the most beautiful soft pink and peach tones on cotton and linen. I still grin every time I pull a pit-pink napkin out of the pot.
Step 1: Save and prep your pits
Save the pits from 5 to 6 avocados. Rinse off any green flesh, and give each pit a few gentle whacks with a knife or wrap them in a towel and tap them with a rolling pin.
You do not need to break them into powder, but cracking them open lets the dye escape more easily.
The avocado skins work too, and they add a deeper, raspberry-tinged pink.
Step 2: Simmer the pits
Put the cracked pits and skins into your dye pot, cover with water, and simmer gently for forty-five minutes to an hour.
The water will turn a murky coral pink. Do not be alarmed by the color at this stage; it looks more like soup than dye, and that is exactly right.
Step 3: Strain and dye
Strain out the pits, add your damp, mordanted fabric, and simmer for another thirty to sixty minutes. Then turn off the heat and let the fabric rest in the cooling bath. Longer is better here: many dyers leave avocado pit dye overnight for the deepest, pinkest results.
Step 4: Rinse and enjoy
Rinse in cool water until clear, wash gently, and hang to dry. What you get is a soft, warm pink that somehow manages to look both delicate and earthy at the same time. It pairs gorgeously with the golden yellows of onion skin dye.
Playing with Color: Modifiers and Overdyeing
Once you have a basic dye bath under your belt, a whole world of color play opens up. Natural dyes respond to small additions called modifiers, and the results are often startling.
The easiest modifier to try is iron. You can buy iron powder, or you can make a simple iron water by soaking a few rusty nails in a jar of vinegar and water for a week.
Adding a splash of this to an onion skin bath shifts the warm gold toward a soft olive or mushroom gray.
It is like watching a color change its mood.
Vinegar and baking soda make gentler adjustments. A splash of vinegar can brighten and warm some dyes, while a pinch of baking soda can shift them cooler. Test a small scrap first, because natural dyes are full of surprises.
Overdyeing is another delight: dye a piece with onion skins first, then dip it into an avocado pit bath, and the two colors blend into a warm peach.
Dye it in the opposite order and you get a slightly different shade. Layering colors is how you move from "pretty" to "completely yours."
Caring for Your Dyed Fabric
Natural dyes are beautiful, and they ask for a little gentleness in return. Wash dyed pieces by hand or on a delicate cycle in cool water with a mild, pH-neutral soap. Skip the bleach, always. Hang them to dry out of bright, direct sunlight, which can fade colors over time.
With mordanting and gentle care, your onion skin golds and avocado pinks will last for years. They may soften and mellow slightly, which many dyers actually love. The fabric ages like a favorite pair of jeans, gaining character instead of losing it.
Simple Projects to Start With
You do not need to dye a whole bolt of fabric to enjoy this craft. Small projects are the perfect place to begin, and they make wonderful handmade gifts.
- Dye a set of cotton napkins. Four plain white napkins from the thrift store become a warm autumn tablescape in an afternoon.
- Dye a bandana or scarf. A lightweight cotton scarf in avocado pink is a gift people actually treasure.
- Dye embroidery floss or fabric scraps. Use your dyed scraps for future sewing, quilting, or mending projects.
- Dye muslin gift wrap. Wrap small presents in naturally dyed fabric instead of paper, and the wrapping becomes part of the gift.
- Dye fabric for a patchwork project. A few onion skin yellows and avocado pinks make the most beautiful, earthy quilt squares.
If you enjoy working with natural materials, you might also love foraging your own wild clay, a wonderfully grounding way to gather craft supplies from the landscape around you.
The two crafts share the same spirit: slow, natural, and deeply satisfying. You can read more about it in our guide to foraging wild clay.
Troubleshooting: When Things Do Not Go as Planned
Let me save you some worry, because almost everyone hits these snags the first time.
"My color came out too pale." This is the most common beginner disappointment, and it usually means one of three things: the fabric was synthetic, the dye bath was too weak, or the fabric did not get enough time in the pot.
Use more skins or pits, simmer longer, and let the fabric soak overnight in the cooling bath.
"The color washed out." This almost always means the fabric was not mordanted, or the mordant was too weak. Go back to the mordanting step and give it a proper soak. Soy milk needs a few days to cure, so plan ahead.
"The color is uneven or blotchy." Uneven color usually comes from fabric that was scrunched too tightly in the pot, or from not stirring. Give your fabric room to move and stir gently every ten minutes or so.
"My hands are stained." Welcome to the club. Natural dye stains fade in a day or two. Rub your hands with a little lemon juice or white vinegar to speed things up, and wear gloves next time.
None of these are failures. They are just the craft teaching you how it wants to be done. The second batch is always better than the first, and the third is better still.
Final Thoughts
There is a particular kind of joy in holding up a piece of fabric you colored yourself, and knowing the color came from an onion you chopped for dinner. It is small, and quiet, and completely unlike anything you can buy.
Natural fabric dyeing rewards patience, but it does not demand perfection. Your first batch might be pale, your second might be uneven, and somewhere around the third, you will pull out a piece so beautiful you will want to frame it.
That is the journey, and it is a lovely one.
So save those onion skins. Crack those avocado pits. Set a pot on the stove, and give yourself an afternoon of slow, gentle magic. Your fabric will thank you, your budget will thank you, and honestly, your heart will thank you too.
Happy dyeing, friend. I cannot wait to see what color you make.