Introduction
I remember the first road I ever tried to draw. I was small, perched at the kitchen table, and my road ran straight across the page like a flat ribbon. However I tried, it never looked like the road outside, the one that narrowed and vanished toward the hills.
Years later, I watched my niece wrestle with a hallway. She frowned, erased, and frowned again. Then a kind voice leaned over and said, "See how those floor lines meet at one dot?" Her pencil found the dot, and the hallway suddenly marched into the page.
That little dot is the whole secret. It belongs to a method called one-point perspective, and once you know it, roads, rooms, and railway tracks begin to make sense on paper.
What Is One-Point Perspective?
One-point perspective is a simple drawing system for showing depth. It rests on one gentle idea: parallel lines that move away from you appear to meet at a single dot. Artists call that dot the vanishing point, and it always sits on the horizon line.
Picture yourself at the end of a long, straight street. The two curbs seem to lean toward each other as they travel away. Far off, they appear to touch. That meeting place is the vanishing point, and every line that recedes in the scene lines up with it.
The "one" in the name means a single vanishing point. Everything in your drawing that moves away from you heads for that same dot. Things that face you directly, such as the front of a house, stay flat and true.
You have seen this effect all your life without naming it. A train platform, a long library aisle, a row of lockers. Whenever a picture seems to pull you into its depths, one-point perspective is usually the quiet worker behind it.
The Three Ingredients
Every one-point drawing rests on three ingredients. Learn to spot them, and you can build almost any scene. Here they are, one at a time, with the plain supplies you already own: an HB pencil, a 2B pencil, a ruler, an eraser, and regular drawing paper.
The Horizon Line
The horizon line is the straight line across your paper that marks your eye level. In a landscape, it is where the sky meets the ground. In a room, it sits at the height of your eyes while you look down a hallway.
Everything above this line is seen from below; everything below it is seen from above. Raise your eye level, and you look down at the scene. Lower it, and the scene rises around you.
For early drawings, place the horizon near the middle of the page. It is the calmest choice, and it leaves generous room for both floor and ceiling.
The Vanishing Point
The vanishing point is the single dot where all receding parallel lines appear to meet. In one-point perspective, you place exactly one, and every line that travels away from you aims at it.
It usually rests on the horizon line, though you may slide it left or right along that line. Center it for a symmetrical scene, like a road or a hallway. Slide it over for a looser, off-center view.
Mark it very lightly, with a small dot or a faint cross. You will erase it before you finish, so keep it shy.
The Orthogonal Lines
Orthogonal lines are the working lines of perspective. They run from the corners and edges of your subject toward the vanishing point. The name sounds grand, but the job is plain: they are your guides.
Think of them as tracks that tell every receding edge where to travel. The edges of a road are orthogonals. So are the lines where a hallway's walls meet its floor and ceiling.
Draw them lightly, because they are scaffolding, not final lines. The finished edges of your drawing will follow them, or hide them completely.
Setting Up in Four Calm Steps
Before you choose a subject, practice the setup. It takes four steps and about two unhurried minutes. Work slowly, with light strokes, and every drawing you attempt later will grow from this small ritual.
- Draw a light horizon line straight across your paper. Rest your ruler along the bottom edge of the page and slide it up, so the line stays level. Press softly.
- Place one vanishing point on that line. A faint dot or cross in the middle works best at first. You may move it later; for now, center it.
- Sketch the front face of your subject. For a building or a box, that means a simple rectangle. Keep its top and bottom parallel to the horizon line, and its sides upright.
- Connect the front corners to the vanishing point with light guide lines. Draw each line in one easy motion, corner to dot. Everything behind the front face must follow those guides.
That is the whole skeleton. A house, a hallway, or a row of gift boxes all build the same way: one flat front face, plus guides that hurry toward a single dot.
Why the Trick Works
Why does such a humble trick convince the eye? Because your brain reads converging lines as depth. When two lines angle toward each other, you interpret them as parallel lines retreating into the distance.
It is the same cue your eyes use all day. A hallway looks deep because its lines narrow. A road looks long because its edges nearly touch at the far end. Your drawing simply borrows that cue.
Perspective is an old friend, not a clever new gadget. Medieval painters used converging lines to give their roads and courtyards believable space. The same method that made their paintings deep will work in your sketchbook.
It will work in a child's drawing of a hallway, too. The trick does not care how old the hand holding the pencil may be. It asks only for one dot, and lines that aim at it faithfully.
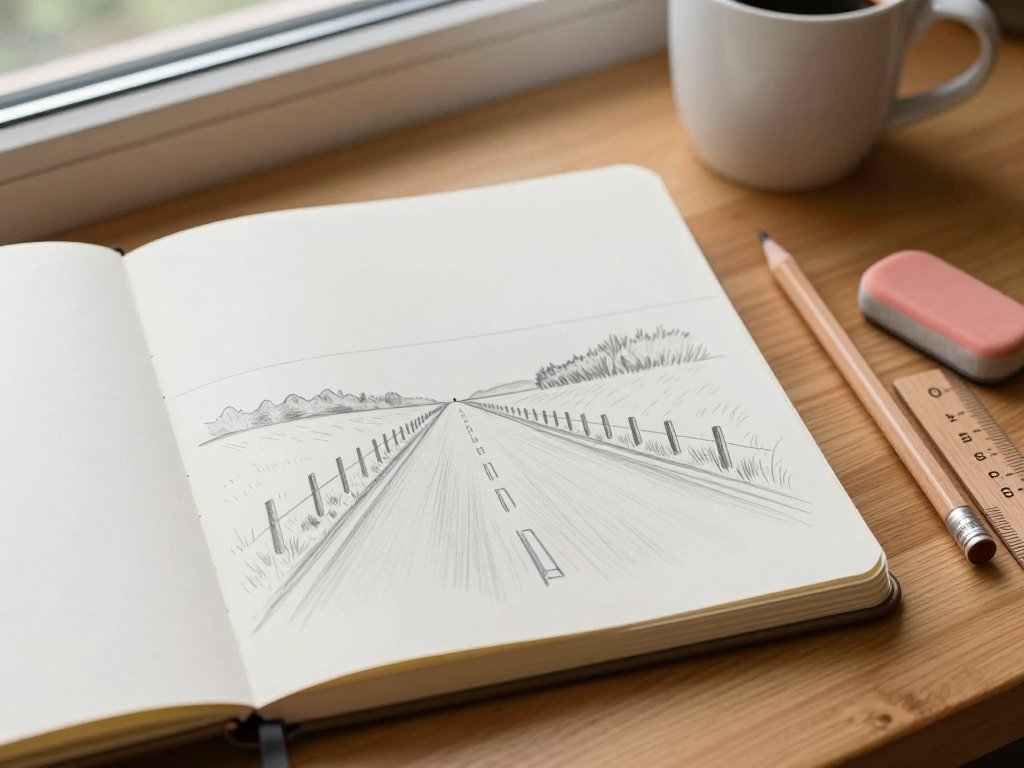
First Practice: A Country Road
Begin with a scene you can picture in your mind's eye: a quiet country road. This practice uses every ingredient at once, yet stays forgiving. There are no strict right angles to fuss over, only gentle lines and open sky.
- Draw a light horizon line across the page, about a third of the way down. Above it will live the sky; below it, the fields and the road.
- Place a small vanishing point in the middle of that line. This is where your road will quietly disappear.
- Angle two lines down from the vanishing point for the road's edges. Start at the dot and let your eye glide toward the bottom corners of the page. Keep both lines light.
- Add the first fence post. Draw a short vertical line near the bottom of one road edge. Then add a second post a little higher, a little smaller, and closer to the dot.
- Keep adding posts, each one smaller and nearer the vanishing point than the last. Stop when they shrink to light ticks. Match them on the other side if you wish.
- Finish with soft touches: a low treeline at the horizon, a cloud or two, gentle grass along the road. Then erase the vanishing point and any stray guides.
Notice what happened. The fence posts are the same height in real life, yet each one draws smaller as it nears the dot. That steady shrinking is what sells the depth.
Your eye now believes the road runs for miles. If the drawing feels clumsy, that is normal and perfectly fine. Every perspective picture is a quiet conversation between you and the page, and the road will straighten with practice.
Second Practice: A Hallway Corner
The other classic beginner scene is the hallway, the drawing my niece finally cracked. You are looking straight down a corridor toward the far wall, and the whole room obeys a single dot at its heart.
- Draw your horizon line at your seated eye level. Place the vanishing point at its center, right where the far wall will stand.
- Sketch the far wall as a small rectangle centered on the vanishing point. This rectangle is the front face of the entire room, and it stays flat and upright.
- Draw the floor and ceiling guides. From each corner of the far wall, run a light line outward to the edge of the page. These lines show where the side walls meet the floor and the ceiling.
- Add a doorway on one side wall. Mark its width with two upright lines rising from the floor guide. Then draw the door's top edge as a light line aimed at the vanishing point.
- Add a second doorway or a picture frame on the other wall. Keep every element polite: uprights stay vertical, and anything that recedes aims at the dot.
- Finish by darkening the lines you love and erasing the guides. Keep the far wall light and soft so it feels genuinely distant.
This is the drawing that made perspective click for my niece. She wrote her name and the date beneath it and taped it to the refrigerator, a hallway deep enough to walk into.
Once the hallway works, rooms with furniture are only a few more rectangles away. The system never changes. You simply add more boxes that politely obey the same dot.
Everyday Scenes to Notice
Here is the pleasant part of learning perspective: the whole world becomes a classroom. Once you know what to look for, examples appear on the most ordinary errands.
Railroad tracks are the purest one-point scene you will find. Stand between the rails and look along them. The two steel lines hurry toward a single dot on the horizon.
A straight sidewalk teaches the same lesson. Look down the block and notice how the curb lines lean together, and how the walk itself seems to climb toward the vanishing point.
A row of lampposts, or fence posts, teaches shrinking. Each post stands the same height, yet each one draws smaller as it nears the dot. Your eye reads that row as distance.
Even indoors, lessons wait for you. Set a chair at the far end of a long kitchen table and look along its top. The table's long edges converge beyond the chair, and the chair itself grows small.
You do not need a sketchbook for these lessons. Simply pause for ten seconds and name the parts: horizon line, vanishing point, orthogonal lines. Naming them tucks them into your memory.
Gentle Fixes for Common Wobbles
First, Keep It Loose
Before fixing anything, lighten your hand. Use the HB pencil for guides and save the 2B for final dark lines. Press softly, because hard lines fight back when you reach for the eraser.
Keep an eraser close by at all times. Guidelines are meant to be drawn over and later erased, so treat them as visitors, not permanent residents.
Give yourself permission to draw badly. Wobbly first attempts are how every artist learns. The page can always hold another try.
Wobble: Everything Looks Crooked
A tilted horizon line is the usual culprit. If your floors slope or your ceiling leans, check that line first. Lay a ruler along it and compare it with the paper's edge.
Then check your uprights. Walls and doorframes should stand straight up and down, parallel to the sides of your paper. One small lean can tip an entire room.
The fix is gentle: lighten the offending line, redraw it true, and carry on. You will rarely need to start over.
Wobble: Shapes Look Stretched
Stretched shapes usually mean the vanishing point is sitting too close to your subject. When the guide lines fan out at sharp angles, the box in front of them can look pulled and rubbery.
Try moving the vanishing point toward the center of the horizon, or farther from the subject. Shallow, easy angles read as natural depth, while wild angles read as distortion.
If a box still misbehaves, redraw its front face first. A calm, correct rectangle at the front will steady most of the shape behind it.
Wobble: Lines Wander
Shaky guide lines usually come from drawing in stops and starts. Instead, draw each guide in one smooth motion, from the corner all the way to the vanishing point.
Let your eye follow the destination. The pencil will chase your gaze, and your gaze already knows the way. Slow is fine; smooth matters more than fast.
If a line still wanders, do not scrub at it. Lay a fresh, light line beside it and move on. Your final dark lines will forgive the mess beneath.
A Small Triumph
Perspective is a skill that clicks with practice, much like learning to ride a bike. One afternoon the lines simply start behaving, and you wonder why they ever felt hard.
Give yourself one relaxed session this weekend, twenty minutes, no more. Draw a hallway from memory, or a road seen through your window. Keep the pencil light and the eraser near.
When the drawing finally makes sense, keep it. Tuck it in a sketchbook or tape it to the fridge like my niece did. A small triumph on paper is worth keeping.
Years from now, you may look back at that first believable road the way I look at mine. It is not a perfect picture. It is simply the day depth came home to your pencil.
