Introduction
Let me tell you about the tube of texture paste I bought that cost more than my dinner.
I was sure it would give my paintings that thick, sculptural look I kept seeing online.
Instead, it sat in my drawer for six months, and when I finally opened it, it had dried into a brick.
That was my expensive lesson: you do not need texture paste to paint with texture. You need a palette knife.
A palette knife is a thin, flexible blade on a handle, and it costs about the same as a takeout coffee.
With it, you can lay down thick, juicy strokes of paint that stand up off the canvas.
It is the fastest, cheapest way to make your paintings feel alive — and it is shockingly beginner-friendly.
In this guide, I will walk you through everything you need to know: what to buy, how to hold the knife, the basic strokes, and the mistakes I made so you do not have to.
By the end, you will be painting textured art that looks like it took serious skill.
It did not. It just took a five-dollar knife.
Why a Palette Knife Beats a Brush
Brushes are for smooth, blended paintings. Palette knives are for bold, expressive ones. They do two completely different jobs.
When you paint with a brush, you are mostly pushing thin paint around. With a knife, you are laying down ribbons of paint that keep their shape.
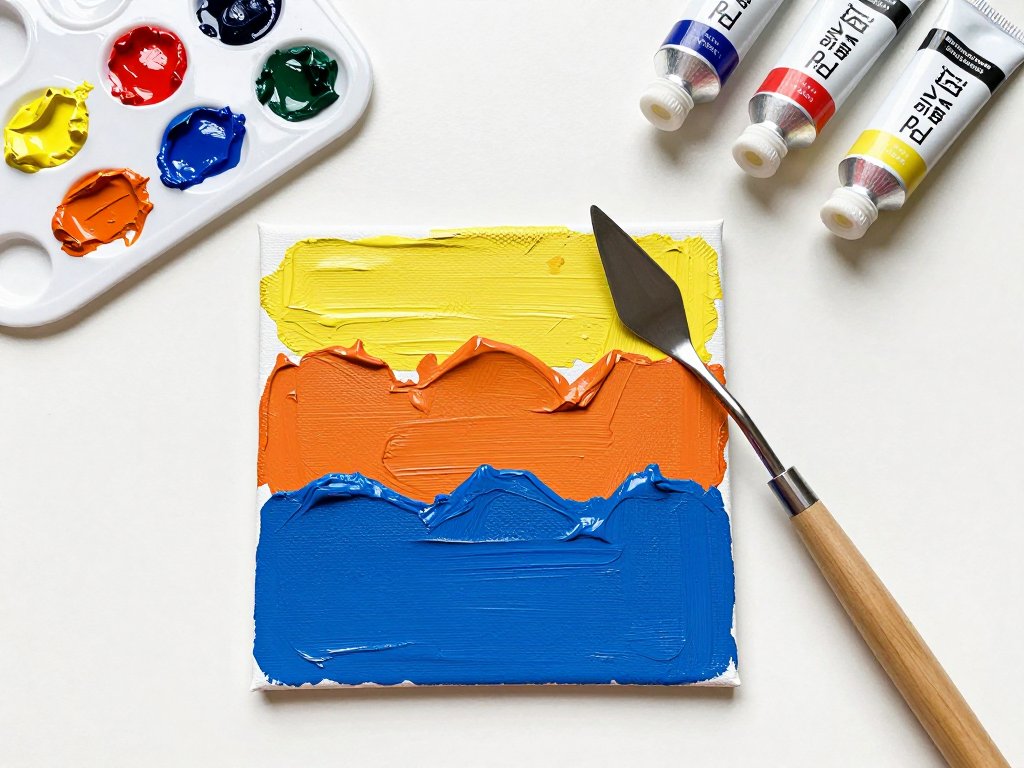
The paint sits on top of the canvas in little mountains and ridges, catching light from every direction.
That is the impasto look — and it is what makes textured paintings feel almost three-dimensional.
There is another reason knives are perfect for beginners: they are forgiving. A brush punishes a shaky hand.
A knife does not care. You can scrape off a bad stroke, wipe the blade clean, and try again in about three seconds.
No muddying, no blending into a mess, no ruined canvas.
And here is the money angle: a basic palette knife set costs five to ten dollars.
Texture mediums and impasto pastes run fifteen to thirty dollars a jar. The knife does ninety percent of the work the paste does, and it never dries out.
That is the kind of math I can get behind.
What You Actually Need
Here is the honest shopping list. You probably own half of it already.
A palette knife. Start with one or two. Look for a diamond-shaped blade with a bent handle — that bend keeps your knuckles out of the paint.
A small one and a medium one cover almost everything you will do. If a set of three is on sale for under ten dollars, grab it.
Paint. Acrylic is the beginner's best friend because it dries fast and cleans up with water. Heavy body acrylics hold their texture better than craft paints, but do not overthink it — use what you have and upgrade later.
A surface. Canvas boards and stretched canvases work great. Paper will buckle under thick paint, so skip it unless you tape it down first.
A palette. A disposable palette pad, a piece of glass, or even a plastic plate. The paint does not care what it sits on.
That is it. No mediums, no special tools, no mystery supplies. If you paint at all, you are probably one trip to the kitchen drawer away from starting.
How to Hold the Knife
Forget everything you know about holding a pencil. A palette knife is not a writing tool — you do not grip it like you are taking notes.
Hold the handle loosely, like you are holding a butter knife you are about to spread toast with.
Your index finger can rest along the top of the handle for control, but keep your grip light.
Tension is the enemy of good knife work. The more relaxed your hand, the more fluid your strokes.
The blade has two sides: the flat face and the edge. You can push paint with the flat face, scrape with the edge, and draw fine lines with the corner tip. Most of your strokes will use the flat face, so start there.
Here is the mistake everyone makes on day one, including me: pressing too hard. You are not spreading peanut butter. You want the paint to stay thick, so let the knife glide on top of the paint, not dig through it. Light pressure is the whole secret.
The Five Strokes You Need
You do not need a hundred techniques. You need five strokes, and you can learn all of them in an afternoon.
The spread. Load a blob of paint on the blade and sweep it across the canvas, tilting the knife slightly. This lays down a flat ribbon of texture — perfect for skies, walls, and backgrounds.
The dab. Touch the loaded blade straight down onto the canvas and lift. This leaves a little peak of paint. Dabs make leaves, snow, sand, and confetti. It is the most satisfying stroke in painting.
The drag. Lay the blade flat against the paint and pull it slowly across. This smooths and blends thick paint, creating soft transitions like clouds and waves.
The scrape. Use the edge of the blade to scrape paint away, revealing the canvas or the color underneath. This is how you carve light into a painting — a scrape through wet paint makes instant highlights.
The line. Use the tip or corner of the blade like a tiny spatula to draw lines, stems, and branches. Load a small amount of paint and pull it along like you are piping icing.
That is the entire toolbox. Spend one practice session just making dabs and spreads on a scrap canvas, and you will already know enough to paint something real.
Your First Textured Painting
Let us put those strokes to work with a project you can finish in one sitting: a simple sunset over water. It uses every stroke above, and it looks far harder than it is.
Step 1: Scrape a horizon. Paint the top half of the canvas with a mix of orange and yellow, spread thin with the knife.
Paint the bottom half with a deep blue. Before the paint dries, scrape a straight line across the middle with the knife edge — that is your horizon.
Step 2: Dab a sun. Load the knife with bright yellow and dab a circle of paint just above the horizon. The dabs will leave a glowing, textured sun that catches the light.
Step 3: Drag the reflection. Below the horizon, drag the knife down through the blue to blend in streaks of orange. Those vertical streaks become the sun's reflection on the water.
Step 4: Scrape the shimmer. While the paint is still wet, scrape a few thin horizontal lines through the reflection. This carves in the glittering path of light on water.
Step 5: Step back. That is the whole painting. Give it a few hours to dry — thick paint takes longer — and hang it somewhere you will see it every day.
Total time: about thirty minutes. Total cost: whatever a tube of paint costs you. Texture paste: zero dollars.
Adding Details with the Knife
Once you are comfortable with the basics, the knife becomes a detail tool too. You can paint almost anything with it if you swap the stroke to fit the subject.
For trees and bushes, use the dab stroke in greens and browns. A few dozen dabs turn a flat trunk line into a full, textured canopy. For flowers, dab bright dots of color over a green base and scrape a few thin petals around each one.
For mountains, spread dark paint with the flat face, then scrape highlights along one edge where the light hits. The scrape creates a convincing snow line with one gesture.
For ocean waves, lay down white paint with a dragging stroke, then use the tip to pull little curls of foam. It reads as spray and foam even though it is just a few careful lines.
The key insight is that the knife does not care what you paint. It is the same five strokes every time, just aimed at different subjects. Once that clicks, you will stop thinking about technique and start thinking about pictures.
Fixing Mistakes the Cheap Way
Here is the part I wish someone had told me on day one: with a palette knife, almost every mistake is free to fix.
Made a stroke you hate? Scrape it off while the paint is wet. The blade removes the paint cleanly, and you can either start that spot over or leave the scrape as a texture feature. Nobody will know it was a mistake.
Too much paint in one spot? Scrape it down with the edge and reuse the paint you removed. It is still perfectly good paint — just push it back onto your palette.
Muddy colors where you wanted clean ones? Do not try to fix it with more paint. Scrape the area clean, wait for it to dry, and lay fresh color on top. Thick paint covers mistakes beautifully.
Wet paint smearing while you work? Give the painting a break. Acrylic dries fast, so ten minutes of coffee time usually fixes the problem. If you are impatient, hit the wet spots with a hair dryer on low.
The only truly expensive mistake in knife painting is letting your paint dry out in the tube. Keep the caps tight and the paint on your palette covered with a damp paper towel, and you will waste almost nothing.
Painting on a Budget
Since we are talking about money, let me show you how cheap this hobby can be. The whole point of knife painting is getting high-impact results without a high-impact price tag.
Buy student-grade heavy body acrylics instead of artist grade. They cost half as much and behave almost identically under a knife. The texture comes from your stroke, not from expensive pigment.
Buy one or two knives, not the fancy twelve-piece set. You will use the same two knives for months. When you know exactly which shapes you reach for, buy those as individual replacements.
Buy canvas panels instead of stretched canvases. They are a fraction of the price and just as good for practice. And keep your practice pieces — the "ugly" ones make perfect test surfaces for new strokes, which means you will never waste a fresh canvas on experiments again.
Here is my favorite budget hack: a cheap spatula from the dollar store works almost as well as a palette knife.
It is a little stiffer, but for big spreads and dabs it is genuinely fine.
If you are not sure you will like knife painting, spend two dollars on a spatula before you spend ten on a proper knife.
Cleaning and Care
Knife care takes about ninety seconds, and it keeps your tools working for years. Do not skip it.
Wipe the blade on a rag between colors. Acrylic dries fast, and a dry crust on the blade will drag through your paint and ruin smooth strokes.
At the end of a session, wipe the blade with a damp cloth or rinse it under water. Acrylic cleans up with water while wet — the moment it dries, you will be scrubbing. A little dish soap handles any stubborn bits.
Do not use anything abrasive on the blade. Scratches in the metal will show up in your paint strokes, and a smooth blade is the whole point.
Store the knives with the blades pointing up or laid flat, and keep them out of reach of little hands. The edges are not razor sharp, but they are still tools, not toys.
What to Paint Next
Once the sunset clicks, the fun part begins: the whole world is a texture opportunity.
Try a field of wildflowers — a green base with dabs of pink, purple, and white. Try a winter tree — a dark trunk scraped with a snow-loaded blade. Try abstract texture art, which is just dabs and spreads in colors you love, layered until they look intentional.
Try painting from a photo of somewhere you have been. Knife painting is loose, so you are not copying the photo — you are translating it into thick color. It is liberating in a way that detail work never is.
If you want to get fancy, try mixing a little gel medium into your paint. It keeps the paint workable longer and adds body, but it is optional. The knife does the heavy lifting; the medium is just a helper.
Conclusion
That dried-up tube of texture paste taught me a lesson I use every time I paint: expensive shortcuts are usually a waste of money, and the simple tool was there all along.
A palette knife will not make you a master overnight. But it will make your paintings look textured, lively, and confident — from your very first session. It costs less than a takeout coffee, it never dries out, and it turns mistakes into features.
So scrape a horizon, dab a sun, and paint something thick and bold this weekend. Your future self — and your wallet — will thank you.
Happy painting!