Introduction
There is a particular quiet that arrives the moment a scalpel touches paper. The room goes still, your breathing slows, and your whole attention narrows to one line of cream card stock.
Papercutting is one of the few crafts that asks almost nothing of you but patience. No screens, no batteries, no waiting for glue to dry. Just paper, a sharp blade, and a steady hand you build as you go.
It is also remarkably cheap to begin. A starter kit costs less than a takeaway dinner, and the skills transfer straight to greetings cards, gift tags, and framed art.
This guide walks you through the tools, the grip, and the single technique that unlocks everything else. By the end of a weekend you can have a finished piece ready to hang.
Here is exactly what we will cover:
- The materials worth buying, and the ones to skip.
- Safe scalpel habits from your very first cut.
- The pivot cut, and why it changes everything.
- Cutting inside shapes before outside edges.
- Three ways to transfer a template.
- A first project you can finish in an afternoon.
- Framing, troubleshooting, and what to try next.
If you have ever lost an afternoon to a craft and felt calmer for it, this is that kind of craft. Let us get your hands moving.
What Papercutting Actually Is
Papercutting is an old folk art, practised for centuries across many cultures. In China, jianzhi paper cuts date back well over a thousand years, often cut from red paper for festivals and windows.
In Japan, the related tradition of kirigami folds and cuts paper, while European silhouette portraits became popular in the 1700s and 1800s. The tools differ, but the idea is identical.
You remove paper to reveal a picture, deciding with every single cut what stays and what goes.
What You Need
Gather these before you start so you are not hunting for a tool mid-cut. This is the complete beginner kit, and nothing here is expensive.
- A hobby scalpel or craft knife that takes #11 blades.
- A pack of spare #11 blades.
- A self-healing cutting mat, A4 or larger.
- Bristol board or smooth card stock, 100-200 gsm.
- A metal ruler for straight edges.
- Washi or low-tack tape to hold the work still.
- A pencil and a soft eraser.
- Glassine or a scrap card for backing.
A hobby scalpel is the tool to start with. Any craft knife that accepts standard #11 blades works, and the small triangular blade suits fine curves and tight corners.
Buy spare blades in a pack, not one at a time. You will go through them faster than you expect, and a fresh blade is the difference between a clean line and a torn one.
A self-healing cutting mat protects your table and stops the blade dulling on a hard surface. Choose one A4 or larger so there is room to rotate the paper.
Bristol board, or smooth card stock between 100 and 200 gsm, is the paper that makes this craft click. It is firm enough to hold fine bridges and smooth enough to cut cleanly.
Printer paper, at around 80 gsm, is too thin. It flops, it tears, and it cannot hold a delicate bridge without buckling under the blade.
A metal ruler is for straight cuts and for steadying the paper. A plastic ruler can be nicked by the blade and climb over it, so metal is safer.
Washi tape or low-tack tape holds the work down without leaving residue. Ordinary sticky tape can tear the card surface when you peel it off.
A pencil and a soft eraser are for marking areas to remove and for template transfer. Keep the pencil sharp so your guide marks stay fine.
Glassine is a smooth, translucent paper sold by art suppliers. Use it as a protective backing, or beneath the work while you press it flat.
Safety First
Scalpels are sharp, so the habits matter far more than any fear. Build these rules from your very first cut and they become automatic.
- Always cut away from yourself, never toward your body.
- Retract or cap the blade the moment you stop cutting.
- Change the blade when it drags instead of slicing.
- Keep your fingers behind the blade, never in front of its path.
- Never cut toward the hand that is holding the paper.
A dull blade is the most common cause of injury. When it dulls you press harder, your hand tenses, and the blade can slip sideways without warning.
Swap blades early and often. They cost very little, and the control a sharp edge gives you is worth every one of them.
Keep your holding hand a few centimetres clear of the cutting line at all times. Rotate the paper rather than reaching across the blade.
If the paper slides, tape it down instead of gripping harder. A fixed sheet is a safe sheet, and your hand can stay relaxed.
Work in good light, at a comfortable height, and never rush the last few cuts of a session. Tired hands make mistakes.
How to Hold the Scalpel
Hold the scalpel a little like a pencil, but more upright. Grip close to the blade for control, and let the handle rest back toward the heel of your palm.
Keep the blade low to the paper, at a shallow angle. You want the edge slicing along the surface, not digging down into it like a plough.
Let your arm and wrist do the work rather than your fingers. Push gently from the shoulder, and make the small steering movements from the wrist.
Keep the blade moving in one smooth pass wherever you can. Starting and stopping mid-line leaves a little ridge in the cut edge.
You can feel the difference immediately. A dragging cut sounds rough and the paper fights back. A clean cut whispers and the blade glides.
If you hear tearing or feel resistance, stop and change the blade. A good cut needs almost no downward pressure at all.
The Pivot Cut
This is the single most important technique in papercutting. Master it and corners stop being the frustrating part of a project.
Make your cut and, as you reach a corner, do not lift the blade and do not swing it sideways. Keep the tip resting in the paper.
Instead, rotate the paper itself under the blade. Turn the card with your free hand while the blade stays almost still, then carry on cutting.
This keeps the corner crisp and the line continuous. Lifting and repositioning leaves a notched or wobbly corner every single time.
Use one finger of your free hand near the cutting line to steer the card. It becomes quite natural after a page or two of practice.
Practise on a Spiral
- Draw a simple spiral on a sheet of scrap card with a pencil.
- Place a finger of your free hand near the line to steer the paper.
- Set the blade on the line and begin the cut.
- At each curve, turn the paper, not the blade.
- Work slowly outward, keeping the tip planted throughout.
Fill a whole scrap sheet with spirals before you attempt a real design. This is the drill that builds the muscle memory every other cut relies on.
Inside Cuts Before Outside Cuts
Cut the enclosed shapes first and save the outer outline for last. This keeps the piece strong while you work on the fiddly interior details.
If you cut the outside edge first, the sheet becomes floppy and fragile. The inner cuts then shift the paper around and can tear the delicate outer line.
Papercutting is really a conversation between positive and negative space. The positive is the paper you keep; the negative is the paper you remove.
Experienced cutters think about the bridges, the thin strips of paper that connect one part of the design to the next. Every bridge must be wide enough to survive handling.
Before you cut, mark each area to remove with a small pencil X. It sounds fussy, but it stops you cutting the wrong side of a line.
The X erases away later and saves an entire piece from ruin. When in doubt, mark it.
Transferring a Template
You need a guide on the card before you cut. There are three honest methods, and each suits a different situation.
Method 1: Tape the Print to the Paper
Print your template at the right size and low-tack tape it directly to the card. Cut through both layers at once, following the printed lines.
This is the easiest method for a beginner. You always see the design clearly, and the tape holds everything still while you work.
Use fresh, low-tack tape and remove it slowly at the end to avoid lifting the surface of the card.
Method 2: Shade and Trace
Turn the print over and shade the back of the design with a soft pencil. Tape it face-up on the card and trace the lines firmly.
The pressure transfers graphite onto the card, leaving a faint grey guide. It is slower, but it leaves no tape marks on your finished paper.
This method suits textured card, or any time you want a completely clean surface for framing.
Method 3: Window Tracing
Tape the print and the card to a bright window. The light shines through both and you trace the design straight onto the card.
This works well on thin card but is harder on heavy stock. Save it for bright days and simple shapes.
For a first piece, choose Method 1. It is the fastest, the most forgiving, and it teaches you to cut on a line before you worry about transfer technique.
Your First Project
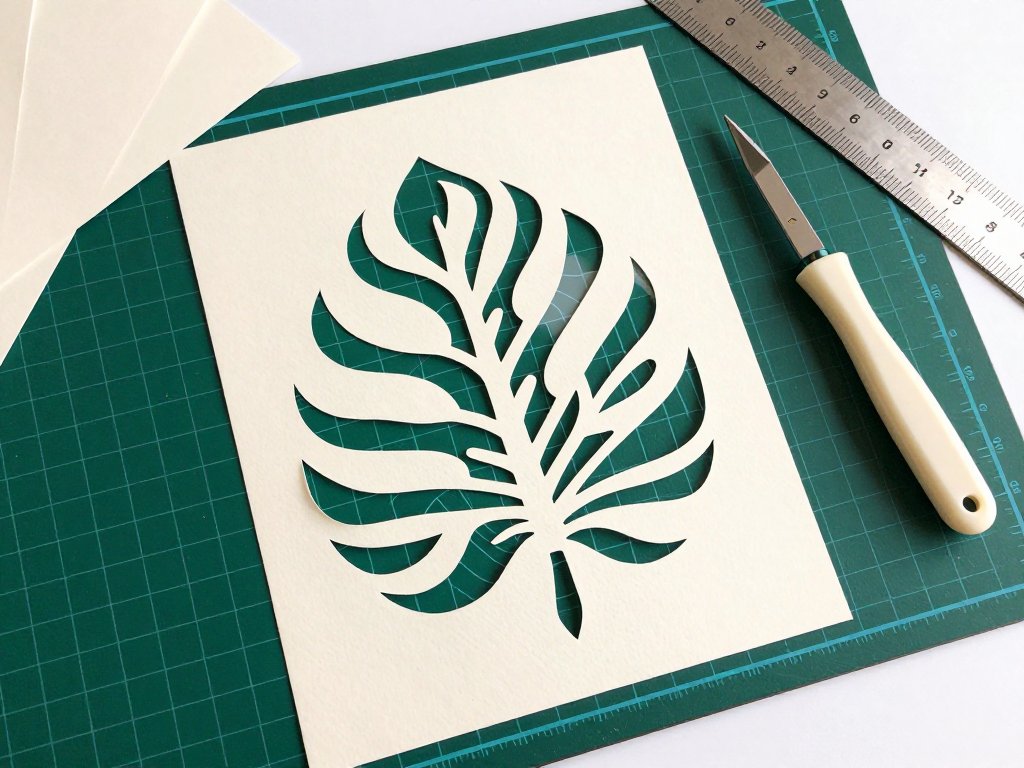
Let us cut a simple botanical leaf from a single piece of card. It is small, elegant, and finishable in one calm afternoon.
- Transfer a leaf outline onto your card, roughly 12 cm long.
- Tape the card to the cutting mat so it cannot slide.
- Mark the enclosed vein shapes with a small pencil X.
- Cut the inner vein shapes first, using the pivot cut at each turn.
- Change the blade the moment the cut starts to drag.
- Cut the outer leaf outline last, in one continuous pass.
- Lift the leaf gently and check the edges against a bright light.
Work from the centre of the leaf outward, so the piece stays supported as long as possible. Keep your free hand steering the card, never touching the blade.
A small moth is a lovely second project. Its symmetrical wings practise the same inside-then-outside order, and the antennae teach you fine, careful lines.
Do not chase perfection on the first leaf. A slightly wobbly vein is completely normal, and it will be invisible once framed against a dark card.
Finishing and Framing
Press the finished piece flat under a heavy book for an hour, or overnight. This removes any curl the cutting introduced.
Mount it on a contrasting coloured card. Lay the piece face-down, add tiny dots of glue with a pin or fine nozzle, then press it onto the backing.
Place the glue dots at the strongest points of the design, never along delicate bridges. Too much glue will buckle the paper and show through the front.
For framing, a simple off-the-shelf frame with a white mount looks clean and costs very little. Choose a backing colour that makes the cut edges sing.
If you enjoy layering and pressing paper, a kindred craft is cyanotype printing on paper, where light does the exposing instead of a blade.
Troubleshooting
Torn Corners
Torn corners almost always mean the blade lifted or swung at the turn. Keep the tip planted and rotate the paper instead of the blade.
Furry or Ragged Edges
A furry edge is the signature of a dull blade. Stop, fit a fresh #11, and the very same line will come out clean and crisp.
The Paper Shifting Mid-Cut
If the card slides, tape it down at the corners. Gripping harder only makes your hand tense and your line wander off course.
Cutting Into the Mat
A light touch keeps the blade in the paper rather than the mat. If you are scoring deep grooves, you are pressing far too hard.
A Design That Falls Apart
If the piece collapses, the connecting bridges of paper are too thin. Thicken them in the template before you cut it again.
Every one of these problems has a simple fix. Most of them come down to blade sharpness and a steady, gentle hand.
Final Thoughts
Your first papercut does not need to be perfect. The point is to finish it, frame it, and notice what you learned along the way.
Every wobbly line is information. The next piece will be steadier, and the one after that steadier still.
When you are ready, choose something slightly harder: a fern, a bird, a small repeating pattern. Add just one new challenge at a time.
What drew you to papercutting in the first place? Hold onto that feeling when a cut goes wrong.
Pour a cup of tea, put on something quiet, and cut one more line. You already have everything you need.
The quiet is waiting.