Introduction
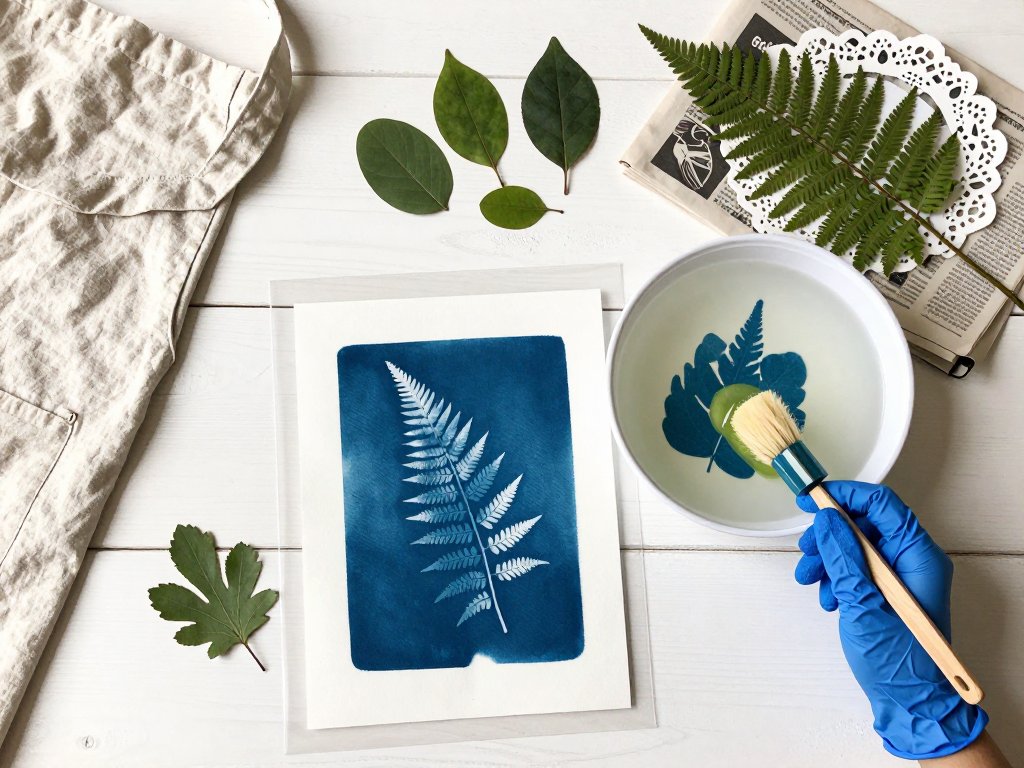
There is a particular kind of magic in laying a fern frond on a coated sheet of paper, carrying the whole thing out into the garden, and then simply waiting. No camera. No darkroom. No chemistry bench.
You press the paper under glass, let the sun work on it for a few minutes, and carry it back inside. Then you slide it into a tray of water.
And the picture arrives. Deep Prussian blue blooms around a white silhouette where the fern was resting, and you stand at the sink watching it happen with your sleeves pushed up.
Cyanotype is one of the oldest photographic crafts, and by far the most forgiving. It has been a quiet favourite of artists, engineers and patient people with a sunny windowsill for well over a century.
This is a guide to that afternoon: how the chemistry works, what to buy, how to coat and expose and rinse, and what to make once you have your first blue print in your hands.
A Process Older Than the Camera
To understand why cyanotype feels so friendly, it helps to know where it came from. This was never a machine-made process. It was invented by hand, for a practical reason.
In 1842, the English astronomer and chemist Sir John Herschel worked out that certain iron salts changed colour when struck by sunlight. He wanted a fast, reliable way to copy his own notes and calculations.
Photography was brand new then, and most processes involved silver, glass plates, and considerable expense. Herschel's method needed only two affordable iron compounds, sunlight, and water.
He gave it the name cyanotype, from the Greek word for dark blue. It was, in the end, a copying method — a way to reproduce a document quickly and cheaply.
The following year, in 1843, the botanist Anna Atkins saw something more in it. She laid British algae specimens directly onto sensitised paper and made prints of them.
She gathered those prints into Photographs of British Algae: Cyanotype Impressions, published in 1843. It is widely held to be the first book illustrated with photographs.
That is worth pausing over. Her illustrations were not drawings. They were photographic silhouettes of real plants, made in her own home, one sheet at a time.
Meanwhile, engineers and architects adopted the very same chemistry. For the better part of a century, technical drawings were reproduced as white lines on blue paper.
That is where the word blueprint comes from — the blue sheet in the draughtsman's office. The craft you are about to try is the original blueprint.
How the Blue Actually Appears
The chemistry is far simpler than the name suggests. Two iron-based compounds do all the work, and neither one is dangerous in the amounts a home crafter uses.
The first is ferric ammonium citrate. The second is potassium ferricyanide. Kits sell them as Part A and Part B, usually mixed together in equal parts just before coating.
Mixed and brushed onto paper, the solution looks a pale yellow-green. In a dim room it will sit there happily for a while. In sunlight, things change quickly.
The coating is sensitive to ultraviolet light, which is the invisible part of sunshine that tans skin. Where UV reaches the coating, the iron compounds react and lock together.
That locked form is Prussian blue, and it is no longer soluble in water. Where the light was blocked — under a leaf, a coin, a lace doily — the coating stays as it was.
Then you rinse. The unreacted coating simply dissolves away, taking the yellow tone with it and leaving the paper white underneath.
What remains is the image: deep blue where the sun struck, pale paper where your subject rested. The reaction is finished in water, which is why you can work safely at the kitchen sink.
One lovely detail to expect. A print straight from the rinse looks slightly flat and greyish. Over the next 24 hours, air oxidation deepens the blue into its full richness.
If you would rather not wait, an optional bath in very dilute hydrogen peroxide, a splash in the rinse tray, intensifies the blue immediately. It is a convenience, not a requirement.
Getting Started: Ready-Made or Coat Your Own
There are two honest routes into cyanotype, and both are perfectly respectable. The one you choose depends on whether you want convenience first or control first.
The Ready-Made Route
Pre-coated cyanotype paper arrives already sensitised and packed in a light-proof envelope. You take out a sheet in dim light, lay your objects on, expose, and rinse.
For a beginner, this is a very kind place to start. A pack of sheets costs about the price of a couple of coffees, and you can make your first blue print within an hour of opening it.
The trade-offs are real but modest. You get less control over the depth of the blue, and the coating is whatever strength the maker chose.
Pre-treated cyanotype fabric is also sold, often as tote bags, cotton squares or yardage. It behaves like the paper, and it removes the coating step entirely.
The Coat-It-Yourself Route
Buying the two-part chemistry gives you the whole craft. You mix, you coat, you choose the paper or cloth, and you decide how heavily you load the brush.
It also works out far cheaper per print, which matters the moment you stop making singles and start making sets. And it is the only way to coat your own fabric.
A Gentle Shopping List
Nothing here is specialist, and very little is expensive. Most of it is probably already in your kitchen or laundry cupboard.
- Pre-coated cyanotype paper, or the two-part chemistry plus your own paper — a few dollars for a small pack.
- A sheet of glass or acrylic from a craft shop or a spare picture frame, with bulldog clips, or a heavy book instead.
- Nitrile or latex gloves — a small box costs about ten dollars and lasts months.
- A shallow tray or dish big enough to lie your paper flat, or a clean plastic tub from the kitchen.
- A hose or sink with running water, and a peg or line for drying.
- An apron and a spread of newspapers to protect the table surface.
- If coating your own: a sponge brush or hake brush, kept only for this purpose.
Add a cardboard box or a dark drawer for drying, and a stack of pressed leaves. Total outlay for a first afternoon, if you already own a tray, is genuinely small.
Coating and Drying Your Paper
If you are starting with ready-coated sheets, skip cheerfully to the next section. This part is for anyone coating their own, and it is not difficult.
Work in a Dim Room
Sensitised paper begins reacting the moment it meets bright light. Work away from a sunny window and avoid fluorescent tubes, which give off enough UV to fog a sheet.
A room lit by an ordinary bulb, or with the blind half drawn, is fine. You will have several comfortable minutes before anything begins to shift.
Pour out equal parts of Part A and Part B, the amounts your kit instructs, into a small cup and swirl them together. Mix only what you need for one session.
Mixed solution does not keep well, so a little at a time is the sensible habit. Discard what is left over rather than saving it.
Brush On a Thin Even Coat
Lay your paper on a sheet of newspaper or a plastic mat, rough side up if it is watercolour paper. Hold it flat with one finger at the corner.
Load a sponge brush or hake brush and draw it across the paper in one direction, then back across at a right angle. Covering the sheet in two passes evens out the streaks.
The coating should look wet and slightly glossy, not puddled and not dry in patches. A thin, even coat gives a cleaner print than a heavy one.
Let the sheet rest a minute while you watch for the sheen to settle. If you see a puddle or a drip, spread it out with a dry corner of the brush.
Dry It in the Dark
Carry the coated sheet into a dark drawer, a closed cupboard, or a light-proof box. It needs to be genuinely dry before exposure, or the objects will stick.
Depending on humidity and how heavy your coat was, that takes roughly half an hour, and can be left overnight without harm.
The paper will feel dry and slightly stiff. It may look faintly yellow-green, which is exactly right. Store coated sheets flat, in the dark, until you use them.
Exposing and Rinsing
This is the part everyone remembers afterwards — the minutes of waiting, and the moment at the tap when the picture appears.
Contact Printing Under Glass
Carry a dried coated sheet outside, or to a sunny windowsill, and arrange your leaves, lace or objects on top. This is called contact printing, because everything is touching.
Lay the sheet of glass or acrylic over the arrangement and clip or weight it at the corners. Pressure keeps leaves flat and keeps wind from lifting the paper.
Curling leaves and thick seed heads let light leak underneath, which softens the edges of the silhouette. Flatter subjects give crisper shapes.
How Long to Leave It in the Sun
On a bright summer day, expect a few minutes. On a hazy day, considerably longer. Under heavy cloud, a print may need twenty minutes or more.
Rather than relying on a clock, learn to read the colour. The coating starts yellow-green, then bronzes, then turns a dull blue-grey as it exhausts itself.
When the paper around your objects looks a deep grey-blue and the exposed edges have gone pale, it is ready. Check at the two-minute mark rather than guessing.
Overhead midday sun in summer is far stronger than late afternoon light. A print made at four o'clock in October may need several times the exposure of one made at noon in July.
The Rinse
Take the sheet indoors, still out of direct sun where you can manage it, lift off your objects, and slide the paper into a tray of clean water.
Agitate it gently. The water will turn yellow almost at once as the unreacted coating washes away, and the blue will appear under your hands.
Change the water two or three times, or rinse under a running tap, until the rinse water runs clear. That usually takes a few minutes, not longer.
If you are using the optional hydrogen peroxide bath, add a small splash to a tray of water and dip the print briefly before the final rinse. The blue will jump immediately.
Then lay the print flat to dry — on newspaper, a rack, or a towel — and let it sit. The colour will deepen noticeably over the next day as it oxidises.
Dry prints flat and weigh them down with a book if they curl. A warped sheet can be pressed, and generally flattens out once fully dry.
What to Lay on Top of the Paper
Once the mechanics feel familiar, the real pleasure begins: choosing what to put on the paper. Cyanotype rewards flatness and patience above all else.
Botanical contact prints are the classic. Fern fronds, maidenhair leaves, seed heads, lace, and flat-pressed flowers all make gorgeous white silhouettes against the blue.
Press plant material flat for a day or two first. A fresh, crisp leaf curls and lets light underneath; a pressed one lies down properly and gives a sharp edge.
Photograms use everyday objects instead of plants. Coins, keys, buttons, paper clips, lace doilies, sewing scissors and small toys all read beautifully.
Feathers are quietly spectacular, especially the fine barb detail of a small garden bird's feather, though they need weighting to lie flat.
For text, write or draw on a sheet of acetate or transparency with a dark marker, then lay it on the coated paper. The light passes around your handwriting and leaves it white.
Composition matters, even in silhouette. Overlap a few ferns so one crosses another, leave generous empty blue around your subject, or arrange leaves along one edge and let the rest stay open.
Make small tiles rather than one large sheet at first. Four prints on one afternoon teach you more than a single ambitious one, and you can compare exposures side by side.
When you have a set you love, gather the prints into an album or a hand-bound journal, perhaps using Japanese stab binding to hold a season of sun prints together in one keepsake book.
Printing on Fabric
Cyanotype is not only a paper craft. The same chemistry loves cloth, and the blues it produces on cotton have a softness that paper cannot match.
Natural fibres take the coating best. Cotton, linen, silk and hemp all work well. Polyester and heavily treated synthetics mostly resist it.
Pre-wash any fabric to strip the sizing and factory finishes, then iron it flat. A wrinkled surface means an uneven coat and a patchy print.
Brush the solution on with a foam brush, or buy pre-treated fabric and skip the coating step. Work on a plastic sheet, since the solution will pass through thin cloth.
Exposure works exactly as it does on paper: arrange your plants, cover with glass, clip, and watch the colour turn. Aim for a slightly stronger bronze than on paper.
Rinse in cool water with the same gentle agitation until the water is clear. Rub the fabric lightly if the coating lingers, but never scrub at the image itself.
Once dry, press the print with a hot iron to help set it, or simply leave it to cure for a few days. Wash finished pieces inside out, in cold water, with no bleach.
Some softening with age is normal, and a little fading is part of the character of a sun print. Keep fabric pieces out of long, harsh sunlight when you can.
Good first projects: a plain tote bag with a single fern, a tea towel printed with herbs from the garden, one blue quilt square, or a lightweight scarf patterned with overlapping leaves.
Wet Cyanotype and Other Experiments
Here is where cyanotype stops being a copying process and becomes painting. The technique is sometimes called wet cyanotype, and it is delightfully loose.
The idea is simple: introduce moisture while the print is exposing. Spritz the coated sheet lightly with water before you lay your plants down, or mist over the top of the glass.
A few drops of white vinegar in the water shifts the chemistry and can push the blue toward green or purple in places. It is unpredictable, which is precisely the appeal.
Sprinkling salt onto a wet surface draws the pigment into speckles and starbursts. A little dish soap in the solution creates soft halos and bubbles where it spreads.
Some makers leave prints out in the rain. The water smears the coating and the exposure stretches out, giving ghostly, streaked images with blurred edges and drifting colour.
Treat every one of these as an experiment rather than a guaranteed result. Results vary with humidity, the paper, the strength of your coating and the sun that day.
Test new additions on scrap offcuts first, and write the date and the recipe on the back. A little notebook of what worked is worth more than any tutorial, including this one.
Toning: Warming the Blue
A finished cyanotype can be shifted away from blue altogether. This is called toning, and it is old practice rather than a modern trick.
The simplest toners are in your kitchen cupboard. Strong black tea, brewed dark and cooled, or a pot of strong coffee, both work on a fully rinsed and dried print.
Tannins in the tea and coffee bind to the iron in the print, pulling the colour toward warm browns, sepia and soft greys. The longer the soak, the deeper the shift.
Use a shallow tray, lay the print face up, and pour the liquid over. Five minutes gives a gentle warmth; an hour can turn a blue print convincingly antique.
Lift the print out, rinse it briefly in clean water, and dry it flat. The toned colour settles over the following day along with the remaining blue.
Always test on a print you do not love first. Paper type, coating strength and exposure all influence how a toner takes, and no two batches behave quite alike.
When a Print Disappoints
Almost every beginner makes a few prints they are not happy with. The good news is that the cause is nearly always one of five things, and all of them are fixable.
Washed Out or Faint
A pale, weak blue usually means underexposure. The sun did not have long enough to convert the coating, so most of it washed away at the tap.
It can also mean the coat was too thin, or that the paper was coated unevenly and the light areas simply lacked chemistry. Give the next one more sun and a fuller brush load.
Too Dark, Detail Lost
If the whole print is a solid navy slab with no white left, you have overexposed it. The light crept under your objects and converted the coating beneath them too.
Cut the time sharply, and check the print at one-minute intervals rather than waiting. Thick or curly subjects also let light underneath, so press them flatter under the glass.
Streaks and Uneven Colour
Banding, brush marks and blotches nearly always come from the coating stage. Too much solution in one place dries thicker and prints darker there.
Brush in one direction, then cross back over in the other, using a light and even pressure. Squeeze excess from the brush before you start, and never let the solution pool.
Yellow or Stained Areas
A yellow cast or a brown stain usually means the print was not rinsed thoroughly enough, leaving unreacted chemistry in the paper. It can darken over time.
Rinse longer, change the water more often, and keep going until it runs completely clear. Very old paper can also yellow on its own, so store prints away from damp.
Fading in Bright Sun
Cyanotype dislikes prolonged, direct sunlight once finished. The same light that made the print will slowly bleach it back out on a sunny wall.
Frame pieces behind UV-filtering glass, hang them away from a south-facing window, and keep your best prints in albums or boxes. Handled that way, they last for years.
Safety and Tidiness
Cyanotype is a gentle craft, but it is still chemistry, and a few sensible habits keep the afternoon pleasant from start to finish.
Wear gloves whenever you mix or brush on the solution. It will stain skin a deep brown-yellow that takes days to wear off, and it can irritate sensitive skin.
Wash your hands afterwards regardless, and avoid touching your face while you work. Keep the solutions well away from your eyes.
Do not inhale the powders if you are mixing from dry chemicals. Work in a ventilated space, away from food preparation areas, and open a window.
Keep dedicated trays, brushes and measuring cups for cyanotype only. Label them clearly so they never find their way back into the kitchen drawer.
Let young children be helpers who place the leaves and choose the shapes. They can carry the glass, arrange ferns and watch the blue appear, and they are better off not handling the chemistry itself.
Dispose of used solution responsibly, following your local guidance. Small home quantities are manageable, but never pour them onto garden beds or down a storm drain.
Spread newspaper before you start, and keep a roll of paper towel within reach. Clean up as you go, and the kitchen returns to normal within minutes of the last tray.
A Last Quiet Word
Your first cyanotype will probably not be perfect. There may be a streak, a pale corner, or a leaf that curled and blurred its own outline.
Keep it anyway. The imperfection is part of the charm, and it is a record of the afternoon you first learned how the sun and water behave together.
The second print will be better, and by the fifth you will have opinions about exposure, subjects and coating that no guide could have given you.
Start with one small project. A single sheet, a few ferns from the garden, a sunny hour and a tray of water is genuinely all this craft asks of you.
Anna Atkins made her first blue prints in dim rooms with no instruction at all, one specimen at a time. You are inheriting a very old and very generous tradition.
So pick a warm afternoon, lay a leaf on the paper, and carry it out into the light. The blue will do the rest.
