Introduction
My Barney was a scruffy golden mutt with one ear that stood at attention and one that flopped sideways. He followed me from the summer I turned seven to the winter I left for college, patient through every mood a girl can have.
Even now I can picture how he tilted his head when I said the word "walk." That tilt is why I paint pets today. A photograph holds a face, but a painting can hold the way an animal made us feel — the warmth, the steadiness, the love.
When my mother asked for something to remember Barney by, a drugstore print felt too cold. I wanted brushstrokes she could run a finger over, proof that a person made this by hand, slowly, on purpose.
Here is what surprised me most: you do not need to be a fine artist to capture a beloved pet. You need a good photo, a modest stack of supplies, and one honest afternoon. Acrylic is forgiving, fast-drying, and easy to clean up in the kitchen sink.
This guide walks you through the whole process the way I wish someone had walked me through it. By Sunday night, you can have a portrait of your own best friend drying on the kitchen table.
Why Paint Your Pet
A pet portrait is more than decoration. It is a small monument to a creature who was never once too busy for you, never once embarrassed to love you in public.
Many people paint them as memorials. After a dog or cat passes, a portrait gives grief a gentle place to land — something to talk to, to dust, and to remember the good years by instead of the hard last ones.
They make extraordinary gifts, too. A new puppy, a rescued cat, a friend's first pet of their own: a hand-painted portrait says you noticed what they love, and that you took the time to honor it.
Paintings also catch what photographs sometimes miss. The tilted head. The floppy ear mid-flap. The particular way a cat drapes herself across the sofa back, half asleep and entirely in charge.
A camera records a split second. A painting lets you choose the personality you want to keep forever.
Choosing the Reference Photo
Everything begins with the photo, and a good one does half the work for you. Take your time at this step; it will save you more struggle than any other.
Shoot in natural light, near a window or in soft outdoor shade. Harsh flash flattens a face and turns kind eyes into glassy black discs. Gentle side light is the most flattering for fur.
Get down to eye level with your pet. Photos taken from above make even the sweetest dog look small and unsure. Kneel, sit, or lie on the floor — you will feel ridiculous, and the photo will be wonderful.
Let the face fill the frame. You want the eyes, nose, and ears crisp and clear. A distant full-body shot leaves you guessing at the details that make a portrait sing.
Take a dozen photos, not one. Pets move; that is their job. The tenth frame often holds the personality the first nine missed entirely.
Then choose the image that makes you smile the moment you see it. That is the one to paint. Your instincts know more than your perfectionism does.
Gathering Your Supplies
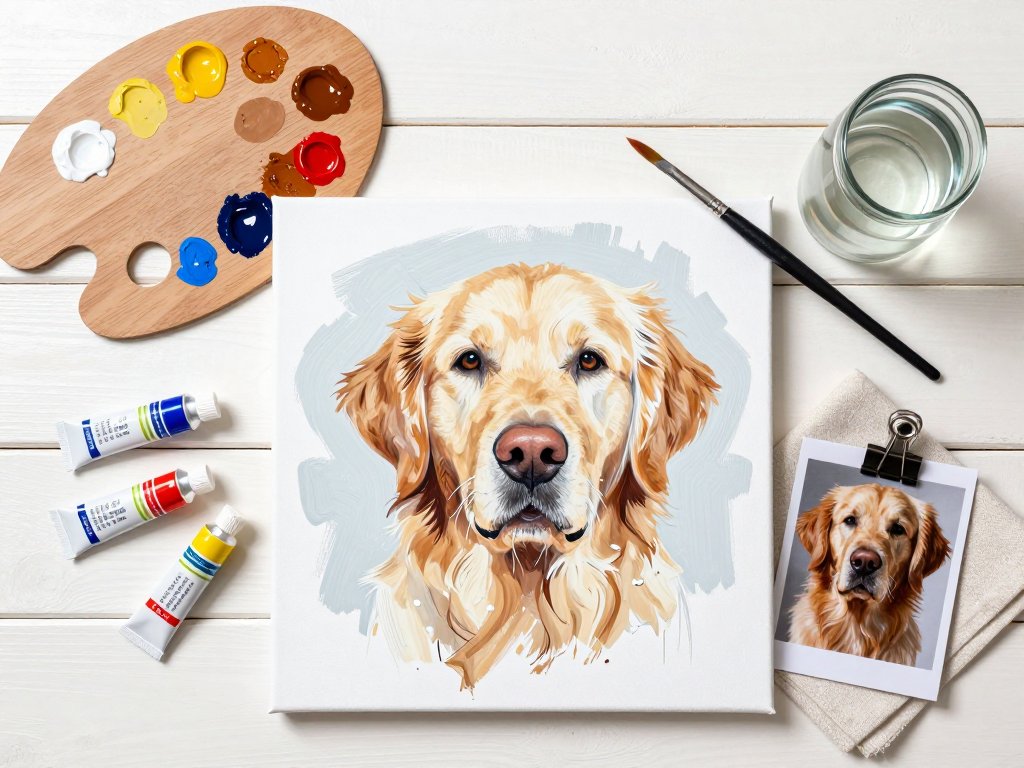
Acrylic is the kindest medium for a beginner. It dries fast, cleans up with plain water, and forgives mistakes — you simply paint over them. Here is the short list you need.
- A canvas or canvas panel, 8 by 10 or 11 by 14 inches. Heavy watercolor paper works beautifully for practice pieces.
- Flat brushes in sizes 4 and 8 for fur and shapes, plus a round brush in size 2 for eyes, whiskers, and fine details.
- Acrylic paints: titanium white, yellow ochre, burnt sienna, burnt umber, ultramarine blue, and a small tube of alizarin crimson for noses and tongues.
- A palette — a disposable paper one or an old dinner plate — plus a water cup and a clean rag.
You do not need forty colors. Every coat on earth, from pale cream to coal black, can be mixed from this short list. A limited palette also keeps your colors clean, which matters more than you would think.
Skip the fancy brush sets. Two flats and one round are enough for a first portrait; add a filbert later if you fall in love with the process.
Framing can stay budget-friendly. Craft stores sell simple frames for very little, or you can paint the canvas edges and hang it bare — a wrapped canvas needs no frame at all.
Sketching Before You Paint
Before any paint touches the canvas, make a light pencil sketch. This is your map; painting is the journey, and a good map keeps you from getting lost halfway through.
The grid method is the most dependable. Draw a grid of equal squares over your photo, draw a matching grid lightly on your canvas, and copy what you see square by square.
Or work with simple shapes. A dog's head is a circle with a muzzle wedge; a cat's is a circle with triangle ears. Sketch the big shapes first, then refine them into a face.
Place the eyes early and get them right before anything else. If the eyes sit correctly, the rest of the face will fall into place around them.
Keep every line light — just enough to guide your brush. Heavy pencil grooves show through thin paint and are hard to cover later.
Step back often and check the proportions. Is the nose drifting low? Is one ear higher than the other? Fix it now in pencil, while it costs nothing, rather than later in paint.
Painting Order: Eyes First, Then Nose, Then Fur
Here is the order that works for me, and it starts with the eyes. The eyes are the life of any portrait, animal or human; everything else can be slightly off and still be forgiven.
Mix a dark version of the eye color and lay in the whole eye shape first. Then add the lighter tones around it, building the color slowly.
Save the darkest spot for last. And then comes the catchlight — the tiny white glint where light bounces off the eye. It is only a dot of paint, but it is the dot that makes a painted pet look awake, alert, and looking back at you.
The nose comes next, in soft layers. Dog and cat noses are rarely flat black; they are dark gray or brown with a warm highlight on top where the light catches the leather.
Then begin the fur, stroking in the direction it grows — down the sides of the face, outward from the nose, up between the ears. Fur that lies against the grain looks wrong no matter how carefully it is painted.
Do not try to paint the whole animal in one pass. Build the portrait in three stages, like a sandwich, and let each layer dry before the next.
First comes the underpainting. Thin your paint with a little water and lay in only the darkest shapes: the shadow under the chin, the deep ear, the corner of the eye. This stage is supposed to look rough.
When that dries, add the mid tones — the true coat color you see in the photograph, laid in loosely over the shadows.
Finish with the lights: the pale fur on the muzzle, the sunlit patch on the forehead, the bright edge of an ear. Dark to mid to light. It sounds simple because it is.
Fur Without the Fuss
Fur is where most beginners panic, so let me reassure you: you do not need to paint every hair. Realism in fur is suggestion, not inventory.
Paint in clumps and layers, the way fur actually grows. Use the flat brush on its side for broad areas and short, firm strokes where the coat is dense.
If your muse is a cat, blend a little more — cat coats are sleek, and long individual strokes make them look shaggy. Dogs, especially scruffy ones, can take far more texture.
Save the fine hairs for the very end. Once the fur is dry, load a nearly dry brush with a lighter color and flick a few single hairs over the top. This dry-brush trick is magic for catching light.
Then resist the urge to add more. Overworked fur turns to mush. Stop while the paint still looks fresh and lively, even if you feel you could keep going. Trust the pause.
Keeping the Background Simple
The background is the frame for your pet's face, not a second painting. Keep it quiet, and the pet stays the star of the show.
A soft wash of color works beautifully. Thin the paint, sweep it on loosely, and let it dry with a few uneven edges — acrylic rewards that relaxed touch.
Or merely suggest a setting. A few blurred strokes of gray-green for grass, a warm amber shape behind the head for a favorite chair. Hints are enough.
You can also paint the background first, before the face, and let your pet float over it. Many portrait painters do this because it means never painting right up to a finished eye.
And if backgrounds frighten you entirely, leave the canvas white around the sketch. A clean, empty background can look wonderfully modern, like a pencil drawing in a gallery.
Common Struggles and Fixes
Every beginner meets the same few problems. Here is how to walk calmly past each one.
Muddy colors come from overmixing or from laying wet paint into wet paint. Limit your palette, mix simply, and let each layer dry before you touch it again.
Overworked fur deserves a second warning. When the coat starts to look like paste, put the brush down and make a cup of tea. Fresh eyes will tell you when to stop.
A stiff or "wrong" expression almost always means one small thing is off — an ear angle, an eye height, a mouth corner. Compare your canvas with the photo, correct that single spot, and the whole face relaxes.
Paint applied too thickly in the early stages becomes a lumpy mess. Thin your first passes with water or a drop of acrylic medium, and save the thick, buttery paint for the final highlights.
Finishing, Framing, and Giving
When the last stroke is done, give the painting a full day to cure. Acrylic looks wet for a long time after it has stopped being tacky, so test a corner before you touch it.
Varnish is optional but lovely. A soft gloss or satin varnish deepens the colors, evens out the surface, and protects the portrait from dust and sunlight.
Sign your name in the corner — small, dark, with the round brush and a steady hand. You earned that signature, and future you will be glad it is there.
Then comes the best part: framing and giving. Choose a simple frame in a color pulled from the painting so it settles happily into any room.
For a memorial portrait, wrap it and give it to the person who misses that animal most. Watch them open it. That moment is worth every muddy color you ever mixed.
A portrait of a living pet makes a wonderful birthday or holiday gift for a child, too — a record of the friend they are growing up with.
A Portrait of Barney
The first portrait I ever finished was Barney, painted from that old photograph with the head tilt and the uneven ears.
I worked on it for two patient weekends, and I cried a little when I signed my name in the corner. My mother cried more when I gave it to her, wrapped in brown paper like a loaf of bread.
She hung it where she could see it from her chair. Visitors ask about the dog in the painting, and she tells them his whole story — every walk, every summer, every silly trick.
That is what a portrait does. It keeps the story alive, and it keeps the love within reach.
Your dog or cat has a story too. The tilted head, the floppy ear, the way they flop at your feet while you read — all of it is waiting in your camera roll right now.
Clear the table, set out your paints, and give yourself one weekend. You do not need to be an artist. You only need to love somebody with four paws and be willing to look at them closely for a few hours.
Barney would have sat for me all afternoon, patient as ever, one ear up and one ear down. Your pet will sit too, mostly. And when you sign your name beneath that familiar face, you will understand why I still do this — one beloved animal at a time.