Introduction
If you've scrolled through crafting social media lately, you've seen them: stunning collages made entirely of tiny paper shapes — circles, hearts, stars, and leaves — arranged into words, patterns, and scenes that glow with color and intention.
This is punch card art, and it is quickly becoming the year's most addictive paper craft.
What makes punch card art so special? It combines the rhythmic, satisfying action of punching paper with the deeper purpose of a vision board.
Instead of cutting and gluing magazine clippings, you punch hundreds — sometimes thousands — of small paper discs and arrange them into a cohesive, inspiring piece.
The result is a tactile, dimensional artwork that feels both meditative and meaningful.
I'm Sophie Bennett, and I love a craft that comes with a clear supply list and a satisfying process.
Punch card art delivers on both fronts. Whether you want to manifest a career change, dream about your next vacation, or simply create something beautiful for your wall, this guide will walk you through everything you need to get started.
What Is Punch Card Art?
Punch card art is exactly what it sounds like: art made from paper shapes created with craft punches.
Also called paper punch art or punch collage, this technique uses shaped hole punches — typically ¼ inch to 2 inches in diameter — to stamp out consistent shapes from colorful paper.
The crafter then arranges those shapes into a larger composition, adhering them to a canvas, board, or heavy paper backing.
The "card" in punch card art comes from the original craft of using paper punches to decorate greeting cards.
But the modern version has evolved far beyond cardmaking. Today's punch card artists create large-scale wall art, intricate word collages, and abstract color fields that resemble pointillist paintings — all made entirely from punched paper pieces.
What sets punch card art apart from traditional collage is the uniformity of the elements.
Because each piece is the same shape (or a small family of shapes), the artwork takes on a rhythmic, patterned quality.
The eye moves across the surface following the shapes, creating a visual flow that feels orderly and intentional.
This is part of why the craft has become so popular for vision boards — the structured repetition mirrors the focused repetition of a daily affirmation or goal.
Why Punch Card Art Makes the Perfect Vision Board
Vision boards have been around for decades, and for good reason. When you place images of your goals where you see them daily, your brain begins to recognize and act on opportunities that align with those goals.
But traditional vision boards — made from magazine clippings, printed photos, and stickers — can feel cluttered or disconnected.
Punch card art offers a fresh alternative.
Here is why punch card vision boards work so well:
Limited palette creates focus. When you choose just three to five paper colors for your punch card vision board, you are forced to distill your goals down to their essence.
That career change might be represented by deep blue and gold. Your travel dreams might be teal, sand, and coral.
The limited palette becomes a visual mantra.
Repetition is meditative. Punching paper is surprisingly calming. The pop of the punch, the collection of shapes, the slow accumulation of a pile of paper circles — it quiets the mind in a way that scrolling through Pinterest never will. The process itself becomes part of your goal-setting ritual.
The texture is genuinely beautiful. Let's be honest: many vision boards end up looking a little chaotic.
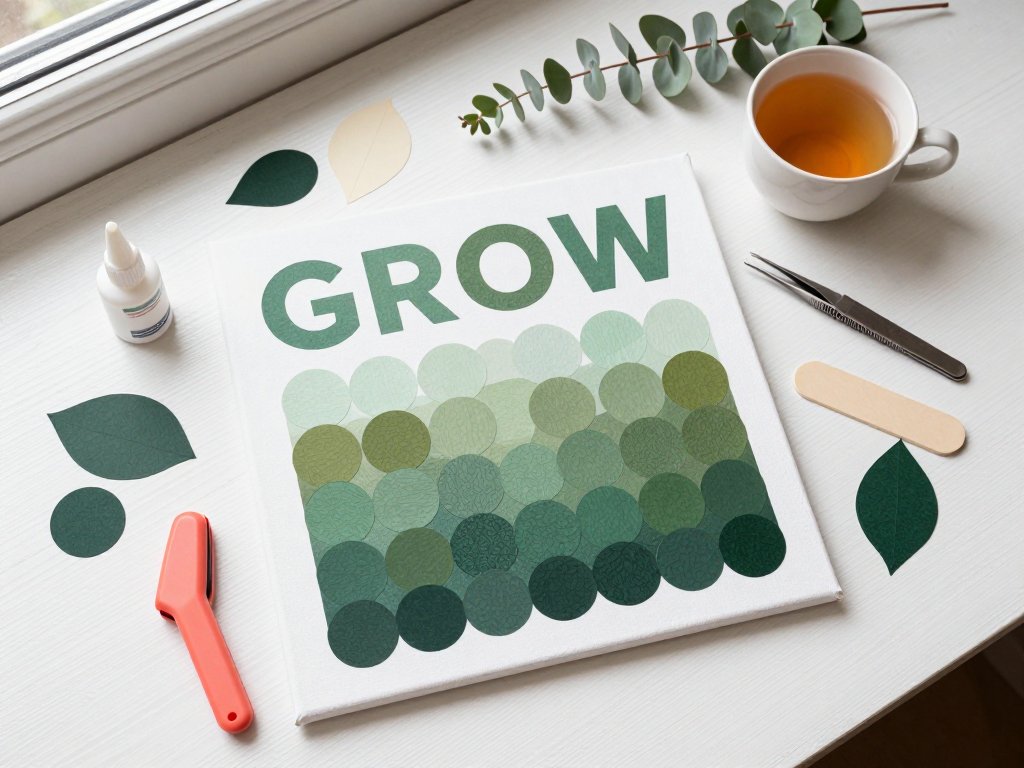
Punch card art, by contrast, has a clean, modern, gallery-ready aesthetic. A punch card vision board of concentric circles spelling out "GROW" in ombré greens will look beautiful in your home office or studio, not hidden away in a journal.
It is deeply personal. Because you are creating every single element by hand, the finished piece carries your energy and attention. There is something powerful about looking at a vision board where every dot was punched and placed by you. It reinforces your commitment to the goals it represents.
Essential Supplies for Punch Card Art
One of the best things about punch card art is that the supply list is short and the materials are accessible. Here is exactly what you need to begin.
Shaped Paper Punches. These are your most important tools. Start with circle punches in a range of sizes — ½ inch, ¾ inch, and 1 inch are the most versatile.
Add a heart punch, a star punch, and a leaf or teardrop punch for variety.
Look for punches with a comfortable grip and a clear alignment window so you can see exactly where you are punching.
Brands like Fiskars, Martha Stewart Crafts, and EK Tools are reliable choices for beginners. If you find yourself loving the craft, a small ¼ inch circle punch is invaluable for fine detail work and filling gaps.
Cardstock and Scrapbook Paper. Standard 65 lb to 80 lb cardstock punches cleanly and holds its shape.
Scrapbook paper works beautifully too and offers patterns, metallics, and textures that plain cardstock cannot match.
Build a small stash of coordinating colors — think in palettes rather than individual sheets.
For a single 12" x 12" vision board, you will use about five to seven different paper colors.
Choose one or two neutrals (white, cream, light gray), two to three main colors that represent your theme, and one bold accent color.
Canvas Boards or Frames. Your backing surface can be a stretched canvas, a canvas panel, a foam core board, or even a thick piece of watercolor paper.
I recommend a 10" x 10" or 12" x 12" stretched canvas for your first project — it is large enough to work with comfortably but small enough to finish in an afternoon.
The slight texture of canvas adds a lovely contrast to the smooth paper shapes.
Adhesive. A good glue matters. I use a combination of a fine-tip glue pen for precision placement and a glue stick for covering larger areas where I will apply multiple shapes.
Aleene's Tacky Glue in a needle-tip bottle is excellent for detailed work. Avoid wet school glue, which will warp your paper shapes.
Washi Tape. Washi tape serves two purposes in punch card art. First, it is perfect for masking off sections of your canvas while you work on one area at a time.
Second, a thin strip of washi tape along the edge of your canvas adds a polished, finished look.
Choose a tape that complements your paper palette.
Tweezers and a Bone Folder. A pair of fine-tipped tweezers makes placing tiny punched shapes significantly easier. A bone folder (or the back of a spoon) helps you press shapes flat after gluing, ensuring they adhere fully without air bubbles.
That is the complete list. If you have a basic paper crafting kit at home, you likely already own half of these supplies.
Choosing Your Vision Board Theme and Word
Before you punch a single shape, decide what your vision board will say or represent. The best punch card vision boards are built around a single word, a short phrase, or a symbolic image. Here are the most popular themes to consider.
Word of the Year. This is my favorite approach for beginners. Choose one word that encapsulates what you want more of in the coming year.
"GROW," "RISE," "FLOW," "PEACE," "HOME," "CREATE," "BRAVE," "JOY," and "KIND" are all excellent choices. A single word is easy to sketch out on your canvas and fill with punched shapes.
The simplicity also makes the finished piece more striking.
Career Goals. Represent your professional ambitions with a palette of power colors — navy, gold, white, and a touch of emerald. Your word might be "LEAD," "BUILD," "LAUNCH," or "ELEVATE." You can also create an abstract composition of ascending circles that visually suggests growth and upward movement.
Travel Dreams. This is where punch card art truly shines. Choose a palette inspired by a specific destination — turquoise and sand for Greece, lavender and gold for Provence, cherry blossom pink and sky blue for Japan.
Arrange your shapes into a loose map shape, a compass, or simply the name of your dream destination.
Every time you look at the board, you will feel the pull of that place.
Family Values. Create a piece that represents what matters most to your family. Punch shapes in warm, loving colors — soft pink, warm gold, cream, and sage green.
The word "TOGETHER," "FAMILY," "HOME," or "GRATITUDE" works beautifully. This is a wonderful project to involve children in, since punching shapes is easy for small hands with supervision.
Abstract Intention. If words are not your thing, create a purely abstract vision board. Choose colors that represent the feeling you want to cultivate — calm, energy, creativity, abundance — and arrange your shapes in a freeform flow.
Concentric circles radiating outward, a gradient from light to dark, or a spiral pattern all communicate intention without spelling it out.
Ask yourself: What do I want to feel when I look at this board? What goal keeps appearing in my thoughts? What word, if I saw it every morning, would change my day? Let the answers guide your theme.
Step-by-Step Guide to Making Your First Punch Card Vision Board
Ready to create? Follow these steps for a smooth, enjoyable first project.
Step 1: Sketch Your Layout. Lightly pencil your word, phrase, or design onto your canvas in a loose block letter style.
Do not worry about perfection — the punched shapes will define the edges. You just need a guide for placement.
If you are creating an abstract design, sketch the general flow of shapes.
Step 2: Choose and Prepare Your Paper Palette. Lay out your cardstock and scrapbook paper in your chosen colors.
Punch a few test shapes from each to see how they look together. Hold them against your canvas.
Adjust until the combination feels right. Stack your papers near your workspace in the order you plan to use them.
Step 3: Punch, Punch, Punch. This is the meditative part. Start punching shapes from your papers.
Punch more than you think you will need — leftover shapes can always go into a jar for future projects.
Aim for a mix of sizes: plenty of ½ inch circles for filling letters, some ¾ inch and 1 inch circles for emphasis, and a scattering of hearts or stars for accents.
I like to punch all my shapes at once so I can focus entirely on composition afterward.
Put on a podcast or an audiobook and settle in.
Step 4: Arrange Before Gluing. Lay out your punched shapes on the canvas without adhesive first.
Start with the outer edges of your letters or shapes, then fill inward. Step back frequently to see how the arrangement looks from a distance.
This dry layout phase is where you can make adjustments — adding more of one color, shifting shapes to fill gaps, swapping sizes for visual balance.
Do not rush this step.
Step 5: Glue in Sections. Once you are happy with the arrangement, glue the pieces down in small sections.
Work from the top of the canvas downward to avoid smudging shapes you have already placed.
Use your fine-tip glue pen for individual shapes and your glue stick for areas where shapes are tightly packed.
Press each shape flat with your bone folder or the back of a spoon. Take breaks — this part requires patience but the result is worth it.
Step 6: Fill Gaps and Add Details. After the main composition is glued, look for gaps.
Tiny spaces between circles can be filled with your smallest punch size — a ¼ inch circle punch is perfect for this.
Add a few accent shapes (hearts, stars) in contrasting colors to give the piece depth and visual interest.
A single gold star in a sea of navy circles will draw the eye beautifully.
Step 7: Finish and Frame. Once all shapes are adhered and the glue is completely dry, add a strip of coordinating washi tape along the edges of your canvas for a clean, finished border.
If you used a canvas board, it is ready to hang as is. If you used a paper backing, frame it behind glass or in a deep-set frame that accommodates the dimensional surface.
Display your punch card vision board somewhere you will see it every day — above your desk, beside your mirror, or on your bedside table.
Techniques to Elevate Your Punch Card Art
Once you have mastered the basics, try these techniques to take your punch card art to the next level.
Ombré Blending. Create a gradient effect by arranging punched shapes from lightest to darkest within a color family.
Start with pale pink circles at the top of your letters, transition to medium rose in the middle, and finish with deep burgundy at the bottom.
The gradual color shift adds a professional, polished look.
Shape Mixing. Do not limit yourself to circles. Use leaf punches to create texture inside large letters, star punches for accent points, and heart punches for emotional emphasis.
The contrast between shape types adds visual richness. A word like "GROW" might use circles for the main fill and leaf shapes scattered throughout as accents — a subtle nod to the word's meaning.
Negative Space Punching. Instead of filling a letter outline with shapes, punch the letter itself out of a larger piece of paper and fill the background instead.
This creates a stunning negative-space effect where the word appears in the color of your canvas, surrounded by a field of punched shapes.
This technique works especially well with metallic or dark canvas backgrounds.
Layered Shapes. Add dimension by layering smaller shapes on top of larger ones. A 1 inch circle base topped with a ½ inch circle in a contrasting color creates a bullseye effect that adds depth to your composition.
Layer a heart punch on top of a slightly larger circle for a floating effect.
Mixed Media Accents. Introduce subtle mixed media elements without overwhelming the punch card aesthetic. A light watercolor wash on your canvas before you begin adds a dreamy background.
A few metallic paint splatters after the shapes are glued adds sparkle. Gold foil accents can be punched alongside your paper shapes for occasional gleaming highlights.
Displaying and Gifting Your Punch Card Vision Boards
Punch card art rewards display. Because the pieces are dimensional with real paper textures and subtle shadows, they change throughout the day as light hits them from different angles. Here are my favorite ways to show them off.
Gallery Wall Clusters. Create a series of small punch card boards — three 6" x 6" canvases with single words like "DREAM," "PLAN," "DO" — and hang them in a row. The repetition of format with variation in color and word creates a striking gallery wall that tells a story.
Desk Easels. A 5" x 7" or 8" x 10" punch card board on a small tabletop easel belongs on your desk. It keeps your goals visible without taking up wall space and is easy to move when you need a fresh perspective.
Gift Giving. Punch card vision boards make deeply personal gifts. Create one for a friend starting a new job using their favorite colors and a word like "THRIVE." Make a family values board for a loved one's home with warm, welcoming tones.
The time and care that goes into each punched shape communicates more than any store-bought present ever could.
Seasonal Rotation. Because punch card boards are relatively quick to make, consider creating one for each season or quarter. A spring board with floral colors and the word "BLOOM." A fall board with warm ambers and "HARVEST." Rotating your vision board keeps your goals fresh and your creative practice active.
Final Thoughts
Punch card art is more than a craft trend — it is a practice in intention, patience, and creative focus.
The rhythm of punching, the satisfaction of arranging, and the pride of stepping back to see a finished piece that represents something meaningful to you — that is a rewarding experience no algorithm can replicate.
Whether you create a single word of the year board, a travel dream collage, or an abstract intention piece, the process will change how you think about both paper crafting and goal setting.
You are not just making art. You are making a visual commitment to yourself, one punched circle at a time.
Here is your starting checklist: choose a word, pick a palette, gather your punches, and begin.
The hardest part is punching that first shape. After that, the rhythm takes over, and before you know it, you will have created something beautiful that reminds you every single day of where you are going.
Happy punching, and may your vision board bring your goals to life.