Introduction
There is an oak leaf tucked into the back of my oldest sketchbook. It is no bigger than my palm, and it was not drawn with lines at all — only dots.
I made it one cold February while my youngest napped. I had one fine liner, a mug of cold coffee, and forty quiet minutes before the monitor crackled.
The drawing took four sittings. Looking at it now, I cannot see a single dot. I only see the leaf.
That is what stippling does. You place one small ink dot at a time, and somehow a shadow appears where you never drew one.
Stippling is the practice of building light and dark from hundreds of tiny pen dots. Each mark is almost nothing. Together they become volume, weight, and softness.
If you can hold a pen steady for twenty minutes and count to ten without losing your place, you can learn this. Below is what you need, two practice drills, and a full beginner project.
What Stippling Actually Is
Stippling is dots — hundreds, sometimes thousands — placed on the page with a fine-tipped pen instead of drawn as lines.
Where dots sit close together, the paper reads as dark. Where they sit far apart, it reads as light. Your eye does the blending for you.
Hatching is the line version of the same idea. You draw parallel lines to darken an area, and the closer the lines sit, the deeper the value.
Cross-hatching lays a second set of lines at an angle over the first. It builds dark quickly, but it leaves a visible direction on the page.
Stippling leaves no direction at all. Its texture is even and grainy whichever way you turn it, which makes it lovely for soft, round subjects.
Fur, moss, stone, feathers, the velvety cap of a mushroom — dots handle all of these more gently than lines can.
Stippling is also forgiving. A dot placed badly disappears into the crowd. A wobbly line announces itself to everyone in the room.
What You Need
You need very little, which is part of the charm. Everything here fits in a coat pocket or a bag by the door.
- A 0.1 fine liner. The finest dots, for highlights, delicate gradients, and small detail work.
- A 0.3 fine liner. Your everyday workhorse. Most of a beginner drawing gets built with this one.
- A 0.5 fine liner. Lays a heavier dot, covers dark areas faster, and sits nicely beneath a 0.3 layer.
- Smooth Bristol board. Its dense, plate-smooth surface lets a 0.1 land exactly where you aim it.
- Or hot-press watercolor paper. Hot-press is smooth. Cold-press is textured and will fight your fine dots.
- A 2H or H pencil and a soft eraser. For the faint guide circle or outline you erase at the end.
- Scrap paper. Test each pen on it, and rest your hand on it so you never smudge the drawing.
Paper texture matters more than you would guess. A rough sheet grabs the nib and pulls dots into commas and blobs.
Smooth paper lets the tip touch lightly, and a light touch is exactly how a tiny dot happens.
Test each pen on your scrap sheet before it touches the drawing. Lay down a row of a dozen dots and see how small your hand can go.
If your pen skips, the nib is lifting away too fast. Slow down until every dot is a full, round, confident touch.
How Dots Become Value
Value means how light or dark something is. In stippling you control it with spacing rather than pressure.
Pressing harder does not make a finer dot — it makes a bigger, wetter one. Keep your touch light and let density do the work.
Think in five values: highlight, light, mid-tone, dark, and darkest dark. Give each one a job before you start.
Highlight is untouched paper. Light is widely spaced dots you could still count. Mid-tone sits about a pen-width apart. Dark nearly touches. Darkest dark is layered until the white gives up.
This is the same thinking behind light and shadow techniques in any medium. Dots are simply the marks you use to get there.
Here is the part beginners find strange: in the darkest area you almost never leave pure white dots showing.
Leaving clean specks in a deep shadow makes it glitter instead of darken. Close the gaps with a smaller pen until the shadow reads as one mass.
The highlight, though, stays untouched. Reserve your brightest paper and defend it — no dots there at all, ever.
One caution: aim for consistency of dot size, not perfection. Dots slightly varied in size read as texture rather than as mistakes.
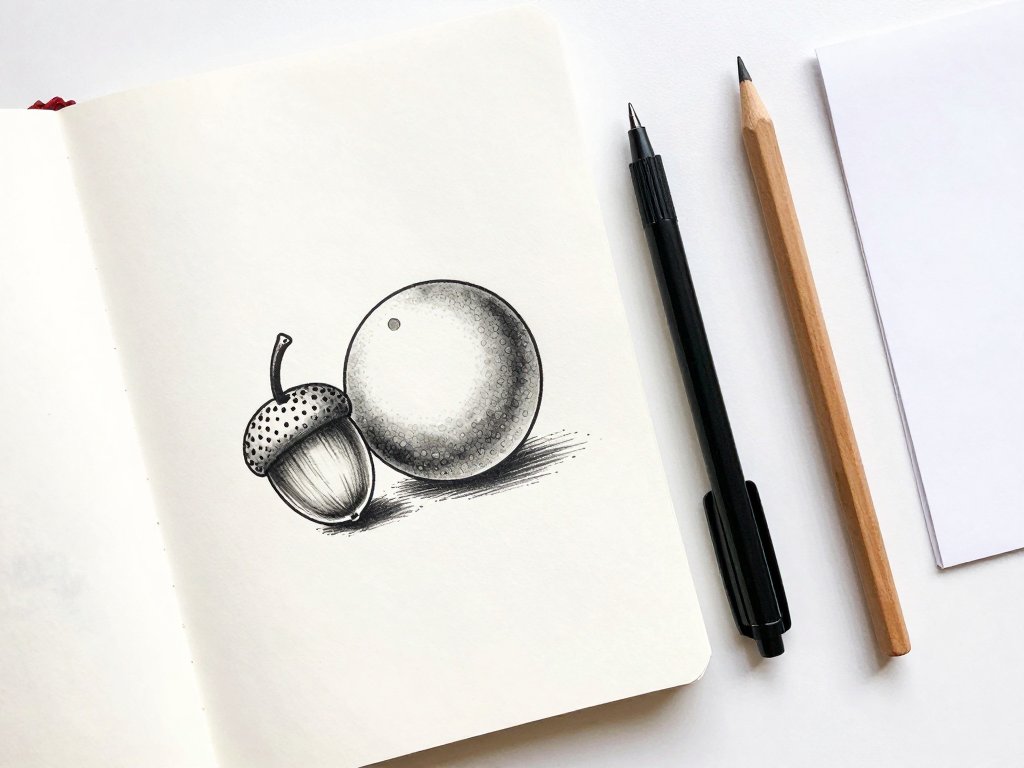
Practice Drill 1: The Stippled Sphere
A sphere is the kindest first subject, because its values follow one simple rule. Light comes from one direction and wraps around the form.
Draw a circle with your hard pencil, then set your light source at the upper left. Everything else follows from that one assumption.
Start at the lower right, in the shadow. That is the darkest zone, and it gives your eye an anchor to work back from.
Work with the 0.3 first, dots about a pen-width apart. Do not fill anything in — just place one light layer across the whole shadow side.
Then go over it again with the same pen, dotting between the existing dots. A third layer with the 0.1 will push it darker still.
Move left and upward with each pass, and let the dots thin out naturally. Density falls away as you approach the light.
Watch the terminator line — the boundary between the lit side and the shadowed side. Blur it. A hard edge there makes the sphere look like a flat disc.
Under the sphere, add a small soft stippled shadow on the ground so it feels as if it rests on something real.
Leave the upper-left quarter completely bare. Then step back and squint. If it reads round, you are finished.
Practice Drill 2: A Five-Value Gradient Bar
Next, draw a rectangle about four inches wide and one inch tall. Divide it into five equal sections with faint pencil lines.
Section one gets no dots at all. Section five gets your densest, darkest mass. The three in between must step evenly across the middle.
Fill section two with widely spaced 0.1 dots — light enough that you could still count them if you tried.
Section three sits a pen-width apart, section four closer, and section five is layered twice with the 0.3 and once more with the 0.1.
Keep the edges between sections soft. Sharp boundaries are the fastest way to make a gradient look like a stripe.
Then comes the real work: look at the bar from across the room. Any section that jumps too fast is the one to fix.
Add dots to the lighter side of the jump and never try to lighten the darker side. You cannot erase ink.
Make three of these bars on scrap paper. By the third, your hand will know the spacing without your eyes checking it.
Project: A Small Stippled Acorn
An acorn is a perfect first finished piece: a textured cap, a smooth body, and a natural cast shadow. It fits on a three-inch square.
- Sketch the outline lightly. With your 2H pencil, draw the acorn about two inches tall — a rounded body, a domed cap, and a short stem. Keep the lines faint enough to vanish under dots.
- Plan the values. Decide where the light comes from, say the upper right. Pencil a light line where the terminator falls across the body.
- Lay the first layer on the body. With the 0.3, dot the shadow side evenly at about a pen-width spacing. Leave the light side, the cap, and the stem alone.
- Build the second and third layers. Return with the 0.3, then the 0.1, dotting into the gaps. Stop when the deepest curve of the body reaches your fourth value.
- Work the cast shadow. With the 0.5, lay a looser field of dots to the lower left, then tighten the part closest to the acorn with the 0.3. This grounds the drawing.
- Stipple the cap. The cap is rough, so use the 0.5 in a slightly uneven rhythm with small clusters. Leave a thin band of bare paper along its upper right edge as a highlight.
- Detail and finish. Sharpen the stem with the 0.1, deepen any spot that still looks flat, then erase every pencil line. Sign the corner and date it.
Total working time for a beginner runs about two to three hours, best spread across two or three sittings.
If the body looks chalky halfway through, you are being too cautious. One more patient layer with the 0.1 will settle it.
Texture Techniques
Once value makes sense, texture is only a change in how you place the same dots. Four variations cover most subjects you will want to draw.
Rough Tree Bark
Bark is vertical and chunky. Use the 0.5 in short broken columns, letting each column run with the direction of the trunk.
Leave irregular vertical gaps between the columns. Those pale streaks are what makes bark look like ridges catching the light.
Soft Fur
Fur reads best when the dots follow the flow of hair rather than sitting on an even grid. Start light with the 0.1 and build density in the direction of growth.
Let the outer edge of the body taper into scattered dots instead of stopping. That fading edge is what makes fur look soft rather than carved.
Leaf Veins
For a leaf, keep the veins as untouched paper. Stipple the blade around them, darker where the surface curves away from the light.
Work in small, tight patches rather than covering the whole leaf evenly. That unevenness is what real leaves actually look like.
The Illusion of Fuzzy Edges
A soft edge is simply an edge where the dots get looser and more scattered as they approach the outside.
Dense at the body, sparse at the rim, with a few stray dots just beyond it. Squint, and the shape looks furred instead of cut out with scissors.
Pen Technique and Steady Hand Habits
Most stippling problems are hand problems rather than eye problems, so a few habits are worth building early.
Rest the heel of your hand on a scrap sheet laid over the drawing. It keeps skin oils off the paper and keeps your wrist from smearing wet ink.
Rotate the page instead of contorting your wrist. Bring each area around to a comfortable angle and let the paper move instead of your arm.
Never drag through wet ink. Fine liners take a moment to dry, especially the 0.5, so work left to right and top to bottom where you can.
Always work from light to dark. Ink travels in one direction only, and an area you darkened too early is finished.
Keep your touch light. The dot should be a tap, not a press — pressing opens the nib and leaves a comma-shaped mark.
And never rush the darkest area. That is where impatience shows up, and where a promising drawing turns muddy.
Common Mistakes
Almost every beginner stippling problem comes from one of four habits, and all four are easy to correct.
- Dots that are too large or comma-shaped. The pen is being pressed or dragged. Slow down and tap the tip vertically.
- Uniform spacing. An even grid of dots reads flat because the eye sees pattern instead of shadow. Vary the spacing deliberately.
- Overworking an area. Past a certain point, more dots turn a shadow grey and lifeless. Step back and stop.
- Starting with the darks. Your darkest value should be the last thing you place, not the first.
There is a quieter fifth mistake: switching pens constantly. Pick a pen, commit to one layer, and finish it before changing tools.
Each pen leaves its own dot size, and mixing them randomly makes the texture look noisy instead of smooth.
Pacing and Patience
Stippling rewards short sittings. Twenty minutes is plenty, and much more than that usually costs you accuracy.
Rest your eyes every so often. Look out a window at something far away, then come back — value problems will jump out at you instantly.
This is genuinely a nap-time project. One layer of one small drawing fits neatly into a quiet hour, and the work keeps between sessions.
There is no wet paint to dry, no color to mix, and nothing to clean up afterward. You set the pen down and walk away.
If progress feels slow, remember what is really happening. You are training your hand to repeat a movement thousands of times without thinking about it.
That skill does not arrive in a single afternoon. It arrives quietly, over a few weeks of short sessions, and then it is simply yours.
Final Thoughts
The first stippled drawing you finish will not be perfect, and that is exactly right. It will be patient, which is rarer.
Keep it. Date the corner. In a year you will find it in the back of a sketchbook and be unable to see the dots at all.
Then you will choose a harder subject — a pinecone, a bird's breast, an old stone wall — and you will know the way in.
Start with the acorn. One small dot at a time, from light to dark, and let the shadow arrive on its own.