Introduction
I would like to tell you about the most expensive houseplant I ever owned. It was a terrarium — a lovely glass globe with moss and a tiny fern — and it cost me sixty dollars at a boutique plant shop. It survived exactly nine weeks.
I did everything the tag said. I gave it bright light. I misted it when I remembered.
And still, one morning, I found the moss gray and fuzzy, the fern brown at the edges, and a thin film of condensation that never went away.
The whole thing smelled like a wet sock.
Here is the embarrassing part: the jar itself was worth maybe three dollars. The plants inside were worth five. What I paid sixty dollars for was mostly someone else's careful assembly — and a lesson I could have learned for free.
So let me save you the sixty dollars. A terrarium is one of the easiest, cheapest, most satisfying summer crafts there is. You can build one for under fifteen dollars, it takes about an hour, and — done right — it can outlive your gym membership. Here is exactly how.
Why I Almost Gave Up on Terrariums
Before we get to the good stuff, let me tell you what went wrong, because almost every terrarium failure comes down to the same three mistakes.
Mistake one: too much water. I watered my first terrarium like a regular plant. A terrarium is not a regular plant. It is a closed ecosystem — what goes in mostly stays in. That water has nowhere to go.
Mistake two: the wrong container. I used a jar with a tight lid and no drainage layer. Every bit of extra water pooled at the roots. Roots sitting in water rot. Rotting roots kill plants. It is that simple.
Mistake three: the wrong plants. I bought the prettiest plants I could find, not the toughest ones. Pretty and tough are rarely the same plant.
Fix those three mistakes and you are ninety percent of the way to a terrarium that thrives. Everything else is decoration.
The Simple Science: How a Terrarium Works
Here is the part I wish someone had explained to me before I spent sixty dollars. A closed terrarium is basically a tiny rainforest in a jar.
Water evaporates from the soil and the plants. It condenses on the glass. It runs back down. The plants drink it, breathe it out, and the cycle starts again. That is the whole machine. Nothing in, almost nothing out.
That is why terrariums are so forgiving. They water themselves, basically. A well-built closed terrarium can go weeks — sometimes months — without you adding a drop.
But that also means you have to set the cycle up correctly from the start. Too much water in the beginning and the whole system drowns. Not enough and it dries out. The good news: getting it right is mostly about layers, and layers are easy.
Think of it this way. You are not buying a plant. You are building a small climate. Get the climate right and the plants are just along for the ride.
What You Actually Need
Here is the budget list. Everything on it is cheap, and most of it you can find at a dollar store or in your own kitchen.
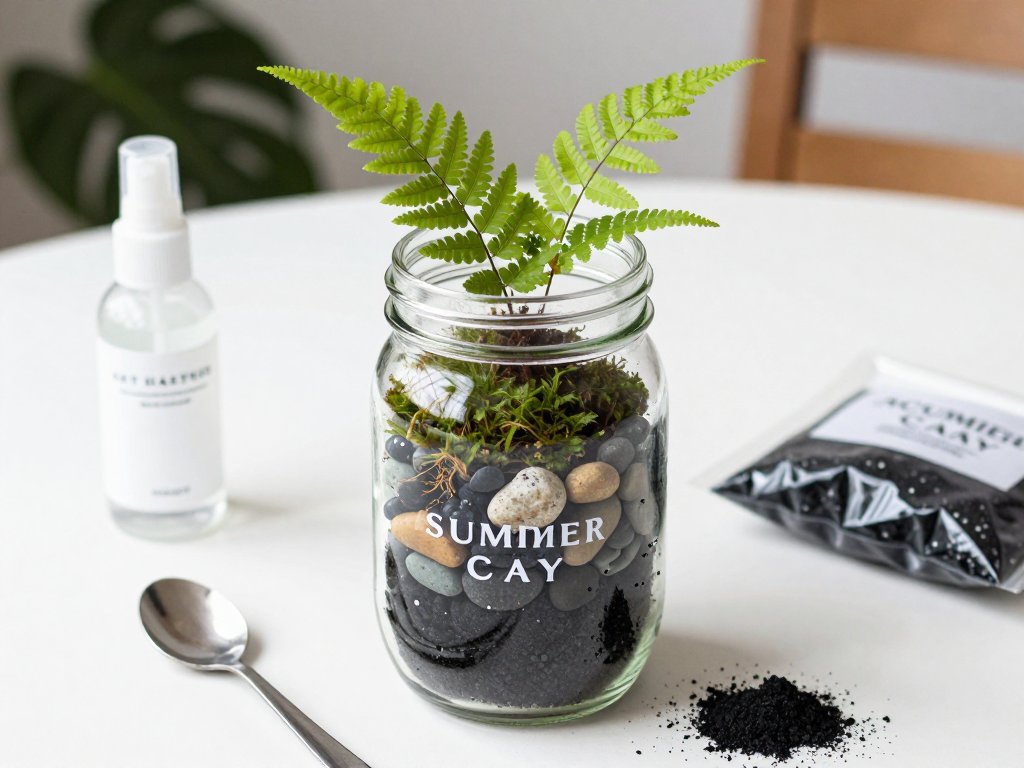
The vessel. A glass jar with a lid that seals — a big pickle jar, a mason jar, an old cookie jar. The plainer the better. You can also use a fishbowl or a vase if you do not mind a slightly open setup.
Small pebbles or gravel. This is your drainage layer. Aquarium gravel, pea gravel, or even the pebbles from a dollar-store flower vase work fine.
Activated charcoal. This is the one item worth buying. A small bag costs a few dollars at a pet store or garden center. It keeps the water in your terrarium from going sour. Do not skip it.
Potting soil. Regular houseplant potting mix is fine. You need only a couple of cups.
Sphagnum moss or a coffee filter. This sits between the pebbles and the soil so the dirt does not wash down into the drainage layer. A paper coffee filter works perfectly and costs nothing.
Plants. Small ferns, moss, baby pothos cuttings, or tiny peperomia. Dollar stores and garden centers sell small plants for two or three dollars. You need two or three.
A spray bottle and a spoon. For watering and for placing soil without making a mess.
Total cost: under fifteen dollars, and probably closer to ten. Compare that to the sixty I spent. See why I am a little sore about it?
Choosing Your Glass
The vessel matters more than you think, so let us talk about it for a minute.
Wide opening beats narrow. A jar with a wide mouth is dramatically easier to plant. You can actually get your hand in there. Narrow-necked bottles look gorgeous in photos and are miserable to build. Start wide.
A sealing lid is your friend. A true closed terrarium needs a lid that seals reasonably well. Mason jars and pickle jars are perfect. If your lid does not seal perfectly, that is fine — a slightly loose seal just means you will add water a little more often.
Size matters for your plants. Tiny plants in a huge jar look lost. Big plants in a small jar outgrow it in a month and you will be trimming constantly. Aim for plants that fill about a third of the vessel when you start.
Before you spend a cent, look around your kitchen. That big pasta sauce jar you were about to recycle is a perfectly good terrarium. The jar is free. The plants are the only real cost.
The Golden Rules of Soil Layers
Here is the anatomy of a healthy terrarium, bottom to top. Get these layers right and you have won.
Layer one: pebbles, about an inch deep. This is the drainage layer. Excess water collects here, away from the roots. If you skip it, your terrarium is a swamp.
Layer two: charcoal, a thin sprinkle. Activated charcoal filters the water and keeps mold and that stale smell away. A thin even layer over the pebbles is plenty. This is the cheapest insurance you will ever buy.
Layer three: the coffee filter or moss. Tear a coffee filter into pieces and lay it over the charcoal. This keeps soil from sifting down into the drainage layer. Trust me, without it, your layers will blur into mud within a month.
Layer four: soil, two to three inches. Deep enough for roots, shallow enough that the plants do not touch the glass lid. Make a gentle slope, higher at the back — it gives the terrarium depth and looks lovely.
That is the whole recipe. Pebbles, charcoal, filter, soil. Four layers, ten minutes, and your terrarium already has a better foundation than most of the expensive ones at the shop.
Picking Plants That Will Not Die
The right plants make this craft almost too easy. Here is how to choose.
Go small and slow-growing. Ferns, moss, baby pothos, peperomia, and tiny nerve plants are the workhorses of terrarium building. They tolerate humidity, grow slowly, and forgive mistakes.
Avoid succulents and cacti. I know they are everywhere and adorable. They hate humidity and wet roots, which means they hate closed terrariums. You will kill them, and it will not be your fault. It will be the jar's fault.
One or two statement plants max. A single small fern plus some moss looks intentional. Six different plants in a pint jar looks like a jungle that is about to need rescuing.
Check for pests before you plant. Give new plants a quick rinse and check the undersides of leaves. One aphid hitchhiker can become an infestation inside a closed jar, where nothing natural keeps it in check.
If you are unsure, buy moss and a fern. That combination is practically unkillable, and it looks like a tiny forest floor — which, let us be honest, is exactly the vibe we are going for.
Building It, Step by Step
Now the fun part. Clear the kitchen table, gather your layers, and give yourself about an hour. No rush — that is the point of summer crafting.
Step 1: Clean the jar. Wash it with soap and water and dry it completely. Any residue from the pickles or sauce will feed mold. Start clean.
Step 2: Add the drainage layer. Spoon in the pebbles to about an inch deep. Tilt the jar as you go if you want them deeper at the back.
Step 3: Sprinkle the charcoal. A thin, even layer over the pebbles. You do not need much — a tablespoon or two for a small jar.
Step 4: Lay down the coffee filter. Tear it into a few pieces and arrange them over the charcoal, overlapping slightly. No gaps big enough for soil to fall through.
Step 5: Add the soil. Spoon in two to three inches, sloping it higher at the back. Pat it down gently — you want it firm but not packed.
Step 6: Plant. Make small holes with your finger or the spoon handle, settle the roots in, and press the soil back around them. Work from back to front so you do not crush what you already planted.
Step 7: Mist. Give everything a light misting with the spray bottle — enough that the soil is damp but not soggy. You can always add more later. You cannot easily take it out.
Step 8: Lid on, admire. Seal it, set it in bright indirect light, and enjoy your tiny ecosystem. That took about an hour and cost less than a pizza.
Care That Takes Five Minutes a Week
Here is the beautiful part: a closed terrarium mostly takes care of itself. Your weekly job is small.
Light. Bright, indirect light — near a window but not in direct sun. Direct sun turns a terrarium into a tiny greenhouse oven and cooks the plants. A foot or two back from an east or north window is ideal.
Water. Check the glass. If there is a gentle mist of condensation on the sides in the morning that clears during the day, the cycle is healthy — do nothing.
If the glass stays bone dry, give the soil a light mist. If it is dripping wet constantly, leave the lid off for a day.
Trim. When a plant touches the glass or the lid, snip it back. Terrariums are small worlds; a little pruning keeps the peace.
Clean the glass. Wipe the inside with a soft cloth or paper towel when water spots build up. You want to see your tiny forest, not through a fog.
That is it. Five minutes a week, maybe less. Compare that to the daily watering most houseplants demand. This is the closest thing to a self-cleaning plant you can own.
Fixing Common Problems
Even a well-built terrarium throws the occasional fit. Here is how to handle the big three.
Problem: fog that never clears. Too much water in the system. Take the lid off for a day or two and let it dry out. It will recover. This is the most common issue and the easiest fix.
Problem: mold on the soil or moss. Remove the moldy bits with a spoon, leave the lid off overnight, and make sure you have that charcoal layer — it really does prevent this. If mold keeps coming back, you are overwatering. Ease off.
Problem: yellowing or mushy leaves. The plant is getting too much water or not enough light. Check both. Move it to brighter indirect light, and if the soil is soggy, let it dry out with the lid off.
One more note: if a plant dies, do not beat yourself up. Pull it out, plant a fresh one, and move on. A terrarium is not a monument. It is a living thing, and living things need occasional do-overs.
Why This Saves You Money
Let us talk dollars, because I know that is why some of you are here. I paid sixty dollars for a terrarium that lasted nine weeks. You can build one for under fifteen dollars that lasts years. The math is not close.
Break it down: a jar from your recycling bin costs nothing. Pebbles cost nothing if you collect them on a walk.
Charcoal is three or four dollars. Soil is a couple of dollars. Two small plants, five or six dollars total.
That is roughly ten to fifteen dollars for the whole project.
Now the fun part: you will have leftover soil, charcoal, and pebbles. That means your second terrarium costs only the price of plants. Your third costs the same. The marginal cost of a beautiful gift terrarium is about five dollars.
And gifts! A handmade terrarium is the perfect hostess gift, teacher gift, or "thinking of you" present. It looks expensive. It cost five dollars. It will outlive the flowers you would have bought for twice the price.
Conclusion
I have built a lot of terrariums since that first sixty-dollar disaster. Every one of them cost less, went together faster, and survived longer than the one that started it all.
The lesson stuck: this craft is simple, cheap, and nearly foolproof — if you respect the layers and the water cycle.
So here is your homework. Find a jar. Collect some pebbles. Buy a tiny fern and a bag of charcoal. Then spend an hour this weekend building a small green world on your kitchen table.
Your windowsill will thank you. Your wallet will thank you. And in nine weeks, when your terrarium is still thriving — you can think of me, and my sixty-dollar fern, and smile.