Introduction
I still remember the vase that started it all. It was a chunky ceramic piece in a dull beige, sitting on a thrift store shelf with a $2.99 sticker on its base.
I almost walked past it. Then I flipped it over and saw the maker's mark — the same studio whose vases sold for forty dollars at the boutique downtown.
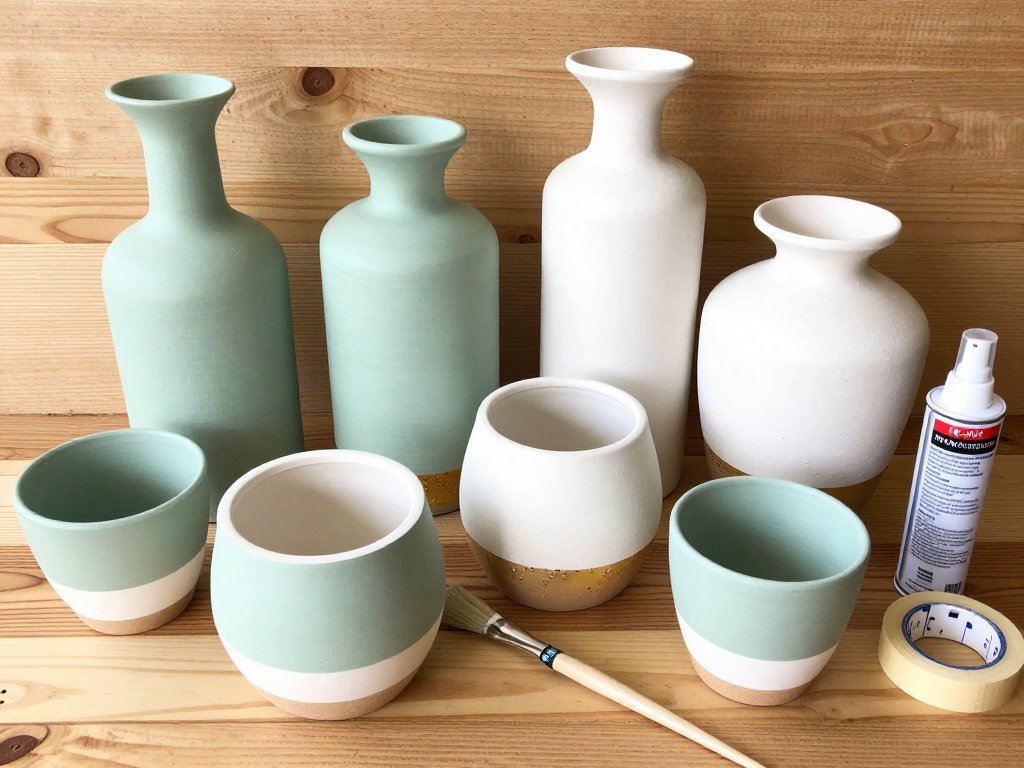
I bought it, painted it a deep sage green with a brushed gold rim, and it has lived on my dining table ever since. People ask where I got it. Nobody believes the answer.
Here is the thing about thrift store ceramics: they are a gold mine wearing a disguise.
The shapes are often beautiful and well-made. They just need a second chance — and a coat of paint.
In this guide, I will walk you through the whole makeover process, from what to look for on the shelf to the sealer that keeps your work looking fresh for years.
Total cost for your first project: about ten dollars.
Why Thrift Store Ceramics Are a Gold Mine
Let us talk numbers, because that is how my brain works.
A new ceramic vase from a decor store runs thirty to sixty dollars. A hand-thrown piece from a craft fair runs more.
The same shape, sitting in a thrift store, costs three to eight dollars. That is a 90 percent discount on the exact same product category — often the exact same brands.
Even accounting for paint, primer, and sealer, your total makeover cost lands around ten to twelve dollars per piece. Your finished item looks like it belongs in a boutique. Your wallet does not know the difference.
There is also a sustainability angle that makes the whole thing feel good. Every piece you rescue is one less item in a landfill, and you are not paying for the energy and shipping of brand-new mass-produced decor.
Upcycling is the rare hobby that saves money and feels virtuous at the same time.
What to Look For (and What to Skip)
Not every thrift store ceramic is worth your ten minutes. Here is my shelf-scanning checklist.
- Vases. The best canvas. They come in every shape imaginable, and paint transforms them instantly. Look for clean lines and interesting silhouettes.
- Planters. Punch a drainage-friendly liner inside and a painted planter becomes a statement piece. Just make sure there is no hidden crack that will leak soil.
- Pitchers and jugs. A painted pitcher becomes a gorgeous utensil holder, flower vase, or kitchen catch-all.
- Mugs and bowls. Small items make quick, satisfying projects — and great gifts.
- Lamp bases. A ceramic lamp base painted to match your room is an instant upgrade.
What to skip: pieces with hairline cracks (they spread), actively chipped rims (hard to hide), and anything with mold or heavy staining. A little crazing — those fine web-like lines in old glaze — is fine; you are painting over it anyway.
One more tip: run your finger along the bottom edge. If the piece has a maker's mark or a country stamp, that is often a sign of quality. Cheap ceramics rarely bother.
Check the price tag twice. Some thrift stores price ceramics by size, not brand, so a quality piece can sit next to a cheap one at the same price. The cheap one is not the better deal — the quality one is.
The $10 Supply Kit
Here is exactly what you need, and what it costs. None of it is exotic.
- Dish soap and a scrubby sponge — you already own these.
- Rubbing alcohol — about $2 for a bottle, or use hand sanitizer in a pinch.
- Bonding primer or multi-surface paint — $6 to $9. This is the one product worth spending on; it is the difference between paint that sticks and paint that peels.
- Acrylic craft paint or chalk paint — $1 to $3 per bottle. Two or three colors are plenty for a first project.
- Foam brushes and a small detail brush — $3 for a pack.
- Painter's tape — $4 a roll, and it lasts for dozens of projects.
- Clear acrylic sealer spray — $6 to $8.
If you are starting from zero, the full kit runs about twenty-five dollars — and it will cover ten or more projects. After the first makeover, your cost per piece drops to just the price of the ceramic itself.
Step 1: Clean Like It Matters
Thrift store ceramics have lived a life. They have collected dust, grease, and the faint residue of someone else's home. Paint will not stick to any of that.
Wash the piece thoroughly with warm water and dish soap. Scrub every surface, especially the inside rim and the base.
Dry it completely, then wipe the whole outside down with rubbing alcohol on a paper towel.
The alcohol removes any last oils and gives the paint a clean surface to grip.
This step takes five minutes and skipping it is the number one reason makeovers fail. A clean ceramic is a paint-ready ceramic. Do not rush it.
Step 2: Prime for Adhesion
Here is the science part, in plain English. Glazed ceramics are shiny and non-porous. Paint wants to bead up and peel off slick surfaces. Primer fixes that by giving the paint a rough, grabby layer to bond with.
Use a bonding primer made for slick surfaces, or choose a multi-surface paint that says "for glass and ceramic" right on the label. Either way, apply a thin, even coat with a foam brush. Do not glob it on — thin coats dry faster and adhere better than thick ones.
Let the primer dry completely. Check the label; most bonding primers want twenty-four hours before painting over. If you paint too soon, you are back to peeling paint. Patience here saves a redo later.
Step 3: Paint
Now the fun part. Two types of paint work beautifully on ceramics:
Chalk paint gives a soft, matte, slightly textured finish that looks expensive and modern. It covers well and is forgiving for beginners — a great first choice.
Acrylic craft paint gives a brighter, more saturated color and dries with a subtle sheen. It is cheaper and comes in every color imaginable.
Whichever you choose, the technique is the same. Apply a thin first coat with a foam brush, working in smooth, even strokes.
Let it dry, then add a second coat. Most colors need two coats; light colors over dark glaze may need three.
Between coats, resist the urge to touch up wet paint — you will only drag it.
Let each coat dry fully before the next.
Two thin coats beat one thick coat every single time. Thick paint drips, pools, and hides your ceramic's nice lines. Thin coats keep the shape crisp.
Test your color on the bottom of the piece first. Ceramic glaze changes how paint looks, and the bottom is invisible once the makeover is done. Ten seconds of testing saves a whole repaint.
Step 4: Detail Work
Solid color is nice. Details are what make people say "wait, you made that?"
The easiest upgrade is painter's tape. Tape off a section — a stripe, a band near the rim, a geometric block — paint it a second color, and peel the tape while the paint is still slightly wet. Crisp lines every time.
Paint pens are the secret weapon of ceramic makeovers. A metallic gold or copper paint pen can outline a rim, write a small word, or dot a polka pattern in minutes. They are easier to control than brushes for fine work, and the metallic shades instantly read as "expensive."
Stencils work beautifully on flat sides of vases and planters. Hold the stencil flat, dab paint through it with a nearly dry brush, and lift carefully. Start with a simple leaf or diamond pattern and build from there.
My rule of thumb: pick one detail, not five. A gold rim, a taped stripe, or a stenciled motif — one accent makes the piece look designed. Five accents make it look busy.
Step 5: Seal It
You painted it. Now protect it. Unsealed acrylic paint on ceramic will chip, scuff, and absorb water stains — especially on pieces you actually use.
A clear acrylic sealer spray is the easiest finish. Take the piece outside or into a ventilated space, give it two light, even coats, and let it dry between coats.
For pieces that will hold water — like a painted vase — spray the inside rim too, or line it with a glass insert so water never touches the paint.
If you want a soft matte look, choose a matte sealer. If you want a subtle shine like a real ceramic glaze, choose a satin or gloss sealer. Either way, sealing is the difference between a makeover that lasts a month and one that lasts years.
One more tip: let the sealer cure for a full week before the piece takes any real use. It will feel dry in an hour. It is not done curing for days. Trust the label.
One note if you chose chalk paint: it is porous and needs sealing even more than acrylic. Chalk paint absorbs water and scuffs without a protective coat, so do not skip this step.
Five Makeover Ideas to Start With
Not sure what to make first? Here are five projects that consistently turn out great.
- The sage green vase. My original project. Any vase, sage chalk paint, a gold paint-pen rim. Ten minutes of painting, one stunning result.
- Two-tone planter. Paint the top half white, the bottom half terracotta or charcoal, with a crisp taped line between them. Instant modern decor.
- Gold-dipped pitcher. Paint the body white and the bottom third gold — or "dip" it by painting the lower half and letting the tape line soften. Looks like a boutique piece.
- Catch-all tray. A shallow ceramic dish painted in a bright color, sealed well, and placed by the door for keys and change. Practical and pretty.
- Matchy lamp base. Paint a ceramic lamp base to match your existing decor. Add a new shade from a thrift store and you have a whole new lamp for under fifteen dollars.
Pick one, gather your supplies, and give yourself an afternoon. The first piece is always the most satisfying.
These makeovers also make wonderful gifts. A painted planter with a small plant inside says you cared enough to make something by hand, and the total cost stays under fifteen dollars.
Common Mistakes and How to Fix Them
Every maker hits these. Here is the fix list.
"My paint is peeling." The piece was not clean, or you skipped primer. Strip what you can, clean with rubbing alcohol, prime properly, and repaint. Annoying, but recoverable.
"My brush strokes show." Use foam brushes, thin coats, and let each coat dry fully. For stubborn streaks, sand very lightly between coats with fine sandpaper, wipe clean, and add one more coat.
"My taped line bled." The tape was not pressed down firmly, or the paint was too wet. Press tape edges down with your fingernail, and peel while the paint is just barely set. If it bleeds, a fine brush and a steady hand can fix the line after it dries.
"The color looks dull." Your sealer choice matters — a satin or gloss sealer brightens color noticeably. Or the paint needed one more coat. Light colors especially reward a third coat.
"I hate the color I chose." Paint over it. That is the beauty of ceramics — they take repainting beautifully. Sand lightly, wipe clean, and start fresh. Your $3 vase does not care.
Conclusion: Your Second-Hand Treasure Awaits
Let me recap the math, because it is the whole point. A $4 thrift store vase, $6 of primer and paint, and a Saturday afternoon equals a $40 piece of decor.
You saved thirty dollars, you made something unique, and you kept a perfectly good ceramic piece out of a landfill.
That is a hobby that pays for itself.
Next time you pass a thrift store, go in. Scan the shelves with fresh eyes.
Look for the piece with good bones and an ugly finish — those are the ones waiting for you.
Wash it, prime it, paint it, seal it, and put it somewhere you will see every day.
And when someone asks where you got that gorgeous vase? Smile and tell them the truth. They will never believe you.
