Introduction
There is something quietly transformative about picking up a spool of copper wire. It arrives in your hand as a humble coil of metal, yet within minutes — with nothing more than your fingers and a pair of pliers — it can become an elegant spiral, a snug cradle for a river stone, or a delicate loop catching the light like a filament of spun gold.
Wire wrapping is one of the oldest jewelry-making techniques known to humanity, and it endures not in spite of its simplicity but because of it.
To wrap wire is to draw in three dimensions, to sketch with a material that holds its shape, to create structure from a single continuous line.
For the beginner, there is no more forgiving medium. Wire requires no kiln, no torch, no soldering iron.
It asks only for your hands, your patience, and your willingness to try again when a loop comes out crooked.
Because copper costs pennies per foot, you can afford to make mistakes — indeed, you should expect them.
Every kink and uneven wrap is a lesson, and the only way to get good at wire wrapping is to let yourself be bad at it first.
This article starts with the materials you need — three inexpensive tools and a spool of wire — then works through three projects: a wrapped bead pendant, a pair of spiral earrings, and a cabochon pendant with a frame wrap.
By the end, you will have learned the fundamental techniques that underlie nearly every wire-wrapped design: the simple loop, the wrapped loop, and the spiral.
Why Wire Wrapping for Beginners?
If you have ever been tempted by jewelry making but felt intimidated by soldering torches, jeweler's saws, and etching chemicals, wire wrapping is your doorway.
The connections are purely mechanical: wire twisted around wire, wire gripping stone, wire holding bead.
A well-made wrap lasts for years, yet it can be undone with the same pliers that created it, allowing you to recycle your materials and try again.
The tool list is almost absurdly short. You need round-nose pliers for loops, flat-nose pliers for gripping, and wire cutters for trimming. That is it. A complete starter kit costs under thirty dollars, and your first few projects will use perhaps two dollars' worth of materials.
There is also a deeply meditative quality to wire wrapping. The repetitive motion of coiling wire — the twist and pull, the steady rhythm — quiets the mind.
It is the kind of craft you can do while listening to a podcast or sitting in the evening quiet, where progress is visible in real time, each wrap bringing you closer to a finished piece.
Materials: What You Need (and What You Don't)
Let us be precise about materials, because the right choices at the beginning make the difference between a frustrating first session and a satisfying one. Your total investment should be well under thirty dollars.
Wire. Buy dead-soft copper wire in 20-gauge and 22-gauge. Dead-soft means the wire is fully annealed — it bends easily with light finger pressure, ideal for learning.
Copper is the best metal for beginners: inexpensive, forgiving, and beautiful, developing a warm patina over time.
A 25-foot spool of each gauge gives you plenty to practice with. Do not start with silver — mistakes on silver cost ten times as much.
Master the technique on copper, then graduate to precious metals.
Round-nose pliers. These have tapered cylindrical jaws used to form loops. Look for smooth jaws — serrated jaws mar the wire surface.
The taper matters: you want pliers where the tip diameter is about 1.5mm, widening to 4mm at the base, so you can make loops of different sizes depending on where along the jaw you form them.
Flat-nose pliers. These have flat, rectangular jaws for gripping wire, making sharp bends, and holding pieces in place. Smooth jaws are essential. Chain-nose pliers, which taper to a point, offer more precision in tight spaces; many beginners start with flat-nose and add chain-nose later.
Wire cutters. Flush cutters are the standard. They leave one side of the cut flat and one side slightly indented. Position the flush side against your work piece for a clean cut. Buy a pair that can comfortably cut 18-gauge wire.
Beads and cabochons. Choose beads with holes at least 1mm in diameter to pass 20-gauge wire through. Glass beads, howlite, jasper, and agate are excellent choices. For the cabochon project, look for a smooth teardrop or oval cabochon 25mm to 35mm in length, with no sharp edges.
That is your complete starter kit. No bench block, hammer, torch, or flex shaft needed. Just wire, pliers, cutters, and something beautiful to wrap.
Understanding Wire: Gauge, Temper, and Metal
Wire is defined by three properties. Understanding them will save you from the most common beginner frustrations.
Gauge refers to diameter, and the numbering is counterintuitive: a higher gauge means thinner wire.
Twenty-gauge is about 0.81mm; 22-gauge is about 0.64mm; 18-gauge is about 1.02mm. For the projects here, use 20-gauge for structural elements and 22-gauge for finer binding.
Sixteen-gauge is too thick for beginners; 24-gauge is too thin for structural pieces.
Temper describes how work-hardened the wire is. Dead-soft wire is fully annealed and extremely pliable.
Half-hard wire has some stiffness and holds its shape better but is harder to bend.
Beginners should almost always choose dead-soft. You can work-harden a finished piece by gently hammering or tumbling it, making the wire springy and strong.
Metal composition affects color, workability, and cost. Copper is warm and reddish, tarnishes to a rich brown, and is the most forgiving.
Brass is harder with a bright gold color but work-hardens quickly and can crack if bent sharply.
Sterling silver bends smoothly and polishes beautifully, but it is expensive. For your first projects, copper is the clear winner.
A note on wire care: copper wire straight from the spool often has manufacturing residue.
Wipe it with a soft cloth before beginning, and wash your hands first — skin oils accelerate tarnishing.
If you prefer to preserve the bright copper color, apply jeweler's lacquer or Renaissance wax, though many wrappers prefer the natural patina that develops over time.
Basic Techniques: The Three Pillars of Wire Wrapping
Before we start projects, master these three techniques on scrap wire until the motion feels natural. These are the vocabulary of wire wrapping, and everything you make will be built from them.
The Simple Loop. Grasp the end of a wire with your round-nose pliers, positioning the tip between the jaws.
Rotate your wrist smoothly away from your body, rolling the wire around the jaw to form a circle.
Rotate in one continuous motion — do not stop mid-loop to adjust. Release and reposition slightly further back on the wire to close the loop.
A proper simple loop is a perfect circle with the wire end meeting itself squarely.
The Wrapped Loop. This is the most important technique in wire wrapping. Bend the wire at a 90-degree angle about 2 inches from the end.
Form a simple loop at the bend, but do not trim the tail. Instead, grasp the loop with flat-nose pliers and wrap the tail around the stem below the loop in tight, even coils.
Aim for three to five wraps lying side by side with no gaps. The finished wrapped loop cannot pull open the way a simple loop can.
The Spiral. Form a tiny loop at the end of your wire — this is the spiral's center.
Hold it with flat-nose pliers and use your fingers to curve the wire around the center, keeping the spiral flat and the gaps between revolutions even.
Move the pliers' position frequently, pushing the curve from just behind the bend. A well-formed spiral lies perfectly flat with a rhythmic, hypnotic geometry.
Project 1: Simple Wrapped Bead Pendant
This teaches the wrapped loop, bead placement, and produces a pendant you can wear on a cord or chain. Total time: about 15 minutes once you have practiced the wrapped loop.
Materials: One 10mm to 14mm round or faceted bead with a hole at least 1mm in diameter. Twelve inches of 20-gauge dead-soft copper wire.
Step 1: Cut 12 inches of 20-gauge wire. Thread it through the bead so the bead sits at center, with roughly equal lengths extending from each side.
Step 2: Bend both wires upward alongside the bead so they run parallel above the top hole. Cross them about 6mm above the bead — right over left — forming an X.
Step 3: Grasp the crossed wires with round-nose pliers just above the X. Pull the back wire up and around the jaw to form a simple loop — this will be the bail for your chain or cord.
Step 4: Hold the loop with flat-nose pliers and wrap the short tail around the long stem three to four times. Trim the excess and press the cut end flat against the wraps.
Step 5: Take the remaining long wire and wrap it around the bead's neck on the opposite side, creating a decorative spiral or additional wraps. Trim and tuck the end.
Step 6: Check the pendant from all angles. The bead should sit straight; the bail loop should be perpendicular to the bead's axis. Use a fine file to smooth any sharp wire ends — essential for comfortable wear.
Your first wrapped bead pendant is complete. String it on a leather cord, ribbon, or chain, and you have a handcrafted piece that looks thoughtful and intentional.
Project 2: Wire Spiral Earrings
These earrings teach symmetry, spiral formation, and the art of making two identical pieces. Take your time and check your work against the first earring as you make the second.
Materials: 24 inches of 20-gauge dead-soft copper wire (12 inches per earring). One pair of French ear wires.
Step 1: Cut two 12-inch lengths of wire. Mark 3 inches from one end of each wire — your reference for the spiral center.
Step 2: Form a tiny loop at the 3-inch mark with round-nose pliers. Hold this loop with flat-nose pliers and curve the long tail around it in a tight spiral, keeping each revolution separated by about the diameter of the wire itself.
Make three full revolutions, creating a spiral about 12mm in diameter.
Step 3: Bend the 3-inch short tail upward at a 90-degree angle above the spiral's center. Form a small loop at the top, perpendicular to the spiral plane. This loop connects to the ear wire.
Step 4: Repeat for the second earring. Keep the first beside you as a reference. The spiral diameter, number of revolutions, spacing, and loop position should match as closely as possible.
Step 5: Open the loop at the bottom of each French ear wire by twisting it sideways — never pull it open in line with the hook, which weakens the metal. Slide the spiral earring loop onto the ear wire, then close it by twisting back. File any sharp ends.
Your spiral earrings catch the light beautifully as they sway. To vary the design, add a small bead at the center of the spiral by threading it onto the wire before forming the center loop.
Project 3: Pendant with Wrapped Cabochon
A cabochon is a polished stone with a flat back and domed front, usually without a drilled hole.
Wrapping one requires creating a wire frame that cradles the stone securely while leaving the face visible.
This is the most advanced of our three projects, and the most rewarding — a well-wrapped cabochon looks like it came from a boutique gallery.
Materials: One smooth teardrop or oval cabochon, 25mm to 35mm in length. 3 feet of 20-gauge and 2 feet of 22-gauge dead-soft copper wire.
Step 1: Measure the cabochon's circumference with string. Cut 12 inches of 20-gauge wire for the frame. Shape the wire around the cabochon's edge, following its contour. The wire should fit snugly — you should be able to slide the stone in and out with moderate resistance.
Step 2: Remove the stone and adjust the frame so it lies flat. The wire ends should meet at the cabochon's narrow point.
Cross them and bend upward to form the bail — create a loop at the top with round-nose pliers, wrap one end around the other three to four times, trim, and file.
Step 3: Place the cabochon back in the frame. Cut 6 inches of 22-gauge wire.
Secure one end to the frame near the stone's bottom by wrapping tightly three times.
Bring the binding wire over the front of the cabochon, across its face, and around the opposite frame wire.
Pull tight — the wire should press against the stone's edge. Wrap around the opposite frame wire twice, then bring it back across the face.
Step 4: Continue back-and-forth binding across the cabochon's face, spacing wraps evenly about 5mm to 8mm apart. Press each wrap snugly against the stone with flat-nose pliers. For a teardrop cabochon, you will need three to five wraps across the face.
Step 5: Secure the binding wire by wrapping it around the frame three times on the final side, then trim and tuck the end. Check that the cabochon does not wobble. If it moves, add another binding wrap at the loosest point.
Step 6: For an elegant finish, add decorative spiral or coil elements to the frame using fresh 22-gauge wire. Wrap it tightly around the exposed frame wire on either side of the cabochon. This looks beautiful and strengthens the frame.
Common Beginner Mistakes (and How to Avoid Them)
Kinking the wire. A kink is a sharp bend that creates a permanent weak point.
It happens when you try to bend wire without supporting the curve. Use your fingers to introduce the broad curve first, then refine with pliers.
If you create a kink, cut off the damaged section — copper is cheap; your time is not worth salvaging it.
Using the wrong gauge. Twenty-gauge is a versatile all-rounder. Sixteen-gauge is extremely difficult to bend by hand; 24-gauge is too flimsy for structural elements. Stick with 20-gauge for frames and 22-gauge for binding wraps until you develop a feel for when to change gauges.
Not filing sharp ends. This is the most common and most consequential oversight — a sharp wire end scratches skin and snags clothing.
After every cut, file or sand the end smooth. A cup burr or needle file makes this quick.
Fine-grit sandpaper (400-grit or higher) also works. This thirty-second step dramatically improves your finished piece.
Overworking the wire. Wire work-hardens as you bend it. The more you manipulate the same spot, the stiffer and more brittle it becomes.
If you feel yourself fighting the wire, stop. Accept the imperfection and move on, or cut and restart.
A restart takes five minutes; a broken wire mid-project can mean starting entirely over.
Uneven wraps. Gaps between wraps signal that you are moving too fast. Place each wrap deliberately, pressed flush against the previous one.
If you find a gap, try sliding the wrap sideways with your pliers, but prevention is better.
Slow down — steadiness is directly related to the stillness of your body.
Skipping the planning step. Before cutting wire, sketch your design and count your intended wraps. A good rule of thumb is four times the finished length, because wrapping consumes length quickly. A few minutes of planning saves you from running out of wire mid-project.
Beyond the Basics: Finding Your Style
The three projects here are starting points, not destinations. Once you have made them, you possess the fundamental vocabulary of wire wrapping. The next step is combining and modifying these techniques to create your own designs.
Try adding a second bead stacked vertically with a wrapped loop between them. Experiment with asymmetrical spirals — three revolutions on one earring, five on the other.
Use different metals: silver has a cool brightness, and niobium wire comes in a stunning range of anodized colors.
Incorporate found objects — sea glass, a small fossil, a carefully chosen river pebble. The principles are the same; only the materials change.
Pay attention to what draws your eye. Do you prefer clean, minimal designs with precise geometric wraps, or organic flowing shapes that follow the wire's natural curves?
Do you like a polished bright finish or the warm aged look of patinated copper?
These preferences are the seeds of your style, and the only way to discover them is to make more pieces.
Keep a practice journal. Photograph every piece, even the failures — a design that did not work today might inspire something brilliant six months from now.
Share your work online; the wire-wrapping community is generous and supportive, and you will learn more from watching other makers than from any single tutorial.
Remember why you started. You picked up wire and pliers to create something with your hands — something tangible and beautiful that did not exist before you sat down to make it.
Every piece you finish carries that original impulse. The wire remembers the shape you gave it.
The stone remembers the cradle you built. And you, the maker, remember the quiet satisfaction of turning raw materials into adornment.
Let the copper tarnish. Let the wraps be slightly uneven. Let your early pieces show the marks of learning — they are badges of effort, not flaws. The only wire-wrapping mistake that truly matters is the one you do not learn from. Everything else is just practice.
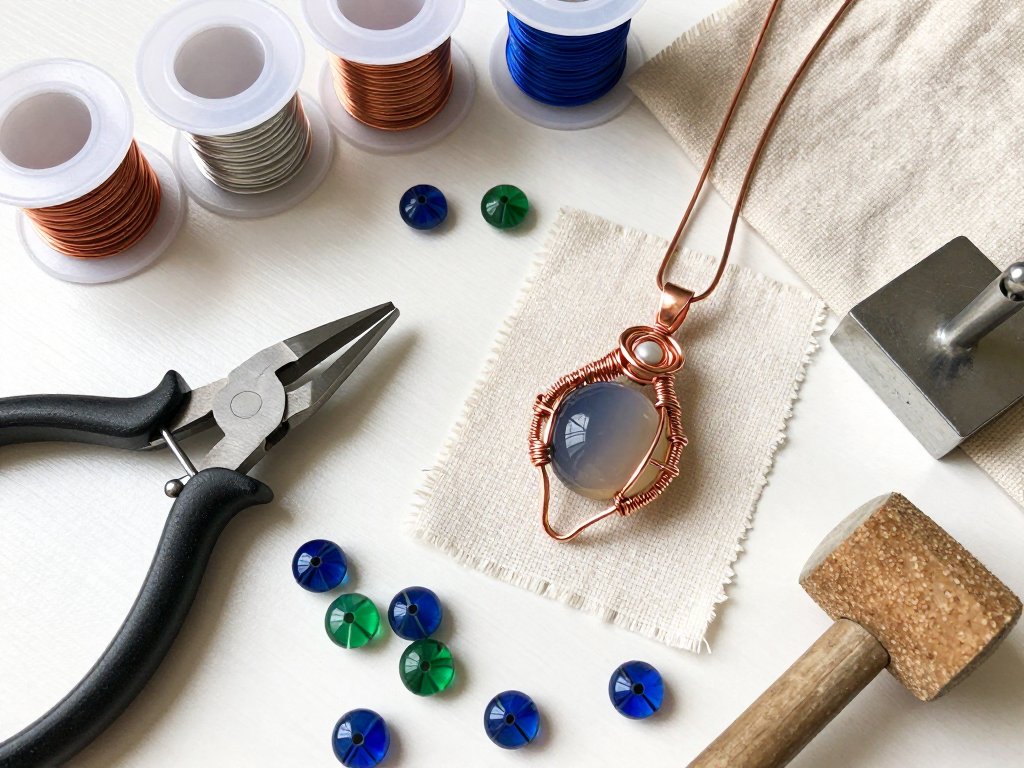
Image Section: Craft Blog Flat Lay for Photography
AI Image Generation Prompt: A bright flat lay photograph on a clean white wooden table, shot from above in natural daylight.
In the center, a work-in-progress wire wrapping project shows a smooth teardrop cabochon of green chrysoprase partially enclosed in a copper wire frame, with loose coils of 20-gauge dead-soft copper wire curling beside it.
To the upper left, basic tools are arranged neatly: round-nose pliers with smooth tapered jaws, flat-nose pliers, and flush wire cutters.
In the lower right, a finished wrapped bead pendant hangs beside the workspace — a round labradorite bead wrapped in copper with a neatly formed bail loop, catching a subtle blue flash.
Small loose beads in earth tones — jasper, howlite, and a river pebble — are scattered around the composition.
Lighting is soft and even with faint shadows beneath each object, clearly showing the copper wire texture, the smooth cabochon polish, and the precise wraps of the finished pendant.
Style: professional craft photography, warm natural tones, slightly desaturated background to let the copper and stone colors dominate.